Triton Kundi User manual


Table of Contents
1. Package Contents
2. Headset Controls / Base Station
3. Battery Installation / Power Save
Mode / Wireless Range
4. Xbox 360 Component/Composite
/VGA Setup
5. Xbox 360® HDMI Setup
6. Xbox 360® E Setup
7. PlayStation®3 HDMI/Component
/Composite Setup
8. PlayStation®4 Connect to
Controller Setup
9. PlayStation®4 Back of TV Setup
10. Wii U GamePad™/Mobile Devices Setup
/ Sync Headset to Base Station
11. PC / Mac
Wireless Stereo Headset
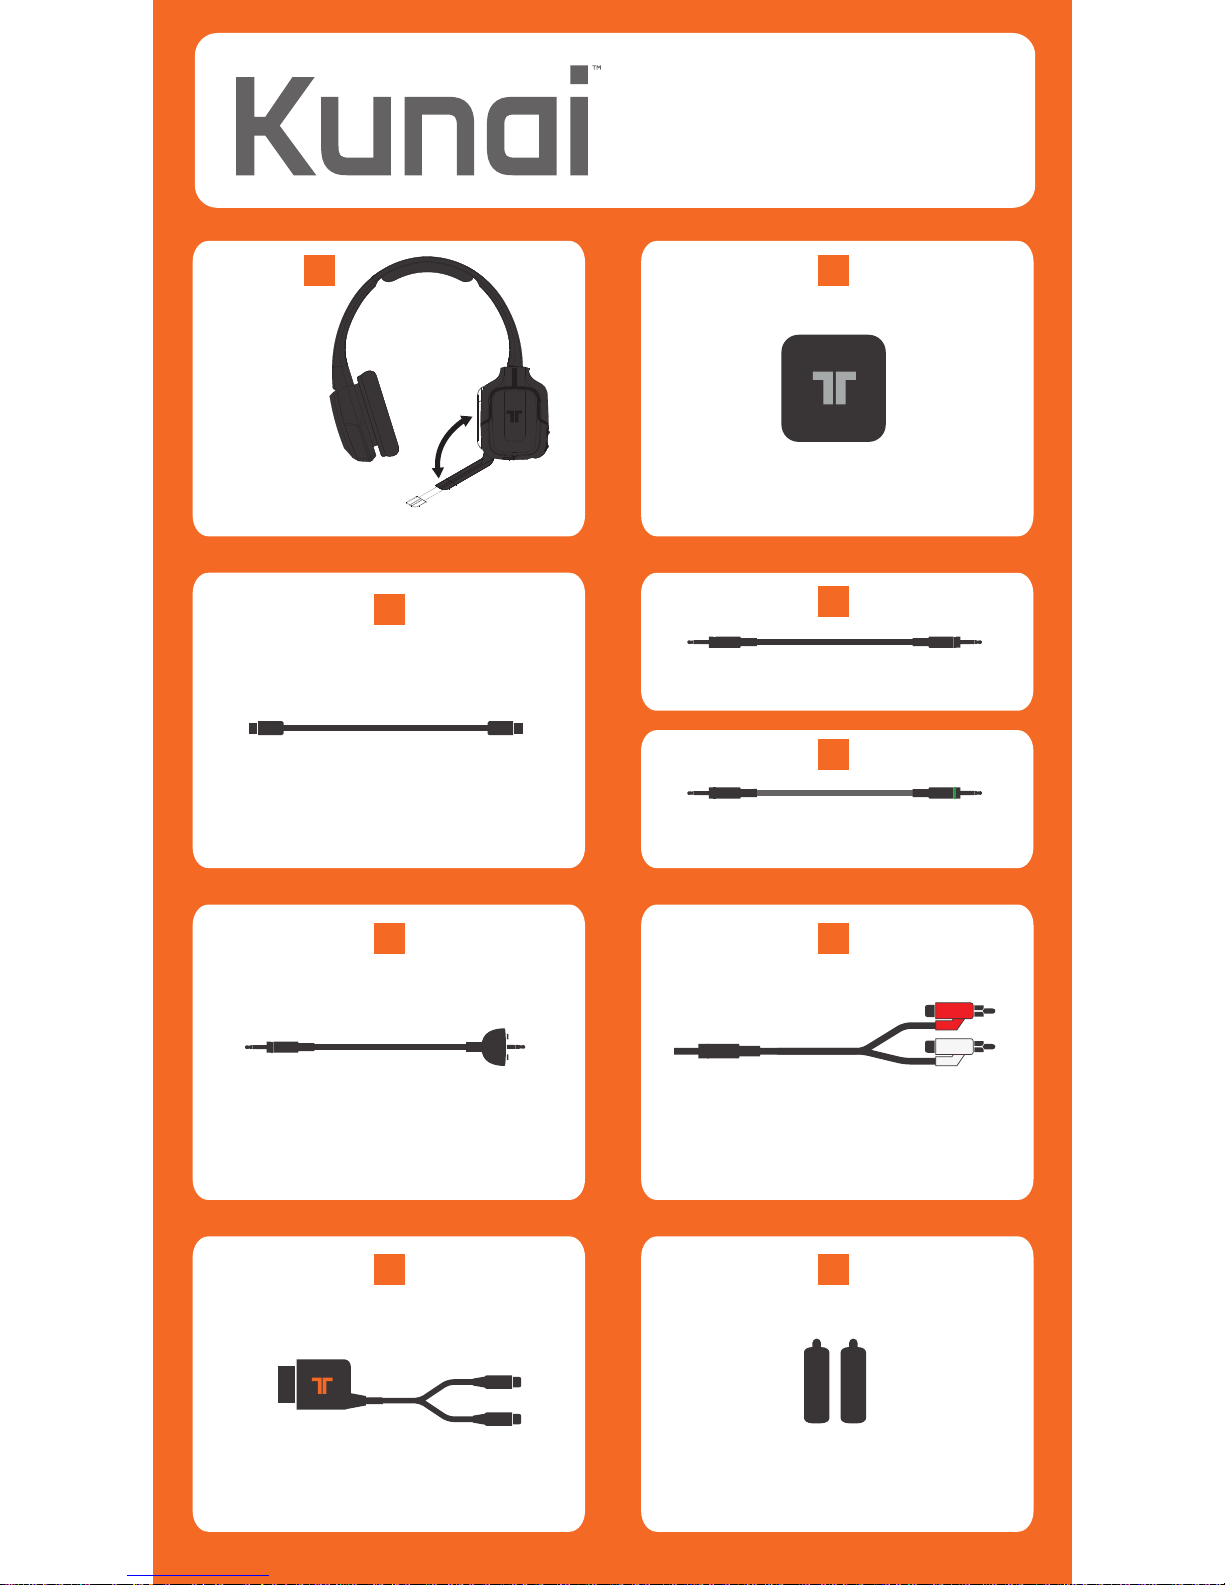
Kunai Headset Base Station
RCA Connection Cable
3.5mm Mobile /Wii U™
/PS4 Cable
USB Cable
2x AA Batteries
Xbox LIVE®
Communication Cable
Analog Audio Adapter
AA
AA
A B
CD
3.5mm Audio Cable
E
F G
H I
1
Wireless Stereo Headset

Base Station
2
AUDIO IN
POWER IN
Push to turn Headset ON/OFF. Press
and hold for 3 seconds to Sync
Headset to Base Station. See page
10 for more information on syncing
the Headset to the Base Station.
Use to adjust the volume of the
game audio.
Use to adjust the volume of
the voices of other players or
music/game volume when using
3.5mm jack on headset
Fold the mic up to mute.
Flashing: Syncing or searching for Headset.
Solid: Connected to a Headset while Base Station
is powered ON.
OFF: Base Station is powered OFF or in standby mode.
Press and hold for 3 seconds to put Base Station in
Sync mode. See page 10 for more information.
USB Port
Audio Input
Headset Controls
A
A
B
B
A
B
C
A
B C
C
D
D
C

Battery Installation
Power Save Mode
Insert 2 AA batteries into the Headset matching the
polarity as shown.
When the battery level is low, the power LED will flash.
Battery life = 20 hours (based on constant audio
playback at medium volume.
If the Headset receives no audio for 10 minutes, the
Headset will power down to save battery power and
the LED on the Base Station will flash.
Wireless Range
The Kunai Headset transmits audio via digital radio
frequency (RF) and has an operating range of 33 feet/10
meters in any direction. Please remain within this range
for optimal performance. Avoid placing the Base Station
on top of a metal surface or behind other devices that
use RF. If the Headset is not operating properly within the
33-foot/10-meter range, try moving the Base Station to a
different location for improved performance.
33ft/10m
3

Plug one end of the USB Cable into a USB port on
the gaming console. Plug the other end of the USB
Cable into the USB Port of the Base Station.
Plug Component/VGA/Composite Cable into Xbox 360.
Connect RCA connection Cable to red/white
connectors on the Component/VGA/Composite Cable.
Plug 3.5mm Audio Cable into the Audio Input of the
Base Station.
Connect the Headset Connector Cable in the
proper order:
1- Connect Headset Connector Cable to the Headset
Connector Port on the Headset.
2- Connect puck side of Headset Connector Cable into Xbox
360-compatible controller.
Insert the batteries into the Headset. See page 10 for
more information.
Power ON the Xbox 360 Console and Headset.
To confirm Xbox LIVE settings, press the “Xbox Guide
Button” when a game is loaded,
and go to Personal Settings > Voice. Ensure that
“Headset Only” is selected.
1
2
3
4
5
6
7
8
Xbox 360 Component/Composite/VGA
*
E
C
C
C
G
E
E
F
G
E
1
2
4

Xbox 360® HDMI
C
E
F
G
1
2
Plug one end of the USB Cable into a USB port on
the gaming console. Plug the other end of the USB
Cable into the USB Port of the Base Station.
Plug Analog Audio Adapter into Xbox 360 AV Port.
Plug Analog Audio Adapter into RCA connector
Cable.
Plug 3.5mm Audio Cable into the Audio Input of the
Base Station.
Connect the Headset Connector Cable in the
proper order:
1- Connect Headset Connector Cable to the
Headset Connector Port on the Headset.
2- Connect puck side of Headset Connector Cable
into Xbox 360-compatible controller.
Insert the batteries into the Headset. See page 10 for
more information.
Power ON the Xbox 360 Console and Headset.
To confirm Xbox LIVE settings, press the “Xbox Guide
Button” when a game is loaded, and go to Personal
Settings > Voice. Ensure that “Headset Only” is
selected.
1
2
3
4
5
6
7
8
C
C
H
H
E
F
G
5

Xbox 360® E
C
E
F
1
2
Plug one end of the USB Cable into a USB port on
the gaming console. Plug the other end of the USB
Cable into the USB Port of the Base Station.
Plug 3.5mm Audio Cable into the Audio Input of the
Base Station. Plug the other end into the 3.5mm A/V
port on the Xbox 360.
Connect the Headset Connector Cable in the proper
order:
1- Connect Headset Connector Cable to the
Headset Connector Port on the Headset.
2- Connect puck side of Headset Connector Cable
into Xbox 360-compatible controller.
Insert the batteries into the Headset. See page 10 for
more information.
Power ON the Xbox 360 Console and Headset.
To confirm Xbox LIVE settings, press the “Xbox Guide
Button” when a game is loaded, and go to Personal
Settings > Voice. Ensure that “Headset Only” is
selected.
1
2
3
4
5
6
C
C
6

PlayStation®3 HDMI/Component/Composite
*
* *
C
E
G
Plug one end of the USB Cable into a USB port on the
gaming console. Plug the other end of the USB Cable
into the USB Port of the Base Station.
Plug RCA Connector Cable into the red/white
connectors of the PS3 AV Cable
Plug the 3.5mm Audio Cable into the RCA
connector cable
Plug 3.5mm Audio Cable into the Audio Input of
the Base Station.
Insert the batteries into the Headset. See page 3
for more information.
Power ON the PlayStation 3 Console and Headset.
PlayStation®Network
On the PS3 go to Settings > Sound Settings > Audio
Output Settings and change the audio output to be
“Audio Input Connector/SCART/AV Multi.”
On the PS3 go to Settings > Accessory Settings > Audio
Device Settings, and set both the input and output to
“TRITTON KUNAI Wireless Headset.” You can see a visual
confirmation that the microphone is functioning if the
bar graph moves.
* Not Included / Non inclus
** Included with console /
Inclus avec la console
D
1
2
3
4
5
A
7
C
G
G
E
C

PlayStation®4 Connect to Controller
* Not Included / Non inclus
** Included with console /
Inclus avec la console
*
D
Plug one end of the 3.5mm Mobile/Wii U/PS4 cable
to the PS4 controller.
Plug the other end of the 3.5mm Mobile/Wii U/PS4
cable to the port on the left earcup of the
headset.
1
2
8
D
D
Table of contents
Other Triton Headset manuals


