Suunto G9 User manual

1

2
CUSTOMERSERVICECONTACTS
Suunto Oy Phone +358 9 875870
Fax +358 9 87587301
Suunto USA Phone 1 (800) 543-9124
Canada Phone 1 (800) 776-7770
European Call Center Phone +358 2 284 11 60
Suunto Website www.suunto.com

3
1. INTRODUCTION ..................................................................................................... 6
1.1. Checklist ................................................................................................... 6
1.2. Care and Maintenance .............................................................................. 6
1.3. Water Resistance ...................................................................................... 7
1.4. Charging the Battery ................................................................................. 7
2. HOW TO USE YOUR SUUNTO G9 .......................................................................... 8
2.1. Display ..................................................................................................... 8
2.1.1. Mode Indicator ................................................................................ 8
2.1.2. Battery Indicator ............................................................................ 8
2.1.3. Alarm Symbol ................................................................................. 8
2.1.4. GPS Activity and Accuracy Bar Display ....................................... 9
2.2. Buttons .................................................................................................. 10
2.2.1. Short and Long Press .................................................................. 10
2.2.2. Start/Data Button .......................................................................... 10
2.2.3. Stop/Cancel Button ...................................................................... 10
2.2.4. Enter Button ................................................................................. 11
2.2.5. Arrow Buttons ............................................................................. 11
2.2.6. Key Lock ...................................................................................... 12
2.3. Menus .................................................................................................... 13
2.3.1. Basic Menu Structure .................................................................. 13
2.3.2. Navigating in the Menus ............................................................... 14
2.4. Understanding GPS ................................................................................. 14
2.4.1. Overview ..................................................................................... 14
2.4.2. Line-of-sight Needed ................................................................... 14
2.4.3. Accuracy ..................................................................................... 15
2.4.4.GPS Usage ...................................................................................15
2.4.5. Versatility ..................................................................................... 16
3. MODES ................................................................................................................. 17
3.1. General Information ................................................................................. 17

4
3.2. Time Mode .............................................................................................. 17
3.2.1. Main display ................................................................................. 17
3.2.2. Stopwatch .................................................................................... 18
3.2.3. Alarm .......................................................................................... 19
3.2.4. Time/Date ..................................................................................... 21
3.2.5. General ........................................................................................ 25
3.2.6. Units ............................................................................................ 27
3.2.7. Function menu .............................................................................. 30
3.3. Weather Mode ......................................................................................... 35
3.3.1. Main Display ................................................................................. 35
3.3.2. Altitude: ........................................................................................ 36
3.3.3. Barometric Memory ...................................................................... 38
3.3.4. Weather Alarm ............................................................................. 39
3.3.5. Function Menu .............................................................................. 39
3.4. Compass Mode ........................................................................................ 40
3.4.1. Main Display ................................................................................. 40
3.4.2. Calibrating the Compass ..............................................................41
3.4.3. Declination .................................................................................... 43
3.4.4. Function Menu .............................................................................. 44
3.5. Course Mode .......................................................................................... 45
3.5.1. Main Display ................................................................................. 45
3.5.2. Set menu ...................................................................................... 46
3.5.3. Viewing the Game Information .................................................... 47
3.5.4. Function Menu: ............................................................................. 48
3.5.5. Clubs ............................................................................................ 53
3.6. Game Mode ............................................................................................ 56
3.6.1. Main Display ................................................................................. 56
3.6.2. Start Round .................................................................................. 58
3.6.3. Marking the Tee ............................................................................ 59
3.6.4. Marking the Ball ............................................................................ 59

5
3.6.5. Selecting Clubs ............................................................................ 60
3.6.6. Viewing the Game Information .................................................... 62
3.6.7. End Hole ....................................................................................... 62
3.6.8. Quit Hole ....................................................................................... 63
3.6.9. Quit Round ................................................................................... 63
3.6.10.Undo ............................................................................................ 63
3.6.11. Penalty ......................................................................................... 63
4. ADDITIONAL FEATURES ....................................................................................... 65
4.1 PC Interface ............................................................................................ 65
4.1.1 Transferring Data ........................................................................ 65
4.2. Suunto Golf Manager .............................................................................. 66
4.2.1 Functions ..................................................................................... 66
4.3. Suuntosports.com ................................................................................... 68
4.3.1. System Requirements .................................................................. 68
4.3.2. SuuntoSports.com Sections ........................................................ 68
5. TECHNICAL SPECIFICATIONS ............................................................................... 71
6. GPS DATUM LISTING .......................................................................................... 72
7. COPYRIGHTAND TRADEMARK NOTICE ............................................................. 80
8. CE ......................................................................................................................... 80
9. LIMITS OF LIABILITY AND ISO 9001 COMPLIANCE ............................................. 81
10. DISCLAIMER ...................................................................................................... 81

6
1. INTRODUCTION
Congratulations, your newly purchased Suunto G9 is designed to provide years of
enjoyment in your golfing activities.
Suunto G9 is a reliable high precision electronic instrument intended for recreational
use.
NOTE: Suunto G9 should not be substituted for acquiring measurements that require
professional or industrial precision.
1.1. CHECKLIST
After purchasing this instrument, make sure the package contains the following items:
• Suunto G9
• Docking Station
• Charger
• PC-interface cable
• CD containing the Suunto Golf Manager software and Suunto G9 instruction manual
• Suunto G9 Quick Guide
Should any of these be missing from the package, contact the resale agent who sold
you the package.
1.2. CARE AND MAINTENANCE
Only perform the procedures described in this manual. Never attempt to disassemble
or service your Suunto G9. Protect your Suunto G9 from shocks, extreme heat and
prolonged exposure to direct sunlight. If not in use, your Suunto G9 should be stored
in a clean, dry environment at room temperature.
Suunto G9 can be wiped clean with a lightly moistened (warm water) cloth. If there are
stubborn stains or marks, you can apply mild soap to the area. Do not expose Suunto
G9 to strong chemicals such as gasoline, cleaning solvents, acetone, alcohol, insect
repellents, adhesives and paint, as they will damage the unit’s seals, case and finish.
Keep the PC interface pins clean with e.g. a toothbrush. Make sure the area around the
sensor is kept free of dirt and sand. Never insert any objects into the sensor opening.

7
1.3. WATER RESISTANCE
Suunto G9 is water resistance-tested up to 10 bar (equivalent to 100 m/330ft depth)
according to ISO 2281 standard (www.iso.ch). However, it is not a diving instrument
and therefore it should not be used to obtain data under water. Do not push the buttons
under water.
NOTE: Lots of water or dirt under the cover of Suunto G9 may disturb the satellite
signal reception.
1.4. CHARGING THE BATTERY
Suunto G9 is equipped with an internal rechargeable battery. You can recharge the
battery approximately 500 times. The life expectancy of a single charge depends on
the use of the GPS, Compass and data storage functions. When the battery level
indicator on the display reaches the red zone, the battery voltage is low. When this
occurs, you should recharge the battery. However, extremely cold weather affects
the battery voltage even when the battery is still fully operational. If the battery warn-
ing indicator is activated in temperatures above 10°C (50°F), recharge the battery.
Do not attempt to change the battery, as this will void warranty. Take the Suunto G9 to
an authorized Suunto dealer for a battery change.
You can charge the battery with either 110V or 220 V mains charger (depending on
the area of purchase), with a car cigarette lighter charger (optional) or with a 9 V
battery.
To charge the battery:
1. Place Suunto G9 on the docking station
with the display facing up.

8
2. HOW TO USE YOUR SUUNTO G9
2.1. DISPLAY
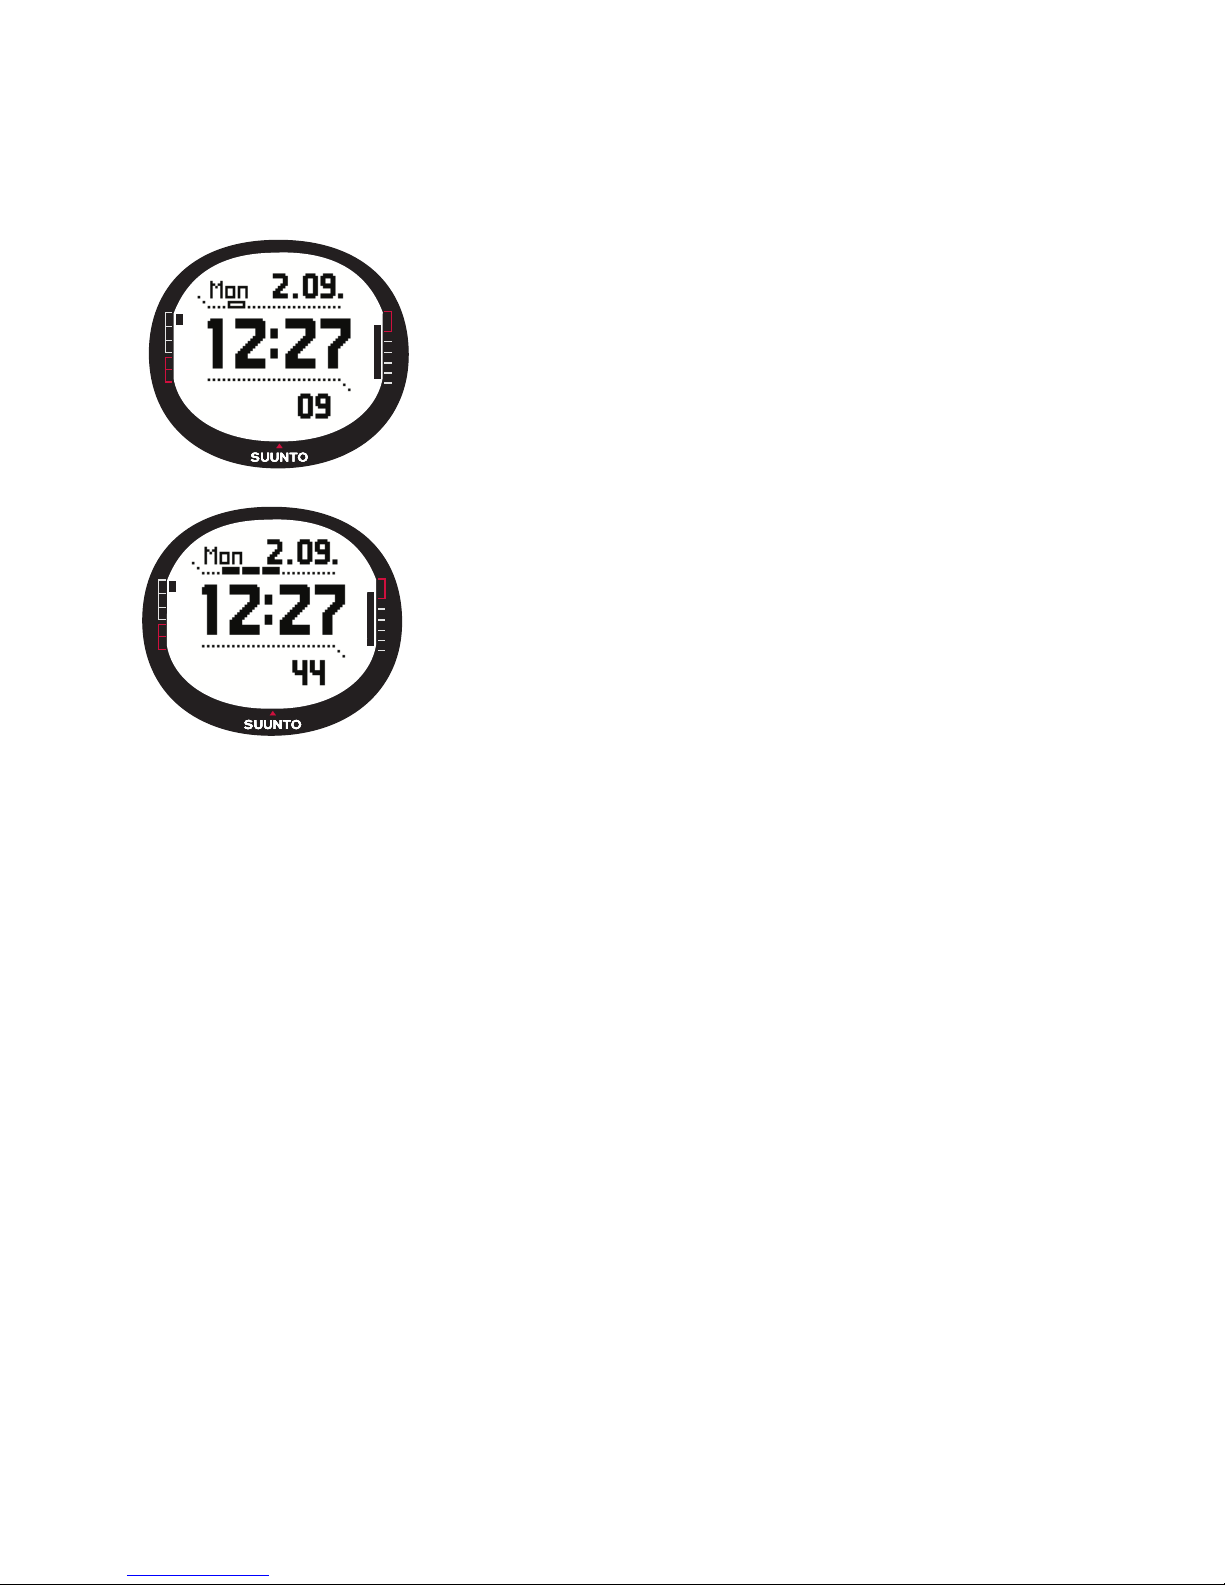
2.1.1. Mode Indicator
On the left side of the display there is a mode indicator
that shows the currently active mode. The mode indica-
tor displays the modes from the top down in the follow-
ing order: TIME, WEATHER, COMPASS, COURSE and
GAME. The active mode is indicated by the moving seg-
ment next to the indicator bar.
2.1.2. Battery Indicator
On the right side of the display there is a battery indicator that shows the battery
voltage. When the indicator is in the red zone, the battery needs recharging. When the
battery is being recharged, the battery indicator moves up continuously until the bat-
tery is full, and the indicator is shown in full length.
2.1.3. Alarm Symbol
If a regular alarm or a Baro Alarm is activated, a rectan-
gular symbol is displayed at the right side of the lower
horizontal dot line.
2. Plug the charger in the docking station. Plug the charger
in an electric outlet.
3. When the battery indicator shows a full battery, dis-
connect the charger from the electric outlet. Suunto
G9 is now ready for use.
NOTE: Heavy use of the GPS, backlight and compass
will significantly reduce the battery life.
9
2.1.4. GPS Activity and Accuracy Bar Display
When the GPS is set on, a dot bar display appears on the
upper horizontal dot line of the display. Once the GPS is
on but does not have a fix, an empty rectangular dot is
displayed. When the GPS has a fix, 1 to 5 filled rectangu-
lar dots are displayed. The amount depends on the fix
quality. More dots represent better satellite coverage
and signal reception.

10
2.2. BUTTONS
2.2.1. Short and Long Press
The buttons may have different functions depending on how long you press them.
The ordinary
press
or
short press
means that the button is pressed quickly.
The
long press
means that the button is pressed for more than 2 seconds.
2.2.2. Start/Data Button
Short Press
• In the Time mode, it starts the timing and records the split times.
• In the Game and Course modes, it returns to the Game statistics display.
NOTE:
If a game
is not active
, Suunto G9
displays the statistics of the last 4 played
rounds.
Long Press
• Activates the backlight when the backlight is not set to the off position. The backlight
stays on as long as a selection is active and 5 seconds after the last selection. (For
more information on the backlight settings, see page 25.)
2.2.3. Stop/Cancel Button
Short Press
• Returns to the previous menu level or to the previous selection
without accepting
the selection.
• In the main mode displays, it acts as a shortcut button that toggles the lowest field
of the main display between three different alternatives. The selection stays active
even if the mode or menu level is changed. Changing the shortcut in the Time mode
is possible only after the Stopwatch has been reset.
• In the Time mode, it stops the timing and scrolls the split times on the display.
Long Press
•Returns to the main display of the current mode without accepting the last selection.
• In the Time/Stopwatch mode it resets the stopwatch.
Other manuals for G9
1
Table of contents
Other Suunto Watch manuals

Suunto
Suunto CORE User manual

Suunto
Suunto Companion Setup guide

Suunto
Suunto n6HR User manual

Suunto
Suunto G9 User manual

Suunto
Suunto EON STEEL Owner's manual

Suunto
Suunto Vector User manual

Suunto
Suunto TRAVERSE ALPHA 2.0 User manual

Suunto
Suunto 9 2.0 User manual

Suunto
Suunto TRAVERSE ALPHA 2.1 User manual

Suunto
Suunto Altimax User manual

Suunto
Suunto G3 User manual

Suunto
Suunto SPARTAN SPORT WRIST HR 1.8 User manual

Suunto
Suunto SPARTAN SPORT WRIST HR 1.11 User manual

Suunto
Suunto M3 User manual

Suunto
Suunto OW202 User manual

Suunto
Suunto AMBIT3 RUN 2.4 User manual

Suunto
Suunto 7 User manual

Suunto
Suunto AMBIT User manual

Suunto
Suunto SPARTAN ULTRA User manual

Suunto
Suunto X6HR User manual


