Slick MP180R User manual

User Guide
2
M P 1 8 0 R

•MP3 Player
• Headphones
•USB Cable
• Quick Start Guide
•CD (Video Converter
and User Guide)
In the box
Headphones USB Cable
Quick Start Guide CDMP3 Player
music
radio
videos
photos
record
voice
delete
1

• 2 GB internal memory
• High resolution 1.8” LCD display
• Rechargeable Li-ion batteryl
• Stores & plays music, video, and pictures
• FM digital radio
• Digital voice recording
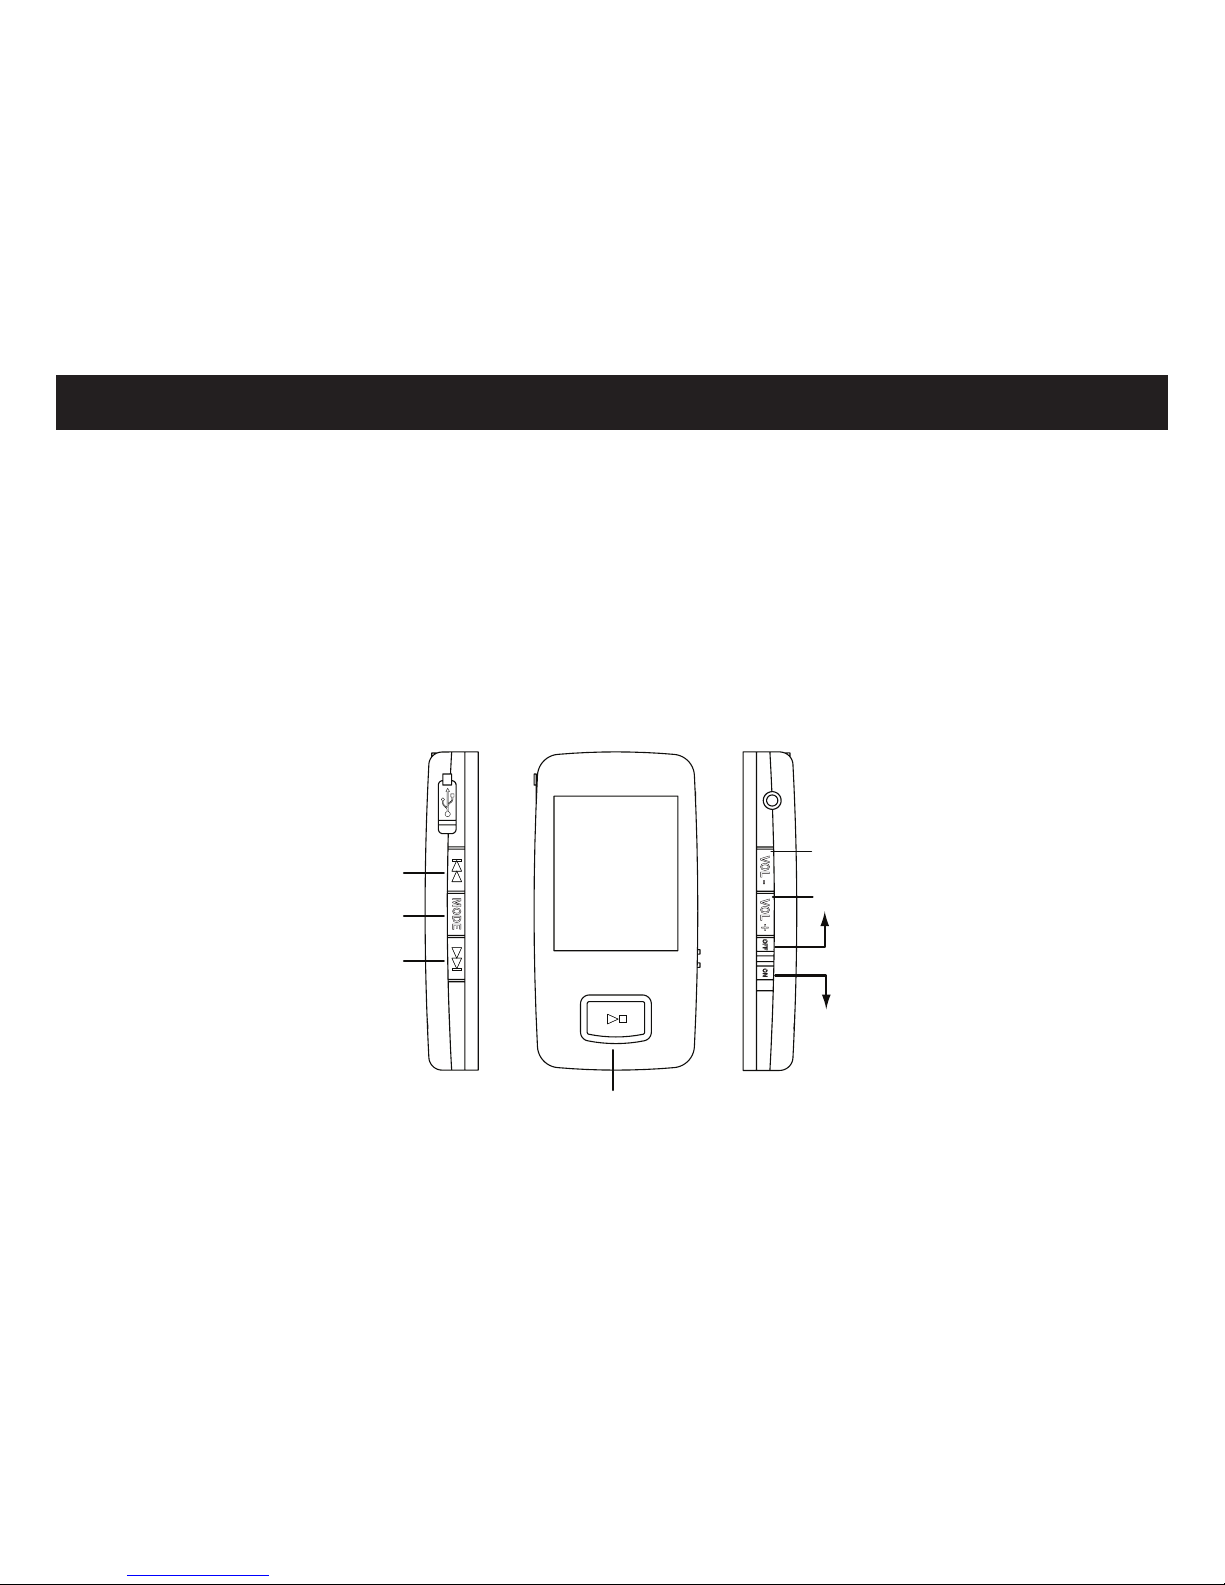
Features & location of controls
1
2
3
4
9
5
7
8
10
6
11
12
13
USB connection port
- Previous track/up (menu list)/ Fast rewind
[MODE] - Return/Return to main menu
- Next track/down (menu list)/ Fast forward
Microphone
Headphone jack 3.5 mm (works with any standard 3.5 mm
headphones)
LCD Screen
Speaker
Headphone jack 2.5 mm (works with 2.5 mm headphones)
- Decrease volume
- Increase volume
1.
2.
3.
4.
5.
6.
7.
8.
9.
10.
11.
12.
13.
[
]
[
]
[]
[VOL −]
[VOL +]
[OFF ON]
2
Features
Location of controls
Basic Operation
To navigate the main menu
Adjusting the volume
●increases the volume
●decreases the volume
moves the selection up
moves the selection down
makes a selection
press to return to the previous menu
press and HOLD to return to the main menu
[MODE]
[
]
[
]
[
]
●
●
[VOL +]
[VOL −]
Power on/off
● To turn on the player, make sure the switch is in the “ON”
position and press and HOLD the button until the display lights
up.
● To turn off the player, press and HOLD the button until the display
shuts off, or slide the switch to the “OFF” position
(shutting the player this way is quicker but the last changes in the
settings, or last player song will not be saved).
[OFF ON]
[OFF ON]
[ ]
[ ]
Slide down to turn on
Slide up to turn o
[OFF ON]
Decrease volume
Increase volume
switch
Power on/o/Select/Conrm
Up (menu)
Previous screen/Main menu
Down (menu)
3

Charging the battery
1. Connect the MP3 Player to your computer using the included USB cable
2. Charge the battery between 3 and 5 hours. (Do not charge for more than 8 hours).
Battery level indication:
indicates that the battery is full
indicates low battery; the player should be charged as soon as possible
music
radio
videos
photos
record
voice
delete
4

Transferring media to the player
1.Find music, picture, or video files on your computer. 2. Connect the MP3 Player to your computer, and locate “MP3.”
3. Drag the files into the player as shown below.
When you are done, disconnect your MP3 Player from the computer using the “Safe Device Removal” utility in the taskbar.
Important: Do not disconnect the MP3 Player from the PC while transferring files as doing so will damage your MP3 Player and your files.
MP3 (G:)
MP3
Drag or copy files here
Locate“MP3”
*Screenshots below may be slightly different than your computer’s
operating system.
5

Main menu
Main Menu
Music
Radio
Videos
Record (record voice memos)
Voice (play back voice memos)
Delete (view or delete files on the player)
Settings
Photos
music
radio
videos
photos
record
voice
delete
radio
videos
photos
record
voice
delete
settings
videos
photos
record
voice
delete
settings
music
photos
record
voice
delete
settings
music
radio
record
voice
delete
settings
music
radio
videos
voice
delete
settings
music
radio
videos
photos
memos
delete
settings
music
radio
videos
photos
record
settings
music
radio
videos
photos
record
voice
[MODE]
When you turn on the player the main menu apperars (to access the main menu at any time, press and HOLD the button).
Use the or button to select an item, and press the button to confirm your selection.
The main menu has the following options available:
[]
[]
[ ]
6

Pausing playback
• While a song is playing, press the button to pause the playback.
• To resume the playback, press the button once again.
To play music
• Select “music” from the main menu and press the button to confirm.
• Press the button to start playing.
Skipping tracks
• Press the button to go back to the previous track.
• Press the button to skip to the next track.
Searching backward or forward within a track
• Press and HOLD the button to fast rewind within a track.
• Press and HOLD the button to fast forward within a track.
Changing the volume
• Press the button to decrease the player volume.
Display
1. Play/Pause/Stop/Rewind/Fast forward
2. Music format
3. Volume indicator
4. Remaining battery power indicator
5. Current track/Total track number
6. Repeat mode indicator
7. Audio visualizer
8. Current music track name
9. Lyrics/ID3 Tag
10. Music progress bar
11. Elapsed time of current track
12. Total time of current track
• Press the button to increase the player volume.
Music
previous/fast rewind
previous screen/main menu
decrease volume
increase volume
play/pause/select
next/fast forward
5
1 2 3 4
7
9
8
11
10
12
6
[]
[
]
[]
[]
[
]
[
]
[
]
[
]
[VOL +]
[VOL −]
music
radio
videos
photos
record
voice
delete
7

To set play mode
The play mode setting enables you to select a play mode to enjoy the music in a desired order.
1. Press the button while listening to music. The music menu appears on the screen.
2. Press the or button to select “Repeat”, and press the button to confirm. The play mode menu
appears on the screen.
3. Use the or button to select the desired mode and press the button to confirm and exit.
The following play modes are available:
• No Repeat: Play all saved music files in order once.
• Repeat One: Play the current or selected music file repeatedly.
• Repeat All: Play all music files in order repeatedly.
• Random All: Play all music files in random repeatedly.
• Dir Normal: Play all music files in the current folder in order once.
• Dir All Repeat: Play all music files in the current folder repeatedly.
• Dir Random All: Play all music files in the current folder in random.
To set the equalizer
The equalizer setting enables you to select an equalizer from the six preset equalizer settings to suit the type of
audio output, or customize your personal equalizer effect.
1. Press the button while listening to music. The music menu appears on the screen.
2. Use the or button to select “Equalizer”, and press the button to confirm. The Equalizer menu
appears on the screen.
3. Use the or button to select the desired Equalizer from Normal,Pop, Rock, Classic, Jazz and Bass.
4. Press the button to confirm and exit.
Repeat
Equalizer
Play Rate
3D
Slide show
No Repeat
Repeat One
Repeat All
Random All
Dir Normal
Normal
Pop
Rock
Classic
Jazz
[MODE]
[]
[]
[
]
[
]
[
]
[
]
[
]
[
]
[
]
[
]
[MODE]
[
]
[]
8

Windows Media Player allows you to organize your media collection,
Player is not installed on your computer, you can get the latest version
by going to
www.microsoft.com/windows/windowsmedia/player/download/
Getting music from your CDs onto your computer:
You can use Windows Media Player to copy, or “Rip”, music from
your audio CDs.
1. Open Windows Media Player.
2. Click on the “Rip” tab.
3. Insert a music CD into your computer’s CD drive.
4. Click the checkboxes to select which tracks to Rip.
5. Click “Start Rip.”
Using Windows Media Player
Click the “Rip” tab.
Click “Start Rip”
9
This manual suits for next models
1
Table of contents
Other Slick Media Player manuals


