Skymsen SI-315HD-N User manual

INSTRUCTION MANUAL
BAND SAW STAINLESS STEEL, MOVABLE TABLE, THICKNESS GUIDE,
BLADE 3.150 mm
MODEL
SI-315HD-N

2
SUMMARY
1. Introducon ...................................................................................... 3
1.1 Safety .................................................................................................................... 3
1.2 Main Components ................................................................................................ 5
1.3 Technical Characteriscs ........................................................................................ 6
2. Installaon and pre Operaon .......................................................... 6
2.1 Installaon ............................................................................................................ 6
2.2 Pre Operaon ........................................................................................................ 7
3. Operaon .......................................................................................... 7
3.1 Starng ................................................................................................................. 7
3.2 Operang Process.................................................................................................. 8
3.3 Cleaning And Sanizaon ..................................................................................... 9
3.4 Cauons With Stainles Steel .................................................................................16
4. General Safety Pracces .................................................................. 17
4.1 Basic Operaon Pracces......................................................................................17
4.2 Safety Procedures and Notes Before Switching the Machine On............................18
4.3 Roune Inspecon................................................................................................19
4.4 Operaon .............................................................................................................19
4.5 Aer Finishing The Work ......................................................................................19
4.6 Maintenance ........................................................................................................20
4.7 Warning ...............................................................................................................20
5. Problems Analysis And Soluons ..................................................... 20
5.1 Problems, Causes And Soluons ...........................................................................20
6. Maintenance ................................................................................... 22
7. Electric Diagram .............................................................................. 23

3
1. Introducon
1.1 Safety
If and when the equipment is not correctly used it is a potenally DANGEROUS machine.
Cleaning, maintenance and any other service in the machine shall be carried out by duly
trained people and with the plug o its socket.
The instrucons below must be always followed to avoid accidents:
1.1.1 Read completely these instrucons.
1.1.2 To avoid to risk electric shocks and damage to the equipment never use it with wet
clothes or shoes and/or standing on wet oors. Do not plunge it into water nor any other
liquid, do not spray water directly to the equipment.
1.1.3 When the equipment is in operaon the operator shall supervise it, principally
when children might be near.
1.1.4 Unplug the equipment when: It is not in use, before to clean it, before to remove or
to place some accessory. before maintenance or any other service.
1.1.5 Do not operate the equipment if the cord or plug are damaged. Do not lean the
cord on table edges, nor let them lie on hot surfaces.
1.1.6 When the equipment may have fall, have been damaged any way, or simply does
not work, take it to Technical Assistance to check.
1.1.7 The use of accessories not recommended by the manufacturer may cause corporal
injures.
1.1.8 Keep the hands or any other object away from moving parts while the equipment is
in operaon, to avoid injures or damage to the equipment.
1.1.9 During operaon never wear loose clothes with wide sleeves principally around the
wrists.
1.1.10 Make sure the equipment voltage and the network voltage are the same, and the
equipment has been solidly grounded.
1.1.11 Never adjust the Blade Guide nor the Thickness Guide with the machine running.
1.1.12 Use steel gloves during the operaon.

4
IMPORTANT
This equipment must not be used by children or any persons with reduced
physical or mental aptness, lack of experience or knowledge, unless they are
under supervision or have received from the person responsible for safety, proper
instrucons on how to use the equipment.
IMPORTANT
Children shall be watched in order to avoid them to play with the equipment.
IMPORTANT
Never spray water directly on to the equipment.
IMPORTANT
Make sure the cord is in perfect condions for use. If it is not, change it for a new
one in accordance with the technical specicaons and safety rules.
The substuon shall be made by a qualied professional, and shall respect the
local safety norms.
1.1.13 This equipment has been developed for commercial operaon, it is used for instance
in restaurants, fast foods, hospitals, bakeries, butchers and similar. It is not recommended
to use it.
- For connuous industrial producon.
- A working ambient having a corrosive or explosive atmosphere, or contaminated with
water vapour, dust or gas.

5
1.2 Main Components
All components are manufactured with carefully chosen raw materials in accordance with
Siemsen experience and tesng standards.
01 - Blade Tension Regulator Handle
02 - ON/OFF Switch
03 - Upper Door
04 - Upper Wheel
05 - Handle
06 - Blade Guide
07 - Blade (width 3/4”)
08 - Movable table
09 - Wheel Staple
10 - Rack
11 - Frame
12 - Thickness Guide
13 - Fixed table
14 - Lower Door
15 - Lower wheel
16 - Blade Guard
17 - Feet
18 - Tray
PICTURE 01
04
11
13
09
15
03
12
05
06
01
07
08
10
18
17
14
02
16

6
TABLE 01
CHARACTERISTICS UNIT SI-315HD-N
Average producon Kg/h Up tp 1000
Voltage V 110
Frequency c/s 60
Power Rang W 1472
Height mm 1900
Width mm 1180
Depth mm 1000
Net Weight kg 136
Shipping Weight kg 190
1.3 Technical Characteriscs
2. Installaon and Pre Operaon
2.1 Installaon
2.1.1 Placing the equipment
The equipment must be placed on a level and rm working surface. See below drawing
the recommended area:
PICTURE 02
600mm
600mm
Área para
instalação
FRENTE
2.1.2 Electric Installaon
The cord has three wires, the green wire is for grounding. It is mandatory the three wires
to be duly connected to a plug in accordance to local rules, before to start the equipment.
INSTALLATION
AREA
FRONT SIDE

7
IMPORTANT
The electric connecon is to be made by a qualied technician, and shall obey the
local safety rules. Check the network voltage, it has to be the same as the motor
voltage.
2.2 Pre Operaon
Before to use this equipment all the parts to be in contact with product shall be washed
with water and neutral soap, see item 3.3 Çleaning and Sanizaon.
Make sure the equipment stay rm on its working place.
3. Operaon
3.1 Starng
1 - Make sure ALL the protecons and the door are in place and the door is closed, items
A. B. and C (Pic 03);
2 – Press the ON/OFF Switch # 01 (Pic 03) on posion “I”.
PICTURE 03
B
1
A
C

8
3.2 Operang Process
3.2.1 Make sure the equipment is stable on its working place.
3.2.2 Adjust the Blade Guide height to meet the meat piece thickness, and not more.
3.2.3 Doors and Blade Guard
The Upper Door, the Lower Door and the Blade Guard shall be on operaon posion and
the doors closed , as long as the equipment is in operaon.
3.2.4 Thickness Guide
To obtain several slices with the same thickness, adjust the Thickness Guide as desired
Turn the Thickness Guide Handle counter clockwise loosing the Thickness Guide, and drive
it to the desired thickness. Then ght back the handle.
3.2.5 Blade
The Blade shall be installed with the teeth turned toward the saw front side, and downward.
To stretch the blade turn clockwise the Blade Tension Regulator Handle unl it stops.
3.2.6 Blade Guide
With the saw switched OFF turn the Handle counter clockwise to loose the Blade Guide.
Adjust the Blade Guide height to meet the meat piece thickness, and not more. Then ght
the handle.
3.2.7 Scdapers
The saw has two scrapers, the wheel scraper and the blade scraper.
The Wheel Scraper
This scraper cleans the bone dust or the residues from the Lower Wheel during operaon.
The Blade Scraper
This scraper cleans the bone dust or the residues from the blade during the operaon.
3.2.8 Lower Wheel
The Lower Wheel is assembled on the lower bearing sha and xed by a staple. The staple
shall always be placed in the sha slit.
The lower wheel may be removed for cleaning aer removing the blade (see item 3.3
Cleaning).

9
3.2.9 Upper Wheel
The Upper Wheel frame has its own sha and bearings.
The Upper Wheel may be removed to clean, aer the Blade has been removed (see item
3.3 Cleaning).
Before to start the Saw
- Pull totally the Movable Table toward the saw front side.
- Place the meat on the Movable Table.
- Choose the slice thickness and adjust the Thickness Guide.
- Adjust the Blade Guide height to meet the meat piece thickness.
- Take place in front of the saw, to have a frontal view of the blade.
Starng the Saw
- To start the saw press the ON/OFF Switch buon ‘I’.
- Hold the Movable Table with the le hand and slide the Table against the Blade slicing
the meat at a constant and uniform speed.
- Aer cung the slice remove it using the right hand. The slice must always be removed
behind the blade to avoid the hand to touch the blade cung side.
When the saw must go through a complete cleaning and sanizaon process:
- before to be used rst me.
- Aer every day end of operaons.
- When the saw is not going to be used for a long period of me.
- Before to start operaon aer a long period it has not been used.
Many parts may be removed for cleaning:
- Upper Door
- Lower Door
- Blade guard
- Fixed Table
- Fixed Table Block
-Movable Table
- Blade
- Upper Wheel
IMPORTANT
Unlug the saw before to start Cleaning.
3.3 Cleaning and Sanizaon
10
- Lower Wheel
- Wheel Scraper
- Blade Scraper
- Back Cover
- Stretcher
- Blade Tension Regulator Handle
- Tray
Follow the below instrucons to remove the above menoned parts:
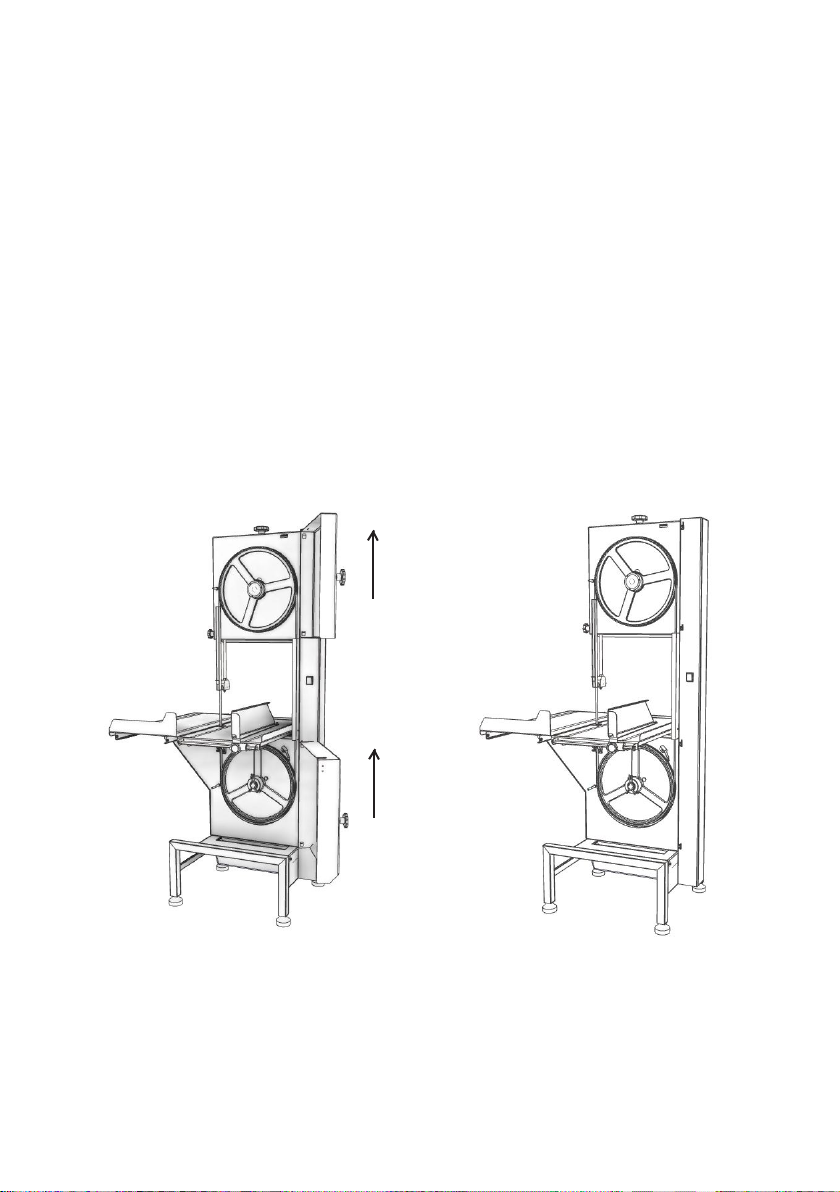
- Upper Door
Open the door, and li it (Picture 04).
- Lower Door
Open the door, and li it (Picture 04).
PICTURE 04
- Blade Guard
Turn counter clockwise the two handles, just enough to loose the Blade Guard, then
remove the Blade Guard pulling it towards the saw front side # 01 (Pic 05).
See Picture 05.
Table of contents
Other Skymsen Saw manuals

Skymsen
Skymsen SF-218 User manual

Skymsen
Skymsen SKG User manual

Skymsen
Skymsen SI-315HD-2 User manual

Skymsen
Skymsen MPL Manual

Skymsen
Skymsen SFL-282 User manual

Skymsen
Skymsen SFL-282 User manual

Skymsen
Skymsen SI-315HD User manual

Skymsen
Skymsen SF-218 User manual

Skymsen
Skymsen SB User manual

Skymsen
Skymsen SFL-295HD User manual

Skymsen
Skymsen SL-282 User manual

Skymsen
Skymsen SKG User manual

Skymsen
Skymsen SFL-282HD User manual

Skymsen
Skymsen SB User manual

Skymsen
Skymsen SF-218 User manual

Skymsen
Skymsen MSL User manual

Skymsen
Skymsen SL-218 User manual

Skymsen
Skymsen SI-282HD User manual

Skymsen
Skymsen Fleetwood SPM User manual

Skymsen
Skymsen BAND SAW User manual


