SIGE 230PRO User manual
AB
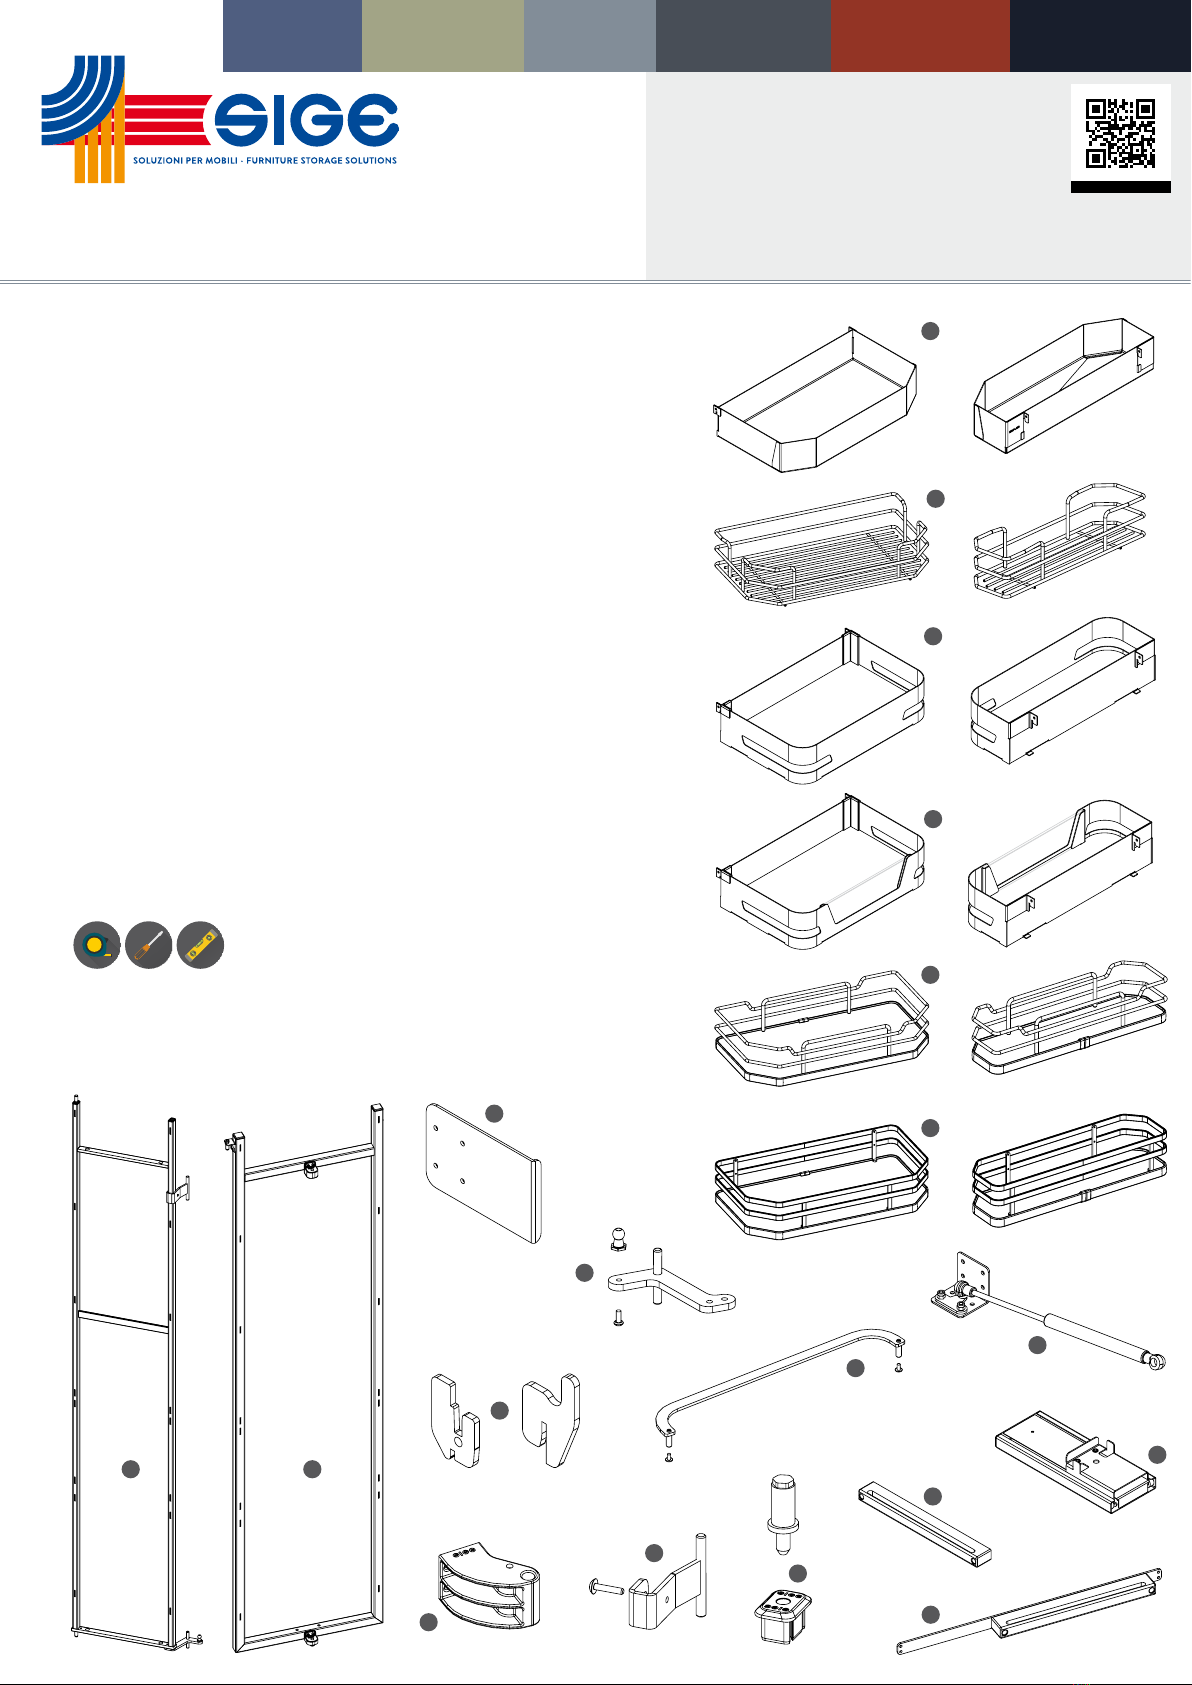
CARATTERISTICHE • FEATURES • CARACTÉRISTIQUES • CARACTERÍSTICAS
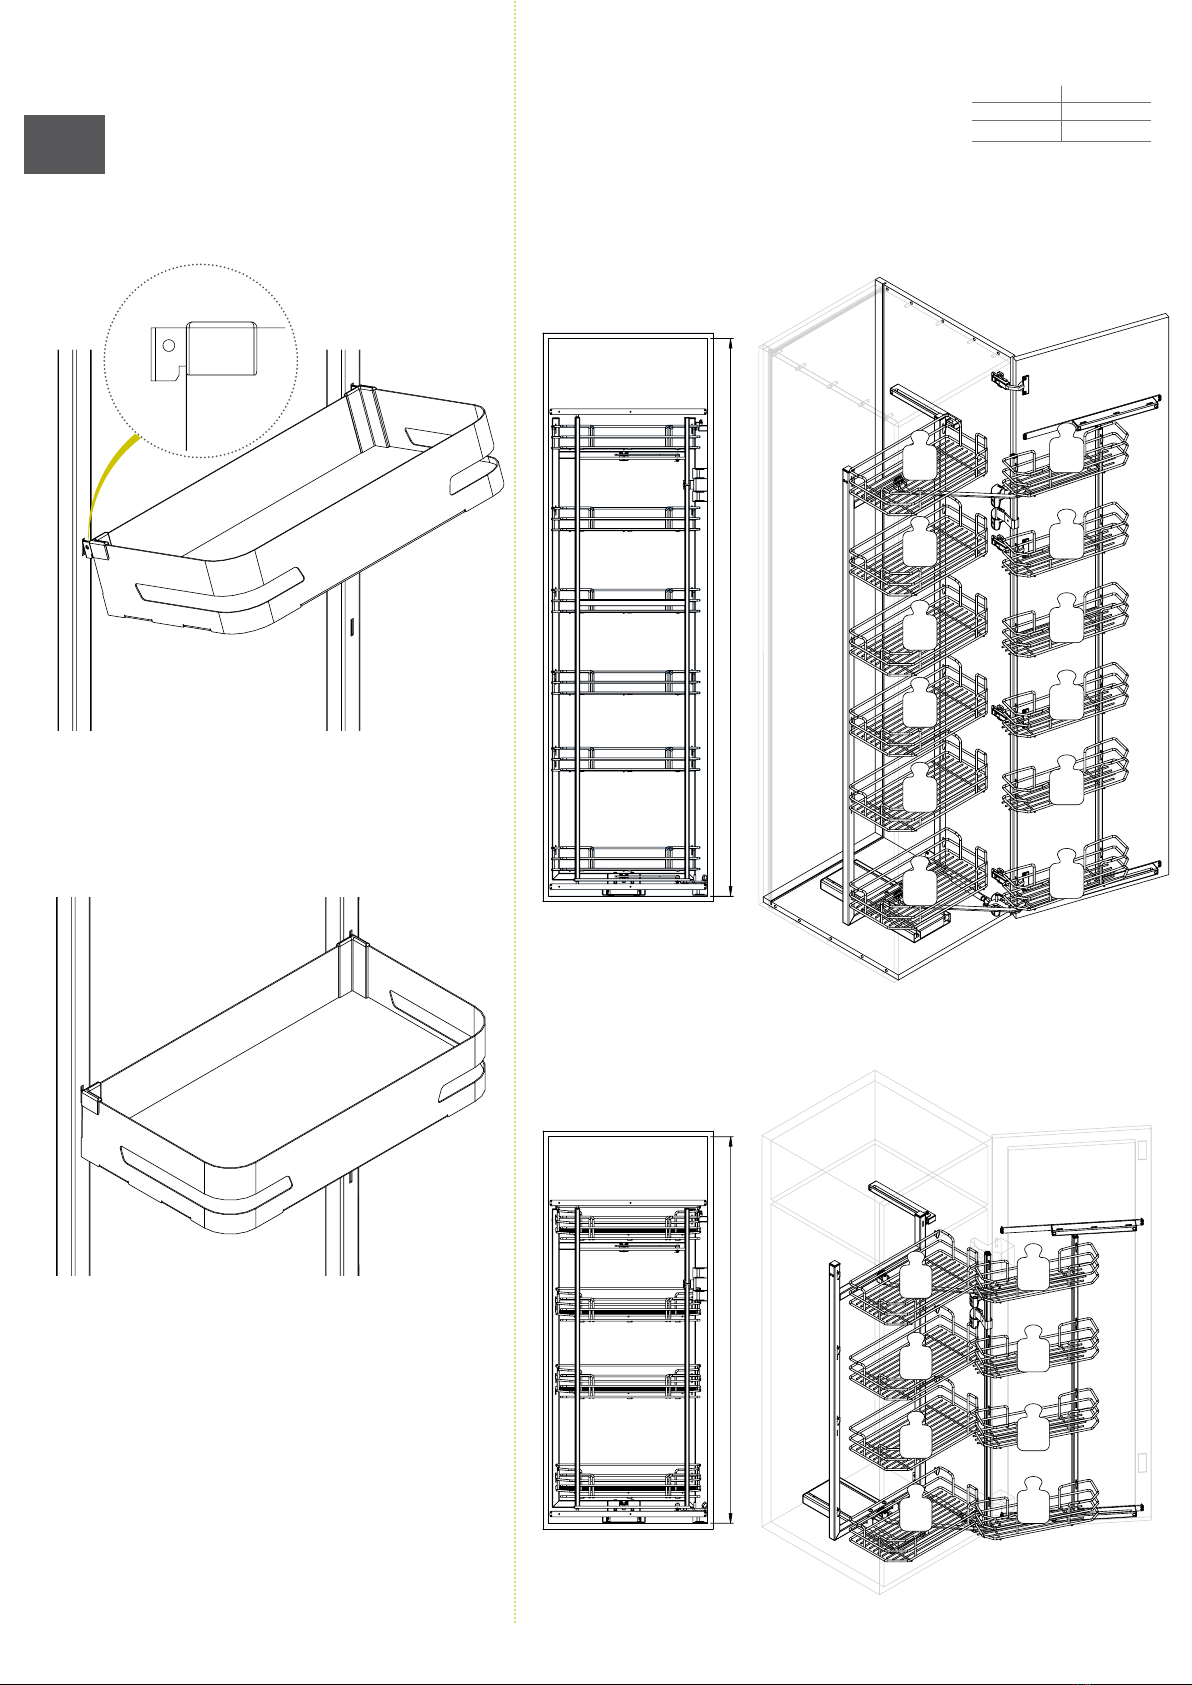
Colonna attrezzata estraibile reversibile a 4/6 setcesti.
Pull out equipped and reversible larder with 4 or 6 set baskets.
Colonne equipée extractible et reversible avec 4 ou 6 set paniers.
Columna aparejada extraible y reversible con 4 ou 6 set cestos.
MINUTERIA INTERNA • FITTINGS • FERRURE • FERRETERIA
N°2 M6x40 Brugola bottone / Button Allen key / Clè Allen bouton / Llave Allen botón
N°2 M5x14 Brugola cilindrica / Cylindrical Allen key / Clè Allen cylindrique / Llave Allen cilíndrica
N°35 4x16 Vite Autofilettante / Self-tapping screw / Vis autotaraudeuse / Tornillo autorroscante
COMPONENTI • PARTS • COMPOSANTS • COMPONENTES
A. N°1 Telaio posteriore / Back frame / Cadre postérieur / Estructura posterior
B. N°1 Telaio anteriore / Front frame / Cadre antérieur / Estructura delantera
C. N°1 Kit guida / Slide kit / Kit glissière / Kit de guías
D. N°1 Kit soft / Soft kit / Kit amortisseur / Kit soft
E. N°3 Supporto in plastica / Plastic support / Support en plastique / Soporte plástico
F. N°1 Staa di rotazione / Rotation bracket / Patte de rotation / Soporte de rotación
G. N°1 Guida in plastica / Plastic slide / Glissière en plastique / Guía de plástico
H. N°1 Staa guida antina / Door slide bracket /
Patte pour la glissière de la porte / Soporte para la guía de la puerta
I. N° 2 Leva di trascinamento / Drag lever / Levier à traîner / Palanca de arrastre
L. N° 1 Snodo / Junction / Jonction / Juntura
M. N°1 Tappo con perno / Cap with pin / Bouchon avec pivot / Tapa con perno
N. N°1 Set Gancio cestello / Basket hook kit / Kit crochet du panier / Kit gancho para cestos
O. N°1 Dima in plastica / Plastic template / Gabarit en plastique / Plantilla de plástico
P. Set cestelli / Baskets set / Kit paniers / Kit cestos
UTENSILERIA • TOOLS • OUTILS • INSTRUMENTOS
MANUTENZIONE • MAINTENANCE • ENTRETIEN • MANTENIMIENTO
Pulire con un panno morbido ed asciutto. Evitare l’uso di solventi e/o abrasivi.
Clean with a soft, dry cloth. Avoid using solvents or abrasive.
Nettoyez avec un chion sec et doux. N’utilisez pas aucun solvant ou produit abrasif.
Limpiar con paño suave y seco. Evitar el uso de solventes y/o abrasivos.
REV 00.2021
F0IST00032
Art 230
MONTAGGIO VERSIONE DX . ASSEMBLY RIGHT VERSION
MONTAGE VERSION DROITE . MONTAJE VERSIÓN DERECHE
PRODOTTO ED ASSEMBLATO IN ITALIA / MADE AND ASSEMBLED IN ITALY / FABRIQUÉ ET ASSEMBLÉ EN ITALIE / HECHO Y MONTADO EN ITALIA
SIGE non Sarà rESponSabIlE dI EvEntualI dannI occorSI pEr utIlIzzo dEl prodotto dIfformE da quEllo pEr Il qualE èStato concEpIto. SIGE wIll not bE rESponSIblE for any EvEntual damaGE duE to adIffErEnt uSE from thE onE It haS bEEn madE.
SIGE nE SEra paS rESponSablE pour touS lES dommaGES àcauSE d’un dIfférEnt utIlIzatIon du produIt pour lEquEl Il aété fabrIqué. SIGE no SEra rESponSablE para cualquIEr daño dEbIdo al uSo dIfErEntE dE lo por El cual un producto ha SIdo rEalIzado.
SIGE S.P.A.
60020 POLVERIGI AN ITALY
TEL +39 071 90 90 000 R.A. FAX +39 071 90 90 804
WWW.SIGESPA.IT INFO@SIGESPA.IT
WEB SITE
D
C
G
O
230+ 230/230i
N
L
M
F
E
I
H
230
P
230i
P
230+
P
230ME
P
230PRO
P
230M
P
INFINITY LINE INFINITY PLUSMATERIA MATERIA EVOGREEN LINEPRO LINE
MECCANISMO FORNITO
NELLA VERSIONE LH
MONTAGGIO VERSIONE DX
MECHANISM PROVIDED
IN THE LH VERSION
ASSEMBLY RIGHT VERSION
MÈCANISME ÉQUIPÉ DANS
LA VERSION LH
MONTAGE VERSION DROITE
MECANISMO PROVISTO
EN LA VERSION LH
MONTAJE VERSIÓN DERECHE
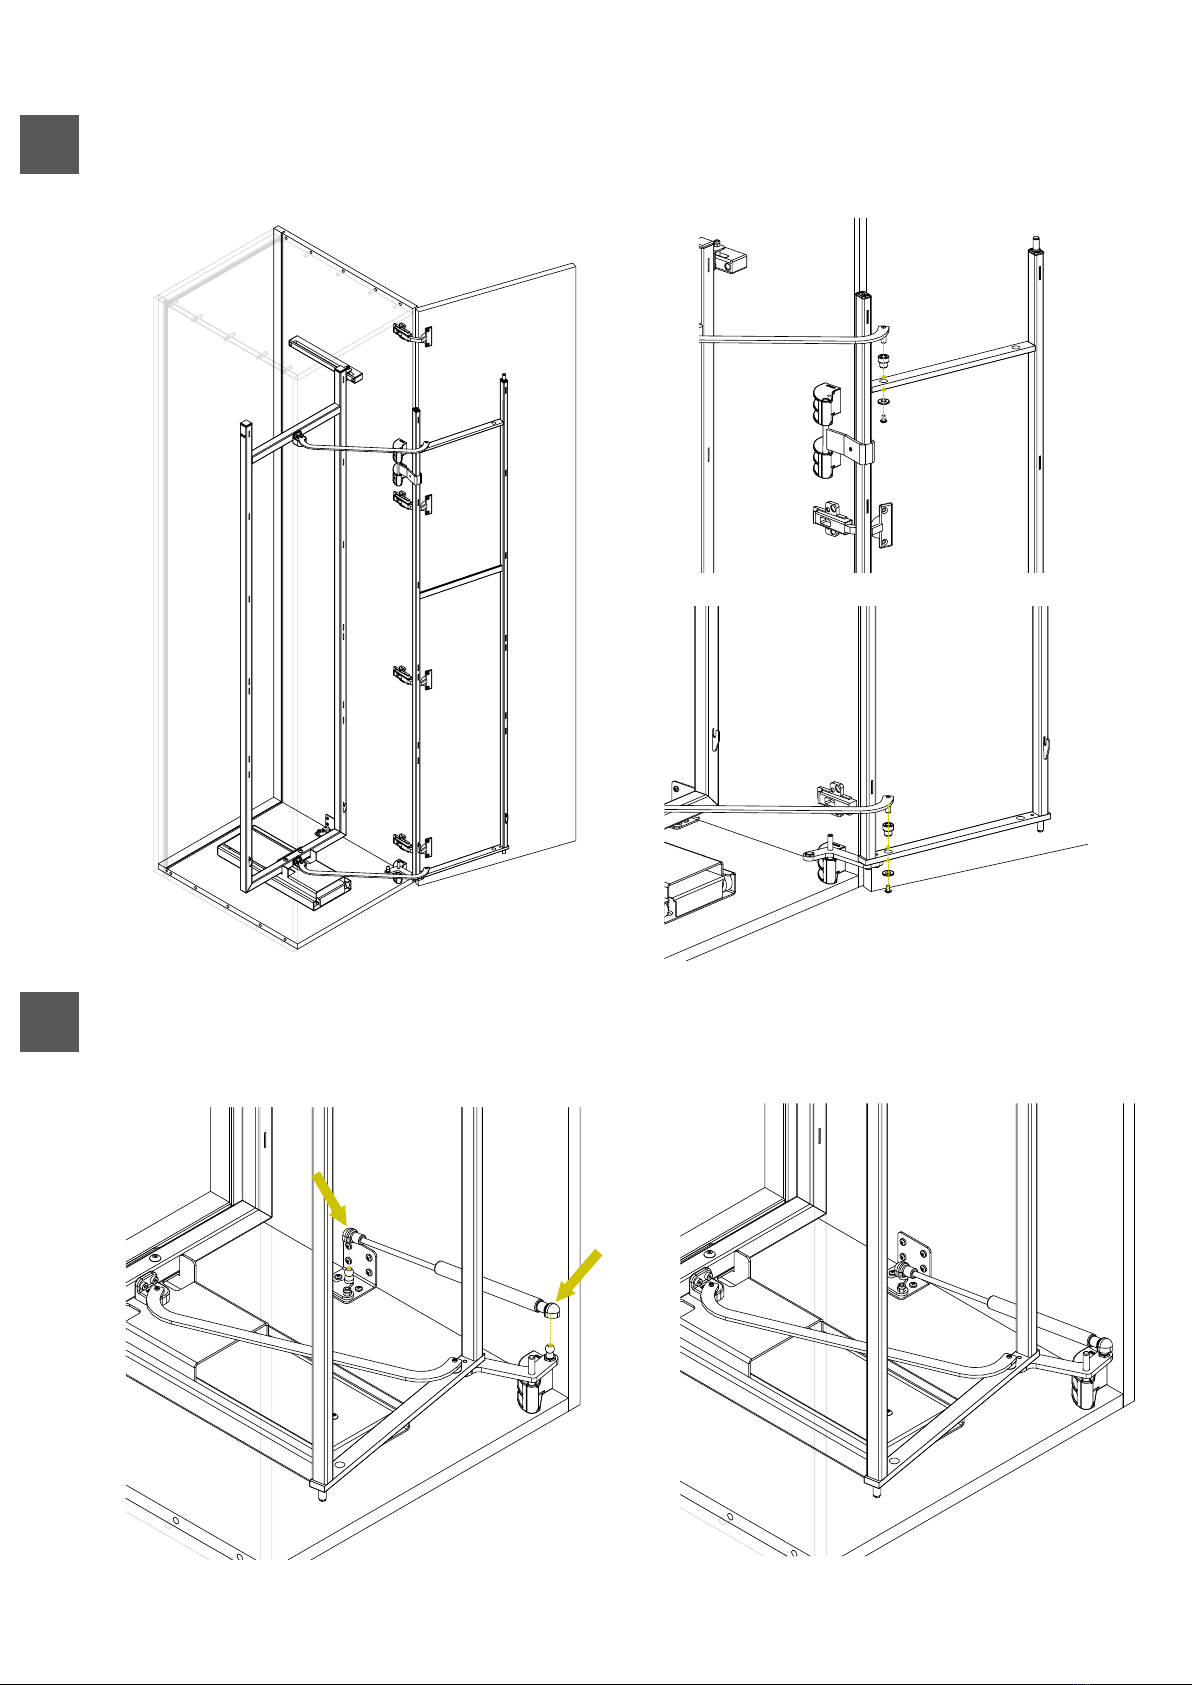
Spostare il tappo con perno M e lo snodo L come fig 1. Avvitare il piastrino con il
perno nell’apposito lato del telaio posteriore A, fig 2.
Move the cap with the pin M and the junction L, as in picture 1. Screw the small
plate along with the pin into the specific side of the back frame, picture 2.
Déplacez le bouchon avec le pivot M et le jonction L comme dans la photo 1.
Vissez la plaque avec le pivot dans le côté approprié du cadre postérieur, photo 2.
Mover la tapa con perno M y la juntura L como indicado en la imagen. Atornillar
la pequeña placa con el perno en el lado específico de la estructura posterior A,
imagen 2.
LHRH
FIG 1 FIG 1 FIG 2
1
N°2 M5x14
L
Z X Y
ART 230A L 410 144
ART 230A L 460 169
ART 230A L 560 219
ART 230B L 410 144
ART 230B L 460 169
ART 230B L 560 219
MIN
475
1645
1069
Avvitare il kit guida C, il supporto in plastica E, il kit soft D e la guida in plastica
G rispettando le quote.
Screw the Slide kit C, the plastic support E, the soft kit D and the plastic slide
G respecting the quotes.
Vissez le kit de glissières C, le support en plastique E, le kit amortisseur D et la
glissière en plastique G en respectant les dimensions.
Atornillar el kit de guías C, el soporte de plástico E, el kit soft D y la guía de
plástico G respetando las medidas.
32
19
91,50
30 30
80
30
30
X
91,50
23 334
9
300
Z
300
9
32
17 20
Y
209251
14380
36
14
17
10
10
17
10
17
14
14
36
36
DISTANZIALE PRE-FORATURA
DRILLING TEMPLATE
GABARIT À PERÇAGE
PLANTILLA DE PERFORACIÓN
2
N°20 M4x16
O
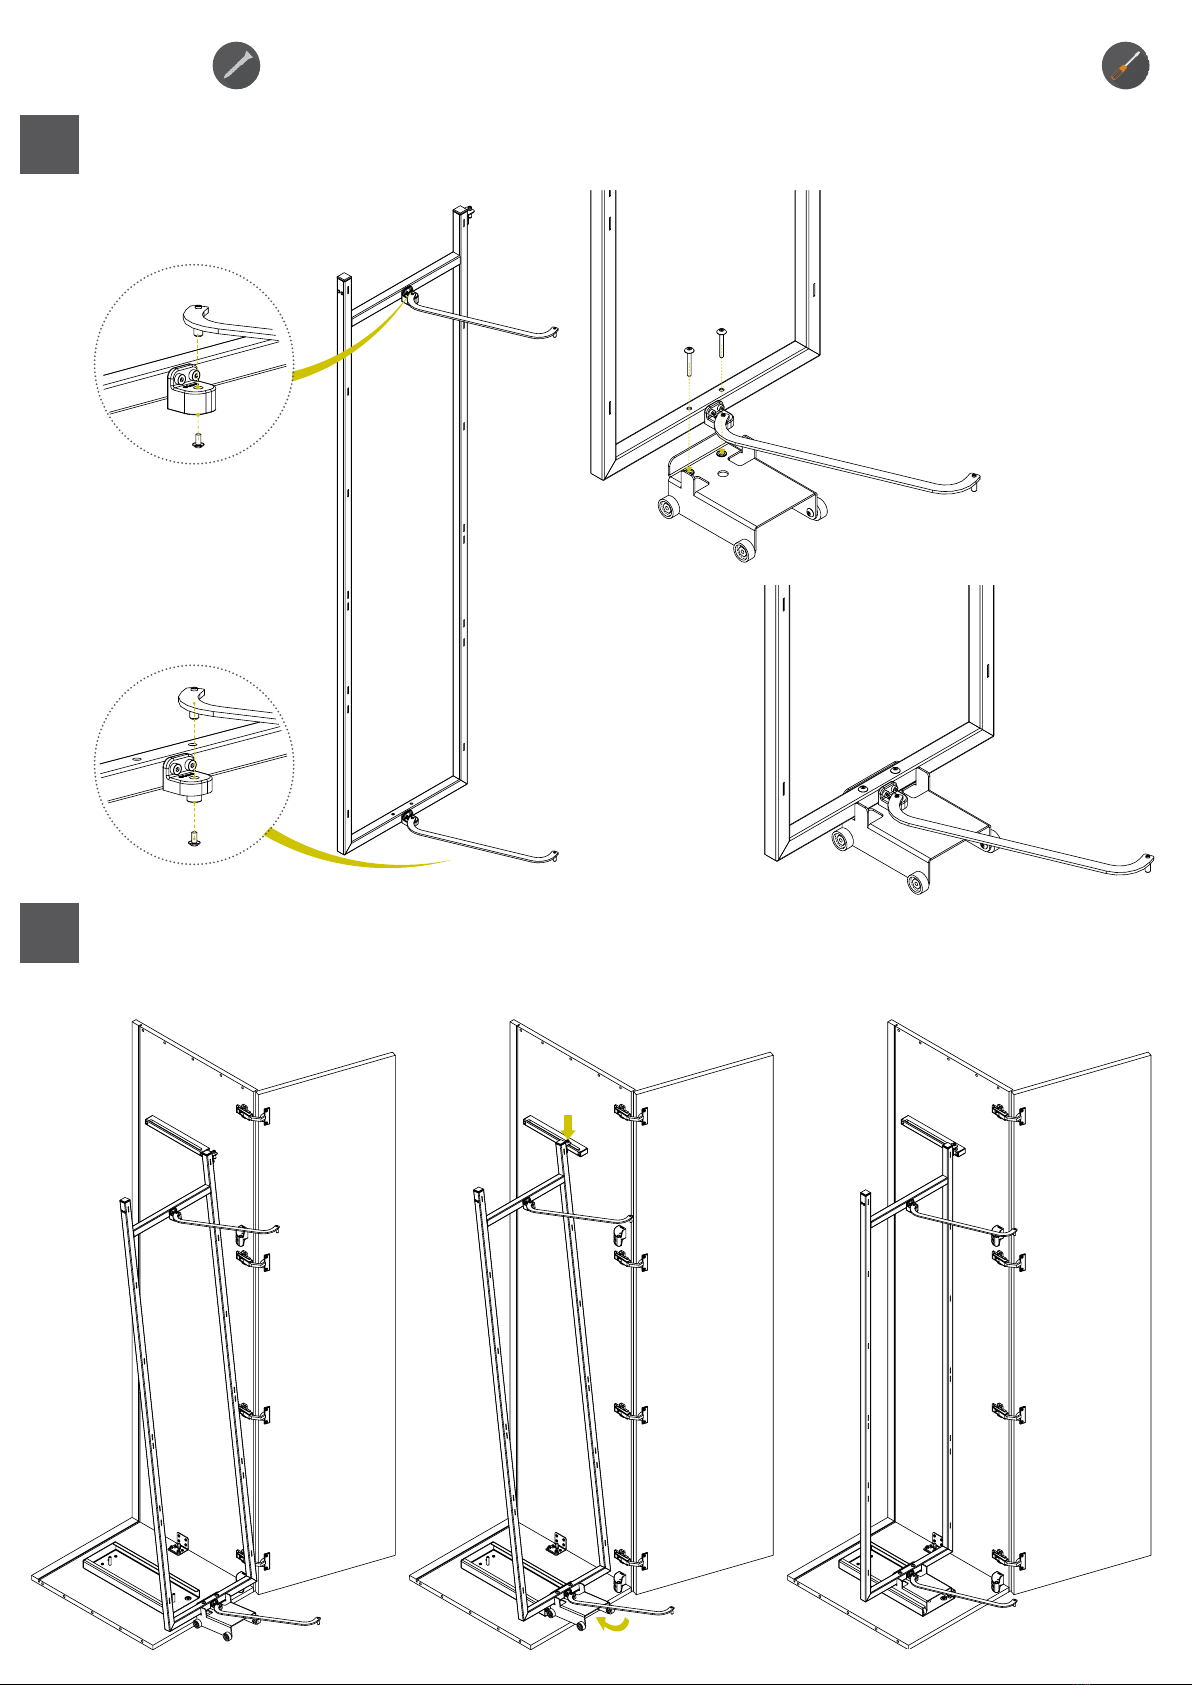
Avvitare il telaio posteriore A nel set guida C e fissare le leve di trascinamento I.
Screw the back frame A into the slide kit C and fix the drag levers I.
Vissez le cadre postérieur A dans le kit de glissières C et fixez les leviers à traîner I.
Atornillar la estructura posterior A en el kit de guías C y fijar las palancas de arrastre.
Inserire il telaio posteriore A all’interno della guida in plastica G e la guida infe-
riore C.
Put the back frame A into the plastic slide G and the lower slide C.
Inserez le cadre postérieur A dans la glissière en plastique G et la glissière
inférieure C.
Colocar la estructura posterior A sobre la guía de plástico G y la guía inferior C.
3
N°2 M6x40
4

Bloccare il cover copri guida con viti premontate.
Assemble the slide cover by using provided screws.
Bloquer la couvercle de la glissière avec les vis fournies.
Montar la tapa de la guía con los tornillos provistos.
5
N°2 M5x14
N°4 4x16
Inserire il telaio anteriore B nei supporti in plastica E premontati e fissare il sup-
porto in plastica E.
Put the front frame B into the pre-assembled plastic supports E and then fix
them.
Insérez le cadre antérieur B dans les supports en plastique E et fixez-les.
Poner la estructura delantera B en los soportes de plástico E y fijarlos.
6
Fissare le leve di trascinamento I con l’apposita ferramenta pre-montata.
Fix the drag levers I with the specific provided hardware.
Fixez les leviers à traîner I avec la ferrure fournie.
Fijar las palancas de arrastre I con la tornillería provistas.
Assemblare il soft D con il meccanismo chiuso.
Assemble the soft kit D when the mechanism is closed.
Montez le kit amortisseur D quand le mécanisme est fermé.
Montar el kit soft D cuando el mecanismo esté cerrado.
FIG 3
7
8
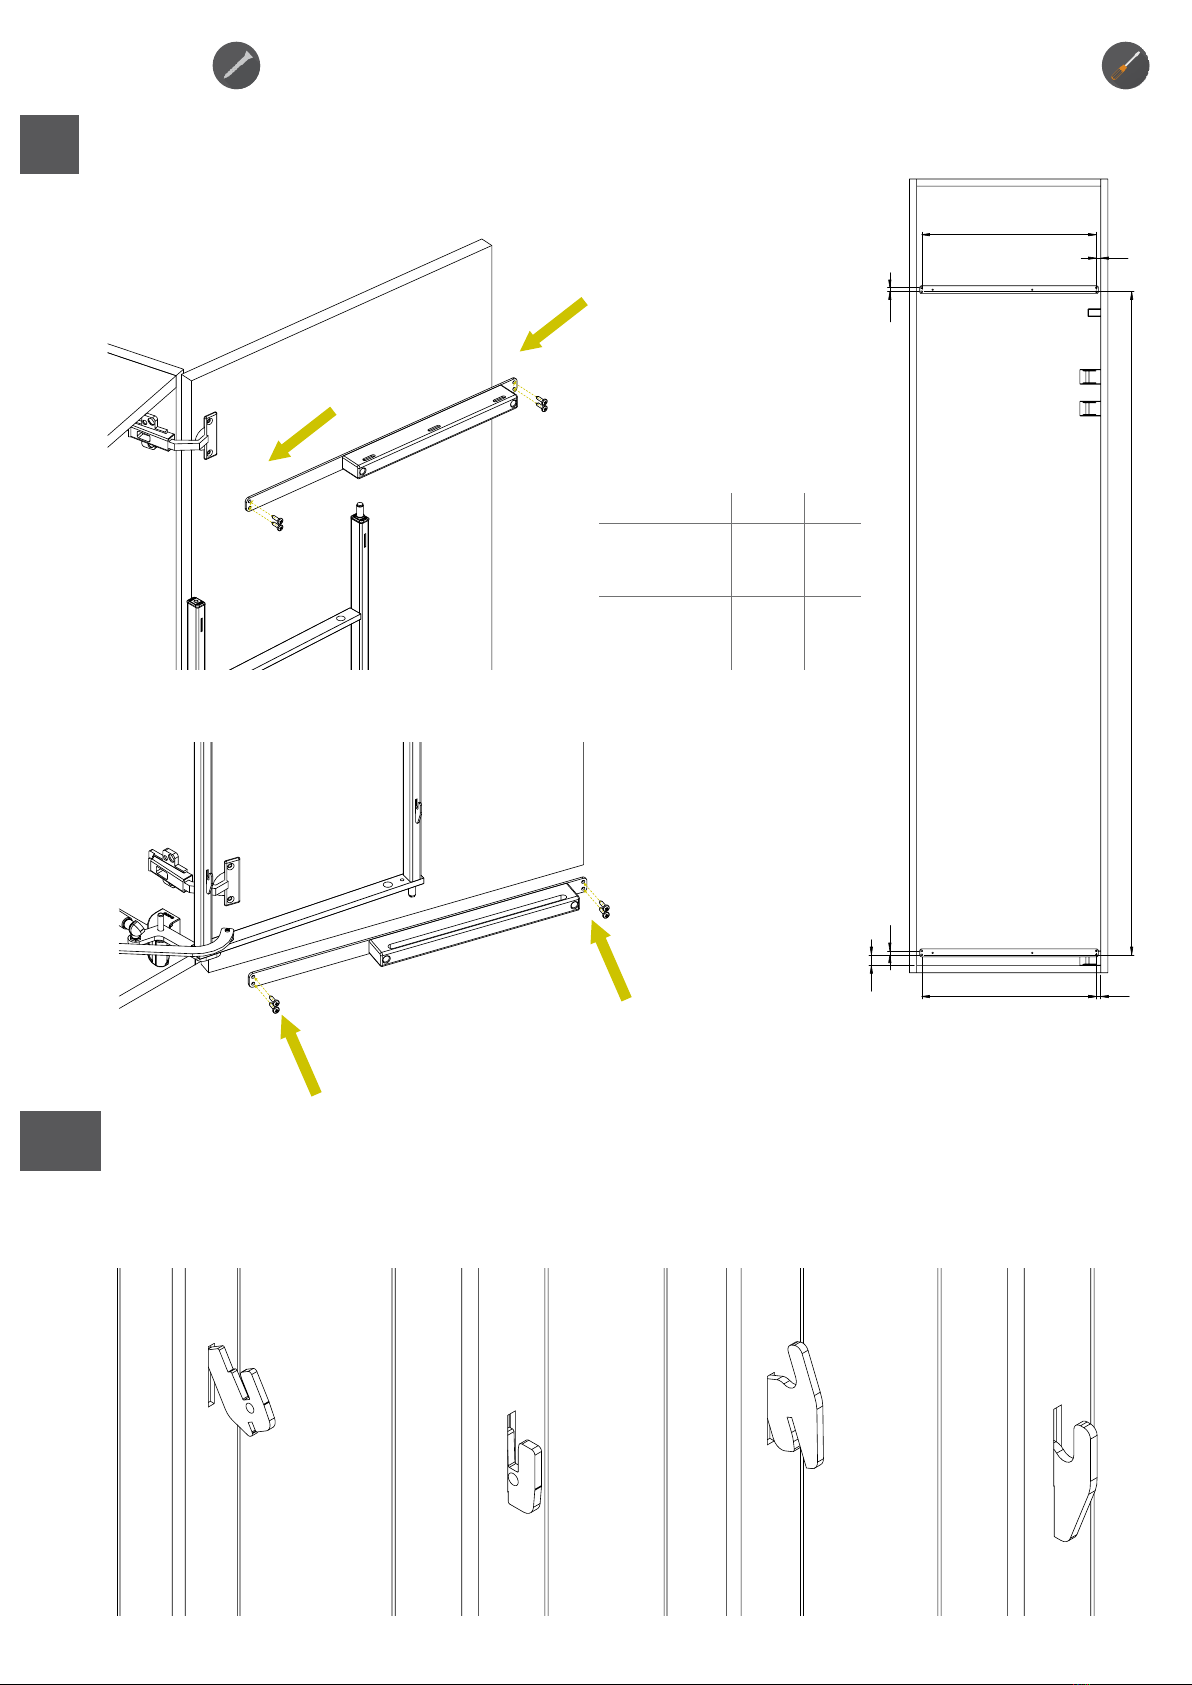
Fissare la staffa guida antina H rispettando le quote.
Fix the door slide bracket H respecting the quotes.
Fissez la patte pour la glissière de la porte H en respectant les dimensions.
Fijar el soporte para la guía de la puerta H respetando las medidas.
10
K
10
27
K
Z
10
10
9
N°8 M4x16
K Z
ART 230A L.410 390
Art 230A L 460 440
Art 230A L 560 540
Art 230B L 410 390
Art 230B L 460 440
ART 230B L 560 540
1660
1084
Montare i ganci N ed i cesti P.
Assemble the basket hooks N and the baskets P.
Montez les crochets du panier N et les paniers P.
Montar los ganchos para cestos N y también los cestos P.
10a
La Sige Spa si riserva il diritto di apportare variazioni senza preavviso - Sige Spa has the right to make changes on it without notice
Sige Spa a le droit d’apporter des variations sans préavis - El Sige Spa se reserva el derecho de realizar cambios sin previo aviso.
10b
B1
B2
8
KG
8
KG
8
KG
8
KG
8
KG
8
KG
4,5
KG
4,5
KG
4,5
KG
4,5
KG
4,5
KG
4,5
KG
FIG 1: ART 230A
Z
8
KG
8
KG
8
KG
8
KG
4,5
KG
4,5
KG
4,5
KG
4,5
KG
FIG 2: ART 230B
Z
Z
ART 230A MIN 1800
ART 230B MIN 1215
Es. fig 1 e fig 2 Art 230 Green Line, alto e basso.
Ex. pic 1 and pic 2 Art 230 Green Line, high and low.
Ex. fig 1 et fig 2 Art 230 Green Line, haut et bas
Ej. fig 1 y fig 2 Art 230 Green Line alto y bajo.
This manual suits for next models
4
Table of contents
Other SIGE Kitchen & Bath Fixture manuals


Popular Kitchen & Bath Fixture manuals by other brands


Alpha Bidet
Alpha Bidet Alpha One user manual

InSinkErator
InSinkErator H/HC3300 Installation, care & use

Clou
Clou Xo type 1 installation instructions

Kohler
Kohler Contra 26448T-4 installation instructions

Grohe
Grohe Bridgeford 20 158 manual

Hans Grohe
Hans Grohe Croma Select S 180 Showerpipe EcoSmart... Instructions for use and assembly instructions