
SICK GRL18 Series User manual

GRL18
Operating Instruction
DE/EN/FR/PT/IT/ES/ZH/JA/RU
8016955.16B5
OPERATING INSTRUCTION

Described product
GR18
GRL18
Manufacturer
SICK AG
Erwin-Sick-Str. 1
79183 Waldkirch
Germany
Production location
Legal information
This work is protected by copyright. Any rights derived from the copyright shall be
reserved for SICK AG. Reproduction of this document or parts of this document is only
permissible within the limits of the legal determination of Copyright Law. Any modifica‐
tion, abridgment or translation of this document is prohibited without the express writ‐
ten permission of SICK AG.
The trademarks stated in this document are the property of their respective owner.
© SICK AG. All rights reserved.
Original document
This document is an original document of SICK AG.
2006/42/EC
NO
SAFETY
8016953.16B5 | SICK
Subject to change without notice 1

Photoelectric retro-reflective sensor
Operating instructions
2 Safety notes
■Read the operating instructions before commissioning.
■Connection, mounting, and setting may only be performed by trained specialists.
■Not a safety component in accordance with the EU Machinery Directive. Only for use in appli‐
cations in accordance with NFPA 79. UL-listed adapters with connecting cables are available.
Enclosure type 1
■When commissioning, protect the device from moisture and contamination.
■These operating instructions contain information required during the life cycle of the sensor.
3 Correct use
The GRL18 is an opto-electronic photoelectric retro-reflective sensor (referred to as "sensor" in
the following) for the optical, non-contact detection of objects, animals, and persons. A reflector
is required for this product to function. If the product is used for any other purpose or modified in
any way, any warranty claim against SICK AG shall become void.
Image 1: GRL18-xxxx2
Image 2: GRL18-xxxx7
Irrtuemer | SICK 1
8016955.16B5

4 Commissioning
1 Adjust the distance between the sensor and the reflector according to the corresponding
diagram (x = sensing range, y = operating reserve).
Image 3: H
2 Mount the sensor and the reflector using suitable mounting brackets (see the SICK range of
accessories). Align the sensor and reflector with each other.
Observe the maximum permissible tightening torque of the sensor of 2.0 Nm for metal/0.9
Nm for plastic [K].
Image: K: GRL18-x24x7
Image: K: GRL18-x24x2
Commissioning
2| SICK Irrtuemer
8016955.16B5

3 The sensors must be connected in a voltage-free state (VS = 0 V). The information in the gra‐
phics [B] must be observed, depending on the type of connection:
– Male connector connection: pin assignment
– Cable: core color
Image: B: GRL18-x24xx
Image: B: GRL18-x11xx
Only apply voltage/switch on the power supply (VS > 0 V) once all electrical connections have
been completed. The green LED indicator lights up on the sensor.
Explanations of the connection diagram (Graphic B):
Switching outputs Q and /Q (according to Graphic B):
GRL18-P (PNP: load -> M)
GRL18-N (NPN: load -> L+)
4 Align the sensor with a suitable reflector. Select the position so that the red emitted light
beam hits the center of the reflector. The sensor must have a clear view of the reflector, with
no object in the path of the beam [see E]. You must ensure that the optical openings of the
sensor and reflector are completely clear.
Image 4: E
5 Sensor with potentiometer:
The sensitivity is adjusted with the potentiometer (type: 270°). Clockwise rotation: operating
reserve increased; counterclockwise rotation: operating reserve reduced. We recommend
setting the potentiometer to "Maximum." A lower operating reserve may be necessary for
depolarizing surfaces.
The sensor is adjusted and ready for operation. Refer to Graphics C and G to check the func‐
tion. If the switching output fails to behave in accordance with Graphic C, check application
conditions. See section Fault diagnosis.
Commissioning
Irrtuemer | SICK 3
8016955.16B5
Image 5: C
Image 6: G
6 Fault diagnosis
Table 7 indicates which measures are to be taken if the sensor stops working.
7 Tab_Fault diagnosis
LED indicator/fault pattern /
LED indicator/fault pattern
Cause /
Cause
Measures /
Measures
Green LED does not light up /
Green LED does not light up
No voltage or voltage below the
limit values /
No voltage or voltage below the
limit values
Check the power supply, check all
electrical connections (cables and
plug connections) /
Check the power supply, check all
electrical connections (cables and
plug connections)
Green LED does not light up /
Green LED does not light up
Voltage interruptions /
Voltage interruptions
Ensure there is a stable power
supply without interruptions /
Ensure there is a stable power
supply without interruptions
Green LED does not light up /
Green LED does not light up
Sensor is faulty /
Sensor is faulty
If the power supply is OK, replace
the sensor /
If the power supply is OK, replace
the sensor
4| SICK Irrtuemer
8016955.16B5
LED indicator/fault pattern /
LED indicator/fault pattern
Cause /
Cause
Measures /
Measures
Yellow LED flashes /
Yellow LED flashes
Sensor is still ready for operation,
but the operating conditions are
not ideal /
Sensor is still ready for operation,
but the operating conditions are
not ideal
Check the operating conditions:
Fully align the beam of light (light
spot) with the reflector / Clean the
optical surfaces (sensor and
reflector) / Readjust the sensiti‐
vity (potentiometer) / If the poten‐
tiometer is set to the max. sensing
range: Reduce the distance bet‐
ween the sensor and the reflector,
and check the reflector type
against Graphic E / Reflector is
not suitable for the application in
question (we recommend only
using SICK reflectors) / Check
sensing range and adjust if neces‐
sary, see Graphic E / Distance
between the sensor and the
reflector is too long /
Check the operating conditions:
Fully align the beam of light (light
spot) with the reflector / Clean
the optical surfaces (sensor and
reflector) / Readjust the sensiti‐
vity (potentiometer) / If the poten‐
tiometer is set to the max. sensing
range: Reduce the distance bet‐
ween the sensor and the reflector,
and check the reflector type
against Graphic E / Reflector is
not suitable for the application in
question (we recommend only
using SICK reflectors) / Check
sensing range and adjust if
necessary, see Graphic E / Dis‐
tance between the sensor and the
reflector is too long
Signal interruptions when object is
detected /
Signal interruptions when object is
detected
Depolarizing property of the
object surface (e.g., tape), reflec‐
tion /
Depolarizing property of the
object surface (e.g., tape), reflec‐
tion
Reduce sensitivity or change the
position of the sensor /
Reduce sensitivity or change the
position of the sensor
8 Disassembly and disposal
The sensor must be disposed of according to the applicable country-specific regulations. Efforts
should be made during the disposal process to recycle the constituent materials (particularly pre‐
cious metals).
9 Maintenance
SICK sensors are maintenance-free.
We recommend doing the following regularly:
1. Clean the external lens surfaces
2. Check the screw connections and plug-in connections
No modifications may be made to devices.
Subject to change without notice. Specified product properties and technical data are not written
guarantees.
Disassembly and disposal
Irrtuemer | SICK 5
8016955.16B5

Reflexions-Lichtschranke
Betriebsanleitung
12 Sicherheitshinweise
■Vor der Inbetriebnahme die Betriebsanleitung lesen.
■Anschluss, Montage und Einstellung nur durch Fachpersonal.
■Kein Sicherheitsbauteil gemäß EU-Maschinenrichtlinie. Nur zur Verwendung in Anwendungen
gemäß NFPA 79. Von UL gelistete Adapter mit Anschlusskabeln sind verfügbar. Enclosure
type 1
■Gerät bei Inbetriebnahme vor Feuchte und Verunreinigung schützen.
■Diese Betriebsanleitung enthält Informationen, die während des Lebenszyklus des Sensors
notwendig sind.
13 Bestimmungsgemäße Verwendung
Die GRL18 ist eine optoelektronische Reflexions-Lichtschranke (im Folgenden Sensor genannt)
und wird zum optischen, berührungslosen Erfassen von Sachen, Tieren und Personen eingesetzt.
Zur Funktion wird ein Reflektor benötigt. Bei jeder anderen Verwendung und bei Veränderungen
am Produkt verfällt jeglicher Gewährleistungsanspruch gegenüber der SICK AG.
Abb. 7: GRL18-xxxx2
6| SICK Irrtuemer
8016955.16B5
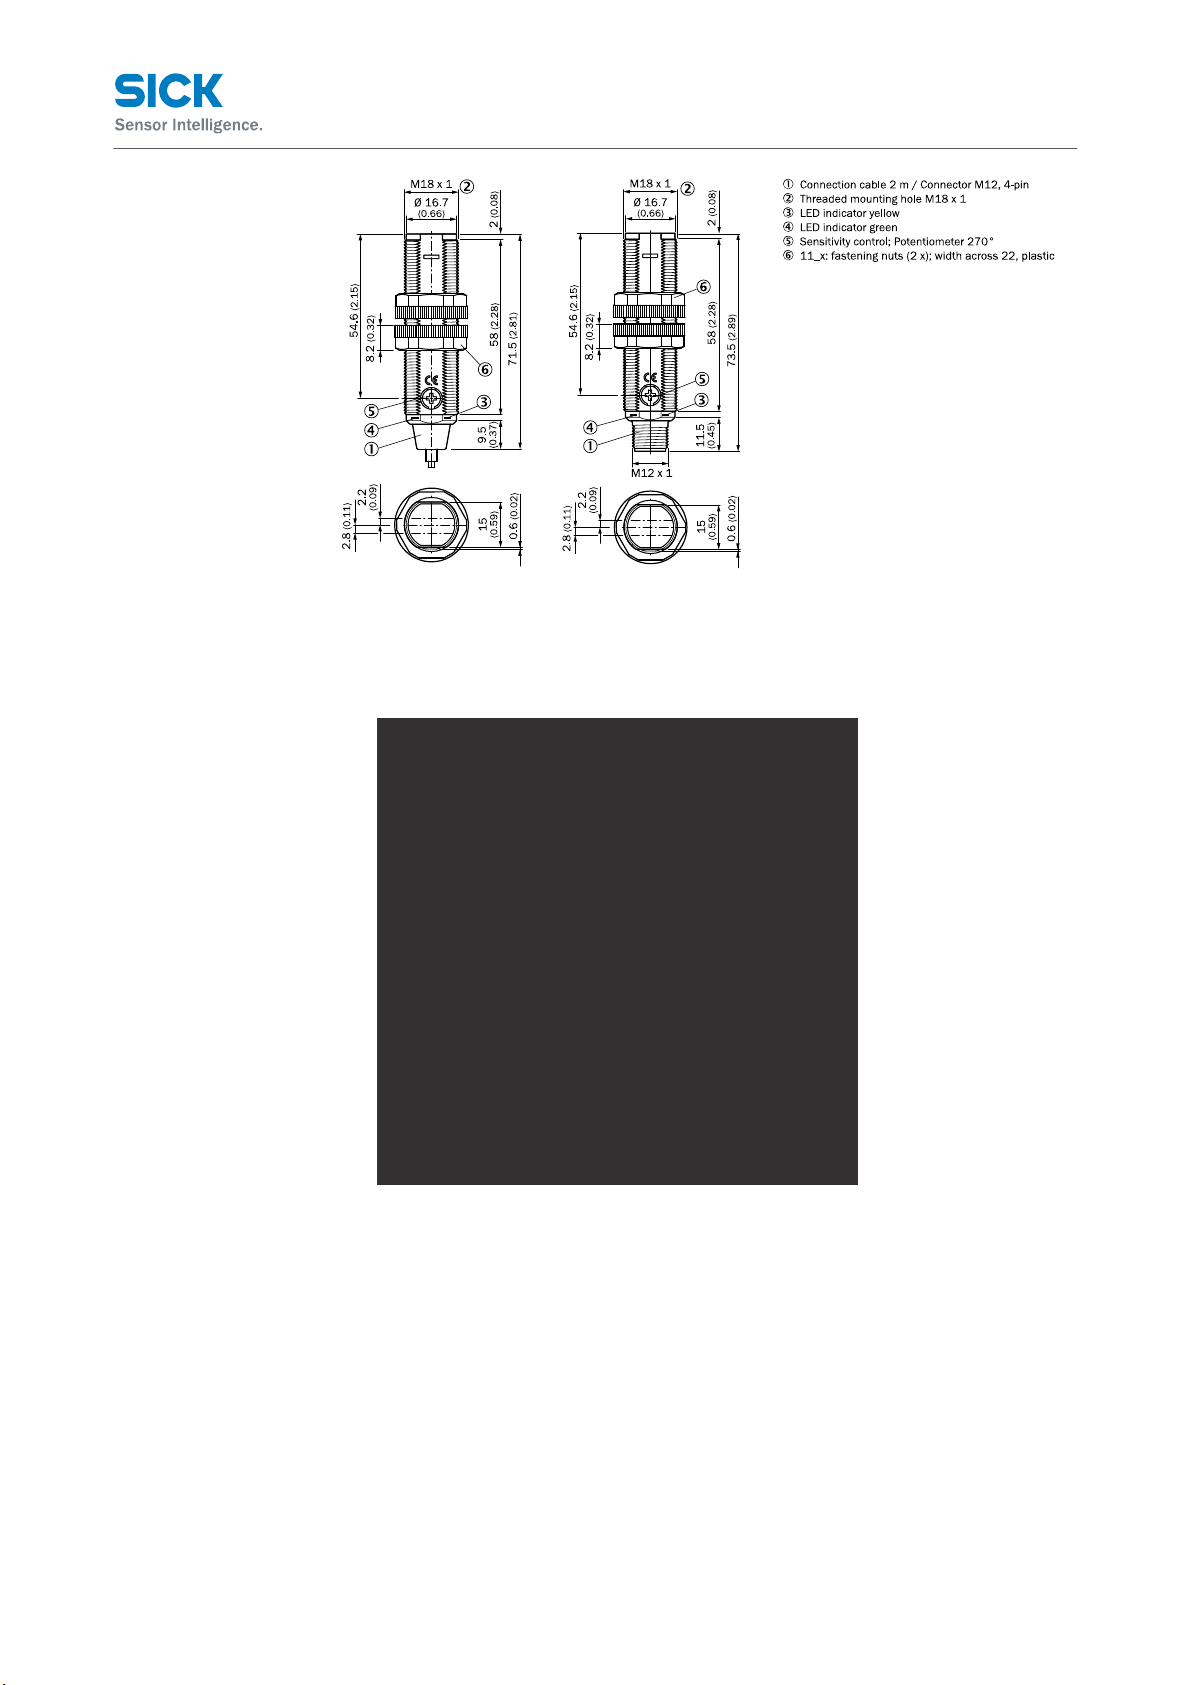
Abb. 8: GRL18-xxxx7
14 Inbetriebnahme
1 Distanz zwischen Sensor und Reflektor mit dem zugehörigen Diagramm [vgl. H] abgleichen
(x = Schaltabstand, y = Funktionsreserve).
Abb. 9: H
2 Sensor und Reflektor an geeignete Befestigungswinkel montieren (siehe SICK-Zubehör-Pro‐
gramm). Sensor und Reflektor zueinander ausrichten.
Maximal zulässiges Anzugsdrehmoment des Sensors von 2,0 Nm für Metall / 0,9 Nm für
Kunststoff beachten [vgl. K].
Inbetriebnahme
Irrtuemer | SICK 7
8016955.16B5

Abb.: K: GRL18-x24x7
Abb.: K: GRL18-x24x2
3 Anschluss der Sensoren muss spannungsfrei (VS = 0 V) erfolgen. Je nach Anschlussart sind
die Informationen in den Grafiken [vgl. B] zu beachten:
– Steckeranschluss: Pinbelegung
– Leitung: Adernfarbe
Abb.: B: GRL18-x24xx
Abb.: B: GRL18-x11xx
Erst nach Anschluss aller elektrischen Verbindungen die Spannungsversorgung (VS > 0 V)
anlegen bzw. einschalten. Am Sensor leuchtet die grüne Anzeige-LED.
Erläuterungen zum Anschlussschema (Grafik B):
Schaltausgänge Q bzw. /Q (gemäß Grafik B):
GRL18-P (PNP: Last -> M)
GRL18-N (NPN: Last -> L+)
Inbetriebnahme
8| SICK Irrtuemer
8016955.16B5
Other manuals for GRL18 Series
1
This manual suits for next models
3
Table of contents
Languages:
Other SICK Accessories manuals


SICK
SICK GLD20 User manual

SICK
SICK VICOTEC320 Series User manual

SICK
SICK GLS611 User manual

SICK
SICK Lector64x Flex User manual

SICK
SICK deTec4 Core User manual

SICK
SICK deTem4 Core Ex User manual

SICK
SICK WLG16 Bluetooth User manual

SICK
SICK TiM4 Series User manual

SICK
SICK WT34 Series User manual

SICK
SICK TiM35x User manual













