SEWOO LK-B30 User manual

B30 Rev. B 06/13
SEWOO TECH CO.,LTD.
374-2, Gajang-dong, Osan-si, Gyeonggi-do, 447-210, Korea
TEL : +82-31-459-8200 FAX : +82-31-459-8880
www.miniprinter.com
All specifications are subject to change without notice
4” DESKTOP LABEL PRINTER
MODEL : LK-B30

1
Table of Contents
1. SAFETY CAUTION
2
2. UNPACKING
4
3. PRINTER IDENTIFICATION
5
4. CONNECTING POWER SUPPLY
7
5. HOOKING UP THE PRINTER AND COMPUTER
8
6. LOADING THE MEDIA
9
7. THE TREATMENT WHEN YOU RUN SHORT OF PAPER AND ENCOUN-
11
8. SETTING UP THE SENSORS
12
9. SELF TEST
13
10. AUTO SETUP FOR LABEL SIZE
14
11. PAUSE AND CANCEL FUNCTION
15
12. PRINTER CLEANING
16
13. CONNECTOR
17
14. STANDARD ROLL MEDIA SPECIFICATION
19
15. STANDARD LABEL SPECIFICATION
20
16. LABEL SPECIFICATION WITH THROUGH-HOLE
21
17. LABEL WITH BLACK MARK
22
18. CONTINUOUS STOCK SPECIFICATION
23
19. SPECIFICATIONS
24
20. COMMAND LIST
26

23
For higher reliability and safety, consider the following precautionary measures.
Read and follow the instructions carefully before running of the product.
1. Safety Caution
Indication
Prohibition Must follow
Do not disassemble Unplug the power from
the outlet
Grounding to prevent
electric shock
Do not handle the product
with wet hands
WARNING
WARNING
WARNING
Failure to follow these instructions could result in fire, electric shock,
or other injuries, or property dam age
Failure to follow these instructions could result in fire, electric shock,
or other injuries, or property dam age
Failure to follow these instructions could result in fire, electric shock,
or other injuries, or property dam age
(Potential risk of electric shock or fire) (Potential risk of electric shock or fire)
(Potential risk of electric shock or fire)(Potential risk of electric shock or fire)
Do not pull or touch the power plug
with wet hands.
Do not bend the wire and do not allow
the wire to be pressed by heavy object.
If a power plug is broken or a plug is cut or
worn, do not use it.
Do not overload the power plug into
one outlet.
(Turn off the power at installation,
transportation, wiring and inspection.)
(Potential risk unit malfunction, electric
shock or fire. When the product needs
to be repaired, please contact in place
where you ordered.inspection.)
Do not pull out the power plug to turn
off the product.
Do not disassemble, repair or modify
the product.
Dealer
(You may get hurt and it can be broken
when it falls)
(Potential risk of fire or unit malfunction)
(Potential risk of fire or unit malfunction)
(Potential risk of discoloration or
electric shock)
Do not install the product in uneven
or inclined surface.
If the product that needs to be repaired,
please contact in place where you
ordered.
Please do not give excessive shock.
Keep product away from the water
and other material.

45
2. Unpacking
Printer
Power Cord(1EA) Power supply
CD (Manual and Software) Quick Manual
Interface cable (selected optionally)
Paper Spindle
3. Printer identification
Notch Sensor
Black Mark Sensor
Button
Interface Connectors
Power Connectors
Paper width Guide
Upper Cover Knob
Power Switch
Printer Head

67
Open the upper cover by pushing the knob in the
direction of the arrow.
Make sure to be careful of the HOT head after
using long time.
Opening the printer
Please make sure you hear the closing sound of the upper cover.
**If the cover is not shut down completely, the printer may not work properly**
1 2
34
Please check the specification of the AC power
cord if it is correct with your power system.
Turn off the power of the printer and connect
the power supply to the printer as shown above.
Connect the AC power cord to the power supply Insert a plug into the electrical outlet
4. Connecting power supply
220VAC
115VAC
Power Connectors

89
After making sure the printer is turned off, connect the printer to the PC.
5. Hooking up the printer and computer
USB
-Computer-
-Printer-
Serial
Parallel
1 2
34
Turn off the printer and open the upper cover by
pushing the knob in the direction of the arrow
Open the paper width guides by pushing them to the
right & Left sides.
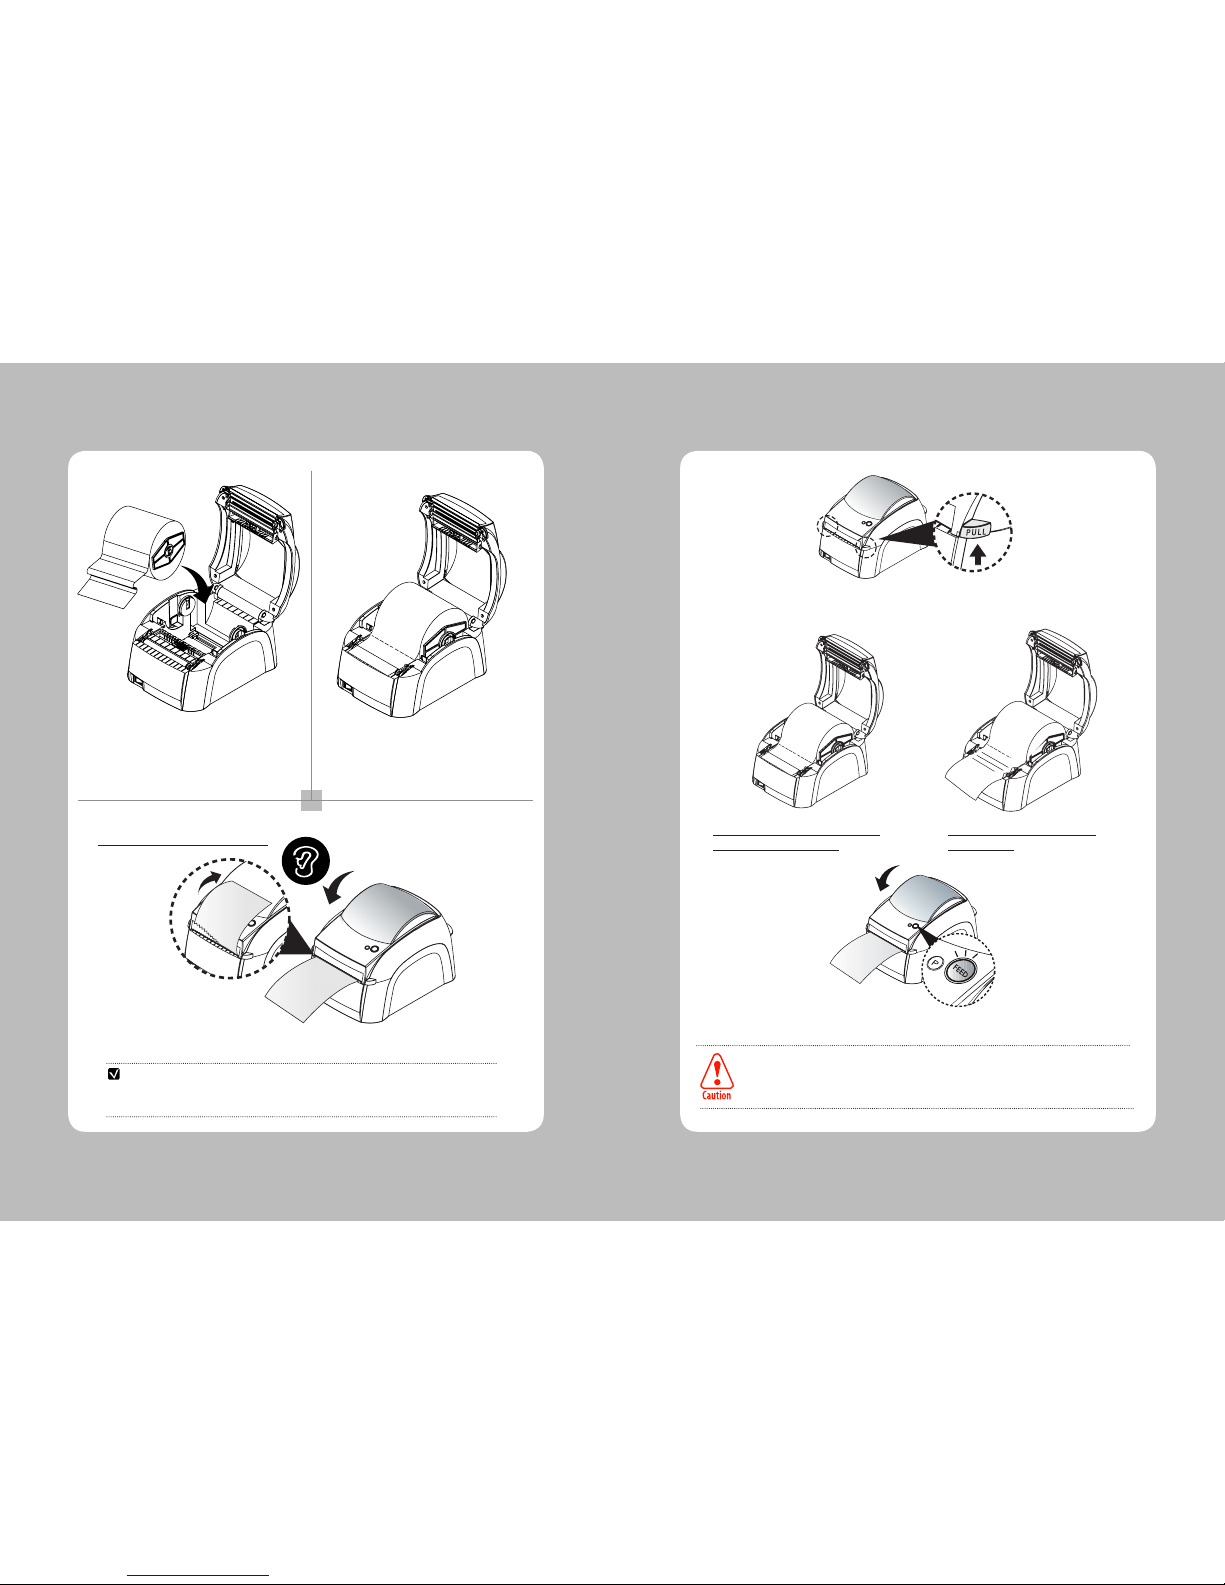
6. Loading the media
Please open the upper cover as shown above
Insert the roll paper to the paper spindle as shown in
the picture.
10 11
5 6
7
Adjust the paper width guide to meet the
paper width
Insert the paper roll into the printer
Close the upper cover completely and make sure you hear the closing sound.
Paper xing tap is only for 1 inch core roll paper and fan-fold paper.
For 1.5” core roll paper, mount it to the label paper guide directly without using paper xing tap.
NOTE
**Please cut the paper in upper direction**
7.
The treatment when you run short of paper and
encounter cutter jam problem
While you are printing with continuous media, please press PULL lever to the direction of the arrow.
**Installation of the new paper when
the printer is short of it **
After the treatment has been done as picture above, the printer function normally once you press FEED button.
When the power is on, the ordered data will be printed without any data lost after installation of the
new paper roll or treatment for paper Jam.
However, if these action has been done in the case the power is off, there can be some data lost since
the printer buffer will not save them while the printer power is off.
**Remove of the paper seized by
paper jam**

12 13
8. Setting up the sensors
1 2
3
Notch SensorBlack Mark Sensor
Set Black Mark Sensor right to the size of roll paper Locate notch sensor on the same number point- as the
black mark sensor is indicating on.
Black Mark Sensor and Notch sensor must always
point to the same number
If the thickness of paper with black mark
is less than 0.1mm, it is recommended
setting the black mark sensor and gap
sensor to different location (number)
each other.
**8 is the initialization number for sensor of the product.**
1 2
3
9. Self Test
Turn off the printer
Press and hold the feed button while turning on
the printer with power switch
The printer prints information on the printer
configuration and quality of the printing
Note
Power switch sig
1 2
3

14 15
1 2
3
10. Auto setup for label size
Turn off the printer While you are pressing and holding ‘P’ button,
turn off the power of printer.
Printer sensor detects the size of the label, issuing the blank label.
1 2
3
**
Auto setup will not be applied on the continuous stock
**
Note
Power switch sig
1 2
3
11. Pause and cancel function
When you would pause on the printing process, press the ‘P’ key.
When you want cancel the printing, press and hold the “P” key for over 2 seconds.
1
2
**
When you would cancel printing, you should proceed the cancel on your PC at first.
**
Over 2 seconds

16 17
12. Printer cleaning
If the interior of the printer is dusty, printing quality can lowered.
In such a case, follow the instructions below to clean up the printer.
1. Make sure to turn the printer power off prior to cleaning
2. Regarding print head cleaning, as the print head sets very hot during printing, turn off the
printer power and wait approximately 10 minute before commencement.
3. When cleaning the print head, take care not to touch the heated portion of the print head.
The print head subject to be damaged by static electricity.
4. Take care not to allow the print head to become scratched and /or damaged in any way.
Preventing Overheating
To prevent the motor from overheating, continuous driving of the printer should be 1.5 m
or less in print length. Set the pause time for 30 seconds or more after driving the printer.
NOTE
1. Use an applicator swab moistened with an alcohol solution to clean the print head and
remove any dusts.
2. Once the cleaning is completed, insert paper roll into the printer few minutes later and
close the printer cover.
13. Connector
Interface Connectors
<USB “ B “ TYPE> <Centronics Parallel>
Standard
<9 Pin Serial>
Other manuals for LK-B30
1
Table of contents
Other SEWOO Label Maker manuals

SEWOO
SEWOO LK-B24 User manual

SEWOO
SEWOO LK-B21R User manual

SEWOO
SEWOO LK-B425 User manual

SEWOO
SEWOO LK-B20 II User manual

SEWOO
SEWOO LK-B425 User manual

SEWOO
SEWOO LK-B40 User manual

SEWOO
SEWOO LK-B30 II User manual

SEWOO
SEWOO LK-B24 User manual

SEWOO
SEWOO LK-B20R User manual

SEWOO
SEWOO LK-B10 User manual


