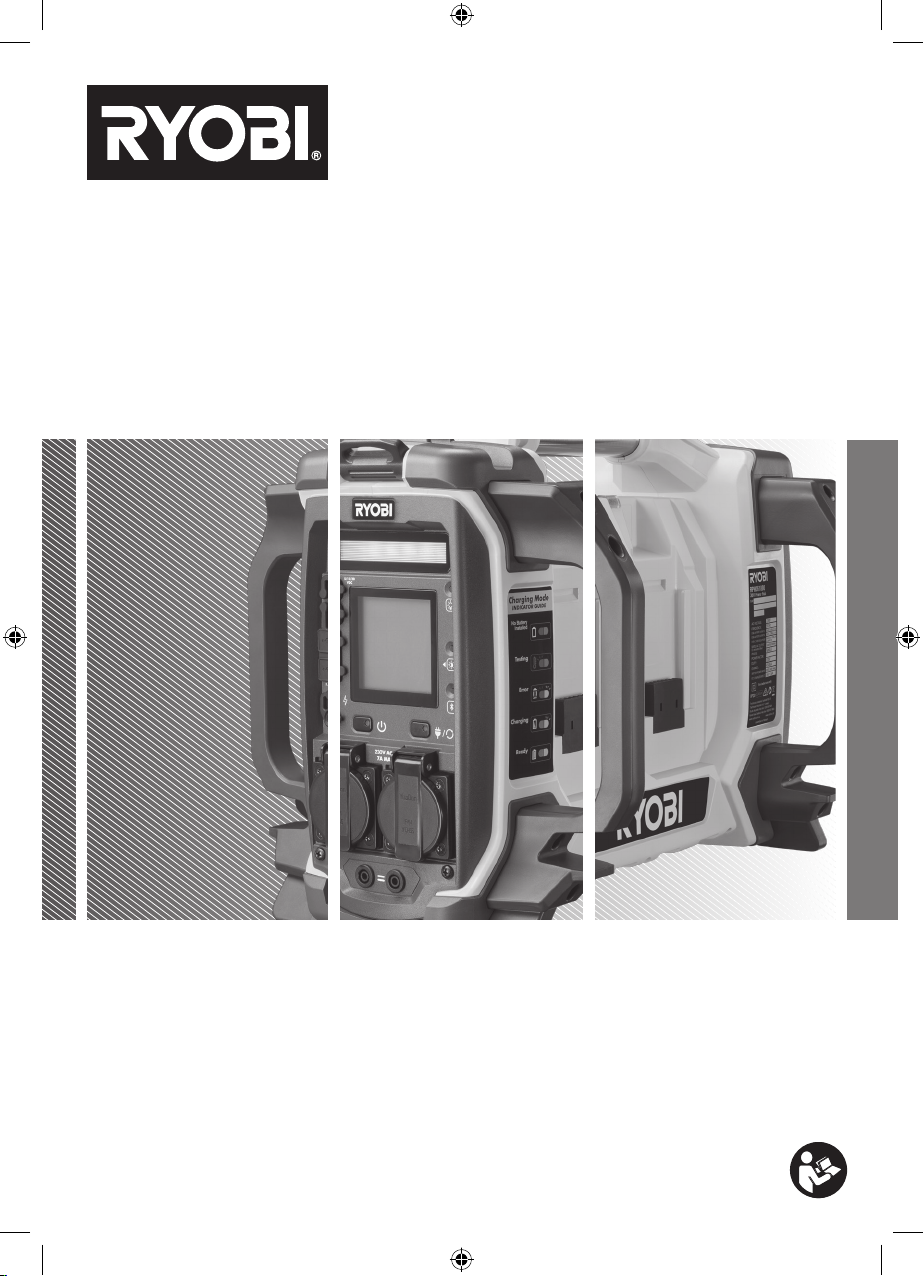
Ryobi RPH361800 User manual

FRONT PAGE
RPH361800

2
Original Instructions
IMPORTANT!
It is essential that you read the instructions in this manual
before assembling, operating, and maintaining the
product.
Subject to technical modication.
Safety, performance, and dependability have been given top
priority in the design of your cordless power hub inverter.
INTENDED USE
The product may be used for the following purposes:
■operating and charging USB-powered devices
■supplying electrical power for operating compatible AC
appliances and devices
The product provides USB A and USB C ports. The main
power button must be on for the USB ports to be active. The
USB A ports supply 5 V d.c. (up to 2.1 A) charging power.
The USB C ports supply 5 V d.c. (up to 3 A), 12 V d.c. (up to
3 A), 20 V d.c (up to 3 A) charging power.
NOTE: The USB-dedicated charging ports provide power
only; they do not provide any communication capabilities.
Suitable USB cables are purchased separately.
The product is intended for indoor use only. Do not use the
product for any other purpose.
There may be regulations, local codes, or ordinances that
apply to the intended use of the product. Consult a qualied
electrician, electrical inspector, or the local agency having
jurisdiction:
■In some areas, power inverters are required to be
registered with local utility companies.
■If the product is used at a construction site, there may be
additional regulations that must be observed.
GENERAL SAFETY WARNINGS
■Save these instructions. Refer to them frequently and
use them to instruct others who may use this product.
If you loan someone the product, loan them these
instructions also.
■The product should be operated only with the battery
packs specified in this manual. When using a battery-
operated product, basic safety precautions should
always be followed to reduce the risk of fire, leaking
batteries, and personal injury.
■Never allow children or people with reduced physical,
sensory, or mental capabilities, or persons who are
not familiar with these instructions to operate, clean,
or maintain the product. Local regulations may restrict
the age of the operator. Children should be adequately
supervised to ensure that they do not play with the
product.
■Stay alert, watch what you are doing, and use common
sense when operating the product. Do not operate the
product while tired, ill, or under the influence of drugs,
alcohol, or medication. A lapse in concentration while
operating the product may result in serious personal injury.
■Do not operate the product in explosive atmospheres, such
as in the presence of flammable liquids, gases, or dust.
■Do not expose the product to rain or wet conditions.
Water entering the product increases the risk of electric
shock.
■Never block the air vents. Blocked vents may cause
overheating. The product automatically turns off when
overheated.
■Keep the product cool. Do not place the product near
heat vents or in direct sunlight.
■Do not use the product if it has been dropped or received
a sharp blow. A damaged power source increases the
risk of fire.
■Do not put foreign objects into the product.
■Do not use any attachments or accessories that are
not recommended by the manufacturer of the product.
The use of an attachment not recommended by the
manufacturer may result in a risk of fire, electric shock,
or injury to persons.
■Operate the product using only the AC power type listed
in the product specifications.
■Do not use the product with electrical cords that are
worn, frayed, bare, or damaged. Do not power devices
with damaged or frayed power cords.
■Do not touch bare wire or receptacles.
■To reduce the risk of damage to the electric plug
and cord, pull by the plug rather than the cord when
disconnecting the charger from the product.
■Use caution when plugging and unplugging other
devices into the product. Do not force plugs into the
product.
■If the product is used in a manner not specified by the
manufacturer, the protection provided by the product
may be impaired.
■Do not overload the product. The product must be used
for powering devices less than the product rating.
■Ensure that the cable size of the extension cord is
capable of carrying the required load. Inadequate cable
size can cause a voltage drop, which can damage the
product and overheat the cord.
■The operating voltage and frequency requirements of all
electronic equipment should be checked before plugging
them into the product. Powering equipment that is not
designed to operate within a ±10% voltage variation and
±3 Hz frequency variation from the product nameplate
ratings may result in damage to the equipment. To avoid
damage, always have an additional load plugged into
the product if solid-state equipment (such as a television
set) is used. A power line conditioner is recommended
for some solid-state applications.
POWER HUB INVERTER SAFETY WARNINGS
■The product is an isolated inverter and has double
insulation construction. It does not use earth connection
for protection.
■Do not power devices that are damaged or with damaged
or frayed power cords.
■Be extra cautious to reduce the risk of dropping a metal
tool onto the product. Dropping a tool onto the product
might cause a spark or short-circuit the battery pack or
other electrical part and may cause an explosion.
■Do not use multiple sockets. Connect only one device
to each AC outlet.
■Do not wire the product into an AC distribution circuit.
■Do not hard-wire the product into a circuit.
■Do not use the product to provide power for emergency
medical equipment or life support devices.
■Do not use the product to jump-start vehicles. Doing
so could result in damage to the vehicle or its electrical
components.

3
Original Instructions
■The product must not be connected to other power
sources except with another power hub inverter with the
same model using the parallel kit.
■The product should only be used on flat, level, stable
surfaces and should be secured when possible. Do not
pull at cords that can cause the product to tip over.
BATTERY SAFETY WARNINGS
■Never smoke or allow a spark or flame near the battery
pack.
■Remove personal metal items, such as rings, bracelets,
necklaces, and watches when working with a battery. A
battery can produce a short-circuit current high enough
to weld a ring or the like to metal, causing a severe burn.
■Under abusive conditions, liquid may be ejected from
the battery; avoid contact. If contact accidentally occurs,
flush with water. If liquid contacts eyes, additionally seek
medical help. Liquid ejected from the battery may cause
irritation or burns.
■Do not use a battery pack or tool that is damaged or
modified. Damaged or modified batteries may exhibit
unpredictable behaviour resulting in fire, explosion, or
risk of injury.
■Do not expose a battery pack or tool to fire or excessive
temperature. Exposure to fire or temperature above 130
°C may cause an explosion.
■To reduce the risk of fire, personal injury, and product
damage due to a short circuit, never immerse the
product, battery pack, or charger in fluid or allow fluid
to flow inside them. Corrosive or conductive fluids, such
as seawater, certain industrial chemicals, and bleach
or bleach-containing products, etc., can cause a short
circuit.
CHARGER SAFETY WARNINGS
■Follow all charging instructions, and do not charge
the battery pack or tool outside the temperature range
specified in the instructions. Charging improperly or at
temperatures outside the specified range may damage
the battery and increase the risk of fire.
■Recharge only with the charger specified by the
manufacturer. A charger that is suitable for one type of
battery pack may create a risk of fire when used with
another battery pack.
■Do not try to charge non-rechargeable batteries with the
product.
TRANSPORTATION AND STORAGE
■Turn off the product, and remove the battery pack. Allow
the product to cool down before storing or transporting.
■Remove all foreign materials from the product. Store the
product in a cool, dry, and well-ventilated place that is
inaccessible to children. Keep the product away from
corrosive agents such as garden chemicals and de-icing
salts. Do not store the product outdoors.
■For transportation in vehicles, remove the battery pack,
and secure the product against movement or falling to
prevent injury to persons or damage to the product.
TRANSPORTING LITHIUM BATTERIES
Transport the battery in accordance with local and national
provisions and regulations.
Follow all special requirements on packaging and labelling
when transporting batteries by a third party. Ensure that
no batteries can come in contact with other batteries
or conductive materials while in transport by protecting
exposed connectors with insulating, non-conductive caps or
tape. Do not transport batteries that are cracked or leaking.
Check with the forwarding company for further advice.
MAINTENANCE
■Use only original manufacturer’s replacement parts,
accessories, and attachments. Failure to do so can cause
possible injury, can contribute to poor performance, and
may void your warranty.
■Servicing requires extreme care and knowledge
and should be performed only by a qualified service
technician. Have the product serviced by an authorised
service centre only.
■You may make adjustments and repairs described in this
manual. For other repairs, have the product serviced by
an authorised service centre only.
■To reduce the risk of electric shock, unplug the product
from the outlet before attempting any instructed
servicing.
■Do not disassemble the product, take it to an authorised
service centre if repair is required. Incorrect reassembly
may result in a risk of fire or electric shock.
■Turn off the product and remove the battery pack before
any cleaning or maintenance task.
■After each use, clean the plastic parts with a soft, dry
cloth. Any part that is damaged should be properly
repaired or replaced by an authorised service centre.
■Do not at any time, let brake fluids, gasoline, petroleum-
based products, penetrating oils, etc., come in contact
with plastic parts. Chemicals can damage, weaken, or
destroy plastic, which could result in serious personal
injury.
■Do not use water to clean the product.
SYMBOLS ON THE PRODUCT
Safety alert
Read and understand all instructions
before operating the product. Follow all
warnings and safety instructions.
The product is a potential source of
electric shock. Do not expose the
product to moisture, rain, or snow. Do
not operate the product with wet hands
or feet.
Do not expose the product to rain or
damp condition.
Class II tool, double insulation
IP20 Ingress protection rating
Isolated inverter

4
Original Instructions
Regulatory Compliance Mark (RCM).
This product meets applicable
regulatory requirements.
Waste electrical products should not
be disposed of with household waste.
Please recycle where facilities exist.
Check with your local authority or
retailer for recycling advice.
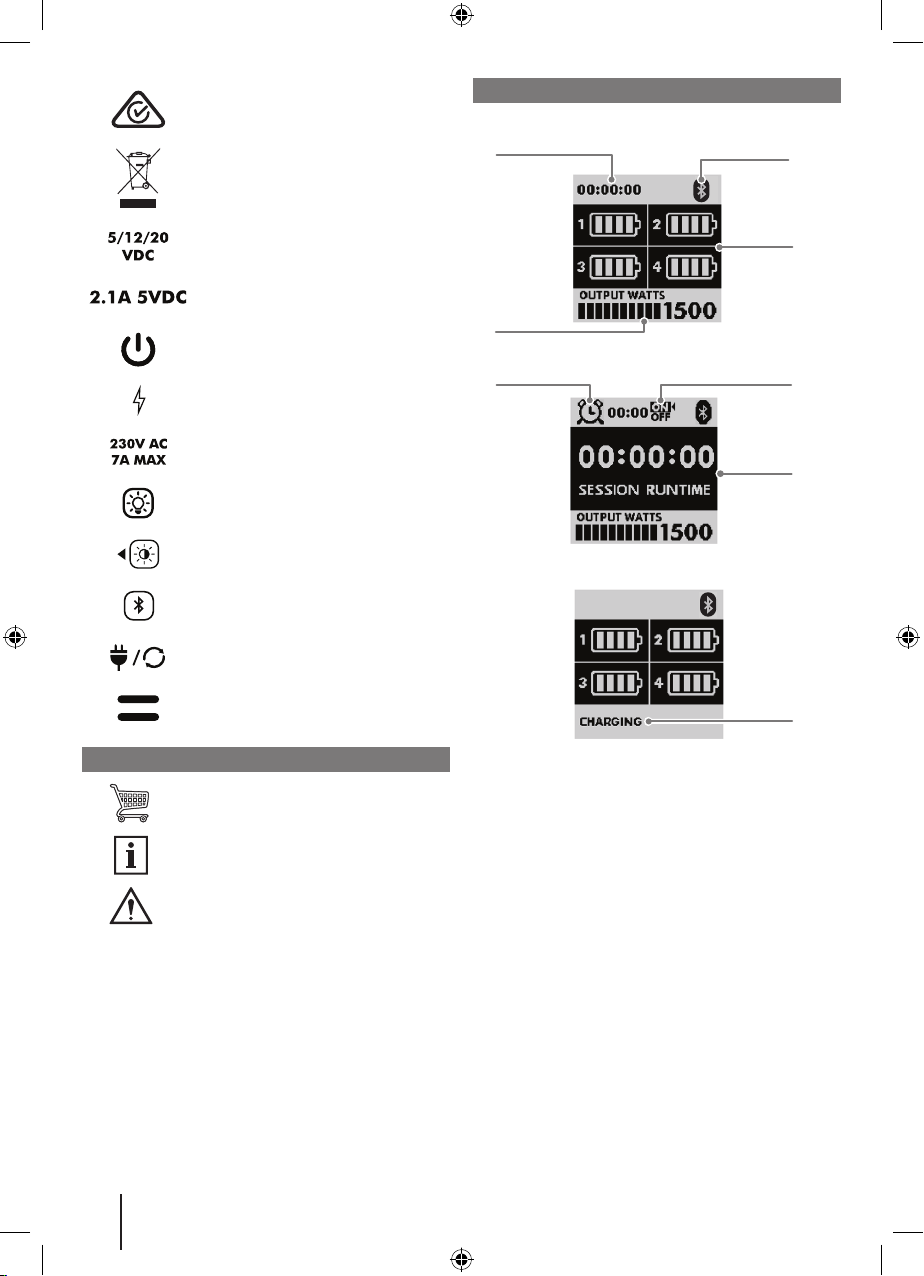
USB C output
USB A output
Main power / restart button
Charger input jack
Maximum AC output
Task light control button
LCD backlight control button
Bluetooth pairing button
AC output / reset button
Parallel kit terminals
SYMBOLS IN THIS MANUAL
Parts or accessories sold separately
Note
Warning
LCD SCREEN OVERVIEW
The LCD screen displays the status and condition of the
product.
1
4
2
3
7
5 6
8
1. Session runtime - indicates the current runtime of the
product.
2. BLUETOOTH connection - indicates that BLUETOOTH
connection is active. The product is BLUETOOTH ready
for future wireless features.
3. Battery status - displays the status of the battery packs
installed in the product.
4. Output power - displays the working output power of the
product.
5. Shutdown timer - if the timer is active, the screen
displays the remaining time before the product turns off.
6. Shut down timer on/off - indicates that the shut down
timer is on or off.
7. Session runtime (with active timer) - displays the current
runtime of the product while the timer is active. To display
the session runtime while the timer is active, press the
session runtime button.
8. Charging status - indicates that the product is charging
a battery pack. Only one battery pack is charged at one
time. The active battery bar flashes to indicate which
battery pack is charging.

5
Original Instructions
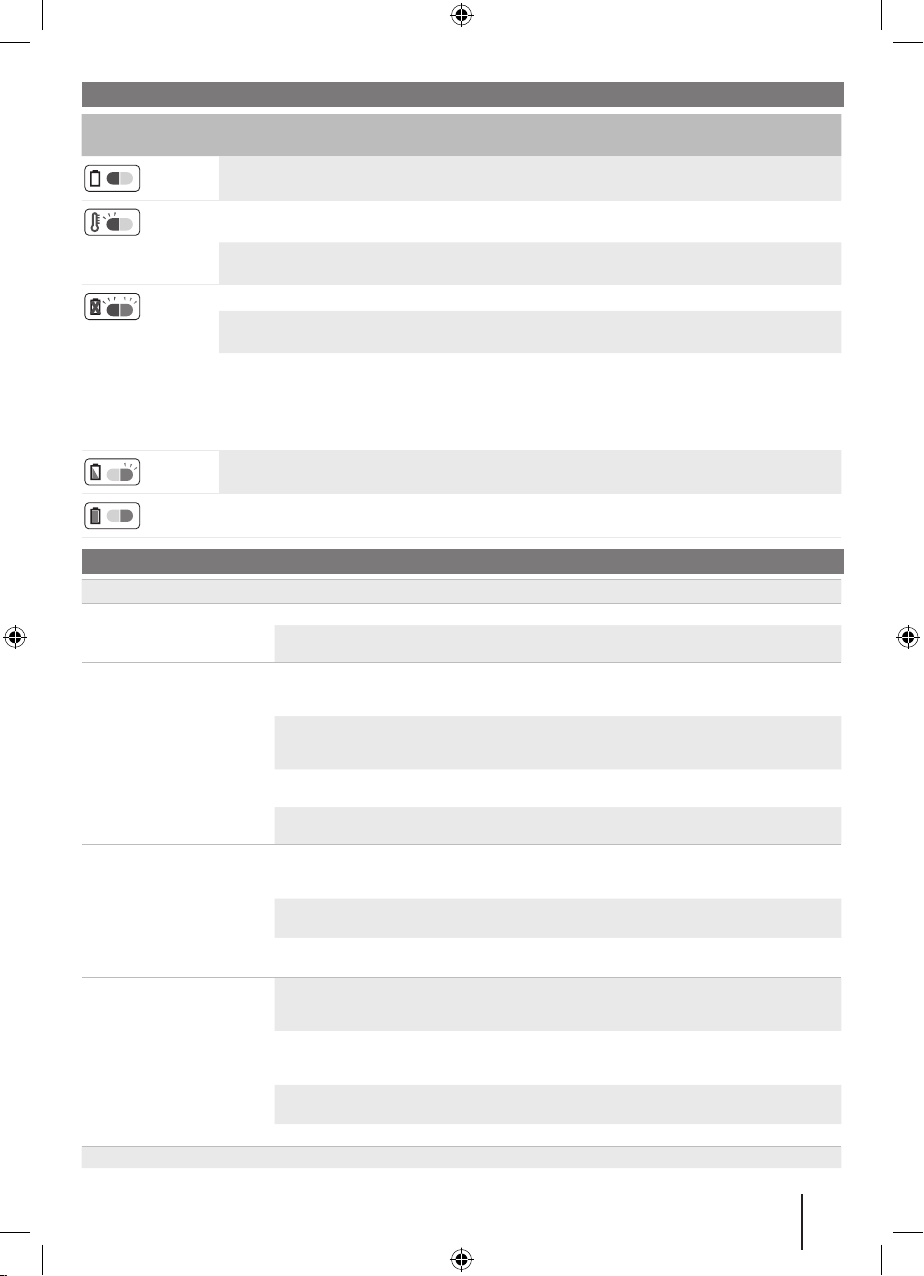
BATTERY PORT LED FUNCTIONS
LED indicator Battery pack
status
Red
LED
Green
LED
Description
Power Without
battery pack
Solid - Ready to charge the battery pack
Testing Hot battery
pack
Flashing - When the battery pack reaches cooled temperature, the
charger begins charge mode.
Cold battery
pack
Flashing - When the battery pack reaches warmed temperature, the
charger begins charge mode.
Error Error Flashing Flashing Battery pack or charger error
Deeply
discharged
Flashing - The charger conditions the battery pack until normal
voltage is reached, then begins charge mode.
■Reinstall the battery pack. If the LED status repeats a second time, try charging a different
battery.
■If a different battery charges normally, dispose of the defective pack (see the battery pack
manual for instructions).
■If a different battery pack also indicates an error, replace the charger.
Charging Fast charging - Flashing The battery is charging.
Ready Battery full - Solid Charging is complete.
TROUBLESHOOTING
Problem Possible cause Solution
The product does not turn
on.
The battery pack is not charged. Recharge the battery pack.
The main power button was
released too quickly.
Press and hold the main power button for 2
seconds.
The AC receptacle does
not work.
The AC output is not active or the
AC power button was released
too quickly.
Press and hold the AC output button for 2 seconds.
The charger is connected. There is no power output (AC and USB) while the
product is charging. Disconnect the charger after
the battery packs are fully charged.
The connected device is
defective.
Try a dierent device.
The product is overloaded. Remove the loads and press the AC output button
to reset the power hub.
The product unexpectedly
turns o.
The battery pack temperature is
outside of the normal operating
range.
Make sure that the battery pack temperature is
between -20 °C and 49 °C.
The battery pack has low or no
charge.
Recharge the battery pack.
The battery packs are faulty. Have the product serviced by an authorised service
centre.
The charger does not work. The battery pack temperature
is outside of normal operating
range.
Make sure that the battery pack temperature is
between 0 °C and 45 °C.
The connection between the
battery pack and inverter is not
good.
Reinstall the battery pack. If problem persists, use
another battery pack.
The charger's voltage is outside
the normal range.
Use another charger.
The battery pack is defective. Use another battery pack.
If the problem persists after trying the above solutions, contact your nearest authorised service centre for assistance.

6
Original Instructions
ERROR MESSAGE NOTIFICATIONS
Error Message Possible cause Solution
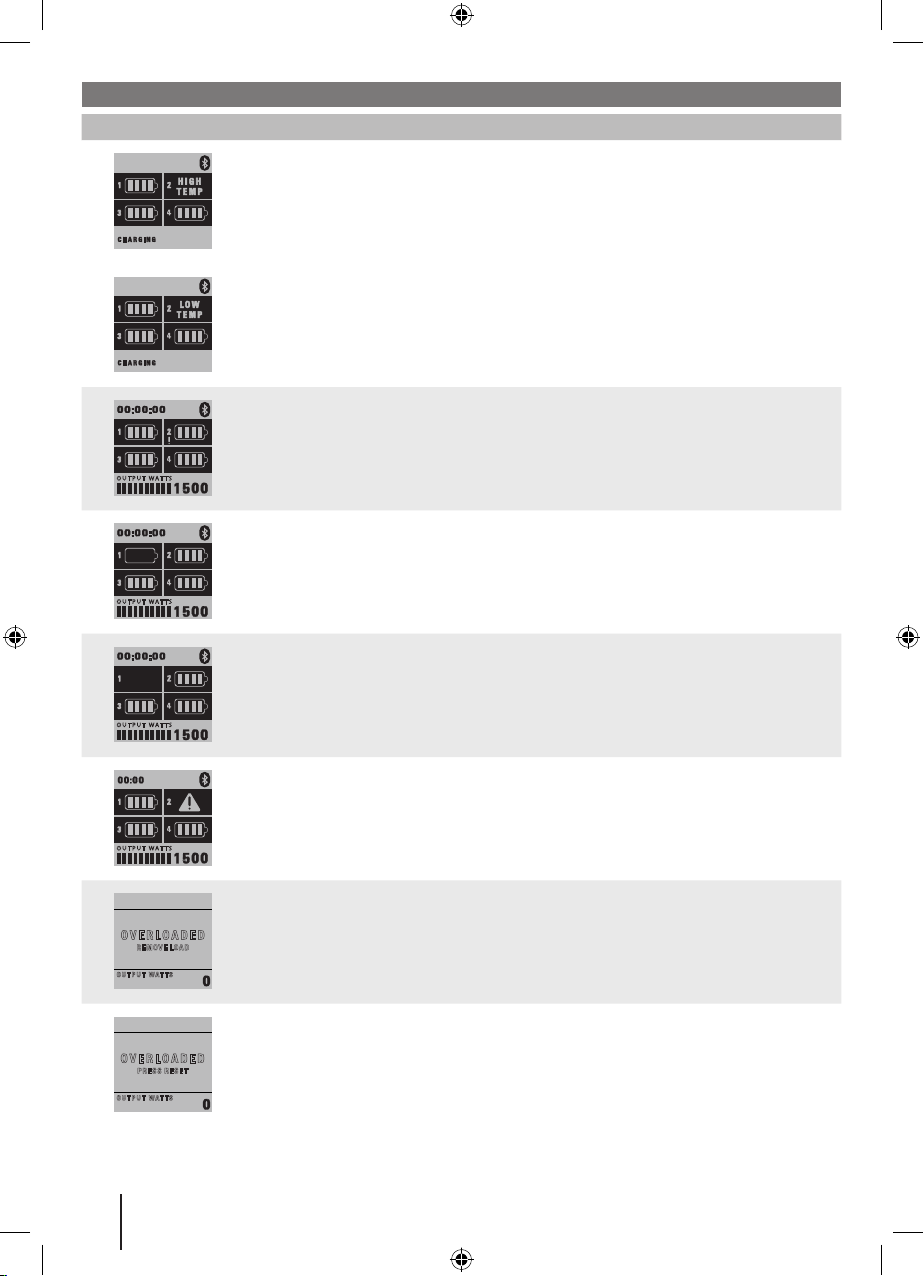
High temperature
or
Low temperature
(when the battery
pack is installed for
charging)
The battery pack is outside
the acceptable charging
temperature range.
Allow the battery pack to reach the
acceptable charging temperature
range. The battery may need to
be removed from the port and
reinstalled to begin charging.
OUTPUT WATTS
Incompatible battery
pack
(displays on the
specic battery pack
slot)
The installed battery pack
is not compatible with the
product.
Remove the incompatible battery
pack.
For a list of compatible battery
packs, refer to the "Compatible
battery packs and power output"
section.
OUTPUT WATTS
Battery pack is low.
(displays on the
specic battery pack
slot)
The battery charge is low. Recharge the battery pack.
OUTPUT WATTS
No battery pack in
slot.
(displays on the
specic battery pack
slot)
There is no battery pack
installed.
The battery pack is not
properly installed.
Remove and reinstall the battery
pack.
OUTPUT WATTS
Battery fault
(displays on the
specic battery pack
slot)
There are protection features
triggered in the battery pack.
The communication between
the inverter and battery pack
fails during charging.
The battery pack is defective.
Wait until the protection feature
is disabled or when the LCD no
longer displays error message.
Use another battery pack.
OVERLOADED
REMOVE LOAD
OUTPUT WATTS
Overloaded
Remove load
The inverter output wattage
exceeds normal operating
range.
Press the reset button to reset the
AC output.
OVERLOADED
PRESS RESET
OUTPUT WATTS
Overloaded
Press reset
The inverter is overloaded. Press the reset button to reset the
AC output.

7
Original Instructions
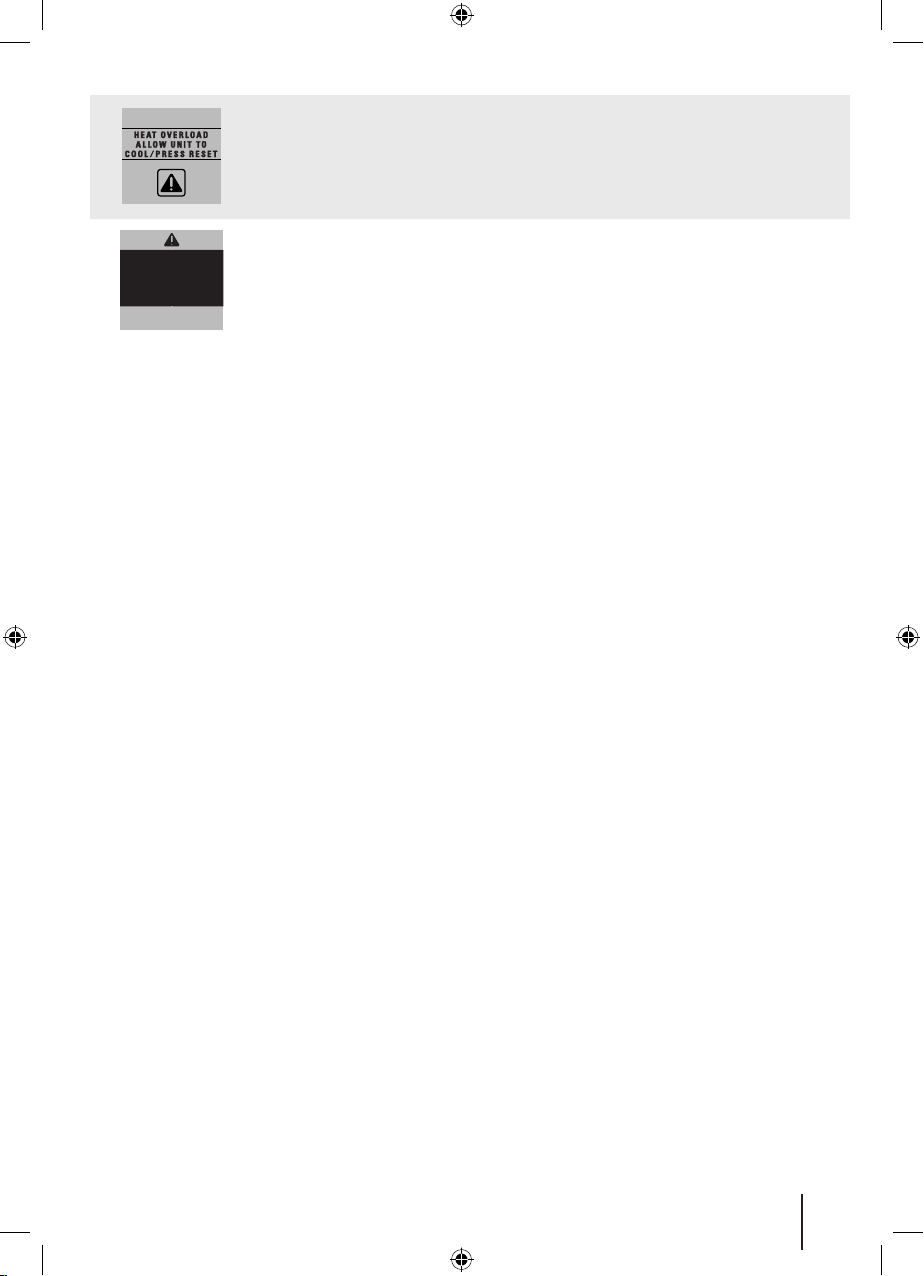
Heat overload
Allow unit to cool/
Press reset
The inverter temperature is out
of the normal operating range.
Allow the product to cool down
and reach the normal operating
temperature.
Press the reset button to reset the
AC output.
SYSTEM FAULT
CALL FOR SERVICE
AU 1300 697 9624
NZ 0508 697 9624
System fault There is an internal
communication error.
Call customer service through the
following numbers:
Australia: 1300 697 9624
New Zealand: 0508 697 9624

8
Know your product
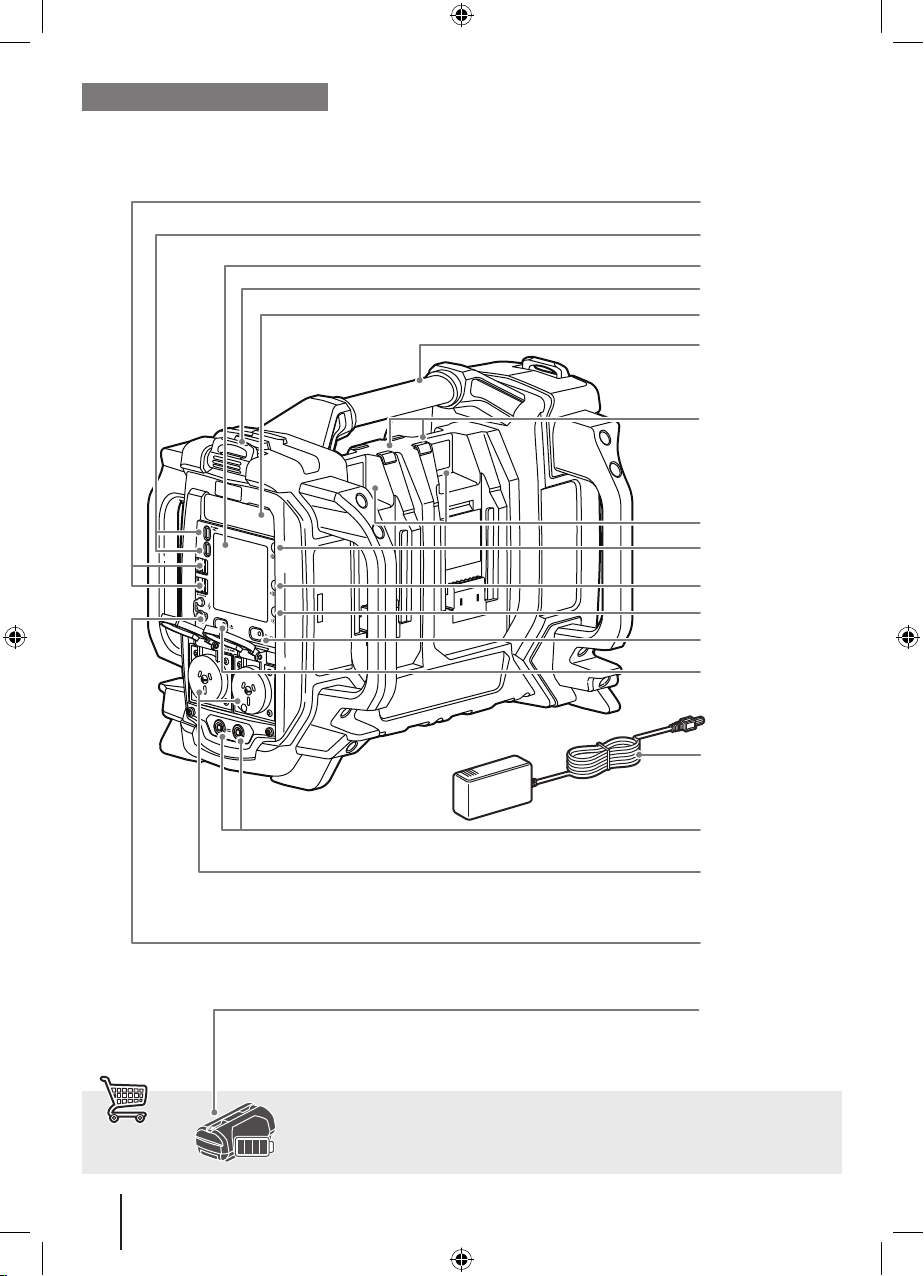
RPH361800
USB A charging
ports
USB C charging
ports
LCD panel
Carry handle
Battery Port LED
Area / warning
light
Strap holder
Battery port
Task light control
button
LCD backlight
control button
Session runtime
button
AC output /
reset button
Main power /
restart button
Charger
Parallel kit
terminals
AC Outlets
Charger input
jack
Battery pack

9
Getting started
2s
2s
2s
2s
1 2
3
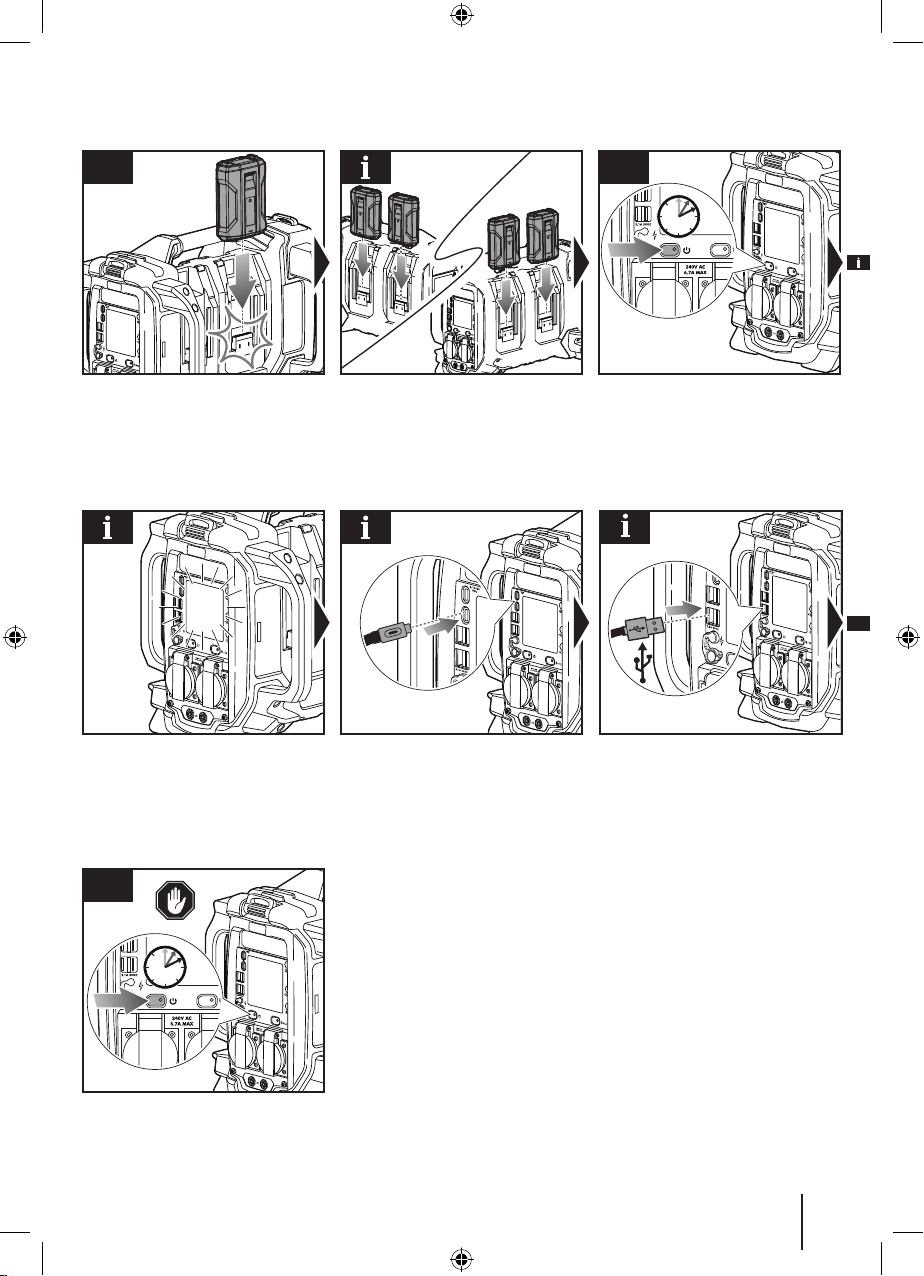
Insert the battery pack until it snaps
into place.
NOTE: The product has 4 battery ports,
but can function even if only one battery
pack is installed.
Insert additional battery packs as
needed. The more battery packs
installed, the greater the amount of
power or run time the product can
provide.
Press and hold the power button for 2
seconds to turn on the product.
NOTE: The main power button
illuminates when power to the product
is on.
NOTE: The LCD panel turns on, and
the USB charging ports and LED task
light can be used.
To turn o the product, press and hold
the main power button for 2 seconds.
3
NOTE: For charging USB-C specic
devices or other devices with up to 3
A, connect these devices to the USB-C
ports. The charging ports provide
power only; they do not provide any
communication capabilities.
NOTE: For charging MP3 players,
tablets, and other devices with up to 2.1
A, connect these devices to the USB-A
ports. The charging ports provide
power only; they do not provide any
communication capabilities.

10
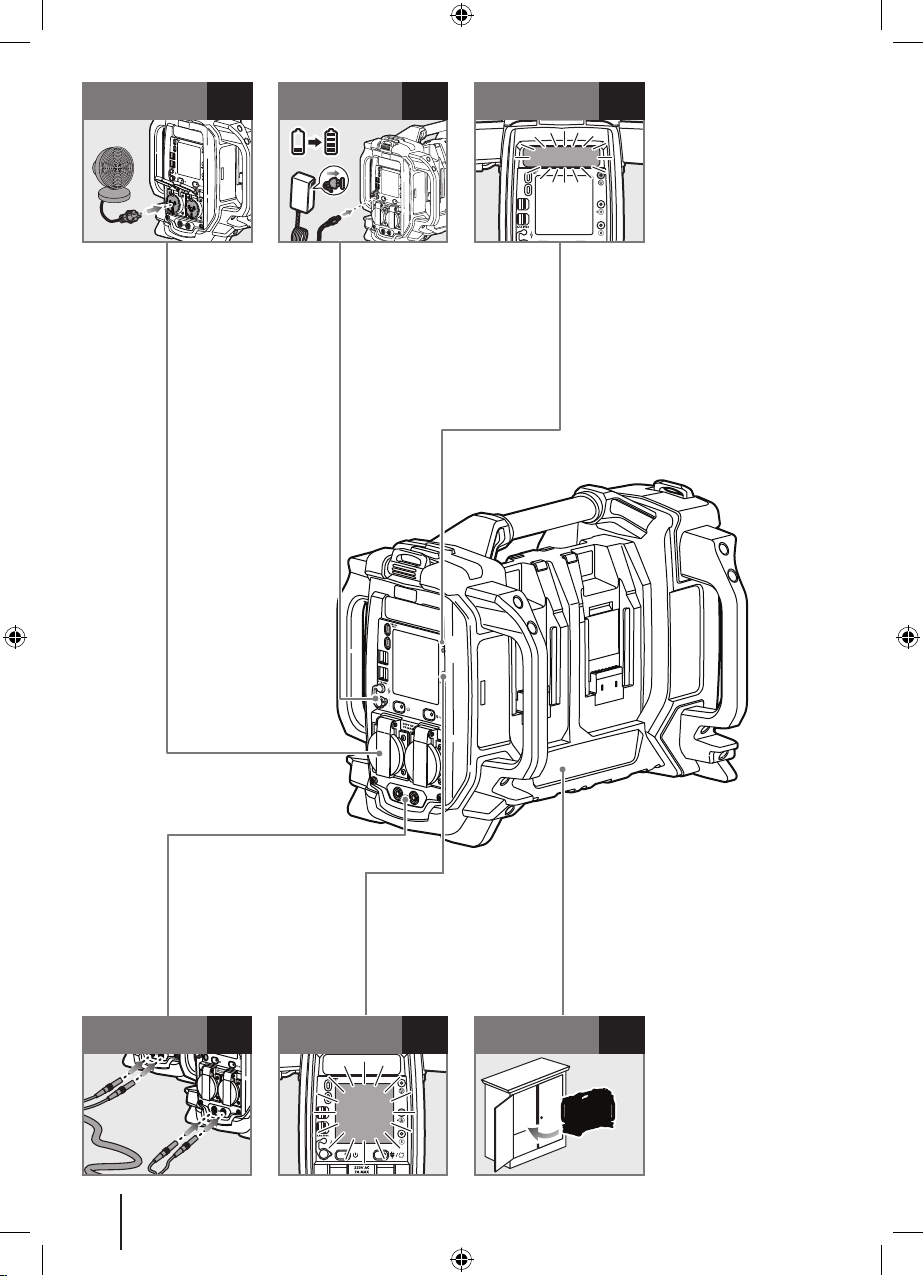
p.11 Using the LED
task light
Cleaning and
storing the product
Adjusting the LCD
backlight
Charging the
product
Using the AC
outlets p.12 p.14
p.15 p.16p.13
Connecting two
power inverters
Table of contents
Other Ryobi Inverter manuals

Ryobi
Ryobi RY907000 User manual

Ryobi
Ryobi RYI1000 User manual

Ryobi
Ryobi 2000i Inverter User manual

Ryobi
Ryobi RG-1250I Operation manual

Ryobi
Ryobi RYi2200 How to use

Ryobi
Ryobi RIG2000PC User manual

Ryobi
Ryobi RIG2000 User manual

Ryobi
Ryobi RGN2500B User manual

Ryobi
Ryobi RY36SHX40 User manual

Ryobi
Ryobi RIG2000PC User manual

Ryobi
Ryobi RY906500S User manual

Ryobi
Ryobi RG-10KVA Operation manual

Ryobi
Ryobi RBT36300 User manual

Ryobi
Ryobi RYi2200GR Manual

Ryobi
Ryobi RY36BI300A User manual

Ryobi
Ryobi RY36BI1800A User manual

Ryobi
Ryobi RY36BI300A User manual

Ryobi
Ryobi RY907000FI User manual

Ryobi
Ryobi RY903600 User manual

Ryobi
Ryobi RY18BI150A User manual