Rohr DFC-50P User manual

This manual provides important safety information and instructions on how to set up your
battery charger. In order to minimize that risk, it’s important to read this manual carefully.
Keep this manual in a safe place, review it frequently and ensure that
all users have read it to ensure safe operation.
BATTERY CHARGER
DFC-10P
DFC-30P
DFC-50P
DFC-450P
DFC-650P
V 3.1
English Français Deutsch Italiano Español
OPERATION MANUAL

© ROHR
DFC-10P / DFC-30P / DFC-50P / DFC-450P / DFC-650P
2© ROHR
English
02 - Content
03 - Quick Start Guide
03 - Safety Instructions and Technical Data
06 - Panel Controls
DFC-10P
DFC-30P
DFC-50P
07 - Panel Controls
DFC-450P
DFC-650P
08 - CE Decleration of Conformity
09 - Français
17 - Deutsch
25 - Italiano
33 - Español
Contents Languages

© ROHR 3
© ROHR
English
DFC-10P / DFC-30P / DFC-50P / DFC-450P / DFC-650P
Quick Start Guide
Safety Features
First connect the red charging lead to the positive on the battery.
Connect the black charging lead to the negative on the battery.
Select your required output voltage, mode and setup options on the battery charger:
a) For DFC-650P models, turn the operation dial to either jump start or charge modes, the higher the
number, the higher the amperage. The timer dial must be used with numbers 4, 5 and 6 on the
operation dial.
b) For DFC-650P models insert 3 x 50a fuses into the fuse holder. For DFC-450P models use 2 x 50a
fuses.
c) Select your required output voltage or jump start mode (applies to specic models).
Connect the charger to a power outlet and turn it on.
The charger will begin charging, if your battery is / becomes full charged, the charger will automatically
switch to trickle charge / stop charge.
For jump start operation, only apply a jump start for a maximum of 5 seconds and then allow a 20
second cool down time.
After use, switch off the battery charger and disconnect from the power outlet.
Disconnect the black charging lead from the negative terminal of the battery.
Disconnect the Red charging lead from the positive terminal of the battery.
Screw or press the battery plugs back into position.
This battery charger features a range of safety features. In the event of a blown fuse, the fuse must
be replaced with an identical fuse. The automatic circuit breaker will stop charging in the event of
overheating. This will automatically start charging again after cooling.
The battery must be disconnected from the vehicle prior to connecting the battery to the charger. Failure
to do so may extensively damage the vehicle and or chargers electric systems.

© ROHR
DFC-10P / DFC-30P / DFC-50P / DFC-450P / DFC-650P
4© ROHR
English
Functions and Controls
Voltage Selection
For models with a switch - change the switch to alter the voltage.
For models with terminals - the negative wire is hard wired, swap the positive wire to the desired voltage
position.
Amperage Selection
For models with a dial - turn the dial to increase the Amp output. Higher numbers produce a higher
Amperage. For models with a switch - change the switch to alter the amperage. MIN - trickle charge /
MAX - fast charge
Pulse Repair Technology
Older batteries can lose their ability to hold charge due to becoming sulphated. This charger features
highly advanced pulse rectier boost battery repair technology that actively repairs this damage. This
battery restoration feature can get almost any battery back to full health.
Mode Icons
For models with both charge and jump start functions - there are two symbols to indicate the function
type:
+-
+-
Charging mode Jump Start Mode
© ROHR 5
© ROHR
English
DFC-10P / DFC-30P / DFC-50P / DFC-450P / DFC-650P
Safety Instructions
Please read and understand this manual and the manual for the product / battery you are
intending to charge before operating this device. Keep this manual for future reference.
1. Only use this device indoors and for its intended use.
2. No warranty is offered for damages resulting from improper use or incorrect operation of this device.
3. This device is not intended to be used by persons (including children) with limited physical, sensory
or mental aptitude or lack of experience and/or knowledge.
4. In the event of a fault or failure, any repairs to this battery charger must be done by a qualied
person authorised by the manufacturer.
5. Keep the power cable away from sources of heat and check the condition of it regularly. If it’s
damaged, have the cable replaced by a qualied person.
6. Do not use the charger if damaged or defective and do not charge disposable, frozen or damaged
batteries.
7. Protect the charger against the elements, especially rainfall. Use the device in well ventilated areas
only.
8. Do not leave the charger connected to a power supply when not in use.
9. When charging, batteries emit gasses that may be explosive. Keep away from any heat sources.
10.Make sure the battery charger is disconnected from a power source when connecting to a battery.
11.Never place a battery right under or on top of the battery charger. Place the battery charger as far
away from the battery as possible. Never place the battery charger under the bonnet.
12.Always make sure the car and battery manufacturers permit the use of a battery charger jump start
prior to using this function (applicable models only).
13.Warning, danger to life - when cleaning, never immerse the device in water or other liquids and
never open the product housing.
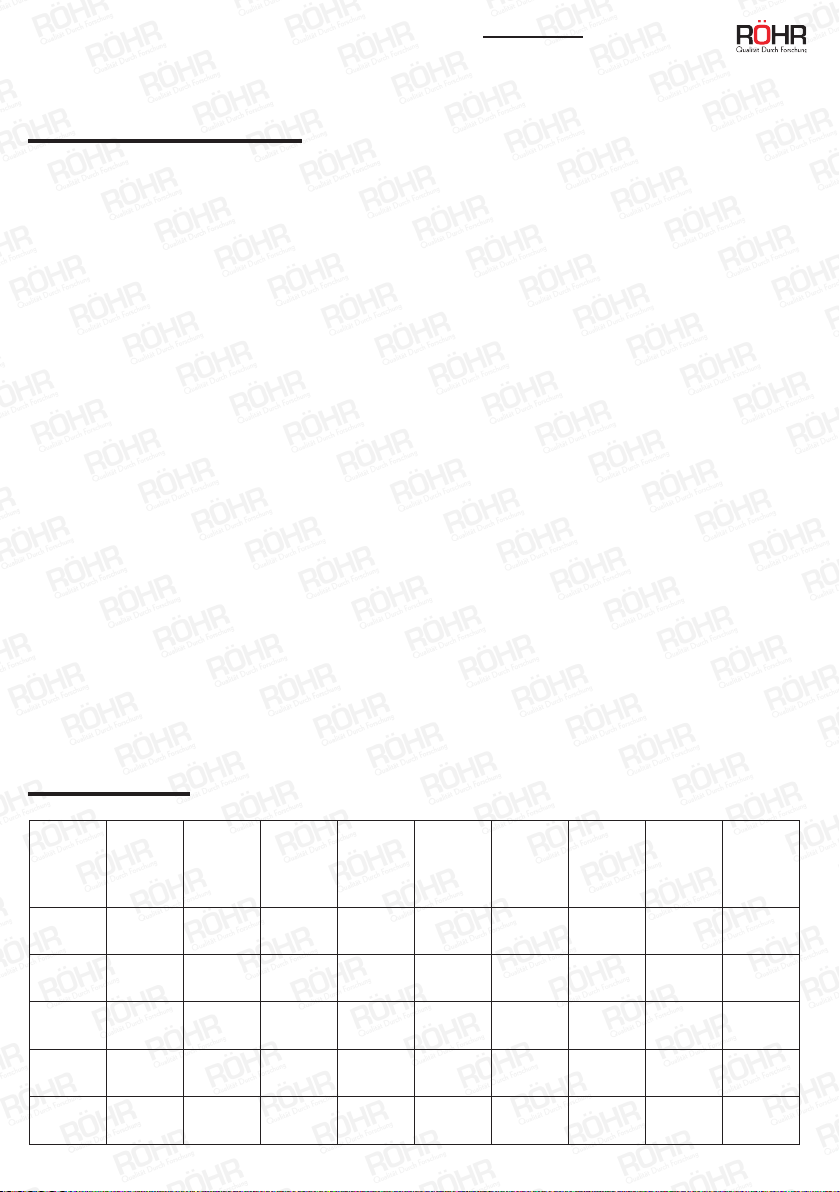
MODEL
INPUT
VOLTAGE
(V)
OUTPUT
VOLTAGE
(V)
CHARGING
CURRENT
(A)
MAX
CHARGING
CURRENT
(A)
FUNCTION
STARTING
CURRENT
(A)
CHARGING
INPUT
POWER (W)
STARTING
INPUT
POWER (W)
BATTERY
CAPACITY
DFC-10P 230 6/12 5/8 10 Charge N/A 250 N/A 20-150ah
DFC-30P 230 12/24 15/20 27 Charge N/A 700 N/A 20-240ah
DFC-50P 230 12/24 20/30 45 Charge/
Start 130 950 6400 50-350ah
DFC-450P 230 12/24 40/50 70 Charge/
Start 300 1200 8500 100-
700ah
DFC-650P 230 12/24 60/70 100 Charge/
Start 480 2200 12000 120-
1000ah
Technical Data
© ROHR
DFC-10P / DFC-30P / DFC-50P / DFC-450P / DFC-650P
6© ROHR
English
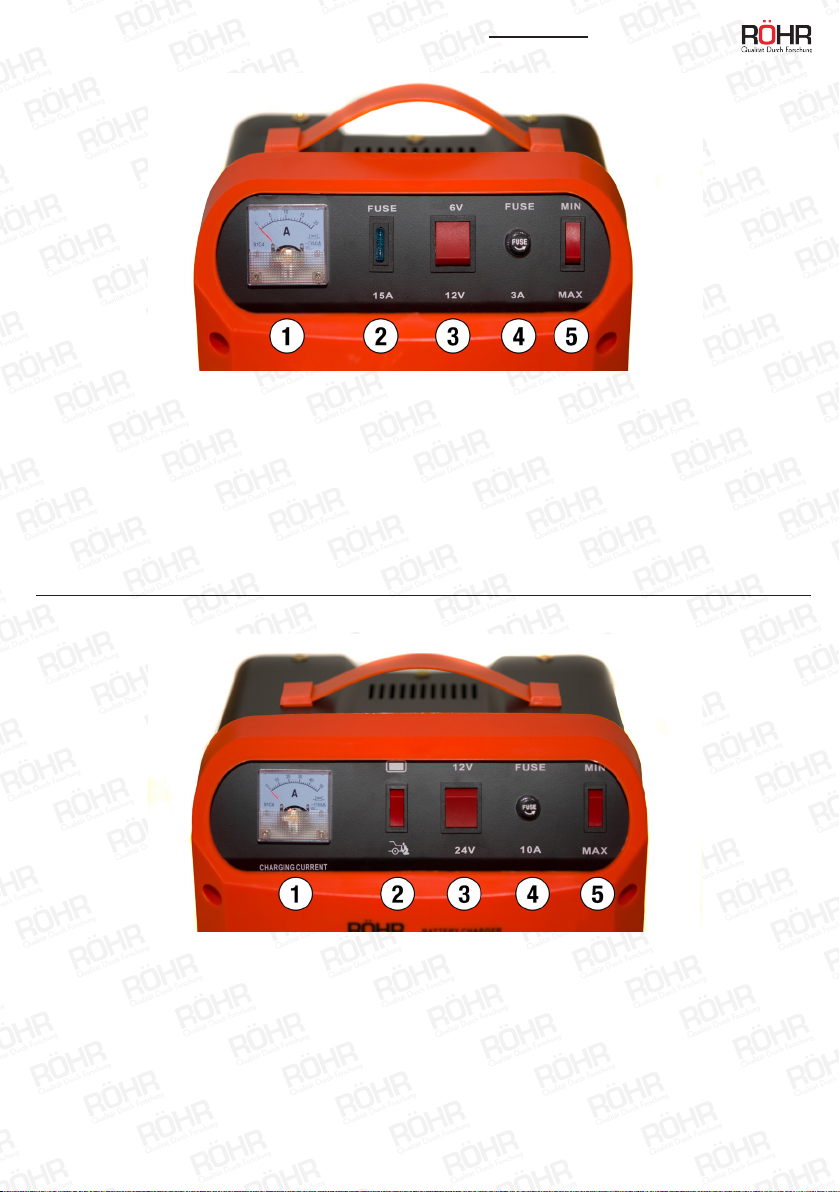
Fig.1 - Panel Controls for the DFC-10P / DFC-30P
Fig.2 - Panel Controls for the DFC-50P
1. Ammeter - displays current / load
2. 15A (DFC-10P) / 30A (DFC-30P) fuse
3. 6/12V (DFC-10P) / 12/24V (DFC-30P) switch
4. 3A (DFC-10P) / 5A (DFC-30P) fuse
5. Amp output switch, MIN - Trickle charge / MAX - Fast Charge
1. Ammeter - displays current / load
2. Mode switch - charging / jump start
3. 12 / 24 Volt switch
4. 10 Amp fuse
5. Amp output switch, MIN - Trickle charge / MAX - Fast Charge
© ROHR 7
© ROHR
English
DFC-10P / DFC-30P / DFC-50P / DFC-450P / DFC-650P
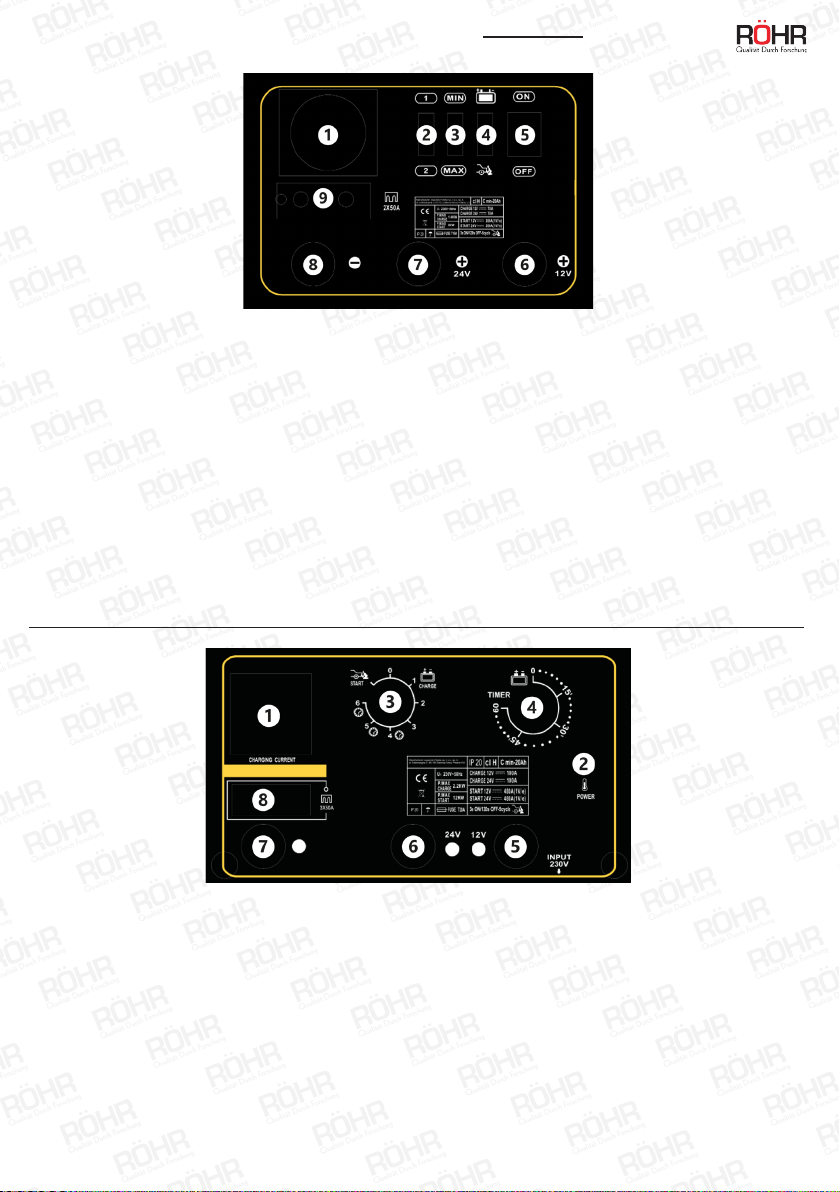
Fig.3 - Panel Controls for the DFC-450P
Fig.4 - Panel Controls for the DFC-650P
1. Ammeter - displays current / load
2. ‘1-2’ Function - Adjusts ampere output
3. Amp output switch, MIN - Trickle charge / MAX - Fast Charge
4. Mode switch - charging / jump start
5. On / off switch
6. 12 Volt positive terminal
7. 24 Volt positive terminal
8. Negative terminal
9. Fuse housing
1. LCD Ammeter - displays current / load
2. Power indicator light
3. Operation dial - turn left for jump start function and turn right for charging currents
4. Timer - used to control charging duration, must be used when operation dial is at 4, 5 or 6.
5. 12 Volt positive terminal
6. 24 Volt positive terminal
7. Negative terminal
8. Fuse housing

© ROHR
DFC-10P / DFC-30P / DFC-50P / DFC-450P / DFC-650P
8© ROHR
English
CE DECLARATION OF CONFORMITY
We hereby declare that the machine described below complies with the relevant basic safety and health
requirements of the EU Directives, both in its basic design and construction as well as in the version put
into circulation by us. This declaration shall cease to be valid if the machine is modied without our prior
approval.
The undersigned: Michael S McQuaide
as authorised by: Union Mart Ltd
Declares that
Description: Battery Charger
Identication code: DFC-10P, DFC-50P, DFC-450P, DFC-650P
Conforms to the following directives and standards:
• Low Voltage Directive 2014/35/EU
• Electromagnetic Compatibility 2014/30/EU
--
And Complies with the provisions of the following standards:
EN60335-1:2012+AC:2014,EN 61000-3-2:2014 EN 60335-2-29:2004+A2:2010,
EN55014:2006+A1:2009+A2:2011,EN 61000-3-3:2013EN 55014-2:1997+A1:2001+A2:2008
--
Notied body: I S E T SRL
The technical documentation is kept by: Union Mart Ltd
Date: 14/03/2018
Signed:
Michael S McQuaide
Managing Director
Name and address of the manufacturer:
Union Mart Ltd, Company No. 8384155. Registered address: Unit 4, Nursling Industrial Estate,
Mauretania Road, Nursling, Southampton, SO16 0YS, United Kingdom.

© ROHR © ROHR
Ce manuel fournit des informations de sécurité importantes et des instructions concernant la
conguration de votre chargeur de batterie. An de minimiser les risques, il est important de lire
attentivement ce manuel.
Conservez ce manuel dans un endroit sûr, relisez-le fréquemment et assurez-vous que tous les
utilisateurs le lisent, an assurer une utilisation sécurisée.
BATTERY CHARGER
MODE D’EMPLOI
FRANÇAIS
DFC-10P
DFC-30P
DFC-50P
DFC-450P
DFC-650P

© ROHR
10 © ROHR
FrançaisDFC-10P / DFC-30P / DFC-50P / DFC-450P / DFC-650P
Sommaire
10 - Sommaire
11 - Guide de démarrage rapide
11 - Dispositifs de sécurité
12 - Fonctions et commandes
12 - Données techniques
13 - Consignes de sécurité
14 - Commandes du panneau
DFC-10P
DFC-50P
DFC-30P
15 - Commandes du panneau
DFC-450P
DFC-650P
16 - Certicat de conformité CE
This manual suits for next models
4
Table of contents
Languages:
Other Rohr Batteries Charger manuals


