RoadScan Canada DC1 Operator's manual

RoadScan Canada
DC1
User Instrucon Manuals

RSC DC1 User Manual
1. USB 2. GPS 3. Power ON/OFF 4. Lens 5. Charging Indicator
6. Recording Indicator 7. GPS Indicator 8. Reset
10. OK / Recording/ One Buon Emergency Recording 11. Back / Menu
12. Up / Playback 13. Down / Pause / Photo
Page 1

RSC DC1 User Manual
POWER
Using the aachment plate, find a suitable locaon for the camera that is free of obstrucon.
It is important to clean the windshield well in the area that the camera will be located prior to
aaching the fixed plate (See setup and installaon). A plate and a sucon cup are provided
with the camera.
The camera can be installed as a plug and play (using the 12 volt cigar lighter plug), hard wired
into the ignion of the vehicle. If camera is not plugged in camera will have power unl it’s
baery life run s out which varies in length from seconds to a minute.
Note: If the plug and play opon is chosen, the 12 volt adaptor will need to be plugged in prior
to use and unplugged when no longer in use. If used, the automac on/off funcon may not
work, always check to see if the camera is working.
***Manufactures 12 month warranty is void if damage occurs to the VEDR due to the
unit being installed incorrectly or wired improperly. It is highly recommended to always use a trained and competent
installer.
The unit will automacally power on when in use with the hard wire kit or 12 volt adaptor. The
unit will also power manually when you press the power buon. The power buon is located
on the le side of the unit when looking at the screen.
Figure 1
Once powered, the camera will chime and a “Welcome” greeng will appear. At this me the
video ‘record’ will automacally be acvated. There is a flashing red symbol that is displayed
in the top right of the camera screen along with a blue blinking on the le side of the camera
(from screen), which indicates the camera is acvely recording. To turn the video recording
off/back on, hit the OK buon located on the le side of the screen.
Page 2

RSC DC1 User Manual
Red light = The camera is plugged in to 12 volt, USB, or hard wired.
Figure 2
Blue light = video recording is in progress.
Figure 3
Green Light = GPS is acve and recording
Figure 4
Page 3

RSC DC1 User Manual
Screen Icons by number:
Figure 5
1. Red Light Flashing/me = Recording in progress
2. WIFI symbol = Indicates if WIFI is connected or not
3. Plug – Indicates that the camera is plugged-in/charging.
4. Lower right corner of screen – white wring = license plate number, speed, me and
date (this allows the user to view the video in windows media without the GPS program
and sll provide the necessary informaon).
Page 4

RSC DC1 User Manual
Figure 6
5. Emergency – Indicates when the camera is in emergency mode. When the camera is
in this mode the video will be stored in a separate folder named ‘emergency’. The data
in this folder cannot be overwrien on the camera and must be deleted manually.
6. Baery - Indicates baery life.
7. Crossed-out Speaker – Indicates that the camera is not recording audio. To turn
audio off momentarily hold the SCROLL UP buon (which is on the right side from the
screen).
Page 5

RSC DC1 User Manual
BUTTONS & MENU ACCESS
Figure 7 Figure 8
There are five essenal buons on the DC1.
1. POWER buon located on the le side of the camera
2. OK buon, top le corner from screen
3. MENU buon (below OK buon)
4. SCROLL UP buon, top right corner from the screen
5. SCROLL DOWN buon, under the Scroll Up buon
Page 6

RSC DC1 User Manual
If the camera is recording, you can press the SCROLL DOWN buon to stop recording and then
press the MENU buon to enter the menu. Also, if the camera is recording you can just press
the MENU buon and the camera will automacally stop recording and enter the menu. Press
the MENU buon again to exit the menu.
While in the menu hit the OK buon to enter any seng opon’s sub menu. Use the SCROLL
UP or SCROLL DOWN to maneuver within the sub menu selected. Once the seng has been
adjusted, press OK buon. This will change the seng and the main menu screen will come
back up. While in a sub menu, press the MENU buon to return to the main menu screen
without changing the seng. Press SCROLL UP or SCROLL DOWN to navigate to the next
sengs.
Figure 9
File Playback: entering this seng will give you opons to view and play files. There are two
folders: video and emergency. (See PlayBack mode)
●Video will have all your video files, including emergency video and photo files
●Emergency will have all emergency videos (See Record Mode / Emergency Mode)
DriverID Seng: This allows you to set your camera to a unique ID of your choosing.
Date / Time: Allows you to set the Date and Time for your camera.
Time Stamp: If on, while the camera is recording the Timestamp at the boom right of the
screen will show, otherwise if off, the Timestamp will not show.
Video Resoluon: Change the resoluon of the video recording. Opons are 2560x1080 p30,
2304x1296 p30, 1920x1080 p30 HDR, and 1280x720 p60.
Page 7

RSC DC1 User Manual
Figure 10
Photo Resoluon: Change the resoluon of photos taken in camera mode. Opons are: 13M
(4800x2700), 9M (4000x2250), and 4M (2688x1512)
Image Quality: Change the quality of the photos captured by camera. Opons are S.Fine
(Super Fine) / Fine/ Normal
EV (Exposure Value): Opons are: -2.0 EV, -1.7 EV, -1.3 EV, -1.0 EV, -0.7 EV, -0.3 EV, 0.0 EV, +0.3
EV, +0.7 EV, +1.0 EV, +1.3 EV, +1.7 EV, +2.0 EV. Aer seng the EV value in the menu, the
exposure of videos will change accordingly.
ADAS Detect: Opons: Off / On. Lane Departure Warning System (LDWS), Low light warning
system, Over fague warning systems.
LCD Seng: Used to set the screen saver me. The cameras screen display will automacally
turn off aer the set me. Press any buon to exit screen save and view the live video.
Opons are: On, Turn Off Aer 30 sec, Turn Off Aer 3 min, Off
Page 8
RSC DC1 User Manual
Figure 11
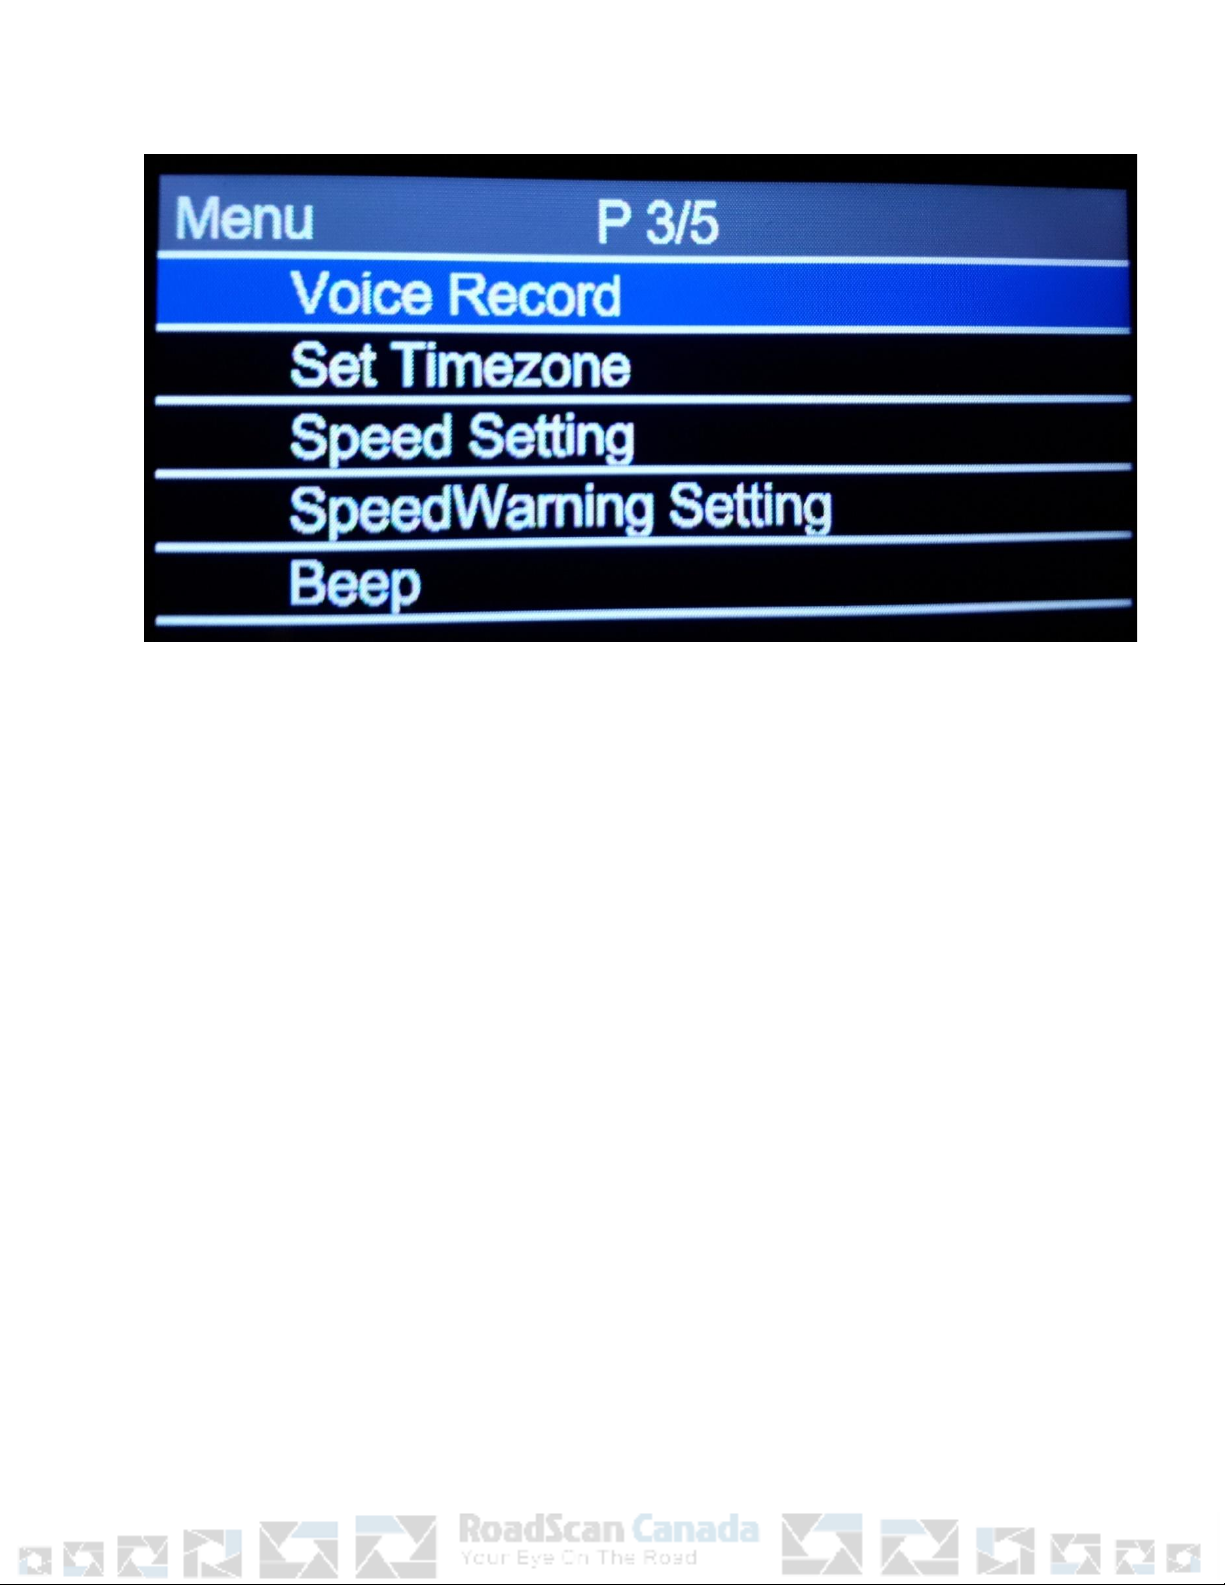
Voice Record: Opons: On / Off. If On the camera will record audio while recording video. If
off, the camera will not record audio. If the audio is manually muted or unmuted (via
momentarily holding the SCROLL UP buon), this will show in the seng.
Set Time zone: Ensure this opon is set to -7. This seng is for PST, -6 for MST and connuing
to reduce the number as you travel east across the country.
Speed Seng: Allows to change the speed measurement unit. Opons are KM/H and M/H
Speed Warning Seng: Opons are off, 80 km/h, and 120 km/h. The camera will show a
warning when it detects speed that reaches or exceeds the set opon.
Beep: Changes the volume of the beep noise the camera emits when the user presses the
camera buons. Opons are: 0 (no volume) to 5.
Page 9
Table of contents
Other RoadScan Canada Dashcam manuals

RoadScan Canada
RoadScan Canada PBC1 Operator's manual

RoadScan Canada
RoadScan Canada RSC DC3 Operator's manual

RoadScan Canada
RoadScan Canada DC3 Operator's manual

RoadScan Canada
RoadScan Canada RS2000 Operator's manual

RoadScan Canada
RoadScan Canada PBC10 Operator's manual

RoadScan Canada
RoadScan Canada DC3 Operator's manual

RoadScan Canada
RoadScan Canada DH22 Operator's manual

RoadScan Canada
RoadScan Canada PBC1 Operator's manual


