Redrock Micro Halo Solo Complete User manual


OVERVIEW
Solve the challenge of mastering focus with the Halo Solo Bundle
Especially designed for solo operators, Halo Solo Bundle delivers an affordable and accurate system that
automatically tracks your subject and keeps them in focus so you don't have to. Halo Explorer gives you
more autofocus options (such as hybrid focus and focus acquisition) while still delivering complete
automatic focusing. When you want manual focus control, it's a fingertip away with the Navigator
command module.
The Halo Solo Complete Kit utilizes 3 main components of the Eclipse ecosystem and a companion
desktop app. Halo Solo can be used with a stand-alone cinema rig or the MoVI Pro system. At this time
Halo Solo can only be used with prime lenses that include hard stops (zoom lenses and still photography
lenses with floating focus rings are not currently compatible)
Navigator - Used to set up the Halo lens database and to control Atlas/Lens Motor.
Atlas - Moves the focus ring on your lens. Receives data input from Navigator and Explorer.
Explorer - Holds the lens database and transmits range information to Atlas/Lens Motor.
App - Used to set up focus points on your lens and store them in Explorer.
Halo Solo Complete User Guide 1

HARDWARE SETUP - CINEMA RIG
In order for Halo to operate correctly all components must be set up and connected properly. All direct
communication during use is via the Eclipse Cables. Wireless communication is only for
setup/programming.
1. Explorer - Explorer can be mounted in any position on your camera rig, but we recommend
mounting it as close to the center of your lens as possible. We recommend mounting Explorer
centered vertically below your lens.
2. Atlas Lens Control Motor - Attach Atlas to your rig (see Atlas user doc for more info). Using the
P-Tap cable, connect Atlas to power. Using the 24” Eclipse Cable, connect the Atlas to the
Explorer. For initial set up, we recommend that you do not engage the Atlas drive gear with your
lens gear. Calibrate Atlas then rotate it off of your lens gear. Power to Explorer will be supplied
through Atlas. Explorer can also be powered via Canon LP battery plate on the back of the
Explorer unit.
3. Navigator - Connect Navigator your rig via the main clamp. Navigator also ships with a spacer
that allows you to connect to a standard tripod pan handle. Using the 24” Eclipse Cable connect
the Navigator to the Explorer. Navigator can also be powered with a Canon LP battery, however
the Eclipse cable must be connected to operate the Halo System.
HARDWARE SETUP - MOVI PRO RIG
In order for Halo to operate correctly all components must be set up and connected properly. All direct
communication is via the Eclipse Cables. Wireless communication is only for setup/programming.
1. Explorer - Mount Explorer as close to the center of your lens as possible. We recommend
mounting Explorer centered vertically below your lens. Explorer can be mounted in any position.
2. Lens Motor - Any lens motor that you use with MoVI Pro can be used with the Halo system. For
initial set up, we recommend that you do not connect your lens motor directly to your lens.
Calibrate your lens motor then rotate it off of your lens gear.
3. Navigator - Connect Navigator your rig. Using the 24” Eclipse Cable, connect Navigator to
Explorer. Using the 6 pin MoVI Pro cable, connect Navigator to MoVI Pro Com 1 or Com 2. See
Navigator Movi Pro setup doc for more info.
Halo Solo Complete User Guide 2

INITIAL SETUP - CINEMA RIG / MoVI PRO
Explorer requires setup before use. You must “initialize” each of your lenses. For initial setup we
recommend setting up only one lens. Once you are familiar with the process, you can set up a maximum
of 8 lenses.
1. Download and install the Halo Explorer Lens Setup App. This app is distributed directly via our
website but will eventually be available via the respective Windows/Mac app stores. Download
here if you have not already. The app can simply be placed in any local folder on your computer.
Wi-Fi is required to set up Explorer. Your Explorer will display “Explr_######” as it’s SSID. The
password for all Eclipse products is 12345678. Connect to Explorer’s access point and start the
app. Note: If your only source of network access is Wi-Fi then once you are connected to
Explorer you will not have normal network access. Explorer does not connect to the internet.
Some operating systems will auto scan for Wi-Fi so if you remove power from Explorer you may
have to reconnect to your Explorer’s Wi-Fi access point.
Access point connection.
Halo Solo Complete User Guide 3

2. Run the app and note the status. (See images below) If you see the “Connecting…” message
make sure Explorer is powered on and you are connected to it’s Wi-Fi access point.
(Main screen - Not Connected)
(Main Screen - Connected)
Halo Solo Complete User Guide 4
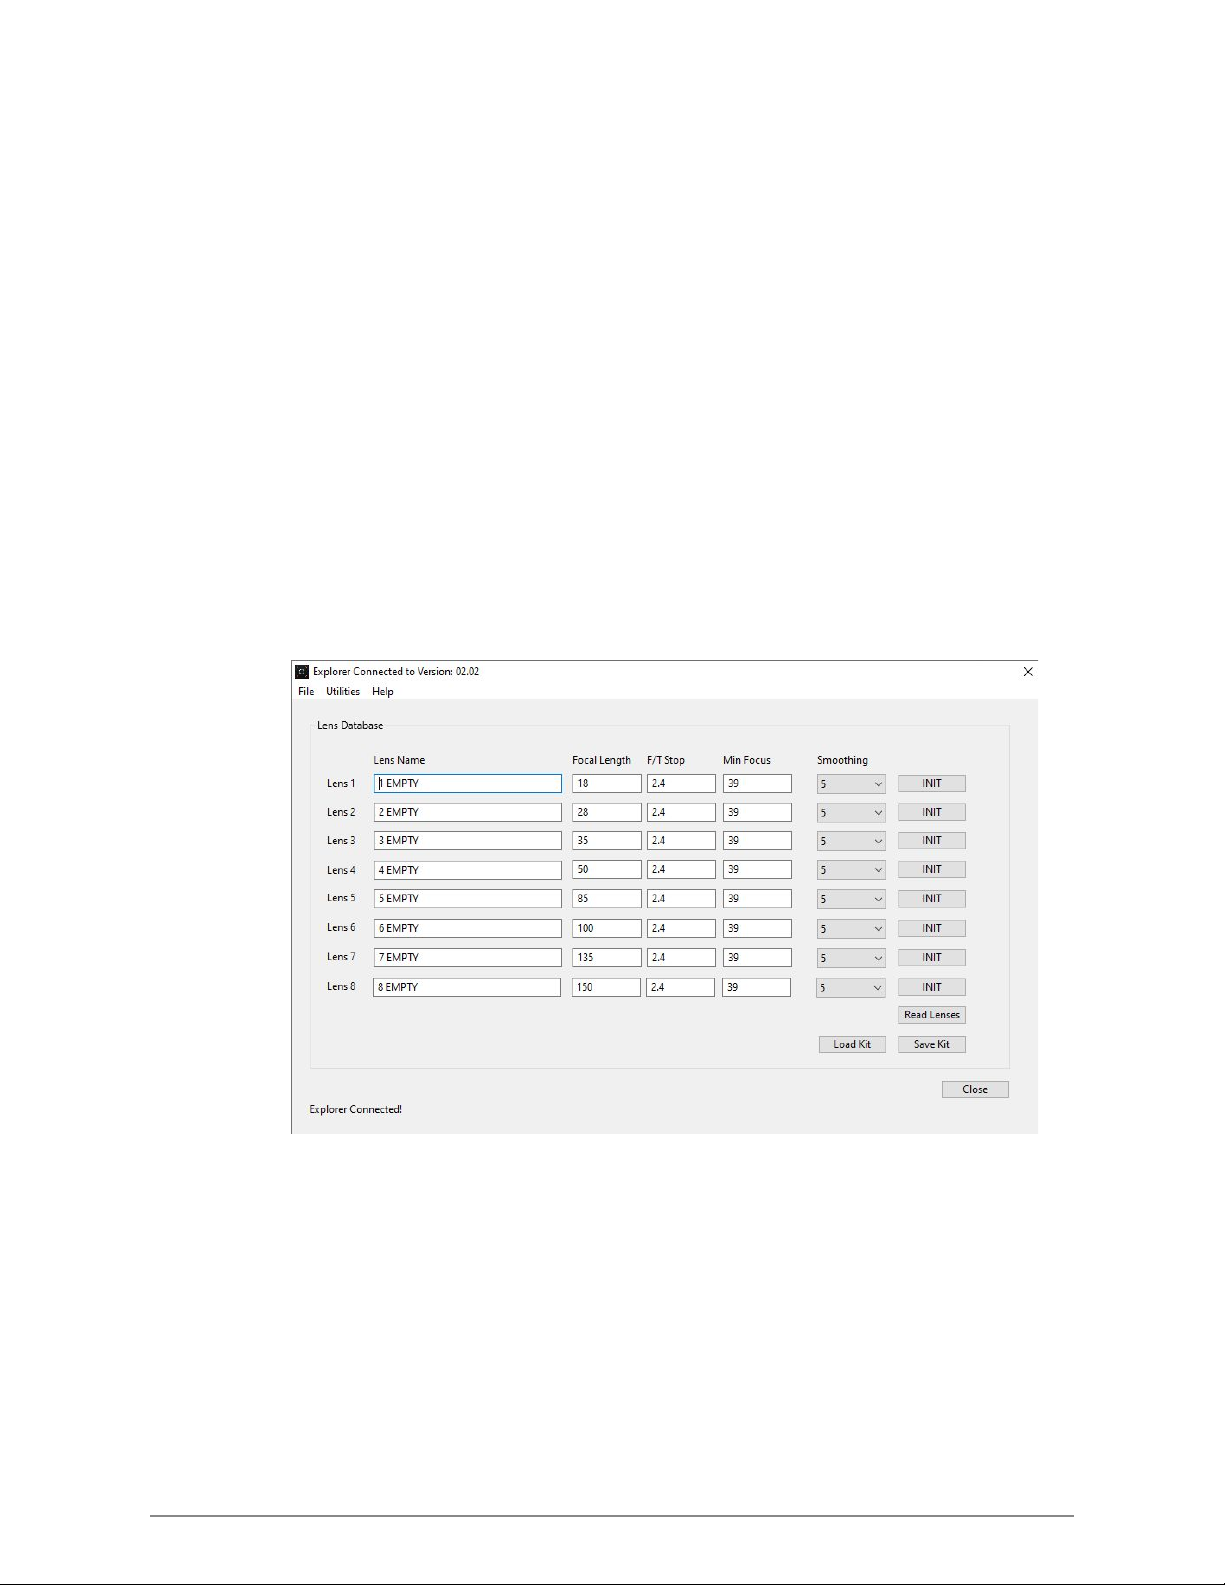
3. Once connected, click on the Lens Kit icon to enter the lens setup screen. This screen will display
some default data. All of the following can be found in the help menu/Motor Setup Section.
a. Lens Name - A general description of your lens. Use up to 16 characters to describe
your lens. We recommend brand and focal length e.g. Canon 50mm but you can use
anything you like e.g Brad’s Lens 1.
b. Focal Length - Use your lens’ focal length. Enter a whole number only. Do not enter
“mm”
c. F/T Stop - This field is for reference only and is not stored in Explorer.
d. Min Focus - Enter your lens’ minimum focus distance in inches. E.g 39 (39” = 3’3”)
e. Smoothing - Smoothing is used in conjunction with Atlas’ “Artistry” or MoVI Pro’s
“Damping” motor settings to produce smoother/slower or rapid focus pulls.
f. INIT Button - See next section
g. Read Lenses Button - Reads the stored lenses from Explorer
h. Save Kit Button - Saves the lenses currently displayed on the screen to a local
database.
i. Load Kit Button - Loads a saved kit onto the screen (Does not send to Explorer)
(Lens Setup Screen)
Halo Solo Complete User Guide 5

4. INIT Lenses - Each lens must be initialized. Initialization consists of setting the minimum focus
point and the maximum focus point. Using Navigator you will rotate your lens to it’s minimum
focus point then it’s maximum focus point. Press the “INIT” button to start the process. As long as
you are still connected to Explorer you should see a value in the “SET MIN FOCUS” column. In
general most lens’ minimum focus point is greater than zero. So even though you can move your
lens past it’s minimum focus distance to get to zero, Explorer is looking for the value that matches
the “Min Focus” value. So if your lens’ Min Focus is 12, rotate your lens to the 12” mark.
Initializing a Lens
a. Fill out all appropriate data
b. Press “INIT”
c. Rotate your lens to the minimum focus distance. Press “SET MIN”
d. Rotate your lens to the maximum focus distance. Press “SET MAX”
e. Once “SET MAX” is clicked all lenses will be processed and sent to Explorer.
Note: SET MIN FOCUS value needs to be the smaller number. If you are moving towards
the minimum focus point and the number is increasing you will get a warning message
and the record will not be saved. In this case set the motor direction to either forward or
reverse or move the motor to the other side of the lens. The forward/reverse setting can
be found in the Atlas menu or in the motor setup menu on MoVI Pro.
(Init Lenses)
(Sending Lenses)
Halo Solo Complete User Guide 6

INITIAL USE
Once you get your first lens setup and sent to Explorer you will see the lens name displayed on Explorer
above the distance data, the distance marker below the distance data, and the smoothing setting on the
lower right corner (05). You may have to scroll to find your lens. Press up or down on the Explorer’s
joystick to scroll lenses.
(“TEST LENS 1”)
1. Activate Halo - With your lens motor off your lens gear, roll focus to 50% on the Navigator
screen which represents the center of the focus travel. Activate Halo by pressing the center
button below the display on the Navigator. The Navigator will display the Halo logo and the
Eclipse Lights (LED’s) will indicate blue. If you are using Atlas, Atlas will also indicate blue (Halo
mode). As soon as you activate Halo, your lens motor will move to the distance indicated by Halo.
Since you are off the lens you will not be able to confirm the location.
(HALO Active)
Halo Solo Complete User Guide 7

2. Test Halo - Place a flat object in front of Explorer to confirm the lens motor responds to the
distance information, also take this time to confirm motor speed/response to make sure you are
familiar with how your lens motor responds to feedback from the Explorer. If you feel the motor
moves too fast or too abruptly adjust the motor Artistry/Damping settings.
3. Once you are familiar with the system you can engage the lens motor with your lens gear.
a. Disengage Halo by pressing the center button below the display on the Navigator.
b. Engage your lens motor.
c. Re-calibrate your lens motor.
d. Engage Halo.
e. Place a flat object in front of Explorer to test motor movement.
Halo Solo Complete User Guide 8

SYSTEM USAGE
Once you are familiar with how the Halo system functions you can fine tune your setup and begin normal
usage. In this section we will cover laser calibration, offset calibration, lens selection, display orientation,
and system modes. Halo has 4 modes: On (Auto Focus), Focus Acquisition, Hybrid, and Off (Manual
Focus).
1. Auto Focus - This mode uses the distance data full time to track your subject.
2. Focus Acquisition - This mode uses distance data to momentarily move your focus mark to your
subject. Once acquired, Halo is disengaged and the acquired focus mark is maintained. You can
continue to track your subject manually.
3. Hybrid - This mode uses distance data to momentarily move your focus mark to your subject.
When disengaged the lens motor will move focus to the current focus mark.
4. Off - Focus tracking is fully controlled by the operator via the Navigator.
Halo Solo Complete User Guide 9
Table of contents
Other Redrock Micro Camera Accessories manuals

Redrock Micro
Redrock Micro Scout HS User manual

Redrock Micro
Redrock Micro microRemote System User manual

Redrock Micro
Redrock Micro Navigator User manual

Redrock Micro
Redrock Micro Scout HS Troubleshooting guide

Redrock Micro
Redrock Micro DIGIBOOM User manual

Redrock Micro
Redrock Micro ATLAS User manual
Popular Camera Accessories manuals by other brands

Viltrox
Viltrox EF-NEX Mount instructions

Calumet
Calumet 7100 Series CK7114 operating instructions

Ropox
Ropox 4Single Series User manual and installation instructions

Cambo
Cambo Wide DS Digital Series Main operating instructions

Samsung
Samsung SHG-120 Specification sheet

Ryobi
Ryobi BPL-1820 Owner's operating manual


