Qilive Q.6806 User manual

EN
FR
ES
IT
PT
PL
HU
RO
RU
UA
Vacuum cleaner with bag
Aspirateur traîneau avec sac
Apirador trineo con bolsa
Aspirapolvere a traino con sacco
Aspirador de arrasto com saco
Odkurzacz z workiem
Csúszótalpas zsákos porszívó
Aspirator cu furtun cu sac
Напольный пылесос с мешком-пылесборником
Пилосос на коліщатках з пилозбірником
Cylinder bag
vacuum cleaner
Q.6806

EN
FR
ES
IT
PT
PL
HU
RU
RO
UA
User manual
Manuel d’utilisation
Manual de instrucciones
Manuale di istruzioni
Manual de utilização
Instrukcja obsługi
Használati utasítás
Manual de instrucţiuni
Руководство пользователя
Довідник користувача
P. 4
P. 15
p. 26
P. 37
P. 47
S. 58
69. o.
P. 80
C. 91
C. 102

EN
FR
ES
IT
PT
PL
HU
RU
RO
UA
1 2 3 54 6 7 8 9
16
17
18
15
14
1213 11 10

4
EN
1. SAFETY INSTRUCTIONS P.4
2. DESCRIPTION P.5
3. ASSEMBLY / DISSEMBLY P.5
4. OPERATION AND USE P.6
5. MAINTENANCE AND CLEANING P.6
6. WARRANTY AND LIMITATION OF LIABILITY P.7
1. SAFETY INSTRUCTIONS
Before using this appliance, please carefully read the following
instructions and keep the user manual for future use:
1. This appliance can be used by children aged from 8 years
and above and persons with reduced physical, sensory or
mental capabilities or lack of experience and knowledge if they
have been given supervision or instruction concerning use of the
appliance in a safe way and understand the hazards involved.
Children shall not play with the appliance. Cleaning and user
maintenance shall not be made by children without supervision.
2. Before connecting the unit to a wall outlet, ensure that the
local electric current corresponds to that specied on the plate
on the unit. Always plug your device into an earthed unit.
3. If the supply cord is damaged, it must be replaced by the
manufacturer, its service agent or similarly qualied persons in
order to avoid a hazard.
4. Do not leave the appliance when plugged in. Unplug it from
the outlet when not in use and before servicing.
5. Do not use outdoors or on wet surfaces.
6. The appliance should not be used as a toy. Supervision is
necessary when using it near children.
7. Useonlyasdescribedinthismanual.Useonlymanufacturer’s
recommended attachments.
8. Do not use with damaged cord or plug. If appliance is not
working as it should, has been dropped, damaged, left outdoors,
or dropped into water, return it to a service center.
CONTENT OVERVIEW :

5
EN
9. Do not pull or carry by cord, use cord as a handle, close door
on cord, or pull cord around sharp edges or corners. Do not run
appliance over cord. Keep cord away from heated surfaces.
10. Do not unplug by pulling on cord. To unplug, grasp the plug,
not the cord.
11. Do not handle plug or appliance with wet hands.
12. Do not put any object into openings. Do not use with any
opening blocked; keep free of dust, lint, hair, or other materials
that may reduce airow.
13. Keep hair, loose clothing, ngers, and all parts of body away
from openings and moving parts.
14. Do not pick up anything that is burning or smoking, such as
cigarettes, matches, or hot ashes.
15. Do not use without having dust bag and/or lter in place.
16. Turn off all controls before unplugging.
17. Use extra care when cleaning on stairs.
18. Do not use to pick up ammable or combustible liquids such
as gasoline. Do not use in areas where such liquids may be
present.
19. Do not use if any electrical wire is damaged, cut, or punctured.
Avoid picking up sharp objects.
20. Turn off appliance before connecting or disconnecting hose
or power attachments.
21. Hold plug when rewinding onto cord reel. Do not allow plug
to whip when rewinding.
22. Unplug before connecting non-electrical mechanical
accessories.
23. This appliance has a polarized plug (one blade is wider that
the other). This plug will t in a polarized outlet only one way. If
the plug does not t fully in the outlet, reverse the plug. If it still
does not t, contact a qualied electrician to install the proper
outlet. Do not change the plug in any way. Do not use adapters.

6
EN 24. This symbol on the product and / or accompanying
documents means that used electrical and electronic
equipment (WEEE) should not be mixed with general
household waste. For proper treatment, recovery and
recycling, please take the product(s) to designated collection
points where it will be accepted free of charge.
Alternatively, in some countries, you may be able to return your
products to your local retailer upon purchase of an equivalent
new product. Disposing of this product correctly will help save
valuable resources and prevent any potential negative effects
on human health and the environment, which could otherwise
arise from inappropriate waste handling. Please contact your
local authority for further details of your nearest designated
collection point. Penalties may be applicable for incorrect
disposal of this waste, in accordance with your national
legislation.
25. Regarding the information pertaining to the installation and
user maintenance, please refer to the paragraph below of the
manual.

7
EN
2. DESCRIPTION
1. Handle
2. Front cover lock
3. Front cover
4. Suction hose receptacle
5. Accessory compartment
6. Dust bag full indicator
7. Cord rewinding button
8. Back cover
9. Mains plug with power cord
10.Large Wheel
11.Air outlet cover
12.ON/OFF Switch
13.Suction power control knob
14.Suction tube
15.Floor brush
16.Suction hose
17.Nozzle brush
18.Crevice nozzle
The general purpose vacuum cleaner (model 143778), has been tested according standard EN
60312-1: 2017 and complies with the essential requirements of regulation (EU) 666/2013 for
vacuum cleaners.
Model No 143778
Annual energy consumption 24.5 kWh/yr
Indicative annual energy consumption (kWh per year), based on 50 cleaning tasks. Actual
annual energy consumption will depend on how the appliance is used.
For general purpose vacuum cleaners and carpet vacuum cleaners; for hard oor vacuum
cleaners, the declaration not suitable for use on carpet with the delivered nozzle.
For general purpose vacuum cleaners and hard oor vacuum cleaners; for carpet vacuum
cleaners, the declaration not suitable for use on hard oors with the delivered nozzle.
The sound power level 68dBA
The rate input power 700W

8
EN 3. ASSEMBLY / DISSEMBLY
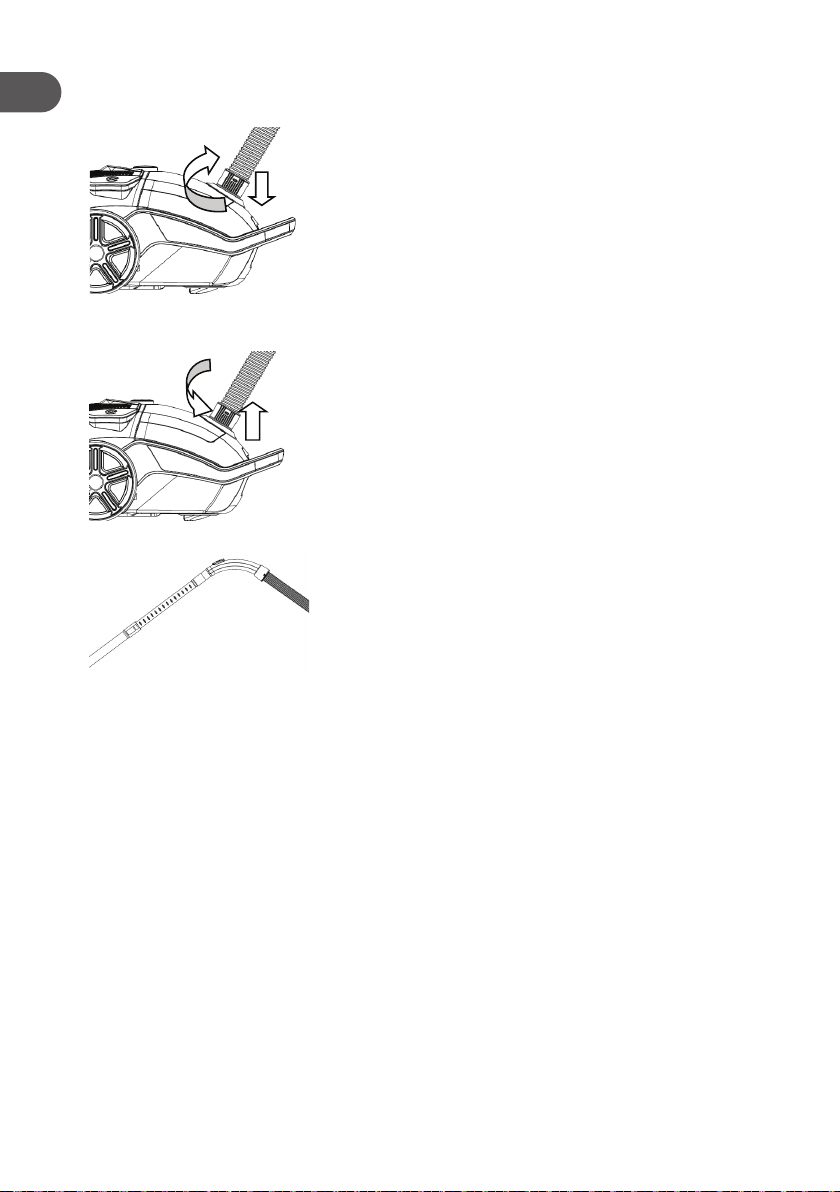
Connect the suction hose (16).
Align and insert the bayonet lock end of the suction hose
(16) into the suction hose receptacle (4) at the front cover
and turn clockwise to lock the bayonet lock tight (Fig 1).
Remove the suction hose (16).
Turn bayonet lock end of the suction hose (16)
counterclockwise to unlock the bayonet lock. Pull out the
bayonet lock end of the suction hose (16) from the suction
hose receptacle (4) (Fig 2).
Connect the suction tube (14) to the curved end of the
suction hose (16) (Fig 3).
Fig. 1
Fig. 2
Fig. 3

9
EN
4. OPERATION AND USE
4.1. MOUNTING AND USER INSTRUCTIONS FOR THE ACCESSORIES -
BRUSH AND NOZZLES
Choose a suitable accessory for your cleaning needs.
4.1.1. FLOOR BRUSH
Connect the oor brush (15) to the end of the suction tube (14) to clean carpets or hard oors.
The oor brush (16) can be adjusted to the type of oor.
Press down the oor selector on the oor brush when
cleaning carpets.
Lift the oor selector to retract the brush for cleaning hard
oors.
The selector in the middle of the oor brush sets the Deep
Clean Mode for use on carpets and Easy Clean mode for
wooden oors.
4.1.2. NOZZLE BRUSH
Connect the nozzle brush (17) to the end of the suction hose (16) to clean sofas, matresses, or
curtains etc.
4.1.3. CREVICE NOZZLE
Connect the crevice nozzle (18) to the end of the suction hose (16) for vacuuming hard-to-reach
places like sofa crevices, wall corners, curtains, gaps between furniture, etc.
The crevice and nozzle brushes are stored in the accessory compartment (5).

10
EN 4.2. VACUUMING INSTRUCTIONS
Insert the mains plug with power cord (9) into a power
socket conforming to the voltage specications of the
vacuum cleaner.
Press the ON/OFF switch (12) with your foot to start the
vacuum cleaner (Fig 4).
Adjust the suction power of the vacuum cleaner:
Rotate the suction power control knob (13) (Fig 5).
Carry vacuum cleaner only by the handle (1) when moving
around (Fig 6).
Switch off the vacuum cleaner with the ON/OFF switch (12)
after completing your work.
Pull the plug from the mains socket.
Press the cord rewinding button (7) to retract the power cord
into the cable compartment (Fig 7).
Fig. 4
Fig. 5
Fig. 6
Fig. 7
5. MAINTENANCE AND CLEANING
Warning! The plug must be removed from the power socket before any maintenance or
replacement.
If the power cord is damaged, it must be replaced by the manufacturer or its service agent
or an appropriately qualied person in order to avoid a hazard.
This manual suits for next models
1
Table of contents
Languages:
Other Qilive Vacuum Cleaner manuals