Power Fist 8467946 User manual

User Manual
8467946
Please read and understand all instructions before use. Retain this manual for future reference.
V 3.01
10 in. Cordless
Grass Trimmer

2For technical questions call 1-800-665-8685
8467946V 3.01
10 in. Cordless Grass Trimmer
SPECIFICATIONS
Li-ion Battery Voltage 18V
Capacity 1,5000 mAH
Recharge Time 1 Hour
Head Style Half Plastic Shield, Adjustable
Cutting Radius 10 in. (25 cm)
Speed 8,000 RPM
Handles Telescopic Shaft with an Adjustable Side Handle
Weight (with Battery) 6.6 lb (3 kg)
INTRODUCTION
Your cordless grass trimmer is designed for trimming and finishing lawn edges and cutting grass around shrubs
and trees. The cordless trimmer offers maximum convenience without the need for a connection to a power outlet.
This trimmer is not built for continuous daily use in a trade or professional capacity.
SAFETY
WARNING! Read and understand all instructions before using this tool. The operator must follow basic
precautions to reduce the risk of personal injury and/or damage to the equipment.
Keep this manual for safety warnings, precautions, operating or inspection and maintenance instructions.
WORK AREA
1. Operate in a safe work environment. Keep your work area clean, well lit and free of distractions.
2. Keep anyone not wearing appropriate safety equipment away from the work area.
3. Store tools properly in a safe and dry location. Keep tools out of the reach of children.
4. Do not install or use in the presence of flammable gases or liquids.

10 in. Cordless Grass Trimmer
3
Visit www.princessauto.com for more information
8467946 V 3.01
PERSONAL SAFETY
WARNING! Wear personal protective equipment approved by the Canadian Standards Association (CSA) or
American National Standards Institute (ANSI).
Personal Protective Equipment
1. Always wear impact safety goggles that provide front and side protection for the eyes.
2. Wear gloves that provide protection based on the work materials or to reduce the effects of tool vibration.
3. Non-skid footwear is recommended to maintain footing and balance in the work environment.
4. Wear protective clothing designed for the work environment.
Personal Precautions
Control the tool, personal movement and the work environment to avoid personal injury or damage to tool.
1. Do not operate any tool when tired or under the influence of drugs, alcohol or medications.
2. Avoid wearing clothes or jewelry that can become entangled with the moving parts of a tool. Keep long hair
covered or bound.
3. Do not overreach when operating a tool. Proper footing and balance enables better control in
unexpected situations.
SPECIFIC SAFETY PRECAUTIONS
• Never operate the trimmer with damaged guards or without guards in place.
• Switch on the trimmer only when hands and feet are away from the cutting head.
• Use only the manufacturer’s recommended replacement parts and accessories.
• AIways remove the battery when leaving the trimmer unattended.
• Disconnect the trimmer from the battery before making any adjustments or when changing lines or clearing
grass from under the guard
• Face the trimmer’s cutting head away from you, other people and animals while the power is connected.
• Use both handles when operating the grass trimmer.
• Keep ventilation openings clear of debris.
• Never reach underneath the trimmer (the cutting area) until it has completely stopped and the battery
is disconnected.

10 in. Cordless Grass Trimmer
4For technical questions call 1-800-665-8685
8467946
V 3.01
GENERAL SAFETY PRECAUTIONS
Electrical Safety
WARNING! To reduce risk of electric shock, be certain that the plug is connected to a properly
grounded receptacle.
1. Disconnect tool from power source before cleaning, servicing, changing parts/accessories or
when not in use.
2. Protect yourself against electric shocks when working on electrical equipment. Avoid body contact with
grounded surfaces. There is an increased chance of electrical shock if your body is grounded.
3. Do not alter any parts of the tool or accessories. All parts and accessories are designed with built-in safety
features that may be compromised if altered.
4. Make certain that power source conforms to requirements of your equipment.
5. Do not expose power tools to rain or to poor weather conditions. Water entering a power tool will increase
the risk of electric shock.
WARNING! All wiring should be performed by a qualified electrician.
Lithium Ion Battery and Charger Safety Warning
WARNING! Do not allow any liquid to get inside charger. Electric shock may result. To facilitate cooling of the
battery pack after use, avoid placing the charger or battery pack in a warm environment such as in a metal
shed, or an uninsulated trailer.
WARNING! If the battery pack case is cracked or damaged, do not insert it into charger. There is a danger of
electric shock or electrocution. Dispose of the battery safely.
Before using the charger, read all instructions and cautionary markings on the charger, battery pack and the product
using the battery pack.
• This charger is not intended for any uses other than charging rechargeable batteries. Any other use may
result in risk of fire, electric shock or electrocution.
• Do not place any object on top of the charger or place the charger on a soft surface that may result in
excessive internal heat. Place the charger in a position away from any heat source.
• To reduce risk of damage to the electric plug and cord, pull by the plug rather than the cord when
disconnecting the charger.
• Make sure the cord is located so that it will not be stepped on, tripped over, or otherwise subjected to
damage or stress.
• An extension cord should not be used unless absolutely necessary. Use of an improper extension cord could
result in the risk of fire, electric shock or electrocution.
• Do not operate the charger if it has received a sharp blow, been dropped or otherwise damaged in any way.
Have it serviced or replaced.
• Do not disassemble charger. Take it to an electrician or power tool repairer when service or repair is
required. Incorrect reassembly may result in a risk of electric shock, electrocution or fire.
• To reduce risk of electric shock, unplug the charger from the outlet before attempting any cleaning.
Removing the battery pack will not reduce this risk.
• Never attempt to connect 2 chargers together.
• Do not store or use the tool and battery pack in locations where the temperature may reach or exceed 104 °F
(40 °C), such as inside sheds or metal buildings in summer.
• The charger is designed to operate on standard household electrical power. Do not attempt to use it on any
other voltage.
• The battery pack is not fully charged out of the carton. First read the safety instructions and then follow the
charging notes and procedures.

10 in. Cordless Grass Trimmer
5
Visit www.princessauto.com for more information
8467946 V 3.01
• The longest life and best performance can be obtained if the battery pack is charger when the air
temperature is between 64 to 75 °F (18 to 24 °C). Do not charge the battery pack in an air temperature below
50 °F (10 °C) or above 104 °F (40 °C). This is important and will prevent damage to the battery pack.
• Do not incinerate the battery pack even if it is seriously damaged or is completely worn out. The battery can
explode in a fire.
• Never attempt to open the battery pack for any reason, If the plastic housing of the battery pack breaks or
cracks, immediately discontinue use and do not recharge.
USE AND CARE OF TOOL
1. Use the correct tool for the job. This tool was designed for a specific function. Do not modify or alter this
tool or use it for an unintended purpose.
2. Do not carry the tool with fingers near or on the trigger and lock off switch.
3. Avoid unintentional starts. Be sure that the lock off switch is in the neutral or OFF position when not in use or
before connecting it to any power source.
10 in. Cordless Grass Trimmer
6For technical questions call 1-800-665-8685
8467946
V 3.01
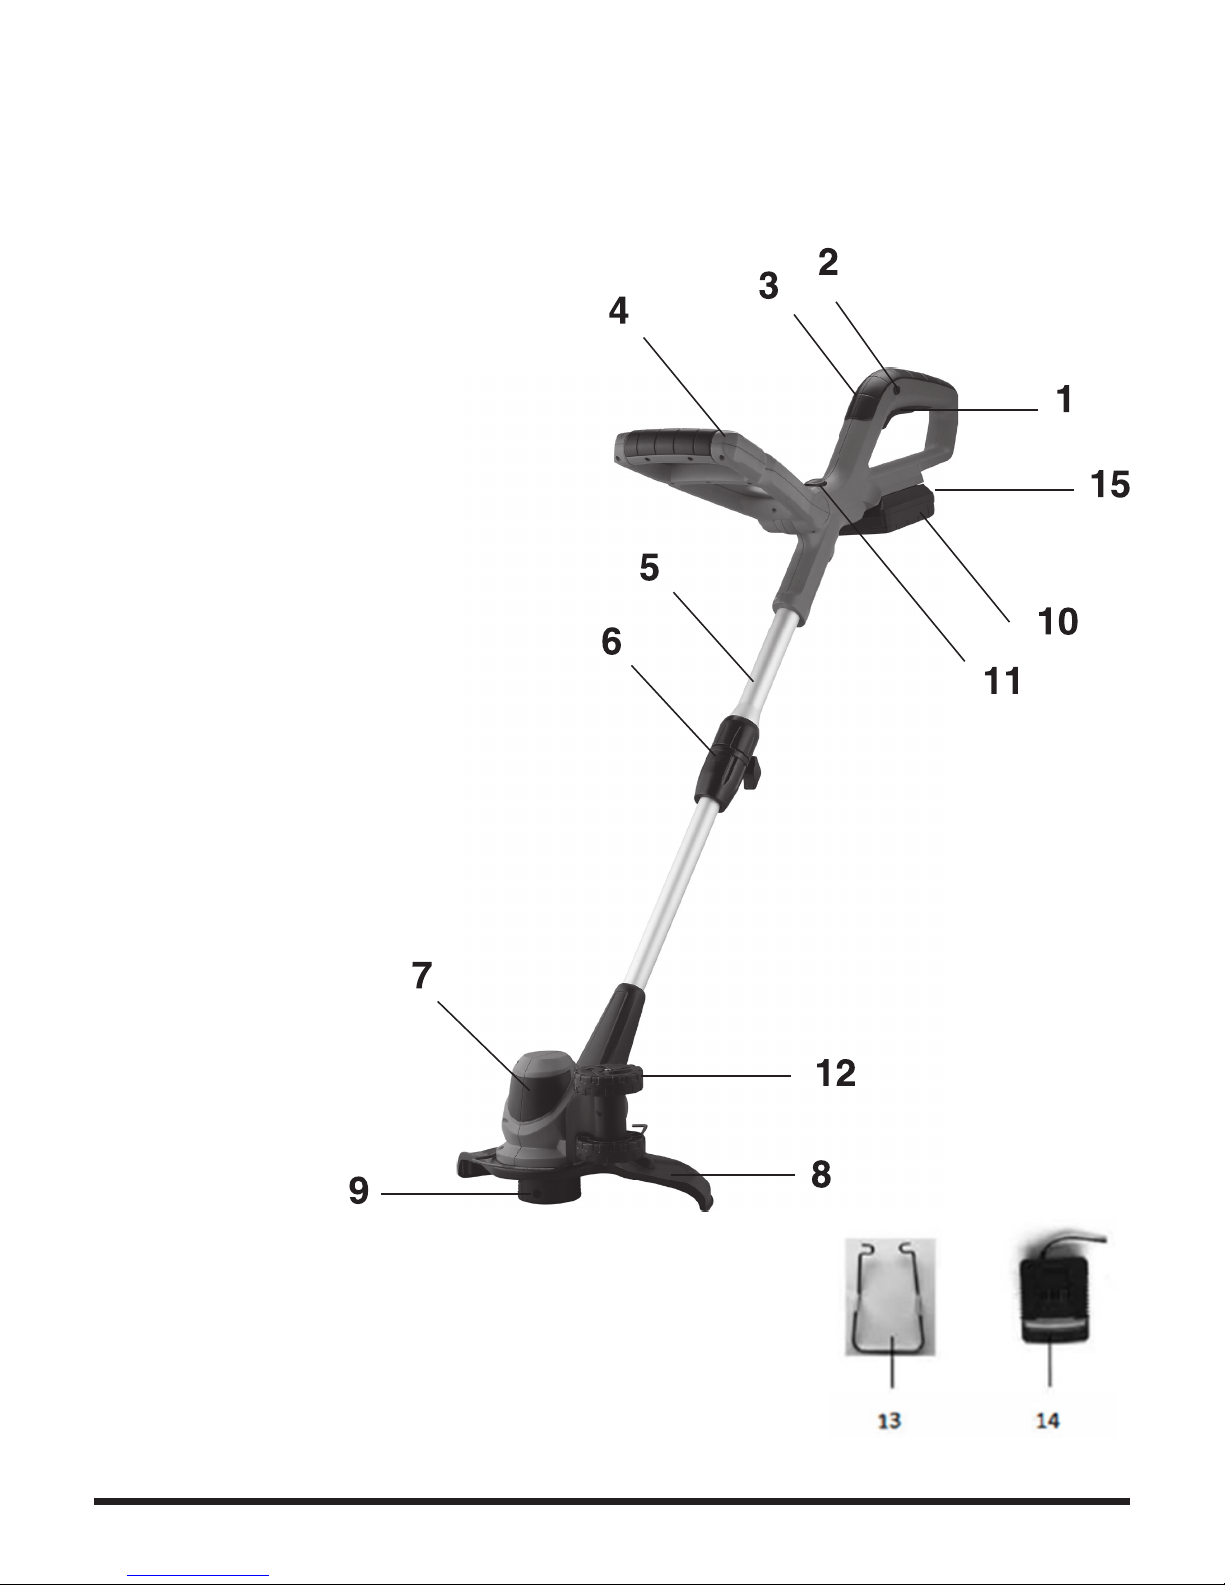
PARTS IDENTIFICATION
WARNING! Do not operate the tool if any part is missing. Replace the missing part before operating. Failure to
do so could result in a malfunction and personal injury.
Remove the parts and accessories from the packaging and inspect for damage. Make sure that all items in the parts
list are included.
Contents:
• Cordless grass trimmer
• Battery (18V lithium ion)
• Battery charger
• Line spool (fitted)
• Screw
• Tree guard
1. ON/OFF Trigger Switch
2. Lock Off Switch
3. Handle (with Soft Grip)
4. Secondary Handle (Adjustable)
5. Telescopic Shaft
6. Shaft Adjustment Lock
7. Cutting Head (Rotating)
8. Safety Guard
9. Spool and Line Assembly
10. Battery
11. Edger Function Switch
12. Edger Wheel
13. Tree Guard
14. Charger (CETL 4004738)
15. Battery Release Button (Not Shown)

10 in. Cordless Grass Trimmer
7
Visit www.princessauto.com for more information
8467946 V 3.01
Fig. 1
Fig. 2
Fig. 3
Fig. 4
Fig. 5
Fig. 6
ASSEMBLY
When this manual refers to a part number, it refers to the included Parts List section.
WARNING! Remove the battery from the grass trimmer, before installing the tree guard,
safety guard and the edging wheel to avoid accidental activation and injury.
1. Insert the tree guard (#13) into the black slot on cutting head (#7). Note the direction
of the tree guard (Fig. 1). When In trimming mode, the tree guard should be like Fig. 2.
2. Locate the safety guard (#8) onto the cutting head and turn it a bit to make sure it
engages into the slots on the cutting head. Note to follow the arrow direction on the
safety guard (Fig. 3).
3. Fix the safety guard onto the cutting head with the screw out of the package (Fig. 4).
4. When in edging mode, the edging wheel needs to be fit on the trimmer. Insert the
edging wheel (#12) into the black slot piece on the cutting head (Fig. 5). Make sure the
edging wheel firmly connects with the slot. Push the tree guard so it does not protrude
(Fig. 6).
INSTALLING OR REMOVING THE BATTERY
Always switch off the tool before insertion or removal of the battery.
Installing the Battery
Align the notches in the base of the grass trimmer’s handle (#3) with those of the battery (#10)
and slide the battery and grass trimmer together until the battery locks into place (Fig. 7).
Removing the Battery
Press down the battery release button (#15) and slide out the battery (Fig. 8).
Getting the best performance from the battery
The length of service from each charging cycle will depend on the type of work undertaken.
To obtain the longest possible battery life:
• Store and charge your batteries in a cool area. Temperatures above or below normal
room temperature will shorten battery life.
• Never store batteries in a discharged condition. Recharge them immediately after they
are discharged.
• All batteries gradually lose their charge. The higher the temperature the quicker they
lose their charge. If you store your grass trimmer for long periods of time without
using it, recharge the batteries every month or two. This practice will prolong
battery life.
OPERATION
TRIMMING FUNCTION
WARNING! Do not try to adjust the telescopic shaft while the trimming line Is rotating.
Remove the battery from grass trimmer before performing adjustments.
1. Adjusting the Cutting Height.
Unscrew the lock sleeve on the shaft and adjust the length of the telescopic shaft (#5)
to the most comfortable operation position (Fig. 9). Turn the lock sleeve anticlockwise
to lock the shaft in position.
Fig. 7
Fig. 8
Fig. 9

10 in. Cordless Grass Trimmer
8For technical questions call 1-800-665-8685
8467946
V 3.01
Fig. 15
Fig. 10
Fig. 11
Fig. 12
Fig. 13
Fig. 14
2. Adjusting the Secondary Handle.
While gripping the rotating part on secondary handle (#4) tightly, turn it in a downward
direction (Fig. 10). Push the secondary handle down until the desired angle is set in one
of five angles. There is a downward arrow marked on this handle. You can follow the
direction of the arrow to adjust the angle (Fig. 11). You will hear a click sound. Release the
rotating part of the secondary handle.
3. Adjusting the Angle of the Cutting Head.
While firmly holding the main handle in one hand and one foot step on the top of the
cutting head, push shaft backwards or forwards to adjust the cutting angle to one of
6 positions (Fig 12).
4. Adjusting the Cutting Head for Trimming or Lawn Edging.
The trimmer is designed to offer both trimming and edging function. To switch from
trimming to edging, press the Edger function switch (#11) on the tool, firmly holding
the telescopic shaft in one hand and turn to the left (Fig. 13 & 14).
5. Switching On.
• To prevent the tool accidental starting, this grass trimmer is designed with a
safety lock off mechanism.
• To turn the grass trimmer on use your thumb to press the lock off switch (#2)
while holding the lock off switch squeeze the on/off trigger switch (#1).
• To turn the grass trimmer off, release the on/off trigger switch.
TRIMMING TIPS
WARNING! Remove battery from grass trimmer before performing adjustments. Make sure that
the work area is free of rocks, debris, lines and other foreign objects.
1. Lower the tree guard to prevent the cutting head from getting too close to an object such
as a tree trunk or wall and causing damage to the Trimming Spool (#9).
2. Start the trimmer before approaching the grass to be cut.
3. Cut the grass by moving the trimmer from the right to left and proceed slowly, keep
the trimmer inclined forwards at an angle of about 30 degrees. Light cuts are better
than heavy cuts as they allow the cut grass to fall away from the cutting head.
4. High grass should be cut in layers always beginning from the top. Do not cut damp
or wet grass. This will overload your trimmer.
5. Watch out for kickbacks and sprays of debris in the event of an impact with hard objects.
6. After finishing the cutting operation, keep the head close to ground level, release the
switch and allow the motor to come to a complete standstill. Place the grass trimmer on
the ground and remove the battery.
CHARGING YOUR LITHIUM ION BATTERY
The battery was shipped in a low charge condition and requires charging prior to use.
• Plug the charger (#14) into a power outlet.
• The power light on the charger will turn green showing that power is being
supplied to the charger.
• Slide the battery into the charger (Fig. 15). The battery only fits one way.
• The charging light on charger will turn red when the battery is charging.
• The charging light on charger will turn green when the battery is fully charged.
• The battery takes 1 hour to charge. Slide the battery out from the charger after no more
than 90 minutes.
• Unplug the charger from the power outlet when the charger is not in use.
• If the battery is completely discharged, 90 minutes charging time will be required to fully
recharge it.

10 in. Cordless Grass Trimmer
9
Visit www.princessauto.com for more information
8467946 V 3.01
• Remove the battery by pressing the release button on the battery and slide out of the charger.
Important Charging Notes
• The charger and battery may become warm to touch while charging. This is a normal condition and does not
indicate a problem.
• Use the charger at normal room temperature whenever possible. Don’t charge the battery in direct sunlight,
near heat sources or a damp place. The charging light will flash in green and red alternately when the
charger becomes too hot and then it stops charging.
Thermal Voltage Protection Indication
• A protective circuit switches off the grass trimmer when the battery is flat to protect the battery against deep
discharging. The cutting line will not move for 2 minutes. Do not continue to press the on/off switch after an
automatic shut-off, as it will damage the battery. The battery must be recharged before further use.
• In the event that the thermal or voltage protection circuit is activated the battery will cease to operate. This
can happen when the tool is used for extended periods.
• The charger’s light will flash green and red alternately when the battery is inserted. Relocate the battery and
charger into a place that is room temperature for 30 minutes. The battery will then charge as normal.
MAINTENANCE
1. Maintain the tool with care. A tool in good condition is efficient, easier to control and will have
fewer problems.
2. Inspect the tool components periodically. Repair or replace damaged or worn components.
3. Keep ventilation slots of the trimmer clean at all times and prevent any foreign matter from entering.
4. Clean the tool after each use using a damp rag, avoiding the electric components. Use a non-scratching
brush for more difficult accumulations of dirt. Avoid using corrosive liquids as they may remove finishes or
damage the tool’s plastic housing/components.
WARNING! Only qualified service personnel should repair the tool. An improperly repaired tool may present a
hazard to the user and/or others.
FITTING AND REPLACING LINE SPOOL ASSEMBLY
WARNING! Remove battery from grass trimmer before performing adjustments to avoid accidental start that can
result in an injury.
The line spool is already fit with the grass trimmer when out of package. You need to replace it with new line when
it’s used up.
• To fit the new line into the spool, press the two clips on the spool cover and pull it out of the spool. Pull out
the old line coil and replace it with new one.
• Put the tine through the hole on the spool cover. Push the line coil back to the spindle of the spool.
Make sure it completely sits on the spindle. The line will automatically come out when you turn
on the grass trimmer.
• Press the two clips on the spool cover and put it back into the spool Make sure the two clips fit the two
recess places. The spool cover needs to tightly fit on the spool (Fig. 16).
• Only use line spool recommended by the manufacturer.
LUBRICATION
Inspect and lubricate the tool when required.
DISPOSAL
Recycle a tool damaged beyond repair at the appropriate facility.
Contact your local municipality for a listing of disposal facilities or by-laws for electronic devices, batteries, oil or
other toxic liquids.
Fig. 16

10 in. Cordless Grass Trimmer
10 For technical questions call 1-800-665-8685
8467946
V 3.01
TROUBLESHOOTING
Contact Princess Auto Ltd. for a solution if the tool does not function properly or parts are missing. If unable to do
so, have a qualified technician service the tool.
Problem(s) Possible cause(s) Suggested solution(s)
Unit does not run. 1. Battery not making contact.
2. Trigger switch not operational.
3. Battery not installed properly.
4. Battery not charged.
1. Check battery is fully inserted.
2. Check that lock off button is released
prior to moving trigger.
3. Check battery installation.
4. Check battery charging requirements.
Line won’t feed. Line tangled in spool. Unwrap 24 in. of line and rewind.
Line fails to cut off. Line cutter in guard is damaged
or missing.
Replace Guard.
Battery will not charge. 1. Battery not inserted into charger.
2. Charger not plugged in.
3. Surrounding air temperature too hot
or too cold.
1. Insert battery into charger until the red
LED glows.
2. Plug charger into a working outlet.
a. Check current at receptacle by
plugging in a lamp or other appliance.
b. Check to see if receptacle is connected
to a light switch that turns the power
off when you turn out the lights.
3. Move charger and tool to a surrounding
air temperature between 40 and 105 °F
(4.5 to 40.5 °C).
Table of contents
Languages:
Other Power Fist Trimmer manuals


