Planar RA-Series User manual

Planar RA-Series
ii
Safety Instructions
Safety precautions and maintenance
WARNING: Use of controls, adjustments or procedures other than those specied in this documentation may result in exposure to
shock, electrical hazards and/or mechanical hazards.
Read and follow these instructions when connecting and using your display:
Operation:
• Keepthedisplayoutofdirectsunlightandawayfromstovesoranyotherheatsources.
• Removeanyobjectthatcouldfallintoventilationholesorpreventpropercoolingofthedisplay’selectronics.
• Donotblocktheventilationholesonthecabinet.
• Whenpositioningthedisplay,makesurethepowerplugandoutletareeasilyaccessible.
• Whenturningoffthedisplaybydetachingthepowercord,wait6secondsbeforere-attachingthepowercordfornormaloperation.
• EnsuretheuseofanapprovedpowercordprovidedbyPlanaratalltimes.
• Donotsubjectthedisplaytoseverevibrationorhighimpactconditionsduringoperation.
• Donotknockordropthedisplayduringoperationortransportation.
Maintenance:
• Toprotectyourdisplayfrompossibledamage,donotputexcessivepressureontheLCDpanel.Whenmovingthedisplay,graspthehandlesonthe
rearofthedisplaytolift.DonotliftthedisplaybyplacingyourhandsontheLCDpanelorbezel.
• Unplugthedisplayifyouarenotgoingtouseitforanextensiveperiodoftime.
• Whenthesurfaceofthedisplaybecomesdirty,wipethesurfacelightlywithasoftcleancloth.Ifthesurfacerequiresadditionalcleaning,useLCD
screencleanerorLCDwipes,whichareavailableatmostelectronicsstores.Donotletcleanerseepintothedisplay,asitmaycauseelectricalshock
ordamage.
• Toavoidtheriskofshockorpermanentdamagetotheset,donotexposethedisplaytodust,rain,wateroranexcessivelymoistenvironment.
• Ifyourdisplaybecomeswet,wipeitwithdryclothassoonaspossible.
• Ifaforeignsubstanceorwatergetsinyourdisplay,turnthepoweroffimmediatelyanddisconnectthepowercord.Thenremovetheforeignsubstance
orwater,andsendtheunittothemaintenancecenter.
• Donotstoreorusethedisplayinlocationsexposedtoheat,directsunlightorextremecold.
• Inordertomaintainthebestperformanceofyourdisplayandensurealongerlifetime,westronglyrecommendusingthedisplayinalocationthatfalls
withinthefollowingtemperatureandhumidityranges.
-Temperature:0-40°C32-104°F
-Humidity:20-80%RH
IMPORTANT:Alwaysactivateamovingscreensaverprogramwhenyouleaveyourdisplayunattended.Alwaysactivateaperiodicscreenrefresh
applicationiftheunitwilldisplayunchangingstaticcontent.Uninterrupteddisplayofstillorstaticimagesoveranextendedperiodmaycause“burnin”,
alsoknownas“after-imaging”or“ghostimaging”,onyourscreen.Thisisawell-knownphenomenoninLCDpaneltechnology.Inmostcases,the“burned
in”or“after-imaging”or“ghostimaging”willdisappeargraduallyoveraperiodoftimeafterthepowerhasbeenswitchedoff.
WARNING:Severe“burn-in”or“after-image”or“ghostimage”symptomswillnotdisappearandcannotberepaired.Thisisalsonotcoveredunderthe
termsofyourwarranty.
Service:
• Thecasingcovershouldbeopenedonlybyqualiedservicepersonnel.
• Ifthereisanyneedforrepairorintegration,pleasecontactPlanarTechnicalSupport.
• Donotleaveyourdisplayunderdirectsunlight.
Planar RA-Series
iii
CE Declaration of Conformity
Wedeclareunderourresponsibilitythattheproductisinconformitywiththefollowingstandards:
• EN60950-1:2006+A11:2009+A1:2010+A12:2011+A2:2013(SafetyrequirementofInformationTechnologyEquipment).
• EN55022:2010(RadioDisturbancerequirementofInformationTechnologyEquipment).
• EN55024:2010(ImmunityrequirementofInformationTechnologyEquipment).
• EN61000-3-2:2006+A1:2009+A2:2009(LimitsforHarmonicCurrentEmission).
• EN61000-3-3:2008(LimitationofVoltageFluctuationandFlicker)
• EN50581:2012(Technicaldocumentationfortheassessmentofelectricalandelectronicproductswithrespecttotherestrictionofhazardous
substances)
• EN50564:2011(Electricalandelectronichouseholdandofceequipment—Measurementoflowpowerconsumption)
followingprovisionsofdirectivesapplicable.
• 2006/95/EC(LowVoltageDirective).
• 2004/108/EC(EMCDirective).
• 2009/125/EC(ErP,Energy-relatedProductDirective,ECNo.1275/2008and642/2009Implementing)
• 2011/65/EU(RoHSDirective)andisproducedbyamanufacturingorganizationonISO9000level.
Federal Communications Commission (FCC) Notice (U.S. Only)
ThisequipmenthasbeentestedandfoundtocomplywiththelimitsforaClassBdigitaldevice,pursuanttopart15oftheFCCRules.
Theselimitsaredesignedtoprovidereasonableprotectionagainstharmfulinterferenceinaresidentialinstallation.Thisequipment
generates,usesandcanradiateradiofrequencyenergyand,ifnotinstalledandusedinaccordancewiththeinstructions,maycause
harmfulinterferencetoradiocommunications.However,thereisnoguaranteethatinterferencewillnotoccurinaparticularinstallation.
Ifthisequipmentdoescauseharmfulinterferencetoradioortelevisionreception,whichcanbedetermined
byturningtheequipmentoffandon,theuserisencouragedtotrytocorrecttheinterferencebyoneormoreofthefollowing
measures:
• Reorientorrelocatethereceivingantenna.
• Increasetheseparationbetweentheequipmentandreceiver.
• Connecttheequipmentintoanoutletonacircuitdifferentfromthattowhichthereceiverisconnected..
Changesormodicationsnotexpresslyapprovedbythepartyresponsibleforcompliancecouldvoidtheuser’sauthoritytooperatethe
equipment.
UseonlyanRFshieldedcablethatwassuppliedwiththedisplaywhenconnectingthisdisplaytoacomputerdevice.
Topreventdamagewhichmayresultinreorshockhazard,donotexposethisappliancetorainorexcessivemoisture.
THISCLASSBDIGITALAPPARATUSMEETSALLREQUIREMENTSOFTHECANADIANINTERFERENCE-CAUSINGEQUIPMENTREGULATIONS.
ThisdevicecomplieswithPart15oftheFCCRules.Operationissubjecttothefollowingtwoconditions:(1)thisdevicemaynot
causeharmfulinterference,and(2)thisdevicemustacceptanyinterferencereceived,includinginterferencethatmaycauseundesired
operation.
Planar RA-Series
iv
End-of-Life Disposal
YournewPublicInformationDisplaycontainsmaterialsthatcanberecycledandreused.Specializedcompaniescanrecycleyourproducttoincreasethe
amountofreusablematerialsandtominimizetheamounttobedisposedof.
Pleasendoutaboutthelocalregulationsonhowtodisposeofyourolddisplayfromyourlocaldealer.
(For customers in Canada and U.S.A.)
Thisproductmaycontainleadand/ormercury.Disposeofinaccordancetolocal-stateandfederalregulations.Foradditionalinformationonrecycling
contactwww.eia.org(ConsumerEducationInitiative)
Waste Electrical and Electronic Equipment-WEEE
Attention users in European Union private households
Thismarkingontheproductoronitspackagingillustratesthat,underEuropeanDirective2012/19/EUgoverningusedelectricaland
electronicappliances,thisproductmaynotbedisposedofwithnormalhouseholdwaste.Youareresponsiblefordisposalofthis
equipmentthroughadesignatedwasteelectricalandelectronicequipmentcollection.Todeterminethelocationsfordroppingoffsuch
wasteelectricalandelectronic,contactyourlocalgovernmentofce,thewastedisposalorganizationthatservesyourhouseholdorthe
storeatwhichyoupurchasedtheproduct.
Attention users in United States:
PleasedisposeofaccordingtoallLocal,StateandFederalLaws.Forthedisposalorrecyclinginformation,contact:www.mygreenelectronics.comorwww.
eiae.org.
End of Life Directives-Recycling
YournewPublicInformationDisplaycontainsseveralmaterialsthatcanberecycledfornewusers.
PleasedisposeofaccordingtoallLocal,State,andFederallaws.

Planar RA-Series
v
Table Of Contents
1. Unpacking and Installation.......................................................1
1.1. Unpacking.........................................................................................1
1.2. PackageContents........................................................................1
1.3. InstallationNotes.........................................................................1
1.4. IRremotesensorandpowerstatusindicator.............2
1.5. MountingonaWall....................................................................3
1.5.1. VESAGrid....................................................................3
1.6. MountinginPortraitPosition................................................4
2. Parts and Functions...................................................................5
2.1. ControlPanel.................................................................................5
2.2. Input/OutputTerminals.............................................................6
2.3. RemoteControl...........................................................................7
2.3.1. Generalfunctions.....................................................7
2.3.2. IDRemoteControl.................................................8
2.3.3. Insertingthebatteriesintheremote
control.............................................................................9
2.3.4. Handlingtheremotecontrol.............................9
3. Connecting External Equipment.......................................... 10
3.1. ConnectingMultipleDisplaysinaDaisy-chain
Conguration..............................................................................10
3.1.1. Displaycontrolconnection..............................10
3.1.2. Digitalvideoconnection....................................10
3.1.3. Analogvideoconnection..................................11
3.2. ConnectingAudioEquipment...........................................12
3.2.1. Connectingexternalspeakers........................12
3.2.2. Connectinganexternalaudiodevice........12
3.3. IRconnection..............................................................................13
3.4. IRPass-throughConnection...............................................13
4. Operation................................................................................. 14
4.1. WatchtheConnectedVideoSource............................14
4.2. ChangeAspectRatio..............................................................14
4.3. ChooseyourPreferredPictureSettings......................14
4.4. ChooseyourPreferredSoundSettings.......................14
4.5. InstallingOPSModules..........................................................14
5. Change your settings ............................................................. 14
5.1. Settings............................................................................................15
5.1.1. Picture..........................................................................15
5.1.2. Sound...........................................................................16
5.1.3. Tiling..............................................................................16
5.1.4. Generalsettings......................................................17
5.2. NetworkSettings......................................................................19
6. Input Mode............................................................................... 20
7. Troubleshooting ...................................................................... 21
8. Technical Specications ......................................................... 22
8.1. RA4980..........................................................................................22
8.2. RA5580..........................................................................................24

Planar RA-Series
1
1. Unpacking and Installation
1.1. Unpacking
• Thisproductispackedinacarton,togetherwiththestandardaccessories.
• Anyotheroptionalaccessorieswillbepackedseparately.
• Duetothesizeandweightofthisdisplayitisrecommendedfortwopeopletomoveit.
• Afteropeningthecarton,ensurethatthecontentsarecompleteandingoodcondition.
1.2. Package Contents
Pleaseverifythatyoureceivedthefollowingitemswithyourpackagecontent:
• LCDdisplay
• RemotecontrolwithAAAbatteries
• Powercord(1.8m)
• RS232cable(1.8m)
• DPcable(1.8m)
• IRextendercable(1.5m)
• IRloopcable(1.8m)
• RS232loopcable(1.8m)
• Alignmentplate:3pieces
• Washer:4pieces
• Screw:4pieces
• Spacer:6pieces
• QuickStartGuide Power Cord DP Cable
IR Extender Cable
IR Loop Cable
Remote Control
and AAA Batteries
RS232 Cable
RS232 Loop Cable
Quick Start Guide
Alignment Plate (3)
Spacer (6) Washer (4) Screw (4)
NOTES:
• Forallotherregions,applyapowercordthatconformstotheACvoltageofthepowersocketandhasbeenapprovedbyandcomplieswiththe
safetyregulationsoftheparticularcountry.
• Youmightliketosavethepackageboxandpackingmaterialforshippingthedisplay.
1.3. Installation Notes
• Duetohighpowerconsumption,alwaysusetheplugexclusivelydesignedforthisproduct.
• Theproductshouldbeinstalledonaatsurfacetoavoidtipping.Thedistancebetweenthebackoftheproductandthewallshouldbemaintained
forproperventilation.Avoidinstallingtheproductinthekitchen,bathroomoranyotherplaceswithhighhumiditysoasnottoshortentheservicelife
oftheelectroniccomponents.
• Theproductcannormallyoperateonlyunder3000minaltitude.Ininstallationsataltitudesabove3000m,someabnormalitiesmaybeexperienced.
Planar RA-Series
2
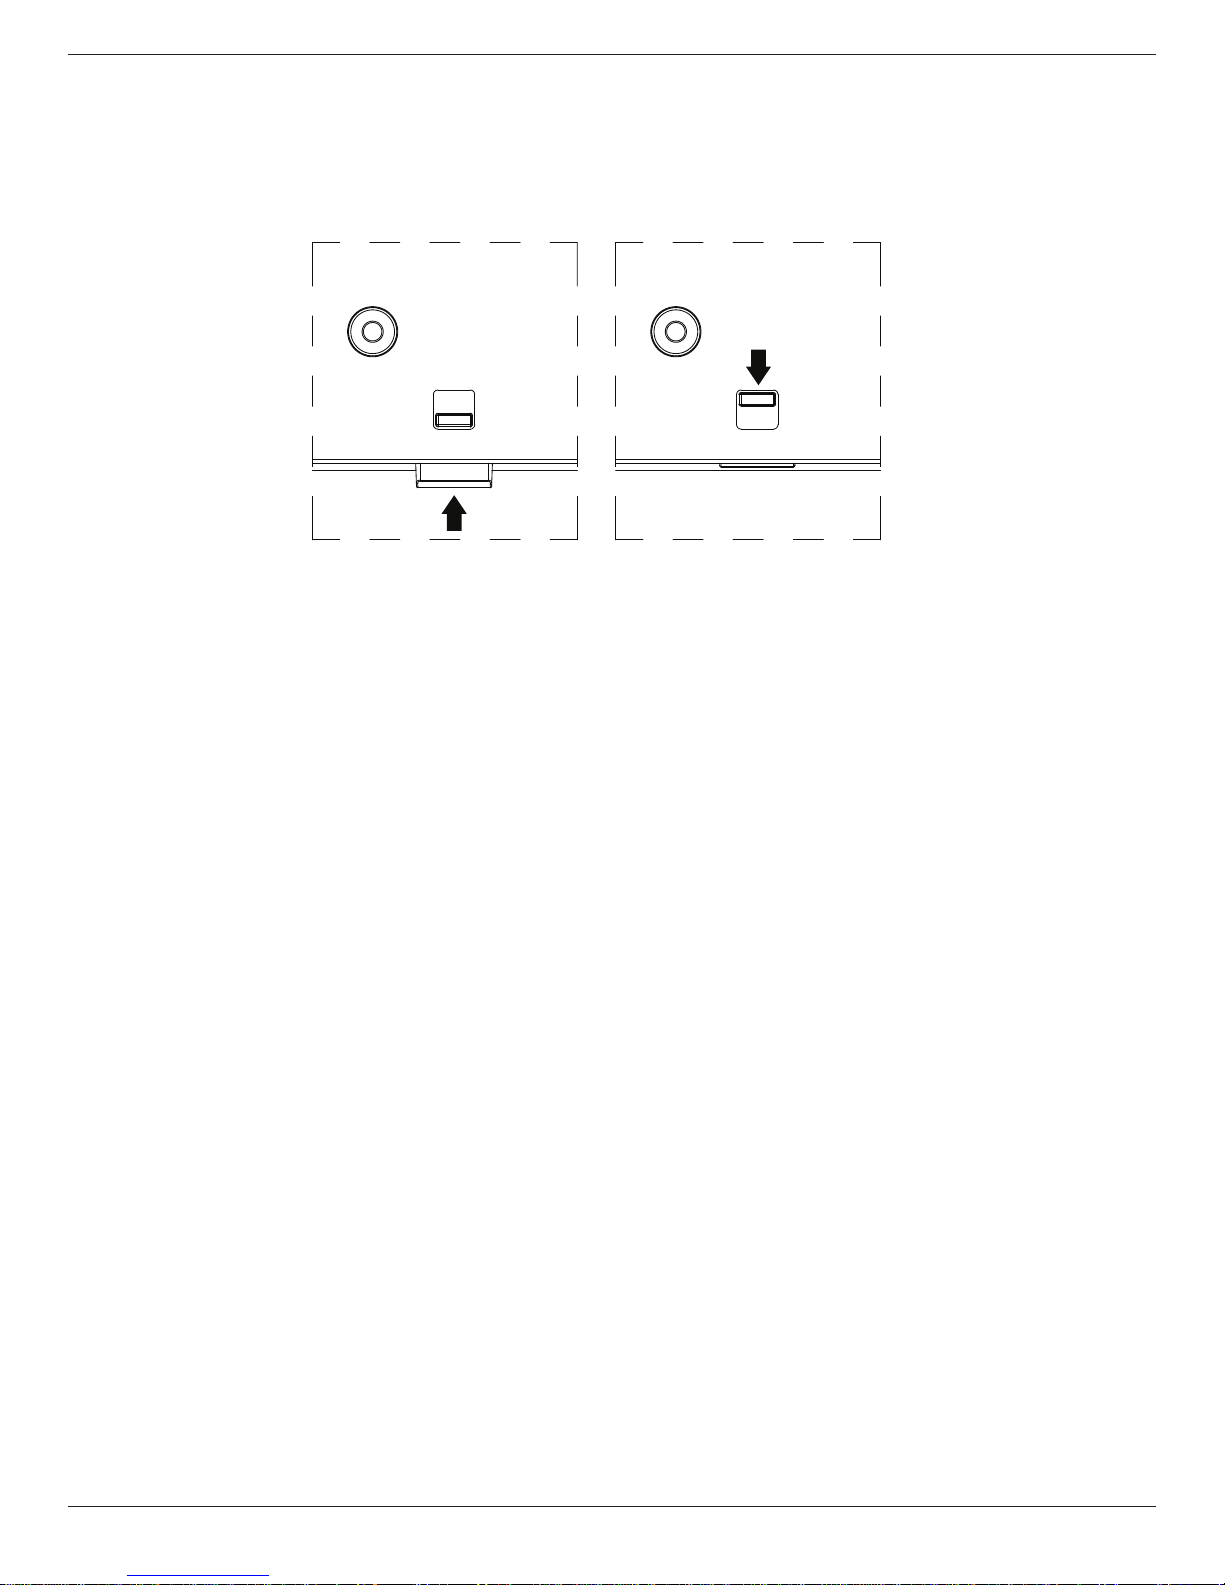
1.4. IR remote sensor and power status indicator
1. ForoptimalIRremotecontrolperformance,pulldowntheretractablelensfromthebacksideofthedisplay.TheLEDpowerstatuslightisalsobest
viewedwhenthelensispulleddown.
2. Whentiledinvideowalls,thelensshouldbepusheduptooptimizetiling.
3. Youwillhearaclickwhenthelensisfullyinposition.
Push up to collapse the lens Pull down to extend the lens
Planar RA-Series
3
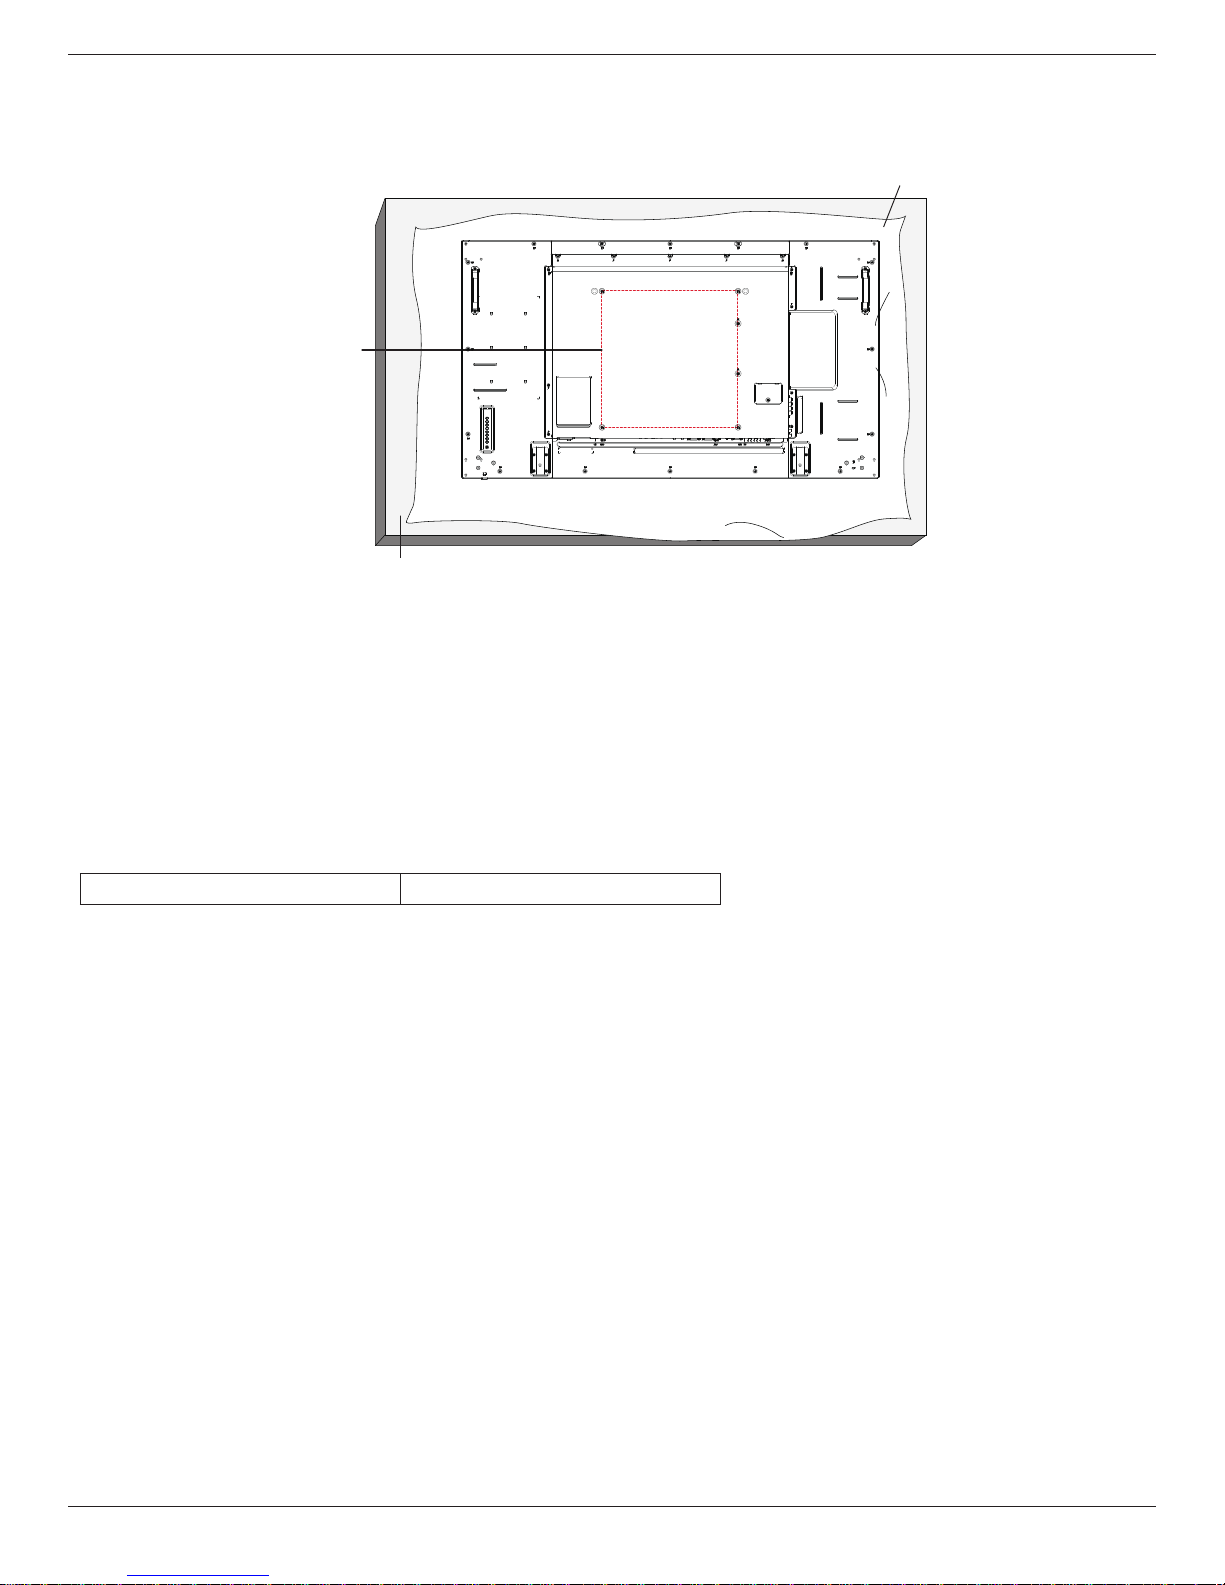
1.5. Mounting on a Wall
Tomountthisdisplaytoawall,youwillhavetoobtainastandardwall-mountingkit(commerciallyavailable).Werecommendusingamountinginterface
thatcomplieswithTUV-GSand/orUL1678standardinNorthAmerica.
VESA Grid
Protective Sheet
Table
1. Layaprotectivesheetonatable,whichwaswrappedaroundthedisplaywhenitwaspackaged,beneaththescreensurfacesoasnottoscratchthe
screenface.
2. Ensureyouhaveallaccessoriesformountingthisdisplay(wallmount,ceilingmountetc).
3. Beforemountingthedisplaytothemountingkit,followtheinstructionsof1.4tocollapsethelens.
4. Followtheinstructionsthatcomewiththebasemountingkit.Failuretofollowcorrectmountingprocedurescouldresultindamagetotheequipment
orinjurytotheuserorinstaller.Productwarrantydoesnotcoverdamagecausedbyimproperinstallation.
5. Forthewall-mountingkit,useM6mountingscrews(havingalength10mmlongerthanthethicknessofthemountingbracket)andtightenthem
securely.
1.5.1. VESA Grid
RA-Series 400(H)x400(V)mm
Caution:
Topreventthedisplayfromfalling:
• Forwallorceilinginstallation,werecommendinstallingthedisplaywithmetalbracketswhicharecommerciallyavailable.Fordetailedinstallation
instructions,refertotheguidereceivedwiththerespectivebracket.
• Tolessentheprobabilityofinjuryanddamageresultingfromfallofthedisplayincaseofearthquakeorothernaturaldisaster,besuretoconsultthe
bracketmanufacturerforinstallationlocation.
Ventilation Requirements for enclosure locating
Toallowheattodisperse,leave25mmbetweensurroundingobjectsandthedisplay.Forlargervideowalls,largergapsaroundthedisplayare
recommendedanddependonthesizeofthewall.
Planar RA-Series
4
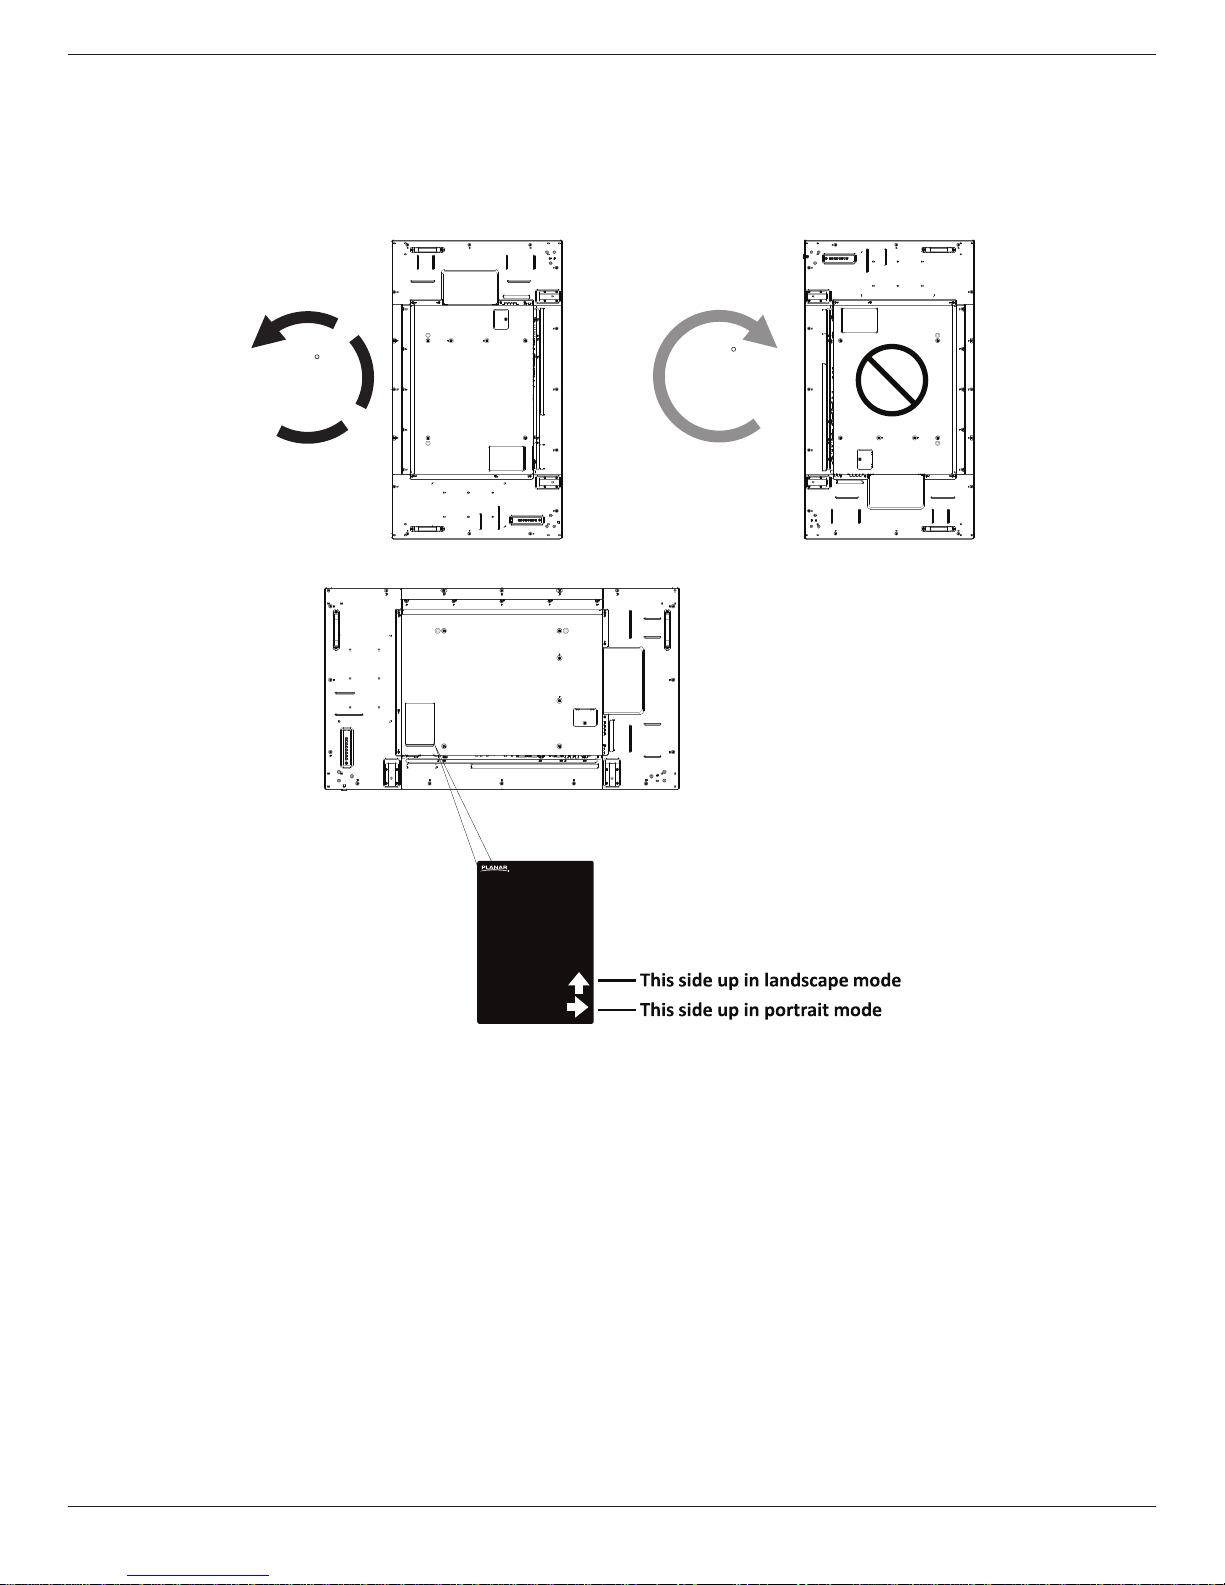
1.6. Mounting in Portrait Position
Thisdisplaycanbeinstalledinportraitposition.
1. Rotate90degreescounterclockwisefromthebacksideofthedisplay.Theterminalswillbeontherightandtopsideoftheuserfromthebackof
thedisplay.
2. Youcanalsorefertothearrowmarkonthelabelonthebackcover.
90
90
Display
TM
NOTE: Wheninstallingthedisplayonawall,pleaseconsultaprofessionaltechnicianforproperinstallation.Weacceptnoliabilityforinstallationsnot
performedbyaprofessionaltechnician.
Planar RA-Series
5
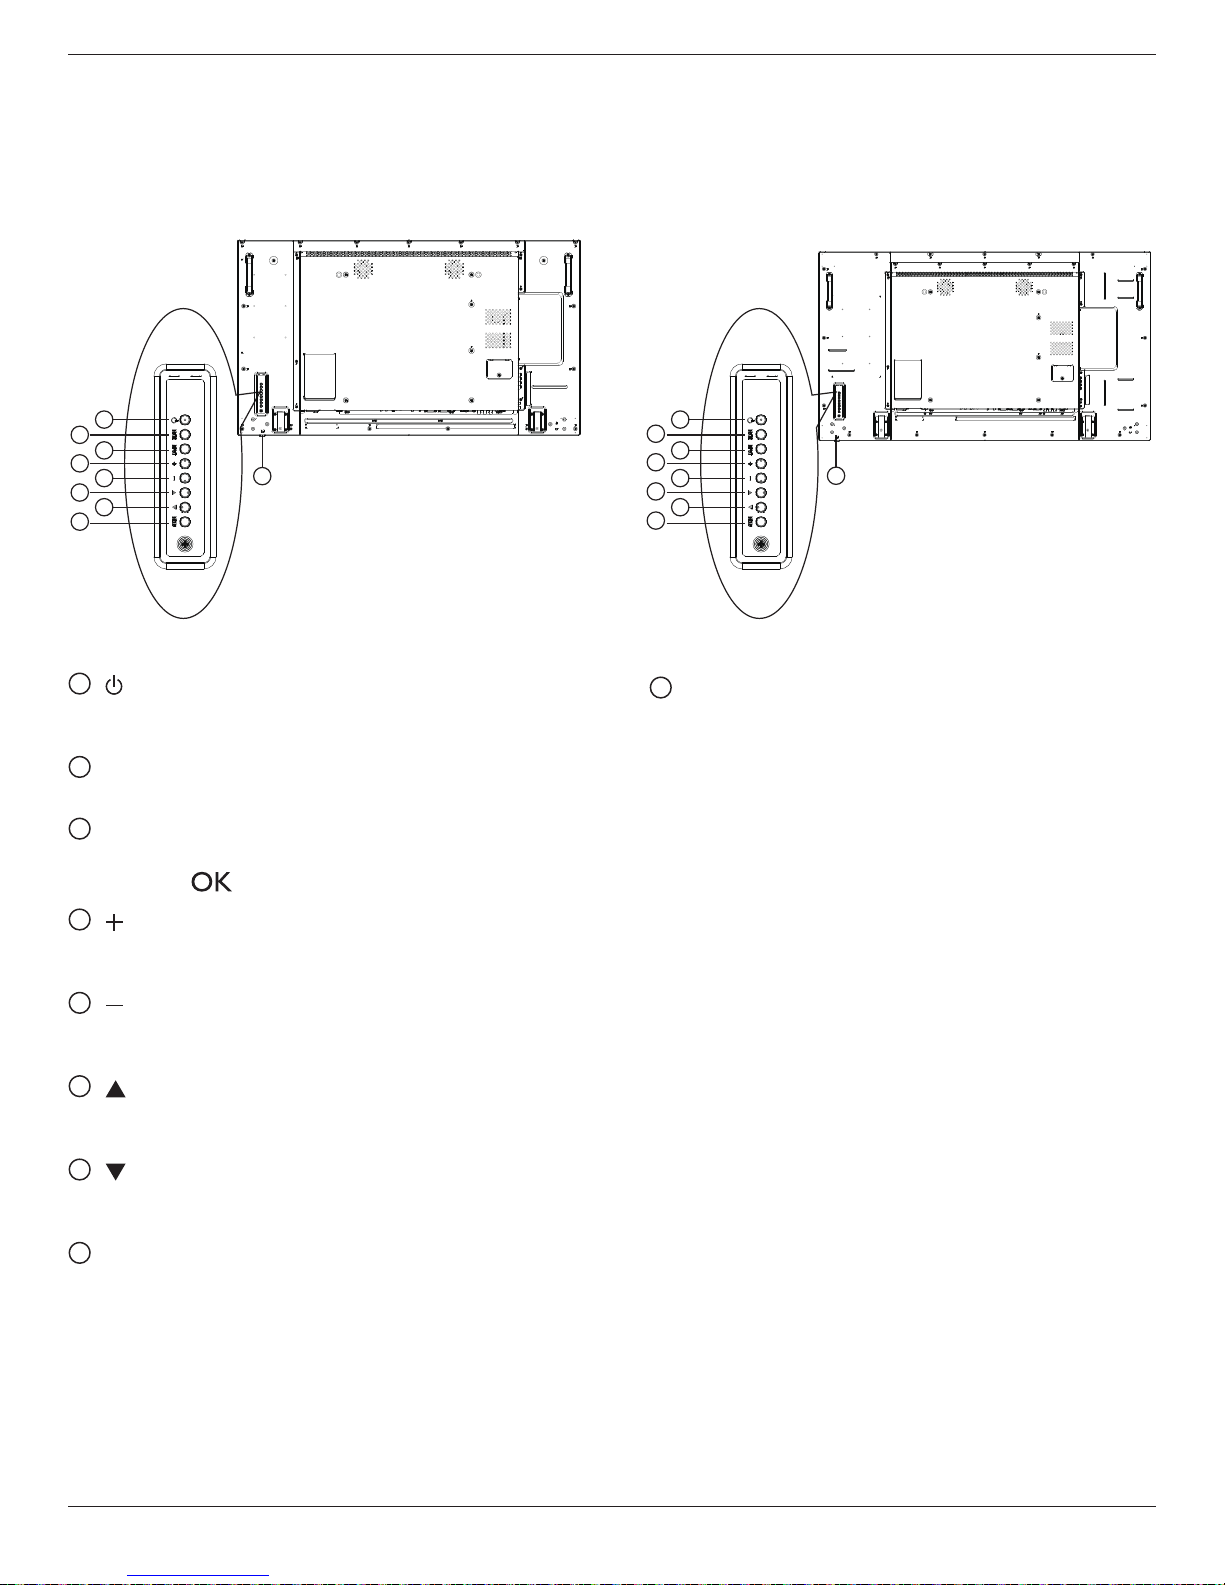
2. Parts and Functions
2.1. Control Panel
2
4
6
8
1
3
5
7
2
4
6
8
1
3
5
7
99
RA5580:RA4980:
1[ ] button
Usethisbuttontoturnthedisplayonortoputthedisplayinto
standbymode.
2[MUTE] button
SwitchtheaudiomuteON/OFF.
3[INPUT] button
Choosetheinputsource.
• Usedas[ ]buttonintheOn-Screen-Displaymenu.
4[ ] button
IncreasetheadjustmentwhileOSDmenuison,orincreasethe
audiooutputlevelwhileOSDmenuisoff.
5[ ] button
DecreasetheadjustmentwhileOSDmenuison,ordecreasethe
audiooutputlevelwhileOSDmenuisoff.
6[ ] button
MovethehighlightbaruptoadjusttheselecteditemwhileOSD
menuison.
7[ ] button
MovethehighlightbardowntoadjusttheselecteditemwhileOSD
menuison.
8[MENU] button
ReturntopreviousmenuwhileOSDmenuison,ortoactivatethe
OSDmenuwhenOSDmenuisoff.
9
Remote control sensor and power status indicator
• Receivescommandsignalsfromtheremotecontrol.
• IndicatestheoperatingstatusofthedisplaywithoutOPS:
-Lightsoffwhenthedisplayisturnedon
-Lightsamberwhenthedisplayisinstandbymode
-Lightsoffwhenthemainpowerofthedisplayisturnedoff
Table of contents
Other Planar Monitor manuals

Planar
Planar LA1500R User manual

Planar
Planar PX171M User manual

Planar
Planar PXN2200 User manual

Planar
Planar ICEBrite EL640.200-SK ALE User manual

Planar
Planar PL1910M User manual

Planar
Planar VitalScreen S VSS15X User manual

Planar
Planar PXN2490MW User manual

Planar
Planar GX40 User manual

Planar
Planar Dome C3i/EX User manual

Planar
Planar PT1704N User manual

Planar
Planar PS4200 User manual

Planar
Planar WS231 User manual

Planar
Planar LC1200R User manual

Planar
Planar CleanPole M4POLE-PS User manual

Planar
Planar PT1503Z User manual

Planar
Planar TD3200 User manual

Planar
Planar m70L User manual

Planar
Planar LA1710R User manual

Planar
Planar PLL2010MW User manual

Planar
Planar PT1910MX User manual


