Pinnacle Smart Thermostat User manual

Smart Thermostat User Guide
Easy Touch. Easy Warm.

02 www.underfloorshop.co.uk • 01284 339 669

04 Installation
05 Wiring Instructions
06 Wifi Connection
08 Thermostat Symbols
09 Start Up Wizard
10 Function & Operation
10 Temporary Override Temperature
10 Mode
10 Key-Lock
11 Menu
12 Clock
12 Event Setting
13 Readout
13 Advanced Setting
15 Open Window Detection
16 Troubleshooting
16 Dimensions
Contents

Introduction
The Pinnacle Smart Thermostat is an intuitive programmable thermostat which can be used to control either
electric or wet underfloor heating systems. It will keep your home at a comfortable temperature whilst minimising
energy use. Simply install the app on your smart phone to control your Pinnacle Smart thermostat remotely.
Technical Specifications
Supply Voltage: 85-265Vac 50/60Hz IP Class: IP21
Standby Power: < 1W/2W (WiFi version) Cable Specification: ≤2.5mm²
Max Load: 16A (Resistive)
Installation
Using your fingers, apply
firm pressure between
the thermostat front and
the outer frame at the
top, and pull towards you.
Connect the thermostat
according to the wiring
diagram.
Carefully click the display
module back in position.
04 www.underfloorshop.co.uk • 01284 339 669
1 2 3 4
Mount and reassemble
the thermostat. Secure
the thermostat to an
electrical wall box using
screws at either side of
the thermostat.

For installations in a bathroom or wet location where the thermostat cannot be installed within the room, please
select either floor sensor, remote air sensor or floor sensor and remote air sensor. A remote air sensor (room-out
sensor) can be purchased separately. All electric underfloor heating must use a floor sensor.
Wiring Instructions
Suggestion: Please keep the max load around 90% of 16A to prolong the lifetime.
FLOOR SENSOR FLOOR SENSOR
ROOM-OUT SENSOR
06 www.underfloorshop.co.uk • 01284 339 669
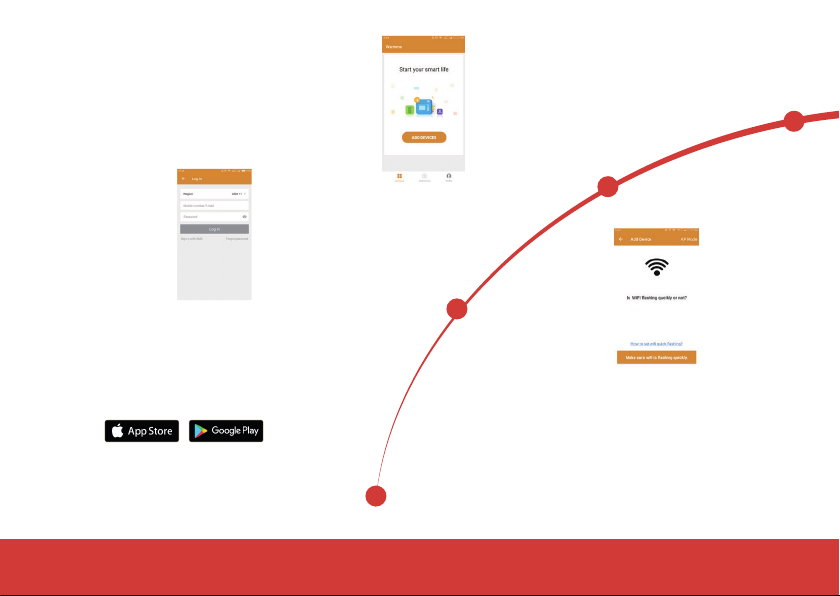
WiFi Connection
Step 1: Scan the QR code on the inside
cover of this User Guide for the app or
download the WARMME app from your
app provider.
Step 2: Create and account, then login
through the registered phone number or
email address.
Step 3: Click "Add Device"
followed by "Wifi Thermostat"
on the bottom of the screen.
Step 4: Check the thermostat WiFi
flag is fast flashing. If not,operate the
thermostat according to the APP tips
until it flashes quickly. Click the “Make
sure WiFi is flashing quickly” button.
If you experience a problem connecting, we're here to help. Contact us on 0800 056 0494 or email technic[email protected]o.uk

Step 5: Fill in the phone with
the WiFi network password,
click “confirm”.
Step 6: Click “Done” after the APP has connected
successfully to the thermostat.
Step 7: You can check the real-time temperature,
adjust or set the temperature, switch on/off or do
other operations on the main interface.
If you experience a problem connecting, we're here to help. Contact us on 0800 056 0494 or email [email protected]o.uk

08 www.underfloorshop.co.uk • 01284 339 669
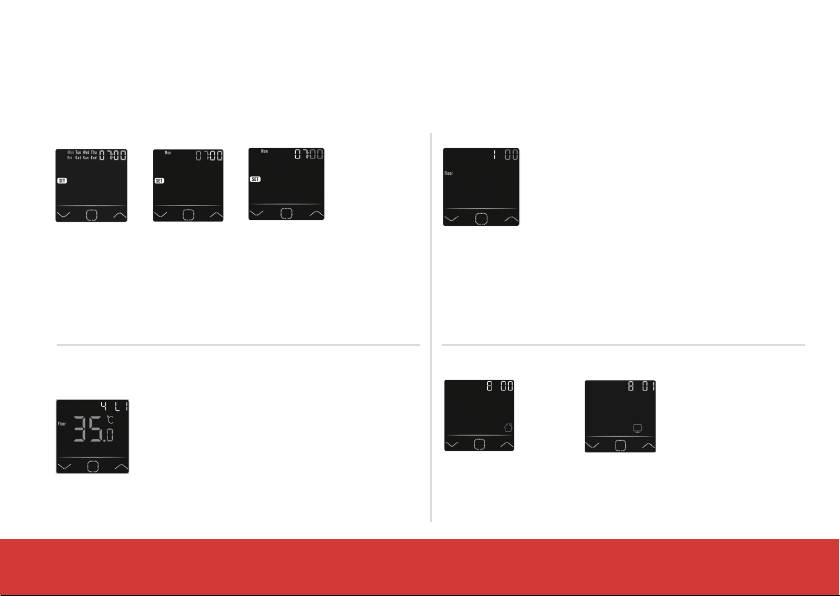
Thermostat Symbols
Once the thermostat has been installed and connected to the electric supply, simply turn the thermostat on
using the Master On/Off switch on the side of the thermostat. Slide the switch down to turn on or up to turn off.
Room Temp WiFi
Event
Manual Mode
Actual Temp
Down Key
Floor Temp Day
Key-Lock
Office
On/Off Switch
Heat
Confirm Key
Set Clock
Frost Protection Mode
Home
Percent
Up Key
•Press the to confirm the selection.
•Press the and to select parameter.
There are 5 options:
•00 Floor sensor: run by floor sensor only
(default).
•01 Room-in sensor: uses the built-in
room sensor.
• 02 Room-in sensor and floor sensor: uses the
built-in sensor with floor temperature limit.
• 03 Room-out sensor: uses a remote air
sensor.
• 04 Room-out sensor and floor sensor: uses
a remote air sensor with floor temperature
limit.
* If the thermostat is connected to the WiFi, it
will update the time automatically.
The thermostat can operate in two timer modes, Home or Office.
The Home schedule has two heating periods and two off periods,
whereas the Office mode has one heating and one off period.
See Page 13 for the full schedule and the pre-programmed
times, which can be adjusted to suit.
If you choose room sensor and floor
sensor, floor temperature limit must
be set to protect floor.
Home Office
Clock
Floor Temperature Limit
Sensor Selection
Home or Office
Startup Wizard
Initial settings must be set when the unit is activated for the first time, this will ensure correct and efficient use of
your underfloor heating system.
Day Set Hour Set Minute Set
(If you choose both sensors)

10 www.underfloorshop.co.uk • 01284 339 669
Function & Operation
Temporary Override Temperature
Mode
Key-Lock
On the actual temperature interface, press the and to set temporary
override temperature. The temperature is only valid at the current event and it
will not be saved.
On the main display, Press the to select the mode.
There are 3 modes:
Auto mode: This is the default mode. The thermostat runs according to programmed
time events set in the Event Setting. It will show home if you choose, otherwise it will
show office.
Manual mode: Thermostat will run with the desired set temperature.
Anti-frozen mode: The thermostat will run with the low setting temperature until
changed, the maximum set temperature in this mode is 15°C.
Lock all keys to prevent the settings from being changed. On the actual temperature interface, press and hold
the and for 3 seconds at the same time to lock or unlock all of the keys.
Table of contents
Popular Thermostat manuals by other brands


Saswell
Saswell SAS920XWHB-7-S-RF User manual and warranty card

Aircalo
Aircalo TFP1-ET85P2 operating manual

Honeywell
Honeywell CM721 user manual

Carrier
Carrier DEBONAIR 33CS Installation and operating instructions

Lennox
Lennox iHarmony Zone Thermostat Installation and setup guide

Gemtech
Gemtech GT7000 Operation


