PETDIARY T720 User manual

DOG TRAINING COLLAR
User Guide

STATEMENT
SAFETY INSTRUCTIONS
REINFORCE LEARNING BEHAVIOURS
TIPS
BEFORE USING THE DOG TRAINING COLLAR
WHEN USING THE DOG TRAINING COLLAR
PACKAGE CONTENTS
SPECIFICATIONS
MAINTENANCE
KEY DEFINITION
OPERATION AND FUNTIONS
Charge the Remote Transmitter
To turn the transmitter on and off
Charge the Collar Receiver
To Turn the Receiver Collar on and off
Check the Receiver Power
PAIRING AND TESTING
How to Pairing/Test the Training System
How to Wear Receiver Collar Correctly
REFERENCE SIZE FOR DIFFERENT DOGS
FAQ
WARRANTY
FCC Compliance
CONTENTS
01
01
03
04
06
09/11
04
11
12
04
02
02
03
05
06
06
06
06
07
07
07
08
09

STATEMENT
Thank you for purchasing a PETDIARY product that has been tested
to meet our stringent quality standards. This product is covered with
PETDIARY product and labor warranty for 12 months from the date of
its original purchase.
Please email us with your order ID and problem or issue, we will
respond within 24 hours.
This warranty is void if the defect is caused by accidental damage,
misuse, abuse, neglect, improper repair or alteration by
unauthorized persons, or a failure to follow operating instructions
provided with the product including adding essential oils directly
into the tank and base.
This warranty does not apply to normal wear and tear or commer-
cial use.In no event shall liability exceed the purchase price paid by
the purchaser of the product. Under no circumstances shall there
be liability for any loss – direct, indirect or incidental – or consequen-
tial damage arising out of, or in connection with the use of the
product.
SAFETY INSTRUCTION
Training collars are used to train the dogs and not for punishment.
Use properly with care and the collar can be a safe and effective
tool to train, building communication and strengthen your bond
with your best friend. Obey all safety messages that follow this
instruction to avoid possible injury.
01

REINFORCE LEARNING BEHAVIOURS
If your dog knows the command but responds inconsistently or acts
slower than your requirement, a training collar can sharpen his skill.
For example, you have taught your dog to come when called, but
over time he responds slower. You can communicate with him via
the remote trainer, so that he immediately responds to your call
1.Set the collar to initial stimulation level and test it.
2.Fit the collar on your dog's neck along with his regular collar.
3.Let him roam around the training area. Then give the command
and simultaneously press the stimulation button.
4.The instant your dog moves toward you, stop stimulation and
praise him.
5.If he stops before he reaches you or turns away repeat the
command and continue the stimulation. Again, stop at the instant
he runs to you and reward him by praising him or feeding him a
treat. Repeat this for 3 or 4 times.
Tips
1. If he doesn't get it for the rst few times, don't give up and do
not increase the stimulation. Try to work on this a couple of times
per day.
2. During the training period never give the command if you are
not able to enforce
it. Your dog has to make the mental connection between the
static stimulation/vibration/beep to his behavior (may take a
week or more for some dogs)
Altogether, both methods of stopping unwanted behavior and
reinforcing learning behaviors can be applied to nearly every
training scenario.
02
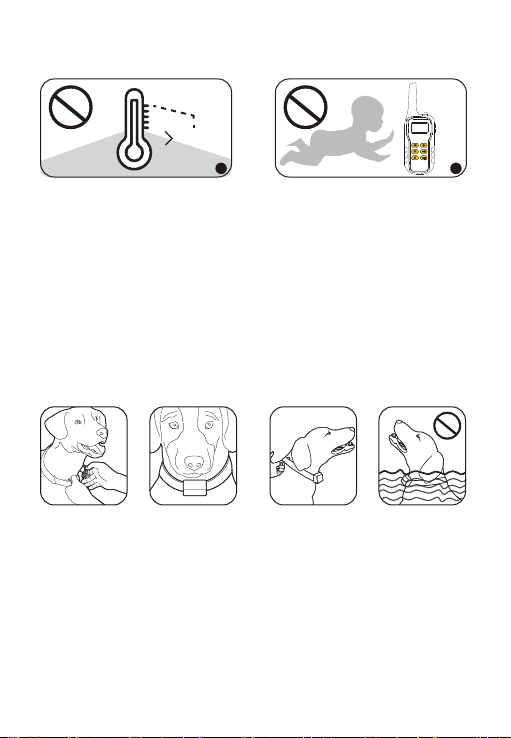
BEFORE USING THE DOG TRAINING COLLAR
WHEN USING THE DOG TRAINING COLLAR
1
113 °F
1
2
1. Do not expose to extreme heat or store at temperatures above
113 °F or 45 °C.
2. Please always keep the training collar out of reach of children.
3. Charge the remote transmitter and receiver at least 2 hours
when receive the item. The collar cannot receive any signals
while it is being charged.
1.Avoid leaving the collar on the dog for more than 12 hours per
day.
2.When possible, reposition the collar on the pet’s neck every 1
to 2 hours.
3.Check the t to prevent excessive pressure.
4.Take off the receiver when your dog swimming.
5.The receiver will turn off automatically after 10 seconds “beep”
sound when battery is low.
CH
03
PACKAGE CONTENTS
SPECIFICATIONS
1 × Handheld Transmitter
1 × Receiver
1 × Nylon Collar Strap
1 × Wrist Strap
1 × USB Charging Cable
2 × Long Contact Points
2 × Long Silicone Case
2 × Short Contact Points
2 × Short Silicone Case
2 × Anti-abrasion Buckle
1 × User Manua
1 × Test Light
Model T720
1-100 LevelShock/Vibration Levels
Channels
Working Time on a Full Charge
Batteries Capacity
Remote Range
Net Weight
3
Transmitter: 180 days
Receiver: 25-40 days
Transmitter: 300mA
Receiver: 650mA
Up to 1100ft
Transmitter: 58g / Receiver: 45g
MAINTENANCE
1.Please examine regularly to ensure tightness of the transmitter
and eliminate any external damages.
2.Clean the screw caps with alcohol weekly.
3.Examine your dog’s neck and carry out weekly cleanup.
The battery is rechargeable. In order to maintain battery life, please
charge it once a month if it is not used.
04
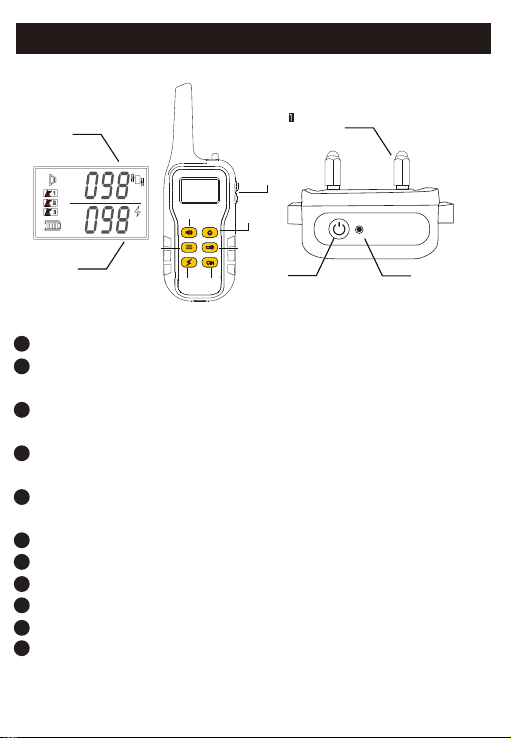
Vibration level ❿Contacts Points
Stimulation level ❿Power Button Indicator light
CH
❶
❷
❸ ❻
❼
❽
❹
❾
❺
KEY DEFINITION
1Power Button: Press to turn the transmitter on and off.
2Tone Button: Press the tone button and the receiver beep once.
Tone level is not adjustable.
3Static Stimulation Button: Press the stimulation button and the
receiver emits an static stimulation once.
4Vibration Button: Press the vibration button and the receiver emits
a vibration once.
5 +/- Button: Adjust levels of vibration and static stimulation from
1-100.
6Channel Button: Press to select a dog channel (dog1/dog2/dog3)
7LED Light Button
8LED Light
9Indicator Light
10 Power Button
11 Contacts Points: Choose a suitable length to t for different
thickness of dog hair.
05
OPERATION AND FUNTIONS
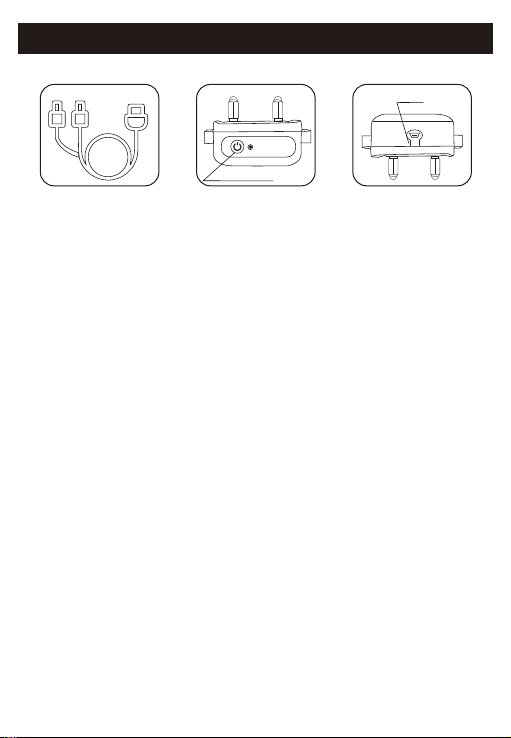
Charge the Remote Transmitter
1.Connect the charger cable to the charging port.
2.Plug the charger into a standard outlet.
3.The battery icon will ash during charging and be solid when
charging is completed.
power button
USB charging port
To turn the transmitter on and off
1.Press power button to turn on/off the transmitter. The backlight is
on/off.
2.The backlight will stay for about 30 seconds, if no operation then
the backlight off.
Charge the Collar Receiver
1.Open the rubber cover, connect the receiver to a charger into a
standard socket.
2.The indicator light ashes red slowly during charging, while the
red light keeps on when fully charged.
To Turn the Receiver Collar on and off
1.Turn on: Press the power button once, the receiver will make a
short “beep” sound, means that the receiver is turned on.
2.Turn off: Press the power button once, the receiver will make a
long “beep” sound and LED light no ash any more.
06
Check the Receiver Power
When the receiver is turned on, press the power button twice
quickly to check the power:
Receiver beeps 5 times, representing 100% (80-100%)
Receiver beeps 4 times, representing 80% (60-80%)
Receiver beeps 3 times, representing 60% (40-60%)
Receiver beeps twice, representing 40%(20-40%)
Receiver beeps once, representing 20% (1-20%)
How to Pairing
1.Turn on the remote and select one of the dog channel by
pressing the CH button.
2.Adjust vibration or static shock level by pressing “+“ or “-“ button.
3.Hold power button on the receiver for 2 seconds, when the
indicator light keep ashing for 10 seconds, press any button on the
remote to pair.
4.If you have multiple receivers, simply choose a different channel
and pair as per the same instructions.
PAIRING AND TESTING
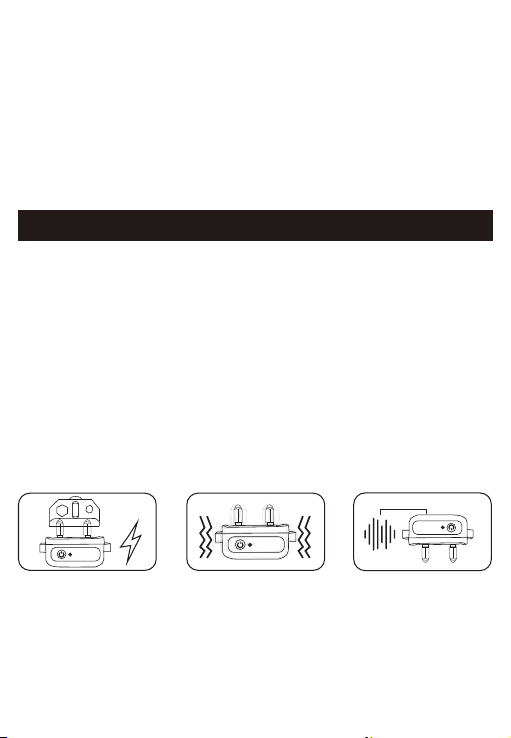
Test the Training System
1.Static Stimulation Function Test
Static stimulation function can not be seen with the naked eye,
please use our test light. Press the static stimulation function button,
the test light will shine
2.Vibration Function Test
Press the vibration function button, the receiver will shake.
B BB
07
3.Tone Function Test
Press the tone button, the receiver will make a sound.
1. Please keep in mind the dog channel you choose and do not
change to other one, or the remote control will be invalid.
2. You need to pair remote transmitter and receiver before use it on
the dog. Please follow the manual for the rst use.
3. The transmitter will fall into sleep mode after 30 seconds if no
interaction. Please reactivate it by pressing any button on the
remote.
4. When the transmitter turned off, it will not produce any functions
when press buttons except for the LED light button
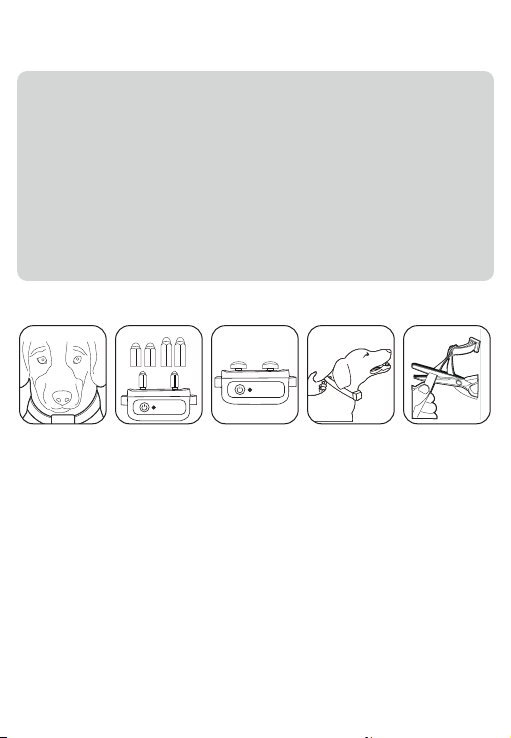
1.Correct wearing position helps healthy and effective pet training.
Receiver shall be placed on bottom of the pet’s neck, and the
screw cap must contact the pet’s skin directly.
2.If you dog has thick fur on the neck, please use longer screw
caps.
3.The anti-abrasion buckle could prevent skin abrasion. It is
recommended to use it 2 to 3 times a week.
4.The space between receiver collar and the pet’s neck shall be
maintained to a nger distance, which can’t be too loose,
otherwise statice effectiveness shall be badly inuenced.
5.The extra part of the nylon strap can be trimmed, or be handled
with other methods.
How to Wear Receiver Collar Correctly
08
Table of contents
Other PETDIARY Pet Care Product manuals


