Panacom PA-7300M User manual

Pg. 1


Pg. 3
PA-7300M Two-line SPeAkerPhone
wiTh 32-nuMber MeMory
uSer’S Guide
INDEX
Parts Checklist 3
INTRODUCTION 4
QUICK REFERENCE GUIDE 4
GETTING STARTED 5
SHORT GLOSSARY OF TERMINOLOGY
USED IN THIS MANUAL 5
MODULAR JACK REQUIREMENTS 5
INSTALLATION OPTIONS 6
BATTERY INSTALLATION 6
TELEPHONE INSTALLATION 7
DESK OR TABLETOP INSTALLATION 7
TONE/PULSE 7
WALL MOUNT INSTALLATION 7
SETTINGS 8
TELEPHONE OPERATION 8
LINE STATUS INDICATOR LIGHTS 8
SPEAKERPHONE LOCATION & USE GUIDELINES 8
ANSWERING AND PLACING CALLS 9
USING THE HANDSET 9
USING THE SPEAKERPHONE 9
SWITCHING BETWEEN SPEAKER AND HANDSET 10
ADJUSTING HANDSET AND SPEAKER VOLUMES 10
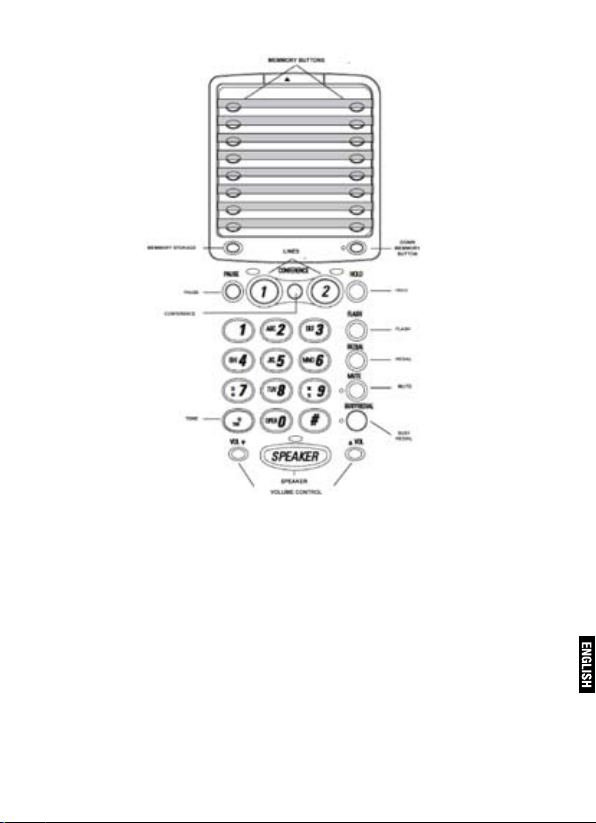
USING THE FEATURES 10
REDIAL 10
BUSY REDIAL 10
HOLD 11
CONFERENCE CALLS 11
MUTE 12
FLASH 12
TEMPORARY TONE 12
MEMORY DIALING 12
Storing a Number in the Upper Memory 12
Storing a Number in the Lower Memory 13

Pg. 4
INSERTING A PAUSE IN THE DIALING SEQUENCE 13
STORING THE LAST NUMBER DIALED 13
CHANGING A STORED NUMBER 13
CLEARING A STORED NUMBER 13
DIALING A STORED NUMBER 13
DIALING LONG NUMBERS OF THE MEMORY 14
CHAIN DIALING 14
SPECIAL FEATURES 14
Flash Length 14
Pause Length 15
Length of Busy Redial 15
TROUBLESHOOTING GUIDE 15
CARE AND MAINTENANCE 16
PANACOM’s RECOMENDATION 17
Thank you for purchasing Panacom’s two-line speakerphone PA-7300M.
Please read the manual carefully before operating.
Parts Checklist
Your package should contain the following items:
Base unit
Handset
Handset cord
Short 4-wire cord
2-wire line cord
4-wire line cord
INTRODUCTION
Your Panacom PA-7300M two-line speakerphone is designed to
meet your business needs at home or in an ofce environment.
Because your time is valuable, and we know you want to use your
phone not read about it, this user manual presents installation and
basic usage information up front, and discusses advanced features
later in the book.
QUICK REFERENCE GUIDE
Find the button that you want information about and then go to the
page listed.
Pg. 5
GETTING STARTED
SHORT GLOSSARY OF TERMINOLOGY USED IN THIS MANUAL
Hook switch: The part of the phone that pops up to activate the
phone line when the handset is lifted from the base. On this phone,
each of the line buttons acts as a hook switch.
Line indicator: The light located next to each of the line buttons; it
shows you the status of each line.
Off-hook. A term used to describe the phone in its active mode. For
this phone, off hook would require that one of the line buttons is active.
On-hook. A term used to describe the phone in an inactive mode.
MODULAR JACK REQUIREMENTS
A modular jack USOC: RJ11C or a RJ14C is required.
Installation of this telephone in locations with 4-prong jacks or with

Pg. 6
hard-wired outlets requires additional converters (not included). The
dealer from whom you purchased the system, or a telephone supply
store, can advise you regarding the proper converter.
PHONE NUMBER LINE 1 LINE 2 PHONE NUMBER
INSTALLATION OPTIONS
Although you can use your Panacom 2-line speakerphone with a
single phone line, it is designed with a 2-line system in mind. The
following diagrams show two possible systems:
2 Lines on a Single Modular Jack
The most common two-line phone system uses a single RJ14 modu-
lar jack which contains both phone lines.
2 Lines on Separate Modular Jacks
It is possible that each line has its own RJ11 modular jack, which means
that you will need a 2-line coupler in order to use both lines on this
phone. Check with your local phone dealer to get a two-line coupler.
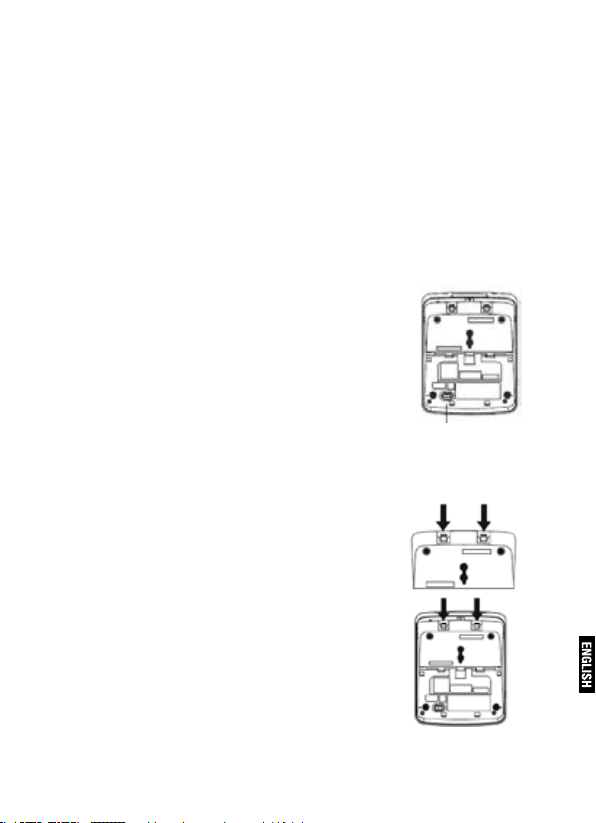
BATTERY INSTALLATION
The installation of the 4 AA optional
batteries allows the normal perfor-
mance of the special functions of
this phone.
Without the battery:
• Line indicators, Call ringer detec-
tion and Conference mode does not
work
• Memory redial function does not
work.
Battery Installation
1. Remove the base plate by press-
ing down the tabs and lifting it from
the base.
2. Press down with a at tool or coin
on the tabs for the battery compart-
ment lid and lift up.
3. Insert the batteries as shown in the di-
agram inside the battery compartment.
Pg. 7
4. Snap the battery compartment lid back into place and replace the
base plate.
TELEPHONE INSTALLATION
Your two-line phone can be placed on a level surface such as a
tabletop or desk, or you can mount it on the wall.
DESK OR TABLETOP INSTALLATION
Plug the telephone line cord into a modular jack (RJ11 or RJ14) and
into the PHONE LINE jack on the back of the unit.
Plug the handset cord into the handset, and into the telephone jack
on the left side of the unit.
TONE/PULSE
Set the PULSE/TONE switch to TONE if you
have Touch-Tone service, or to PULSE if you
have Pulse (rotary) service.
WALL MOUNT INSTALLATION
1. Rotate the handset hook.
2. Set the TONE/PULSE switch to TONE if you
have touch-tone service or to PULSE if you have
pulse (rotary) service.
3. Remove the base plate from the back by
pressing down on the snap tabs located at the
top and then lifting it off.
4. Plug the phone line cord into the phone jack
on the back of the unit.
5. Reverse the direction of the Base Plate and
replace it by putting the tabs into the slots on
the top of the unit rst, and then snapping the
bottom tabs into place.
6. Connect the phone cord to the modular
jack on the wall.
7. Slip the mounting holes over the wall plate
posts and slide the unit down rmly into place.
(Wall plate not included.)
8. Plug the handset cord into the handset and
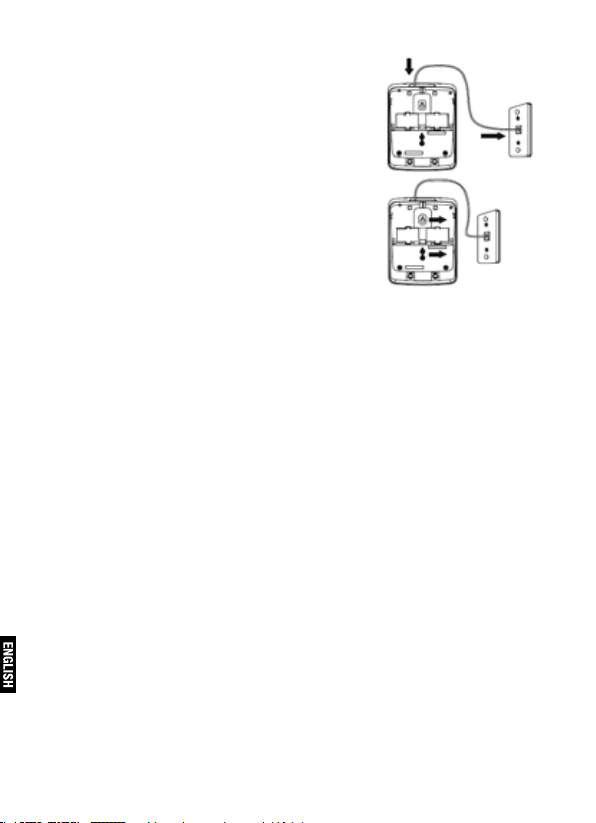
Pg. 8
into the unit, and then hang up the hand-
set.
SETTINGS
Adjust the volume of the Ringer for each
line changing the position of the Volume
Switch (HI [High], LO [Low] or OFF), until
you get the setting wanted.
Set the PULSE/TONE switch to TONE if
you have Touch-Tone service, or to PULSE
if you have Pulse (rotary) service.
TELEPHONE OPERATION
You can use the telephone by speaking and
listening through the handset, or by using the Speakerphone fea-
ture.
LINE STATUS INDICATOR LIGHTS
This two-line phone is designed for use at multiple stations, the sta-
tus of the indicator lights tells you what is happening on each line.
When the Indicator Light Is It Means
Off Line not in use
Red Line in use
Flashing Red (Fast) Incoming call
Blinking Red (Slow) Call on hold
NOTE: Batteries must be installed for the indicator lights to work.
SPEAKERPHONE LOCATION & USE GUIDELINES
For best speakerphone performance, avoid the following:
• Areas with high background noise. (The microphone might pick
up these sounds and prevent the speakerphone from going into the
receiving mode when you nish talking.)
• Surfaces affected by vibration.
• Recessed areas such as in a corner, under a cupboard, or next to
a cabinet, which can generate an echo effect.
Note the following guidelines when you use the speakerphone:

Pg. 9
• The speakerphone works similar to a two-way radio in that you can
only listen or talk at one time.
• Stay reasonably close to the phone so that you can be clearly
heard by the person to whom you are talking.
• The speakerphone indicator light is on when the speakerphone is in use.
ANSWERING AND PLACING CALLS
Because this phone has two lines, you must choose a line by press-
ing the corresponding line button in order to place an outgoing call
or to answer an incoming call.
USING THE HANDSET
The only difference between using the handset with this phone and
other corded phones is that you must press a line number button
after picking up the handset in order to access that line.
USING THE SPEAKERPHONE
To use the speakerphone feature, press a line button and then press
SPEAKER
Placing a Call
1. Press the line number (1 or 2).
2. Press SPEAKER.
3. Dial the phone number you want to call.
4. Press SPEAKER to hang up.
Receiving a Call
1. Press the line number button next to the indicator that is ashing
red to answer an incoming call.
2. Press SPEAKER to answer the call.
3. Press SPEAKER to hang up the phone.
Placing a Call While Talking on Another Line
To place a call without hanging up on the rst caller:
1. Press the HOLD button to put the rst caller on hold.
2. Press the available line number button to get a dial tone.
3. Dial the phone number you want to call.
Receiving a Call While Talking on Another Line
When you receive a call while you are talking on another line, you hear
the phone ring. To pick up the call without nishing the rst call:
1. Press the HOLD button to put the rst caller on hold.

Pg. 10
2. Press the line number button next to ashing red indicator light to
answer that call.
If you want to hang up on the rst caller, just push the line button that
is ashing red to answer that line.
NOTE: You always need to put the rst caller on hold before answer-
ing a second call, or you will hang up on the rst caller.
SWITCHING BETWEEN SPEAKER AND HANDSET
You can switch between the speaker and the headset after dialing a
number or at any moment during a conversation.
• From speaker to handset, raise the headset.
• From handset to speaker, press SPEAKER; then hang up the handset.
ADJUSTING HANDSET AND SPEAKER VOLUMES
The volume controls for the handset and speaker are separate, so you
can adjust one without affecting the other. Use the VOLUME arrows at
the bottom of the keypad to adjust the handset volume while using the
handset, or the speaker volume while using the speakerphone.
TIP: To return to the default volume settings, press both volume ar-
rows at the same time.
USING THE FEATURES
This section discusses all of the basic telephone features.
REDIAL
Redial the last number you called by pressing the REDIAL button
after you get a dial tone.
NOTE: The Redial feature holds in memory the last numbers that you
pressed. If you pressed any numbers after dialing the phone number
you last called (for example, when accessing a voice-menu system)
those numbers are dialed.
If you get a busy answer, you can press REDIAL once again without
hanging up to save some time while redialing the same number.
BUSY REDIAL
When calling you get busy signal, press the button BUSY REDIAL and
hung up the handset if you are using it. The phone will automatically
call every 30 seconds (up to 10 times) while you do other tasks.
Table of contents
Languages:
Other Panacom Telephone manuals

Panacom
Panacom PA-7580 User manual

Panacom
Panacom PA-7700 User manual

Panacom
Panacom PA-7580 User manual

Panacom
Panacom PA-7400 User manual

Panacom
Panacom pa-7250 Slimline User manual

Panacom
Panacom PA-7934 User manual

Panacom
Panacom PA-7540 User manual

Panacom
Panacom PA-7262 User manual

Panacom
Panacom PA-7210 User manual

Panacom
Panacom PA-7520 User manual


