Orion VAN GEAR User manual

ORION VAN GEAR
Sprinter Wheel Wrap Ladder
INSTALLATION GUIDE support@orionvangear.com - (971) 267-2552
v1
Proudly Made in Oregon

PLEASE READ BEFORE INSTALLATION
ORION VAN GEAR LLC STRONGLY RECOMMENDS PROFESSIONAL INSTALLATION OF
AFTERMARKET ACCESSORIES TO YOUR VEHICLE. IMPROPER INSTALLATION COULD RESULT
IN AN AUTOMOBILE ACCIDENT AND COULD CAUSE SERIOUS INJURIES OR DEATH. YOU ARE
RESPONSIBLE FOR ASSEMBLING AND SECURING ORION VAN GEAR PRODUCTS TO YOUR
VEHICLE, CHECKING THE MOUNTING POINTS AND ATTACHMENTS PRIOR TO USE, AND
REGULARLY INSPECTING THE PRODUCTS FOR WEAR AND OR DAMAGE. YOU MUST ENSURE
THE PERSON(S) INSTALLING THE PRODUCT READ, UNDERSTAND, AND FOLLOW ALL
INSTRUCTIONS AND WARNINGS BEFORE BEGINNING THE INSTALLATION. THE
RESPONSIBILITY TO CORRECTLY INSTALL ORION VAN GEAR PRODUCTS IS YOURS AND MUST
BE TAKEN SERIOUSLY. ORION VAN GEAR LLC WILL NOT BE HELD LIABLE OR RESPONSIBLE
FOR DAMAGES OR PERSONAL INJURIES RESULTING FROM THE USE OF OUR PRODUCTS.
● ALWAYS INSPECT YOUR PRODUCTS UPON ARRIVAL
FOR SHIPPING DAMAGE OR MISSING PARTS
● REPORT MISSING OR DAMAGED PIECES TO OUR
SUPPORT TEAM BEFORE BEGINNING THE
INSTALLATION - SUPPORT@ORIONVANGEAR.COM
LINK TO ORIONVANGEAR.COM

MATERIALS REQUIRED
REQUIRED
● 1x 7/16” Wrench
● Drill Set
- 1/8” Drill Bit
- 9/32” Drill Bit
● 1x 5/32” Ball End Allen Key (For 1/4”-20 Hardware)
● 1x Blue Threadlock (Medium Strength)
[RECOMMENDED ON T-NUT HARDWARE]
● 1x 1 oz Anti-seize Lubricant
[RECOMMENDED ON ALL NYLON LOCKNUT JOINTS]
● 1x Step Ladder
RECOMMENDED
● 1x Extra Person
● Extra Rags (to keep things clean)
● 1x Tape Measure
● Mild Soap + Warm Water (to clean off excess anti-seize)
*Included hardware shown on next page

INCLUDED HARDWARE
1/4”-20 Hardware
1” BL
1 1/4” BL
20x
Black
10x
WASHERS
6x
4x
BUTTON-HEAD SCREWS
5x
Silver
Side Ladder (top)
Seam Plate (4 hole)
Bayonet
Ladder (bottom)
8x
5/8” BL
2x
Bottom Plate
*ROOF RAIL BRACKET
*TRACK WASHER
(ROOF ADAPTER)
2x
2x
1” SS
*CARRIAGE BOLTS (5/16-18)
HEX NYLON NUT
OPTIONAL (No Rack Install)
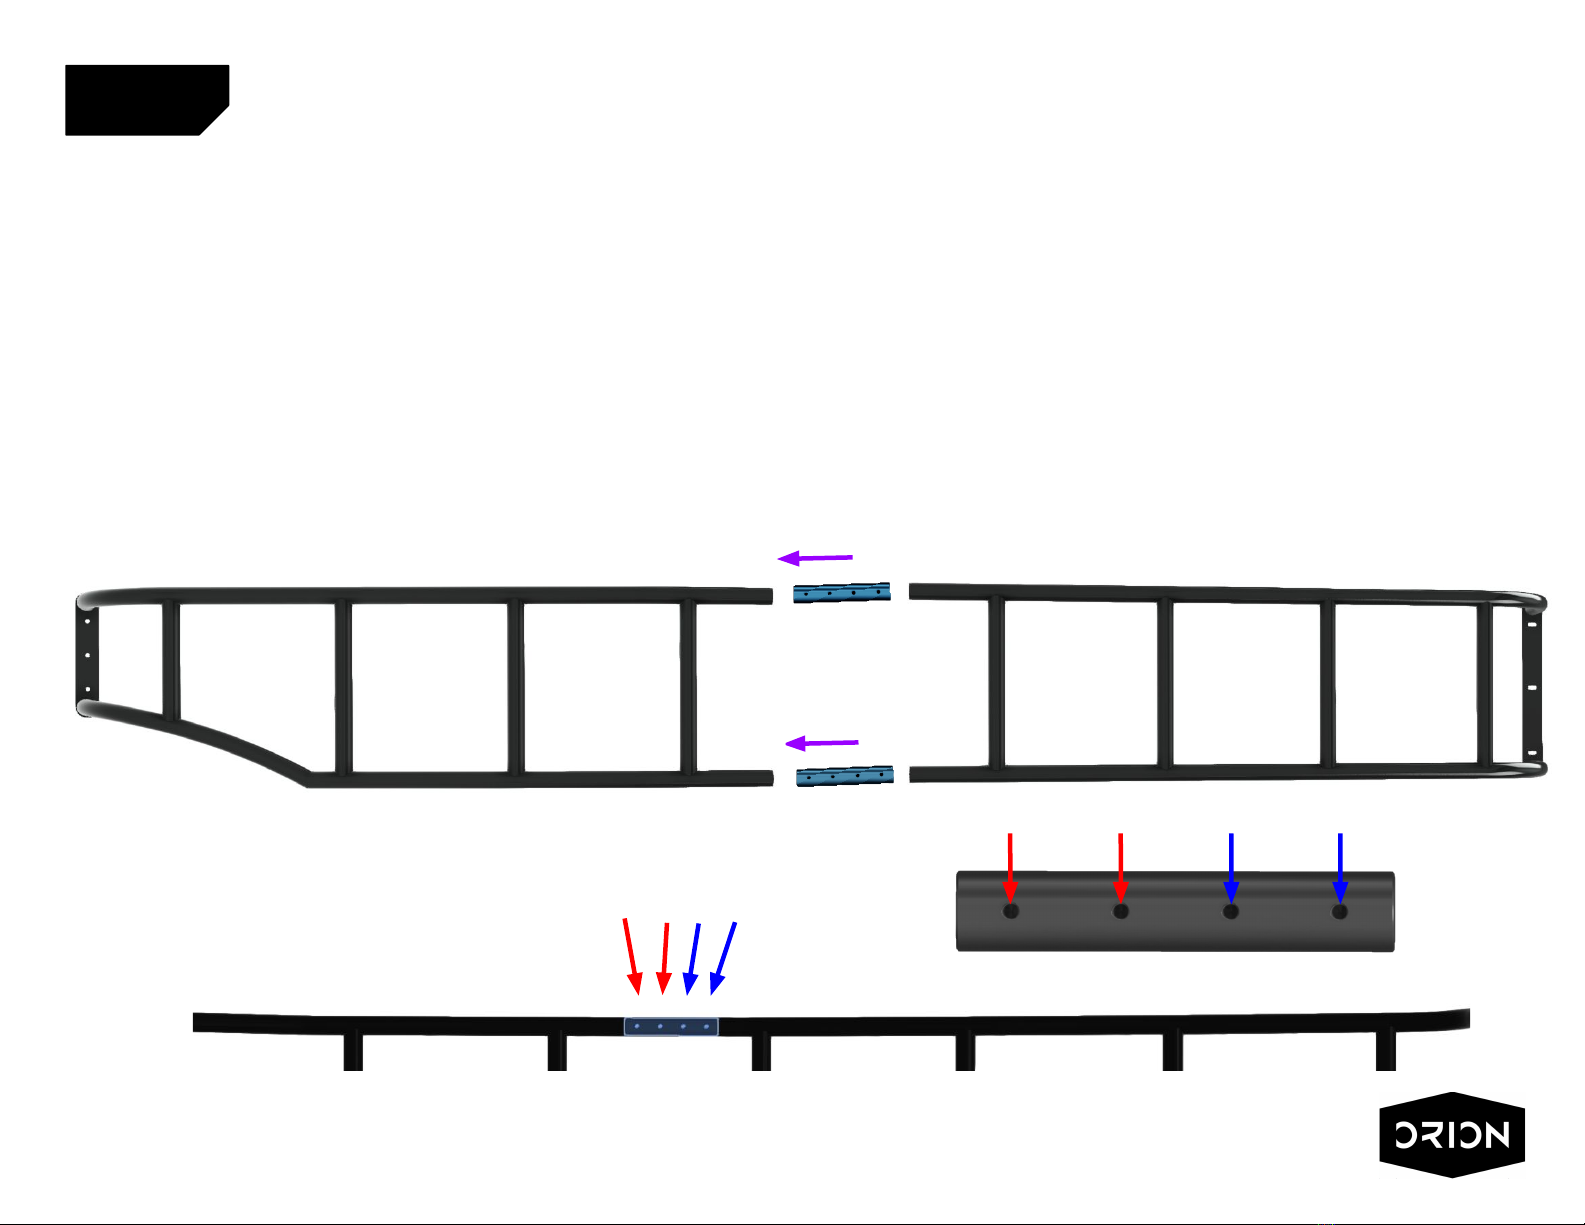
1A - Slide the 2x BAYONETS into the bottom ladder section making sure to align the threaded
holes on the BAYONET with the holes on the ladder.
1B - Insert 4x 5/8" SCREWS through the ladder into the BAYONETS. (Apply Threadlocker)
1C - Join the top and bottom ladder sections together and Insert remaining 4x 5/8" SCREWS
(Apply Threadlocker)
1D - Tighten all SCREWS.
STEP 1
5/8” BL SCREW & 15S T-NUT (4 EACH SIDE/8 TOTAL)
[1/4”-20 HARDWARE]
[APPLY THREADLOCKER]
(top section)(bottom section)
BAYONETS

2A- Loosely attach the BOTTOM PLATE to the ladder as illustrated in Fig. 2A using 3x 1” SCREWS, 6
WASHERS, and 3 NYLOCK NUTS. (Apply Anti-Seize) Position the plate so the nuts are centered in
the slot to allow for adjustment later.
2B- Next, position the ladder so the top of the BOTTOM PLATE sits flush towards the top of the van’s
pinch weld as illustrated in Fig. 2B. Keep in mind where the top of the ladder accesses your roof in
relation to solar panels, deck panels, and empty space. Using the 4 holes on the bottom plate as a
template, mark and drill holes into the van’s pinch weld. Use a 1/8" drill bit for the pilot holes
followed by a 9/32” bit for the final hole size. It’s recommended to paint the holes after they are drilled.
STEP 2
Fig. 2B
Bottom Plate
Top of Van
Pinch Weld
Fig. 2A

3A- Use 4x 1.25” SCREWS, 8x WASHERS, and 4x NYLON NUTS to grip the BOTTOM
PLATE, pinch weld, and backing SEAM PLATE. Use the order specified in Fig 3A below.
(Apply anti-seize)
3B - Have someone hold the top of the ladder so it doesn’t rub against the rack on top as
you tighten the 4 seam plate connections.
STEP 3
1 1/4” BL SCREW, LOCKNUT, (4)
AND WASHERS (8)
[1/4”-20 HARDWARE]
[APPLY ANTI SEIZE]
Bottom Flange (4 hole)
Backing Seam Plate (4 hole)
Pinch Weld
1 1/4” BL SCREW
WASHER
WASHER
NYLON NUT
Under Van
Fig. 3A

4A- The top of the ladder mounts directly to to the side of the Stealth+ rack Fig 4A. Alternatively, it
can be mounted without the rack using our optional roof bracket and hardware as shown in Fig 4B.
4B- Carefully lean the ladder towards the van until the top touches the rack. Adjust the position of
the ladder as desired. If you need to adjust the ladder up or down loosen the 3 bolts on the bottom
plate from step 2A. Once you have it in the desired position use the 3 holes on the top of the ladder
as a template, mark and drill holes into the side of the roof rack. Use a 1/8" drill bit for the pilot
holes followed by a 9/32” bit for the final hole size. It’s recommended to paint the holes after they are
drilled.
4C- Hold the ladder in position and loosely attach the top connections using 3x 1" SCREWS with 6x
WASHERS, 3x NYLON NUTS. Screws should be hand tight minus 1 turn to allow adjustment in the
next step. (Apply AntiSeize)
STEP 4
1” BL SCREW, NYLOCK NUTS (3 EA)
WASHERs (6 EA)
[1/4”-20 HARDWARE]
[APPLY ANTISIEZE]
Fig. 4A Fig. 4B

5A- Reattach the bottom plate to the ladder. Make final adjustments and tighten all connections.
5B- Please write a review (takes less than 1 minute!)
STEP 5
Positive reviews from awesome customers like you help others to feel confident about
choosing Orion Van Gear too. Not only do reviews improve our products but they let others
know that we care just as much about providing quality customer service as we do about
making exceptional van products. We will be forever grateful if you take 60 seconds to
share your experience along with a few pictures of the ladder on your van. Thank you in
advance for helping us out.
orionvangear.com/pages/reviews
ORION VAN GEAR PRODUCTS
ARE PROUDLY MADE IN THE USA.

STOKED WITH YOUR NEW ORION PRODUCTS?
Help us spread the word about by tagging us in your photos and
videos (@OrionVanGear) on Instagram, Facebook, and TikTok!
We can’t wait to see your adventures and hear your stories!
FOR ANY QUESTIONS REGARDING INSTALLATION
OR REPLACEMENT PARTS CONTACT US:
ORION VAN GEAR PRODUCTS
ARE PROUDLY MADE IN THE USA.
support@orionvangear.com
(971) 267-2552
instagram.com/orionvangear
facebook.com/orionvangear
tiktok.com/@orionvangear
WIN UNIQUE PRIZES 🏆
Leave an eligible photo/video review on our website after
installing our products to automatically enter to win unique
prizes. You will receive a unique review link via email 2-3
weeks after your rack is delivered so keep an eye out! Or
use this link: https://orionvangear.com/pages/reviews
Other manuals for VAN GEAR
1
Table of contents
Other Orion Automobile Accessories manuals


