Nuna Triv User manual


Designed
around your life

2TRIV™instructions 3
TRIV™instructions
Contents
Product Information
Product Registration 4
Warranty 4
Contact 4
Child Usage Requirements 5
Warnings 6
Parts List 8
Product Setup 10
Product Use 14
Accessories 22
Cleaning and Maintenance 26
IMPORTANT!
KEEP THESE
INSTRUCTIONS FOR
FUTURE REFERENCE:
READ CAREFULLY

Child Usage Requirements
This stroller is suitable for use with children who meet the
following requirements:
Weight: up to 50 lb maximum (22.7 kg)
Height: up to 45 inches (114.3 cm)
When using the stroller frame with a PIPA™series infant
carrier, refer to the child usage requirements listed in the
infant carrier instruction manual.
4TRIV™instructions 5
TRIV™instructions
Product Information
Model Number:__________________________________________________________________
Manufactured in (date): ______________________________________________________
Product Registration
Please fill in the above information. The model number
and the manufactured in date are located on a label on the
stroller frame. Fill out the prepaid registration postcard
attached to the product and mail it today.
To register your product, please visit:
www.nunababy.com
Click on the “Register Gear” link on the homepage.
Warranty
We have purposely designed our high-quality products so
that they can grow with both your child and your family.
Because we stand by our product, our gear is covered by
a custom warranty per product, starting from the day it
was purchased. Please have the proof of purchase, model
number and manufactured in date available when you
contact us.
For warranty information please visit:
www.nunababy.com/warranty
Contact
For replacement parts, service, or additional warranty
questions, please contact our customer service department.
In the USA:
infousa@nunababy.com
www.nunababy.com
1.855.NUNA.USA

6TRIV™instructions 7
TRIV™instructions
WARN IN G
Failure to follow these warnings and instructions could
result in serious injury or death.
A child’s safety is your responsibility. NEVER leave your
child unattended.
To avoid any danger of suffocation, remove all plastic
covers before using the stroller and destroy or keep
away from babies and children!
Keep small parts away from children as they pose a
choking hazard.
Discontinue using the stroller if it becomes damaged
or broken.
DO NOT make any changes or modifications to the
stroller that are not specified in this manual.
Use original Nuna parts and accessories only.
Overloading, incorrect folding, and using accessories
other than those approved by Nuna, e.g. child seats,
bag hooks, rain covers, buggy boards, etc., may
damage or make the stroller unsafe.
Use of the stroller with a child weighing more than 50 lb
(22.7 kg) or taller than 45 inches (114.3 cm) in height
will cause excessive wear and stress on the stroller, and
could create an unstable condition. Use the stroller with
only one child at a time.
To prevent a hazardous, unstable condition, do not place
more than 10 lb (4.5 kg) in storage basket and never
place purses, shopping bags, parcels or other items on
the handle or canopy.
DO NOT use storage basket as a child carrier.
To prevent a hazardous, unstable condition, do not place
more than 1 lb (0.45 kg) in the storage pocket on the back
of the seat.
Avoid serious injury from falling or sliding out. ALWAYS
use seat belt. After fastening buckles, adjust belts to
get a snug fit around your child.
AVOID FINGER ENTRAPMENT Use care when folding
and unfolding the stroller. Be certain the stroller is fully
erected and locked before allowing your child near the
stroller.
STRANGULATION HAZARD Do not place items with a
string around your child’s neck, suspend strings from
the stroller, or attach strings to toys.
DO NOT let your child play with the stroller.
ALWAYS keep your child in view while in the stroller.
NEVER allow your child to stand on the stroller.
ALWAYS check that the ring adapter is correctly
engaged before use.
The parking brake MUST be engaged when the stroller
is stopped and when placing and removing child.
Negotiate curbs and rough ground carefully. Repeated
impact could cause damage to the stroller.
The stroller is to be used only at walking speed and is
not intended for use while jogging, skating, etc.
NEVER use the stroller on stairs or escalators. You may
suddenly lose control of the stroller or your child may fall
out.
The stroller does not replace a crib or a bed. Should
your child need to sleep, they should be placed in a crib
or sleeping area based on your child’s requirements.
ALWAYS allow the fabric to dry naturally away from direct
heat.
DO NOT leave the stroller exposed in the vicinity of
a strong source of heat, i.e. a radiator or open fire, or
store the stroller in a damp place.

8TRIV™instructions 9
TRIV™instructions
22
23
20
21
x2
1
x2
2
26
27
25
24
28
8
4
5
Parts List
Make sure all parts are available before assembly.
If any part is missing, please contact Nuna (see page 4
for information). No tools are required for assembly.
1 Front Wheel (x2)
2 Rear Wheel (x2)
3 Adapter Release Button
4 Car Seat Ring Adapter
5 Adapter Fold Strap
6 Canopy
7 Arm Bar
8 Insert
9 Seat Pad
10 Calf Support
11 Front Wheel
12 Rain Cover
13 Swivel Lock
14 Storage Basket
15 Calf Support Adjustment
Button
16 Stroller Frame
17 Seat Release Button
18 Buckle
19 Shoulder Harness Pad
20 Handle
21 Handle Adjustment
Button
22 Rear Wheel
23 Brake Lever
24 Stroller Fold Strap
(under the seat)
25 Storage Pocket
26 Recline Adjustment
Button
27 Fold Button (in the
middle of the Recline
Adjustment Button)
28 Canopy Window
8
9
6
7
10
12
13
14
17
18
15
11
19
16
3

Product Setup
Open Stroller
1 - Lift the handle to open the stroller frame.
2 - Pull the seat up towards the handle.
A “click” sound means the seat is open.
Check that the stroller is open completely and locked
before continuing.
Front Wheels
3 - Slide the front wheel onto the end of the front leg.
A “click” sound means the front wheel is assembled
completely.
Check that the wheel is securely attached by pulling out.
Repeat on opposite side.
4 - To remove the front wheel, press the release button (1)
and detach the front wheel from the front leg (2).
Rear Wheels
5 - Insert the rear wheel into the rear leg. A “click” sound
means the rear wheel is assembled completely.
Check that the wheel is securely attached by pulling out.
Repeat on opposite side.
6 - To remove the rear wheel, press the release button (1)
and detach the rear wheel from the rear leg (2).
click
click
10 TRIV™instructions 11
TRIV™instructions
2
1
1
2
4
36
click
2
1
5

1
2
Arm Bar
It is always recommended that the arm bar be used, but
it is not a restraint device. Always secure the child with
the harness.
1 - Align the arm bar ends with the arm bar mounts, and
insert until it clicks into place. A “click” sound means the
arm bar is assembled completely.
2 - To remove the arm bar, press the arm bar release buttons
(1) and lift the arm bar up (2).
Insert
3- To assemble the insert, place the insert over the seat pad
and thread the shoulder, waist and crotch harness straps
through their respective slots.
4- Attach the hook and loop fastener on the insert to the
top of the seat pad.
Check Setup
Stroller frame is fully open and locked.
Rear and front wheels are securely attached.
Arm bar is securely attached.
12 TRIV™instructions 13
TRIV™instructions
click
11
2
3
4

Product Use
Canopy
1 - To open the canopy, pull the canopy toward the front of
the seat. To close the canopy, push it back.
2 - Unzip the zipper for extra shade.
3 - For added ventilation, flip the canopy window cover up.
Front Swivel Locks
It is recommended to use the front swivel locks on uneven
surfaces.
4 - Pull the front swivel lock up (1) to lock the front wheel
and push down (2) to unlock it.
Brake
5 - To lock the rear wheels, step down on the brake lever.
6 - To unlock the rear wheels, lift up on the brake lever.
Always apply the brake when the stroller is stopped.
Push the stroller slightly to ensure the brake is engaged.
5
6
14 TRIV™instructions 15
TRIV™instructions
1
2
3
4
1
2
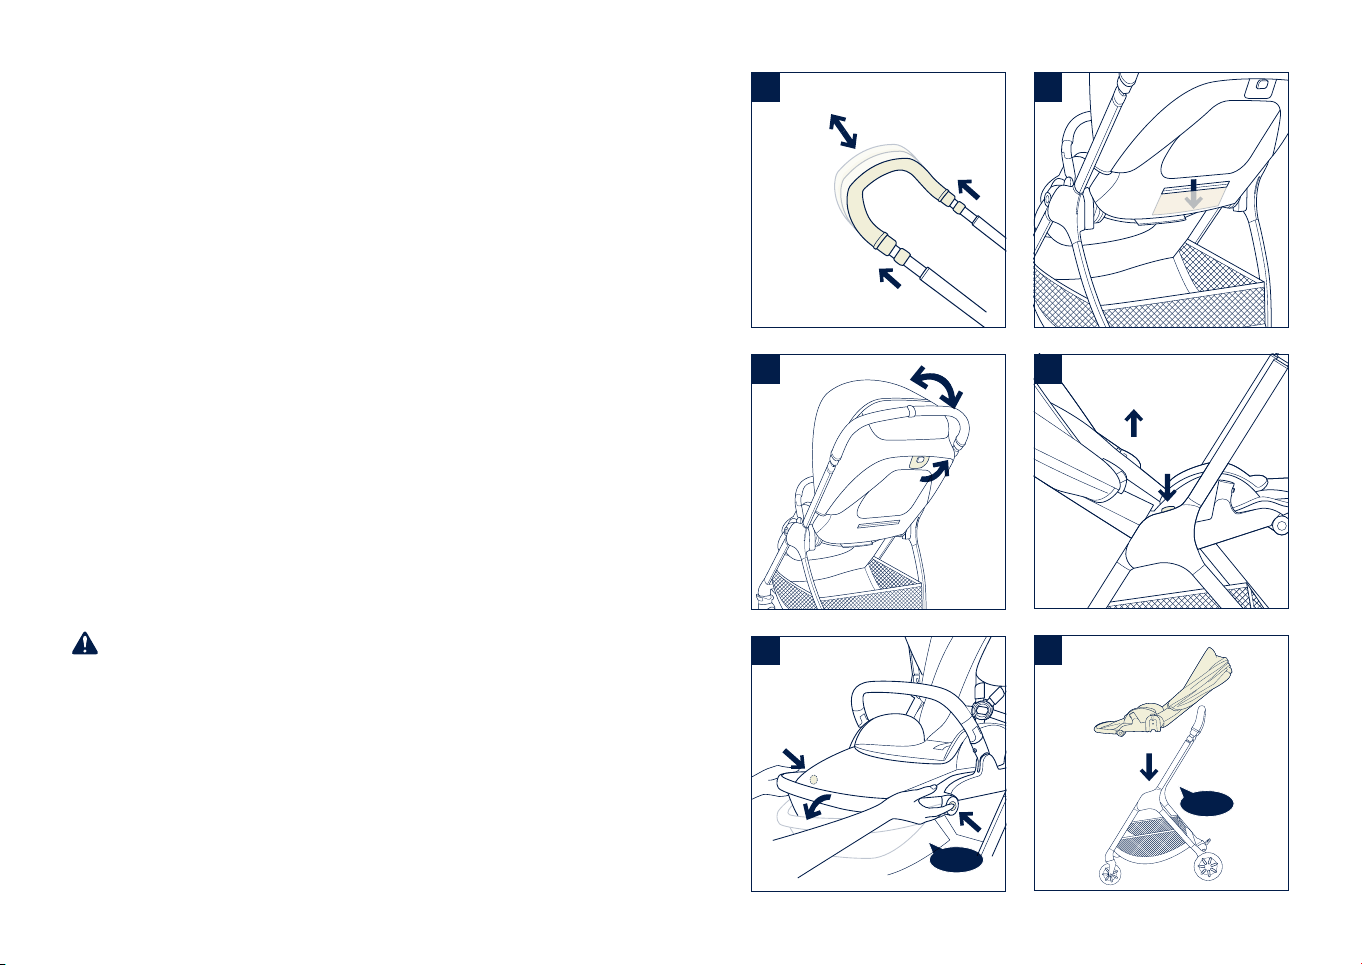
Handle
The handle has 5 positions.
1 - To adjust the height of the handle, pull the handle
adjustment button (1) and move the handle up or down (2).
Recline
There are 3 recline positions.
2 - To recline the seat, pull the recline adjustment button (1)
and tilt the backrest up or down (2).
Calf Support
The calf support has 2 positions.
3 -To raise the calf support, lift up until it locks into position
with a “click.”
To lower the calf support, press the calf support
adjustment buttons (1) and push the calf support down
(2).
Storage Pocket
4 - Use the storage pocket on the back of the seat for
lightweight storage.
To prevent a hazardous, unstable condition, DO NOT
place more than 1 lb (0.45 kg) of items in the storage
pocket.
Reverse Seat
5- Press the seat release button (1) and lift the seat up (2).
6- Reverse the seat, and then attach it to the frame.
A “click” sound means the seat is attached completely.
4
16 TRIV™instructions 17TRIV™instructions
5
6
1
2
click
click
2
1
2
1
2
1
3
1
2
1
1
Other manuals for Triv
5
Table of contents
Other Nuna Stroller manuals


