Northern Lights Cedar Tub User manual

Cedar Tub Care Manual
Rev 13 - Sept 2016
Table of Contents
1. The Advantages of a Wooden Hot Tub vs. the Acrylic Spa .................................................................... 3
2. Levelling .................................................................................................................................................. 3
3. Filling & Draining Procedure .................................................................................................................. 3
3.1 Initial Filling Procedure ................................................................................................................ 3
3.2 Draining Procedure ....................................................................................................................... 4
4. Seasonal Use & Drainage ........................................................................................................................ 4
5. Avoiding & Fixing Leaks ........................................................................................................................ 6
6. Tightness of Bands ................................................................................................................................... 7
7. Preserving the Wood Finish ..................................................................................................................... 7
7.1 Interior Finish ............................................................................................................................... 7
7.2 Exterior Finish .............................................................................................................................. 8
7.3 Cover Finish .................................................................................................................................. 8
8. Control Adjustments ................................................................................................................................ 9
8.1 Temperature ............................................................................................................................. 9
8.3 Jets and Air Control Valves ................................................................................................... 10
8.4 Pump Hi-Lo Control .............................................................................................................. 10
8.5 Light On-Off Control ............................................................................................................. 10
8.6 Hi Temperature Reset .............................................................................................................. 10
9. Keeping Wooden Tub’s Water Clear & Sanitary................................................................................... 11
9.1 The Hot Tub and Spa Challenge 11
9.2 Physical (Mechanical) Cleansing 11
9.2.1 Other Basic Tips ...................................................................................................................... 12
9.3 Water Balancing 13
9.3.1 pH ............................................................................................................................................ 13
9.3.2 Total Alkalinity ........................................................................................................................ 14
9.3.3 Calcium Hardness .................................................................................................................... 14
9.3.4 Controlling Foaming ................................................................................................................ 15
9.3.5 Stain-producing Metals ............................................................................................................ 15
9.3.6 Total Dissolved Solids (TDS) .................................................................................................. 15
9.4 Micro-Organism (Bacteria) Control – Sanitation and Oxidation. 16
9.4.1 Bromine .................................................................................................................................. 17
9.4.1.1 The Use of the Two-Part System ......................................................................................................... 17
9.4.1.2 The Use of Brominating Tablets .......................................................................................................... 18
9.4.2 The Use of Metal Ions or Mineral Treatments ......................................................................... 20
9.4.2.1 Spa Frog Silver Mineral Cartridge ....................................................................................................... 20
9.4.2.2 Silver/Copper/Zinc Electric Ionization ................................................................................................ 20
9.4.3 Oxidation and Shock Treatment............................................................................................... 23
9.4.4 The Use of an Ozonator ........................................................................................................... 23
9.4.5 Algae, White Water Mold and Biofilm Control ....................................................................... 24
9.5 Too Many Choices- Just Summarize what to Use! 25
9.6 Water Trouble Shooting 27
9.7 Quick Water Treatment Summary Instructions 30
9.7.1 Tub without an Ionizer and Ozonator ...................................................................................... 30
9.7.2 Tub with an Ionizer and Ozonator .......................................................................................... 31
9.8 Replacement Chemicals 32
10. Controls Troubleshooting ...................................................................................................................... 32
11. Warranty Claims ................................................................................................................................... 33

2
Rev 13
General Safety Instructions/Warnings
FOLLOW ALL WARNINGS CAREFULLY!!
o Do not permit electric appliances (such as a light, telephone, radio or television) within 5ft (1.5
M) of this hot tub.
o Children should not use hot tubs without adult supervision.
o Do not use hot tubs unless all suction guards are installed to prevent body and hair entrapment.
o Pregnant or people under medical care (such as but not limited to heart disease, diabetes, blood
pressure, circulatory problems, obesity) should consult a physician before using a hot tub.
o People using medications and/or having an adverse medical history should consult a Physician be-
fore using a hot tub.
o People with infections or infectious diseases, sores or open wounds should not use a hot tub.
o To avoid injury, exercise care when entering or exiting the hot tub. Wet surfaces will be slippery.
o Do not use drugs or alcohol before or during the use of a hot tub to avoid unconsciousness and
possible drowning.
o Water temperature in excess of 100°F (38°C) may be injurious to your health.
o Before entering the spa or hot tub measure the water temperature with an accurate thermometer.
o Never walk, climb, play or jump on the cover.
o When Tub is not in use, cover must be properly positioned and secured
o Prolonged immersion in a hot tub may be injurious to your health.
CAUTION: DO NOT OPERATE THE EQUIPMENT WHEN THERE IS LITTLE OR NO
WATER IN THE HOT TUB.
PROLONGED IMMERSION IN HOT WATER MAY INDUCE HYPERTHERMIA READ
THE FOLLOWING SYMPTOMS:
The causes, symptoms, and effects of hyperthermia may be described as follows. Hyperthermia
occurs when the internal temperature of the body reaches a level several degrees above the normal
body temperature of 37° C (98.6°). The symptoms of hyperthermia include drowsiness, lethargy, and
an increase in the internal temperature of the body. The effects of hyperthermia include:
1. unawareness of impending hazard;
2. failure to perceive heat;
3. failure to recognize the need to exit the hot tub;
4. physical inability to exit hot tub;
5. fetal damage in pregnant women, and
6. unconsciousness and danger of drowning.
WARNING: THE USE OF ALCOHOL OR DRUGS CAN GREATLY INCREASE THE
RISK OF FATAL HYPERTHERMIA IN HOT TUBS
SAVE THESE INSTRUCTIONS!

3
Rev 13
Cedar Tub Care
1. The Advantages of a Wooden Hot Tub vs. the Acrylic Spa
Although acrylic spas are by far more prevalent today than wooden hot tubs, it was the wooden hot tub
that began the experience of social bathing in America. Whether to purchase an acrylic spa or a wooden
hot tub depends mostly on personal preference and each individual situation. There are many reasons for
choosing a wooden tub over a plastic spa.
Because they are assembled on site, they can be carried through any doorway, stairs or other narrow access. With
a spa, you have a large one-piece which can be unwieldy or impossible to move into its final location.
The vertical walls and greater depth of the wooden tub surround the bather with more water than would be found
in a spa, so there is a greater effect of buoyancy in the hot tub. In addition, there is typically much more legroom
since you can stretch out under the bench, and taller bathers are more comfortably accommodated.
Because of a wooden hot tub’s greater depth, a smaller diameter hot tub will seat the same number of people as a
larger spa. For example, a 5’ (152 cm) round hot tub will seat as many people as a 7’ (213 cm) square spa. And a
smaller surface area means less heating expense.
And, of course, there’s the rustic look of a traditional wooden hot tub. From an aesthetic point of view, nothing
matches the appearance of a wooden tub.
2. Levelling
The tub should be placed on a leveled base. We recommend using 18 in x 18 in (400mm x 400mm) con-
crete patio blocks for this. The area should first be dug down to clay in such a way that there is a slight
slope. Place 4 mil (100 micron) polyethylene plastic over the clay. Then, using 1 inch (2.5 cm) plastic
conduit, arrange for any water to be able to drain out of the pit. Now fill the dug-out area with a small
aggregate gravel fill. Compact and level the gravel before positioning the patio blocks.
We prefer this method to pouring a cement base. Should the ground settle unevenly and the base becomes
tilted, the patio blocks can be re-leveled. This is not the case for a poured concrete base.
3. Filling & Draining Procedure
3.1 Initial Filling Procedure
If your tub has a skimmer, it will be equipped with a shut-off valve that can be closed. This (closing) al-
lows the level of the water to be low without air being sucked into the pump through the skimmer. The
pump and heater can be turned on once 5 inches (13 cm) of water are in the tub. Do not allow the heater to
be on, if the pump makes a surging sound. If the pump has not primed (no flow) do not leave pump on
more than 2 minutes and follow priming instructions provided in section 10.
Upon power up, a Balboa Spa Pack will display “Pr”, which stands for prime. This display condition will
last for 4 minutes. If, during this time, you push the jets button the pump will run at high speed until the 4
minutes expires or until you push the jets button again. This high speed mode is available to help drive
out air from the pumping circuit. When you first fill the tub in a gradual way, as described next, it is not
recommended you use the pump in high speed until the level is at least up to the seats.
As mentioned, the tub should be filled to at least 5 inches (13cm) above the floor or 2 inches (5 cm) be-
yond the bottom drain (suction) hole. However, you do not need to stop at this level, if you are not seeing
any significant leaks. Continue to fill the tub until leaks are noticeable. Close the skimmer valve (push
in) and then, with the cover on, both the pump (low speed) and heater can be turned on to raise the water
temperature to about 90° F (32°C). The higher temperature accelerates the swelling of the wood, and the
water spurting out of the jets helps wet the upper parts of the staves. If you have leaks, keep adding water,

4
Rev 13
since you don’t want air to be sucked into the pump. (If the leaks are significant, then you need to keep the
pump and spa pack off, keep the staves moist by spraying water on them and then covering the tub. This
way the wood will moisten and start the expansion process, without continuously pouring water into it.)
After the above temperature has been reached wait until leaks have subsided significantly. Then slowly
fill the tub to a higher level where you again experience significant leaks. Wait to reestablish the tempera-
ture, for leaks to subside and continue the process until the tub is full. This method should minimize the
total amount of water that is initially leaked during the filling stage. If leaking continues, use the saw dust
provided. It will drift into the leaking holes and help plug them up.
If the staves have shrunk and there are considerable gaps between them, then water loss will be excessive
and some other remedial steps may need to be taken. These include spraying the wood frequently for
three days to keep it moist so the staves will expand. Then use the above procedure but additionally add
cups of saw dust to the water. The staves will expand around 4% between being perfectly dry and being
fully wet. Absorption of moisture takes time however, so you may need patience.
Initially use only the bromine tablets and occasional shock (Oxy-Pur) as you bring the water to the desired
bathing temperature. After the 1st filling, the water will absorb tannins from the wood and it will become
brownish. It is safe to use the tub. After 1 week or after the water is dark brown, drain the water. Carry
out any necessary maintenance and then refill the tub. Coloring of the water will reoccur for the 2nd and
third fill or in some cases longer. Some specific water conditions may cause the tannin to release more
slowly, in which case the browning will last longer than the normal 3-4 weeks. Once you are no longer
changing the water frequently, you can start using the full water balancing and sanitization procedures.
Experience will allow you to determine at what level to keep the water to account for the displacement
that will occurs as bathers enter the tub. The smaller tubs have the largest displacement effect per person.
The water level should stay above the skimmer intake. If you wish to use the tub below this level, close
the skimmer valve (push in).
3.2 Draining Procedure
The tub is drained using the hose bib valve located after the pump. When you wish to replace the water,
you can drain the tub either the slow way or the fast way. With the slow method you 1st turn off the
breaker. Then attach a garden hose to the drain bib (faucet) and open it. Place the other end of the garden
hose at a location where you want the water to drain to. About an inch of water will be left in the bottom
of the tub. If you also wish to get rid of this, you will need to use a submersible style pump or wet-and-
dry vacuum cleaner.
If you wish to drain the tub faster, you can use the pump to assist. 1st turn the spa pack to the minimum
temperature. Then close both the globe valve connected to the outlet of the filter and the skimmer gate
valve. The globe valve attached to the pump suction is left open. Again attach a garden hose to the drain
bib and open it. Then let the pump run at low speed to create extra pressure which will force water out of
the hose at a higher flow rate. Watch the level and when the pump starts to suck in air, turn off the break-
er.
When draining the hot tub for the season additional measures to prevent dry-out and to remove any
trapped water in the pump, pipes, filter and the heat recovery blanket need to be taken. See the 3rd para-
graph in the next sections for details.
4. Seasonal Use & Drainage
Our cedar hot tubs, with an insulating cover, are reasonably energy efficient. Equipped with a 3 kW or
higher heater you will have no problems maintaining a hot water temperature. In moderate winter cli-
mates, such as on the west coast of North America (including British Columbia), Central & Northern
Europe our tubs can certainly be used throughout all 4 seasons. In extreme winter conditions, such as ex-
ist in the interior of Canada and the Northern Central US, outdoor use becomes problematic although
5
Rev 13
certainly not impossible. Water may freeze over the air valves and controls, heating costs will be high and
most people will find -30° air temperatures too extreme. Special insulation techniques would have to be
considered to keep a tub running in such extreme winter conditions, in order to keep the heating costs rea-
sonable. These including having the floor insulated (a standard option available at time of order), and
insulating the sides and pipes (see the Question and Answers section of Northern Lights Cedar Tub As-
sembly Manual). We also offer an “artic cover” with 50% better insulation coefficient than our regular
cover (R21 vs. R14). Never, however, insulate around the pump motor since it generates significant heat
that must be allowed to dissipate. It is essential to keep the pump running continuously on low speed in
the winter and not to use the timer or filtration cycle during the winter (set filtration setting to FC or 12).
Water in the pipes will freeze much before any water in the tub freezes and having the pump running
keeps the pipes warmer and the pump additionally adds some heat. Digital controllers have freeze protec-
tion sensing. This means that should the water temperature drop to in the range of 44°F (6.6C) the pump
is turned on, even if the filtration cycle is not set at continuous.
Persons having ordered a gas heater should not use the gas heater in freezing winter conditions, since spa
gas heaters are not designed to be run in freezing temperatures due to condensation problems. Northern
Lights Cedar Tubs now offers a hybrid gas/electric heating system. This allows the gas heater to be turned
off in sustained freezing conditions but the hot tub can stay heated using the electric heater.
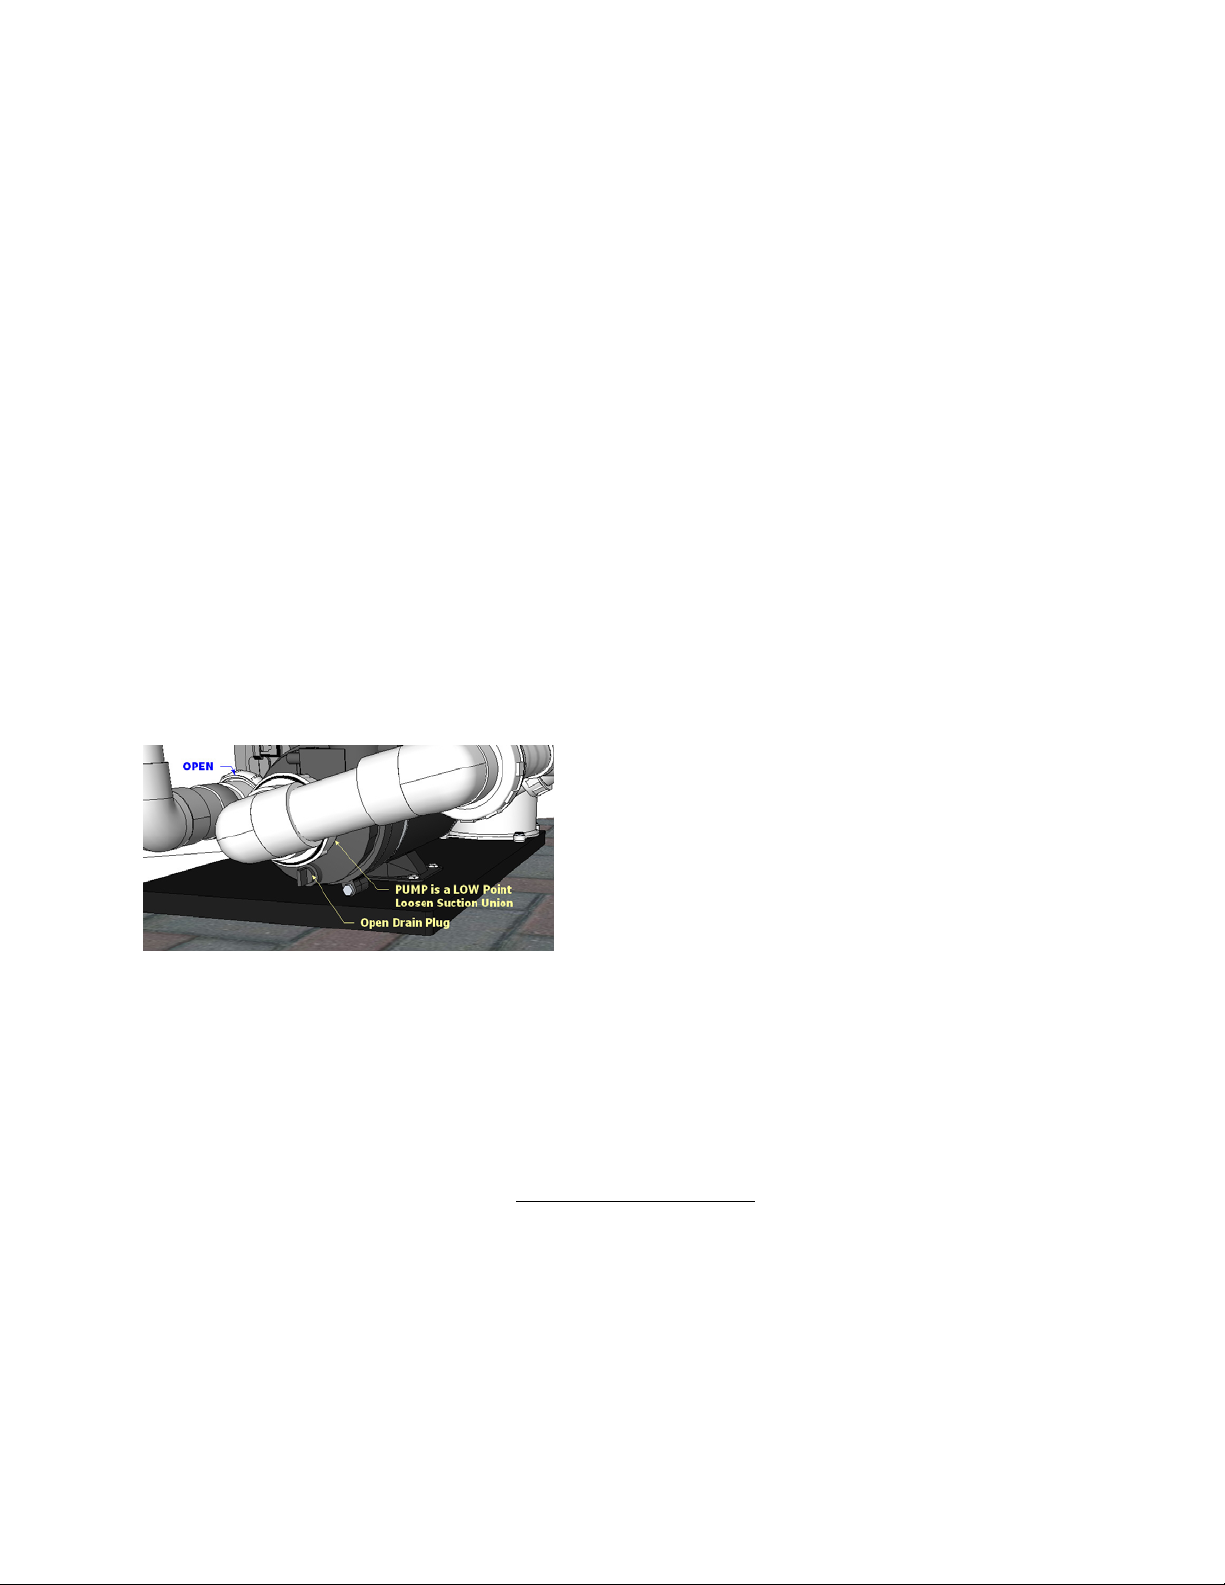
When draining the tub for the winter season, it will be advantageous to wait for frost so the moisture in the
wood will freeze. This stops the wood from drying. Turn off the electric breaker and then drain the tub,
retaining the residual water that is below the drain hole. For all systems, know where water can get
trapped which are typically the low points and get rid of the water at these low points. Remove the filter
cartridge, clean it and store it. Loosen appropriate union
fittings on the heater and pump suction to drain the water
that is trapped in the pump and heater, which are two of
the low points. You also want to open the drain plug in
the pump, if it has one. If you also have a gas heater,
open the unions and let water drain from its pipes. The
water that remains in the tub can safely be allowed to
freeze. Add some algaecide, so the water won’t turn bad
should it get warm before you are ready to fill the tub
again. If you wish, you can also suck the remaining water out using a wet & dry shop vacuum cleaner or a
portable sump pump, to clean the floor. However, after cleaning, add an inch (2.5 cm) of clean water back
in and again add some algaecide. Attach the cover and ensure it is sealing good all around the tub.
In the spring you will find that the staves are still moist. First reconnect any open unions and plugs.
Check that all unions have been tightened and that the O-rings have been seated properly. Replace the
filter. Check that the isolating valves are open. If you refill the tub while freezing conditions still exist,
you need to apply external heat to any location that may have retained ice. This can involve placing a fan
style heater on the seat to thaw any ice in the bottom of the tub. Also the tub should be filled to the initial
3” (7.5cm) level (above the suction drain) through the top of the filter using warm water. This will thaw
any ice that may be in a low spot in the piping or equipment. Start the filling procedure, as per section 3,
paragraph 2. This will avoid the spa pack registering freeze conditions, which with some spa packs can
cause problems in quickly heating the water, especially if the pack is set to LOW current mode. Because
the wood may have shrunk a small amount (provided you didn’t allow it to completely dry out), a little
swelling may need to occur again to seal the tub.
Persons living in warm climates, where the tub gets used during the winter but not during the hot summer,
need to consider all options, before they decide to drain the tub and allow it to dry out. In a hot desert
climate, a drained tub will quickly dry and excessive shrinkage of staves may occur. It would be better to
keep the tub filled, with the spa pack set to sleep mode or, if the tub has no digital spa pack, keep the
pump running at low speed but with heater off. Of course sanitizer must still remain present and for pro-
longed no-use the Argenia Silver Water System would be ideal. It does not even need the pump to be

6
Rev 13
running. If this is not an option then consider the Frog Mineral cartridge. If keeping water in the tub is not
practical, for some reason, and the tub must be drained and will dry out frequently, then your conditions
are such that a liner is the most practical solution. Contact us if this is the case.
A problem that can occur, if the tub is left with residual water in the bottom, is that a dark film can deposit
on the wood. The Argenia Silver Water System would best prevent this, but if it happens, you should gen-
tly scrub this off the bottom of the floor with a Borax solution and then suck it up with a wet & dry
vacuum cleaner. The filter and drain screen will catch the rest. You can also use a gentle diluted bleach
to get rid of the darker staining or you can simply wait. Over time the sanitizer you use will slowly bleach
out the stained floor.
5. Avoiding & Fixing Leaks
Indeed wooden hot tubs will leak when first filled or when refilled at the beginning of the season. The
amount of leaked water can vary from considerable to not even being noticeable. Once the wood has
swollen sufficiently leaks will usually seal, although we cannot provide a guarantee against this, unless we
shipped the tub assembled.
If the tub sealed well and then starts to leak, our experience shows that there is basically one common rea-
sons why this occurs, if the tub was not allowed to dry out. Without a doubt this is due to overuse of
chlorine (especially Tri-Chlor products) which will attack the wood, causing leaks. If a tub holds water
perfectly for months or years and then begins leaking inexplicably, this is usually indicative of over-
chlorination. If the problem is identified early enough, the damage can be halted and repaired with little
cost or time. This problem can be avoided simply by using a sanitizer system that significantly reduces the
need for high levels of chlorine. We use bromine for that reason and even better results are obtained if the
Metal Ionization system is used to avoid even bromine.
Much less common than leaks due to halogens are leaks in a hot tub due to an assembly problem. A tub
that never seems to seal at all is indicative of this. Our assembly method, if followed, is intended to avoid
this. However if these are not followed, to the letter, problems can occur. For example, we have had
some customers leave out an entire stave. If the tub was not test fitted and little attention was paid to
properly eliminating gaps, leaks above the floor between some staves can stay permanent unless the tub is
reassembled. If all the staves are not fully pushed against the floor edge, leaks through the stave dado can
occur. This may occur if you ended up with an extreme V and did not check that you had full floor con-
tact at all staves. We also require customers to use silicon caulking at the interface of the floor and staves.
If this was not done, some leaks through the dado may not fully seal. Should the tub continue to drip after
2 weeks, we first ask you to use the saw dust we supply. Be sure you remove the filter when doing so. If
the leak continues or reappears, we recommend carefully removing the adjoining staves corresponding to
each leak, inspecting them, and then repairing the problem. If it is a due to a poorly matching set of staves
or damage in a stave that was not previously detected, new staves may be required. If it was due to a
caulking problem, remove the old silicone caulking carefully and redo the job. If you feel you need to
apply silicone caulking between some staves, then you must do it all the way up the stave. Ensure when
the staves are repositioned, the back of the dado will touch the floor edge.
Some customers may not have the option of removing and inspecting the staves, because they have in-
stalled the tub in such a manner that they can’t get proper access to the outside portion. In that case a 2-
part marine epoxy can be beneficial, and some of our customers who have used it have reported good re-
sults. You will need to mix it and squirt it into the leaking joints using a hypodermic syringe. The syringe
you can obtain from a veterinarian supply store. The 2-part marine epoxy, AeroMarine 300/21 is availa-
ble from the following source: http://www.aeromarineproducts.com/. The tub does not need to be
completely dry. Allow the product to set, which may take 2 days.
.

7
Rev 13
Remember to not over tighten the straps. They only need to be tight enough to prevent a leak. The gaps
between the top straps should be no less than that ¼” (6mm) of the gap in the bottom strap. Excessive
pressure will squeeze the staves such that the width will be reduced and the thickness will increase. The
wood, if it is then allowed to dry, will not return to the original dimensions it had when first assembled.
This will results in gaps between the staves. Such complete drying can ruin the sealing permanently and
must be avoided since the tub will then leak profusely for considerable time when refilled. It may in fact
never properly reseal. If this happens, a vinyl liner will have to be used.
6. Tightness of Bands
The bottom band will be tightened by the installers until a definite resistance is felt. The middle and up-
per bands will have a more spongy resistance, since there is no floor to stop further tightening. Do not
initially tighten the middle and upper band tensioners more than a ¼ inch (0.6 cm) past the gap in the low-
er band. After the wood swelling has stabilized, back off the middle and top tensioners, ½ turn every 2nd
day until the gap in these matches the bottom strap’s gap.
We place # 6 or #8 screws below each strap to assist in alignment of the straps. If the tub is left drained,
during the off-season, the wood may shrink. The screws serve to hold the straps in place.
7. Preserving the Wood Finish
7.1 Interior Finish
The interior of the tub is kept natural. As long as the wood stays wet the rich cedar appearance will come
through. With use, and oxidation, the wood will turn to a whitish-grey colour when dry. It may also be-
come mineralised, if the water is very hard or from adding Ca hardener when water is too soft. However,
even under these conditions the natural golden-brown colour will still come through once the wood is re-
wetted.
The nemesis of the interior finish is the tri-chlor type chlorine compounds and to a far lesser extent di-
chlor or bromine sanitizer. If tri-chlor type of sanitizer is used and/or tri-chlor-based shock is frequently
added to water, the surface fibres will, over time, break down resulting in a “pulpy” white surface. This is
an undesirable situation that is easily avoided by using bromine products or if you must di-chlor granules.
We have compared tubs used year around for 4 years. The tubs using only “tri-chlor” type of chlorine had
begun to have a pulpy surface after 1 year or earlier. The tubs that relied on ozone and used only reduced
levels of bromine sanitizers or some di-chlor sanitizer showed little evidence of pulping at all after 4
years.
Best, however, is avoiding halogens all together and using the metal ion system instead in combination
with an ozonator or MPS. This is also cheaper and less work over the long run.
Should the interior surface develop this cellulite or pulpy surface, because you used tri-chlor compounds,
you can remove this. Drain the tub and while the surfaces are still wet or damp, gently remove the pulpy
material using a plastic kitchen scouring pad. Do this to all surfaces including the bottom of seats. Suck
up all the loose scraped-off material, with a wet/dry shop vacuum. After you have refilled the tub, you
will need to frequently check the drain strainers, since the residual pulp will collect at these locations,
eventually plugging the drain holes. Also, frequently check the filter and clean and replace. After about
a week the water should be clear of further fibres. If you then switch to a bromine approach or better yet a
metal ion approach you can stop further fibre breakdown. You should quickly notice the beneficial effects
in that the suction screen stops getting plugged with pulp.

8
Rev 13
7.2 Exterior Finish
As with any wood, sun and rain will take its toll on the appearance of cedar wood, unless attention is paid
to a wood preservation schedule. Northern Light can deliver assembled tubs with 1 to 3 coat of a Sikkens
Cetol 1 RE exterior protective translucent finish applied to the outside and the top end of the staves pre-
pared as discussed below. We use a cedar tint. This Sikkens Cetol 1 RE (satin finish) is a high
performing wood stain/preservative. When looking yourself to buy a suitable finish you want to select a
wood finish meant for exterior application. It needs to one that can “breath”. This is to allow moisture to
escape and not cause the finish to blister. Other examples are the Penofin Premium Red Label (Western
Red Cedar tint) or Penofin Marine Oil Finish (Transparent Natural). These are not the only manufacturers
of suitable finishes. We are not able to use and test them all.
Another surface that must be prepared and maintained carefully is the top rim. Since this is an end-cut
surface, that would tend to retain water, it is the surface most susceptible to bacterial rot over the long
term. To prevent this, 1st this surface of the newly assembled tub should be sanded with a belt sander to a
smooth and slightly rounded finish. The fine sandpaper helps to plug the end grain. Then very carefully
apply 1 application of a clear “end cut anti-rot” solution that often contains zinc naphthenate. An example
is the Armor All product “Clear Coat Wood preservative 33-721ARM”. An alternative is Copper Green
32001 Clear Wood Preservative. Once this has dried apply 1 or 2 coats of the exterior finish you use on
the outside surfaces of the staves, and once these have dried apply 1 coat of an exterior oil-based urethane
finish, or a 2-part clear marine epoxy (latter will look very shiny). This combination will completely seal
the end cut and will also prevent stain from transferring to the white underside of the cover. If this surface
finish deteriorates over time, refinish it.
With time, when the appearance of a wood surface becomes dried and pales, apply another coat. The de-
tails will depend on the stain you initially selected, so read the products literature. The discolouring of the
hot tub staves differs from that of wood that stays dry. The pressure from the interior water (moisture) in
the staves, migrates tannin and oils and even resin to the outside that can affect the colouration of oil
based wood preservatives. This can be quite variable from stave to stave or cedar batches, because nature
doesn’t grow wood as though it was a factory produced material. The fading of the finish is highly de-
pendent on the sun exposure. If the tub is in a shaded area, a maintenance coat will need to be applied
much less frequently than a tub that has a strong southerly exposure. Top surfaces, such as stair steps,
shelves, cover of an enclosure, tend fade and deteriorate faster than vertical surfaces because of the effect
of rain or water pooling on such surfaces. You do not want to skip applying the recommended number of
coats on such surfaces; in fact you want to apply an additional coat.
The stainless steel bands can be polished and then waxed. The threaded rod and tightening nuts should be
lightly greased with waterproof lithium-based greased. These latter items are not stainless steel and if not
treated as such can rust.
7.3 Cover Finish
Air born dust dirt and soot mixed with rain or snow will over time
deposit a dirty looking film on the cover. This can be removed us-
ing water and a product like Fantastik. Use a soft brush to help lift
the dirt and grime. The photo shows the cleaning in progress. A
pressure washer also works very well. A cover protective solution,
that provides uV protection, is available from Northern Lights.

9
Rev 13
8. Control Adjustments
8.1 Temperature
The spa pack will be equipped with a digital control panel. It can take over a day to bring a large tub up to
temperature, especially if the water coming out of the faucet is very cold.
The digital temperature control system eliminates the trial & error process of setting the temperature and
keeps the water to remain at a much more constant temperature of +/- 1° F. The human body is very sen-
sitive to temperatures around 98.6° Fahrenheit (37°C). When the temperature is only some 3-4 °F (2°C)
above this, the time you can be immersed in the tub is limited. For safety reasons, all manufactures of
Digital controls are required by law to limit the upper temperature to 104° F (40°C). Below 98.6° F
(37°C) the water will still be comfortable however it will not feel hot. Since your body can now dissipate
heat you can stay in the tub for extended times, without becoming “drained”.
If the digital panel is switched from Standard to Sleep mode the control set-point will be
20˚F (11˚C) below the actual setting. This is useful if the tub will not be used for a while.
Our hybrid heat hot tubs, equipped with gas heaters use the spa pack to supply 230 volts to the gas heater,
and a normally open contact that closes when heat is demanded. The gas heater’s own thermostat is in that
situation disabled. The exception to the external temperature regulation method is if you are using one of
our cottage propane systems. In that case there is no external digital control and the gas heater’s own
thermostat is used.
8.2 Cold Water Start-Up
If a tub is being filled with quite cold water, which is below the “freeze protection” temperature of the Spa
Pack, the system may behave strangely to you (this is especially true if your spa pack is set to the LOW
current mode). The code for freeze protection (for example IC) should be flashing. In such a condition,
the spa pack will cause the pump to run at low speed and also turn on the blower circuit (even though no
blower is used). Then if the LOW current mode is set to be on (for example with a VS501Z, A10 up) the
heater will then not come on. This will result in having only the pump heat available to raise the water
temperature and this may not be enough. If you live in a cold winter climate, to avoid this condition, you
should use a 40 or 50 Amp breaker so that the spa pack can be set to HI current mode. This will allow the
heater to come on when a freeze protection condition occurs.
If your service is 30A and the low current DIP switch setting must be on, then to get around the problem,
temporarily switch A10 to Off (down), but be sure you don’t touch the jets button. This will allow the
heater to come on and not trip the 30A breaker. After the IC condition has cleared, the A10 switch can be
switched to ON (up) again.
If you are doing a fresh fill after the tub has sat drained over the winter, thaw any ice in the bottom of the
tub using a fan style electric heater placed on a seat, with the cover on. Then fill to the 5-inch level
through the top of the filter using warm water. Then replace filter top and close (push in) the skimmer
valve. Keep the cover on and then turn on the power. As the water is warmed by the heater keep adding a
little more water such that you can keep the sensors above 45° F (7° C).

1 0
Rev 13
8.3 Jets and Air Control Valves
The air to the jets is turned on by twisting the air jet control valve knob. Be sure to turn air off when not
in use. Air will cool the water faster, so to avoid excessive energy use, turn the jet air only on when the
jets are being used for massaging.
8.4 Pump Hi-Lo Control
The pump has a high and a low speed. This is adjusted by pressing the “Jets” button on the digital panel.
When the tub is not in use the pump should remain in low speed. Digital Spa Packs can be set to a “filtra-
tion” time cycle. If such a cycle is set, the pump will not stay running in low speed when outside the
“filtration period”. If a tub is not controlled by a spa pack, such as is the case for Cottage systems, and
instead a pneumatic air switch is used to change the pump speed, then it is mandatory to keep the pump
running 24 hrs, during freezing temperatures.
8.5 Light On-Off Control
The light(s) are operated on 12VAC and are transformer isolated. This prevents the possibility of electro-
cution. The lights are turned off and on by depressing the air-button or the button on the digital panel
labeled “Light”. Bulbs (12Volt, 12 Watt) are accessible from the rear of the fixture. A twisting motion is
required to remove the socket to replace the bulb. If you have purchased the 22-bulb LED light, it is con-
nected by the same light socket that holds the regular 12-volt bulb.
8.6 Hi Temperature Reset
If heater high temperature trip engages, determine the source and after correcting the problem, follow the
reset procedure described with the Digital Spa Pack manual.
Table of contents
Popular Hot Tub manuals by other brands

Bestway
Bestway Lay-Z-Spa 54189 manual

Jacuzzi
Jacuzzi ARGA ARG101C0110 Use & maintenance

Morphy Richards
Morphy Richards Essentials PC4006 user manual

Softub
Softub PRESTIGE Owners Manual Water Treatment Guide

JNJ SPAS
JNJ SPAS SPA-318 Programming instructions

KIRAMI
KIRAMI Comfort Family Instructions for use
 owner's manual")


