Norsjö Carrier User manual
Instruction manual version 6, 2008
Norsjö Carrier 4-Stroke
Short and Long version

Norsjö Carrier 4-Stroke
Model Post Petrol Short and Long version
CONTENTS
INTRODUCTION ................................................................................. 1
IDENTIFICATION of MOPED ................................................................. 2
SAFETY INSTRUCTIONS ...................................................................... 3
INSTRUMENT AND CONTROLS ............................................................. 4
DRIVING POSITION ............................................................................ 10
FUEL ................................................................................................. 11
MOTOR OIL ....................................................................................... 12
PRIOR TO START, DAILY CHECKS ......................................................... 12
STARTING AND STOPPING THE ENGINE ................................................. 13
DRIVING DURING THE WINTER ............................................................ 14
CHANGING GEAR ............................................................................... 15
BRAKES ............................................................................................ 16
LOADING PLATFORM ......................................................................... 18
SERVICE AND MAINTENANCE .............................................................. 20
TOWING THE MOPED .......................................................................... 25
LONG-TERM STORAGE OF MOPED ....................................................... 26
FAULT FINDING .................................................................................. 27
TECHNICAL DATA ............................................................................... 29

Norsjö Carrier 4-Stroke
Model Post Petrol Short and Long version
INTRODUCTION
We thank you for the trust you have shown us by buying a Norsjö Carrier 4-Stroke.
We hope that this manual will help you quickly get to know your new moped.
Read through this instruction manual from beginning to end before you start to use
your moped. Any queries will be answered by Norsjö Mekaniska AB.
About this instruction manual
This instruction manual describes how your carrier moped should be used, how service
and inspections should be carried out to make sure that the moped operates correctly
and safely. This instruction manual covers instructions for normal use and maintenance
which can be carried out by the driver. More in-depth fault fi nding and maintenance
should be carried out by qualifi ed service personnel. Remember that a well-maintained
moped will make your work more enjoyable and safer and will also lead to lower
maintenance costs and maintain a high second-hand value for your moped!
Guarantee
Even with a quality product, on the odd occasion, material or manufacturing faults
arise which are covered by the guarantee. Contact Norsjö Mekaniska AB if such a
fault occurs.
Do not modify the moped
The moped is designed and type-approved so that it complies with current legal
requirements. No modifi cations may be carried out on the moped to change the engine’s
power or increase its speed. In order to ensure correct working order and maintain a
roadworthy moped, it is important that you always use original spare parts. A modern
carrier moped is a technically advanced product. Always turn to a qualifi ed specialist if
the moped needs to be repaired or adjusted.
Running-in
Every engine needs a certain amount of time to wear in the moving parts against each
other. It is therefore important that during the fi rst 500 kms, the engine is not run too
hard. You should therefore change down when going uphill or if the conditions are poor
(uneven road surface for example). Do not use full acceleration except for short periods
during the run-in period. Furthermore, avoid using full throttle while the engine is cold
or when driving downhill. The moped requires service and inspection in connection
with the run-in period. For further information, see page 20. ”Service in connection with
run-in period”.
Page
1 of 30
Norsjö Carrier 4-Stroke
Model Post Petrol Short and Long version
IDENTIFICATION of MOPED
Registration number
The moped’s primary identity is its registration number. When ordering spare parts,
the moped’s registration number should always be quoted. The registration number
can be found on the moped’s rear fender.
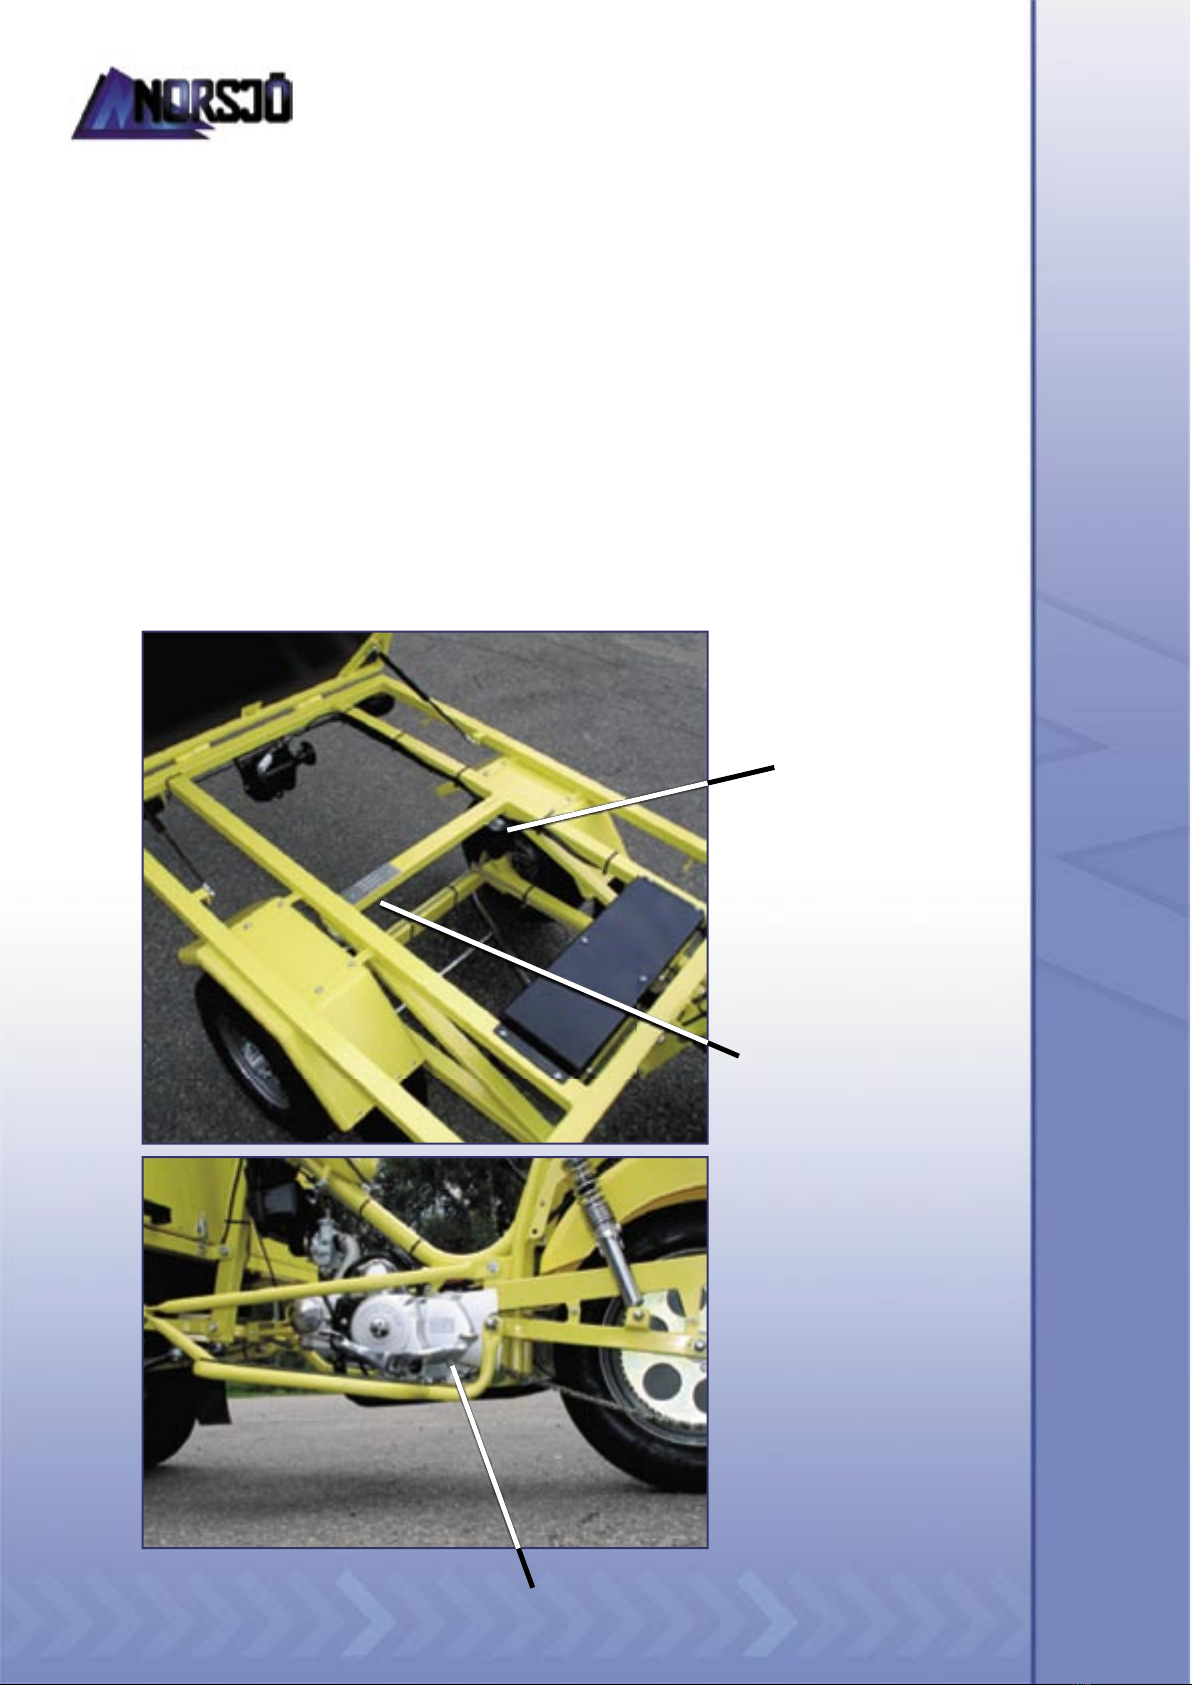
Type plate and frame number
The moped’s type plate and frame number are situated under the platform.
Engine number
The engine number can be found on the engine’s left side under the gear lever.
Page
2 of 30
Engine number
Type plate
Frame number

Norsjö Carrier 4-Stroke
Model Post Petrol Short and Long version
SAFETY INSTRUCTIONS
Risk of carbon monoxide poisoning
Exhaust fumes from internal combustion engines contain carbon monoxide.
Breathing in the exhaust fumes can be lethal!
You should therefore consider the following:
• Never start the moped in a closed area which lacks good ventilation.
• Never breathe in the exhaust fumes.
• Always ensure that the exhaust pipe is free of obstruction.
Handling and fi lling up with fuel - fi re risk
• Never fi ll the moped up with fuel when the engine is running.
• Never overfi ll the tank.
• If a spillage does arise when fi lling up with petrol, wipe away the petrol carefully
and then wait 5-10 minutes until any petrol that remains has evaporated.
• Do not fi ll up in the proximity of fi re.
• Never use a petrol-driven moped in an environment that is explosive or fl ammable.
• If there is a leakage in the fuel line, tank or any other part of the fuel system,
the engine should be stopped immediately and the fault should be rectifi ed
immediately.
• Avoid breathing in petrol fumes.
• Avoid skin contact with petrol.
Work with the moped’s battery
When working on the moped’s battery, special safety precautions must be taken.
See further, page 24, “The starter battery”.
Page
3 of 30

Norsjö Carrier 4-Stroke
Model Post Petrol Short and Long version
INSTRUMENT AND CONTROLS
Instrument
Ignition switch
The ignition switch has three positions, of which two of them are identical.
The three positions are:
• Position 1 = Locked
• Position 2 = Drive
• Position 3 = Drive
The ignition switch’s Locked position can be obtained by turning the key counter clockwise as
far as it will go. In this position, all electrical functions, except for the indicators are switched
off and the ignition key can be taken out.
The ignition switch’s Drive position can be obtained by turning the key to the middle position,
or as far clockwise as it will go. In this position, the engine’s ignition system and the moped’s
electrical system except for the lights are operating.
Power to the lights takes place via a generator which is completely separate from the battery
and the lights may therefore only be used when the engine is running.
Never leave the ignition switch in the Drive position when the engine is switched
off as this will discharge the battery. If left on for longer periods, the ignition sys-
tem may also be damaged.
Control lamps
On the instrument panel, there are control lamps:
• Green lamp - when lit, the gearbox is in neutral.
• Blue lamp - when lit, the main beam is switched on.
• Green lamp - when lit, the indicators are switched on.
Page
4 of 30
Speedometer
Control
lamps
Ignition
switch
• Green lamp - when lit, the indicators are switched on.
Speedometer
Control
lamps
Ignition
switch

Norsjö Carrier 4-Stroke
Model Post Petrol Short and Long version
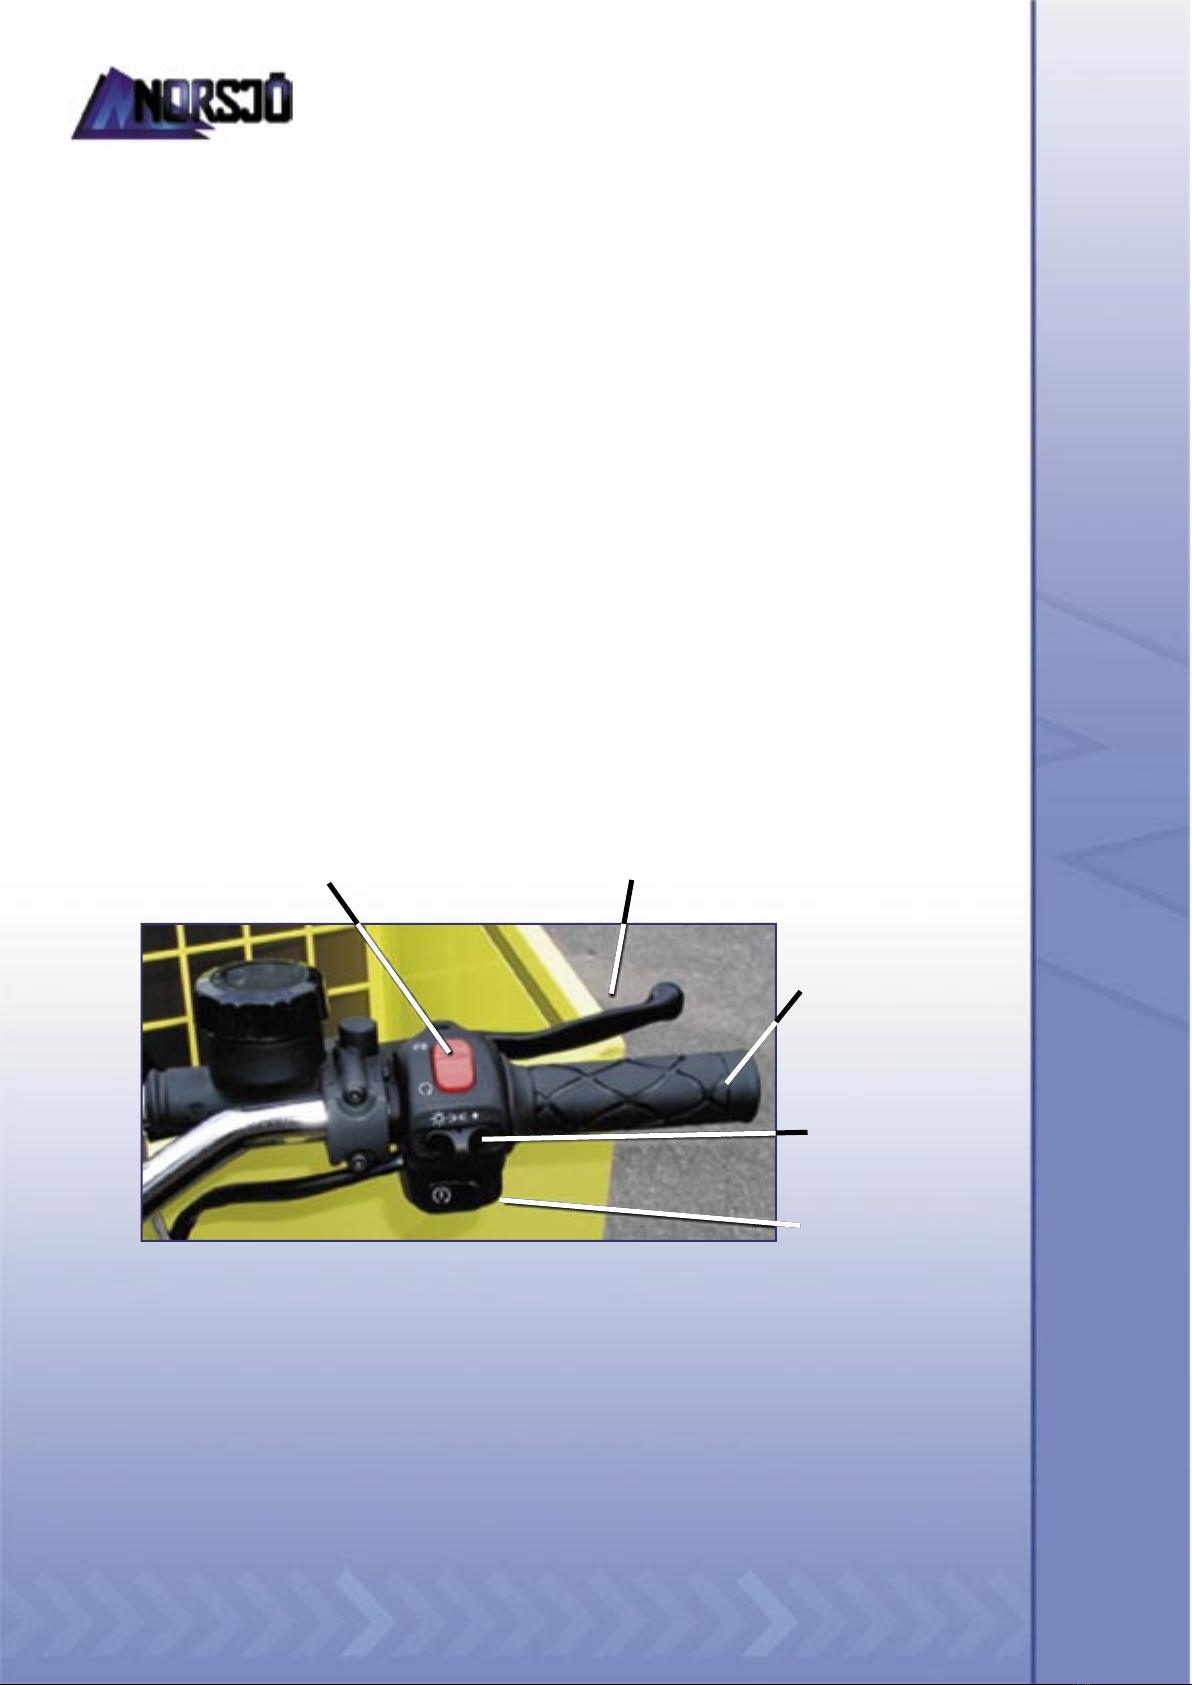
Handlebar controls - left side
Functions which can be found on the handlebar’s left side are:
Full/half beam switch and full beam fl ash.
Full/half beam switch has two fi xed positions which switch on the full beam/half beam.
There is also a spring-back position which switches the full beam on (fl ash).
Half beam must be switched on when driving during daytime!
Horn
When the spring-cushioned switch is pressed in, the moped’s horn sounds.
Indicator switch
If the direction indicator control is pushed to the left, the left indicator light starts to
blink. If the direction indicator control is pushed to the right, the right indicator light
starts to blink. To reset the direction indicator control to its neutral position, press it in.
Brake handle
The control for the rear wheel brake is on the left-hand side of the handlebar.
Page
5 of 30
Horn
Brake handle
Full beam fl ash
Full/half beam switch
Indicators
Norsjö Carrier 4-Stroke
Model Post Petrol Short and Long version
Handlebar controls – right-hand side
Emergency stop
The emergency stop may only be used in case of emergencies. If the emergency stop is
used on a daily basis to stop the engine, it may result in damage to the ignition system’s
electronics.
Brake handle
The control for the front wheel brakes is on the right-hand side of the handlebar.
Headlamp and parking lights
The sliding selector switch has 3 positions. The lights are fully switched off when
the selector switch is moved to the right. In the middle position, the parking light is
switched on, while full/half beam is activated when the selector switch is moved
to the left.
Start button
Starts the engine when the start button is pressed in at the same time as one of the
handbrakes is pressed in.
Page
6 of 30
Start button
Headlamp and
parking lights
Emergency
shutdown Brake handle
Gasreglage

Norsjö Carrier 4-Stroke
Model Post Petrol Short and Long version
Foot controls - left side
Gear lever
The gearbox has 4 gears and is manoeuvred with the left foot. The gears are placed with
fi rst gear, in the down position from neutral. The other gears are placed upwards.
Foot control – right-hand side
Kick-start
Is used as an alternative to the electrical start.
Accelerator pedal
This control is used to accelerate and is foot-manoeuvred with the right foot.
Page
7 of 30
Gear lever
Kick-start
Accelerator pedal
Kick-start

Norsjö Carrier 4-Stroke
Model Post Petrol Short and Long version
Parking brake
The moped is fi tted with a mechanically manoeuvred parking brake which operates on
the rear wheel. It is operated with a lever placed on the frame tube underneath the
saddle. The handbrake comes on when the lever is pulled upwards.
If the lever is pressed downwards, the handbrake is switched off/remains in
the off position.
Petrol shutoff valve
The petrol shutoff valve is situated on the tank’s left side. There are 3 positions:
• OFF -The petrol shutoff valve is
switched off.
• ON -normal position.
• RESERV - this position provides
a petrol reserve of approximately
0.5 litres. Only use this position on
your way to a petrol station after
you have run out of petrol.
Do not forget to change to the ”ON”
position after you have fi lled up
with petrol!
Page
8 of 30
Parking brake
Petrol shutoff valve
Table of contents


