
netvox R72615 User manual

Model:RA0715_R72615_RA0715Y
Wireless CO2/Temperature/Humidity Environment Sensor
Wireless CO2/Temperature/Humidity Environment Sensor
User Manual
Firmware:V1.3
Hardware:V0.4
1
Table of Content
1. Introduction.............................................................................................................................................................................................................................................................. 1
2. Appearance...............................................................................................................................................................................................................................................................1
4 .Set up Instruction..................................................................................................................................................................................................................................................... 3
5. Data Report.............................................................................................................................................................................................................................................................. 4
6. Installation................................................................................................................................................................................................................................................................5
7. Important Maintenance Instruction..........................................................................................................................................................................................................................6
1. Introduction
RA0715_R72615_RA0715Y is a ClassA type device based on the LoRaWAN open protocol of Netvox and is compatible with the LoRaWAN protocol.
RA0715_R72615_RA0715Y is unmasked for indoor inspection. RA0715_R72615_RA0715Y can be connected to a variety of sensors. A variety of
sensor combinations are required. As detectors for PM2.5, temperature and humidity, CO, NO, liquid level, and soil, the values collected by the sensor
are reported to the corresponding gateway.
LoRa Wireless Technology:
LoRa is a wireless communication technology dedicated to long distance and low power consumption. Compared with other communication methods,
LoRa spread spectrum modulation method greatly increases to expand the communication distance. Widely used in long-distance, low-data wireless
communications. For example, automatic meter reading, building automation equipment, wireless security systems, industrial monitoring. Main
features include small size, low power consumption, transmission distance, anti-interference ability and so on.
LoRaWAN:
LoRaWAN uses LoRa technology to define end-to-end standard specifications to ensure interoperability between devices and gateways from different
manufacturers.
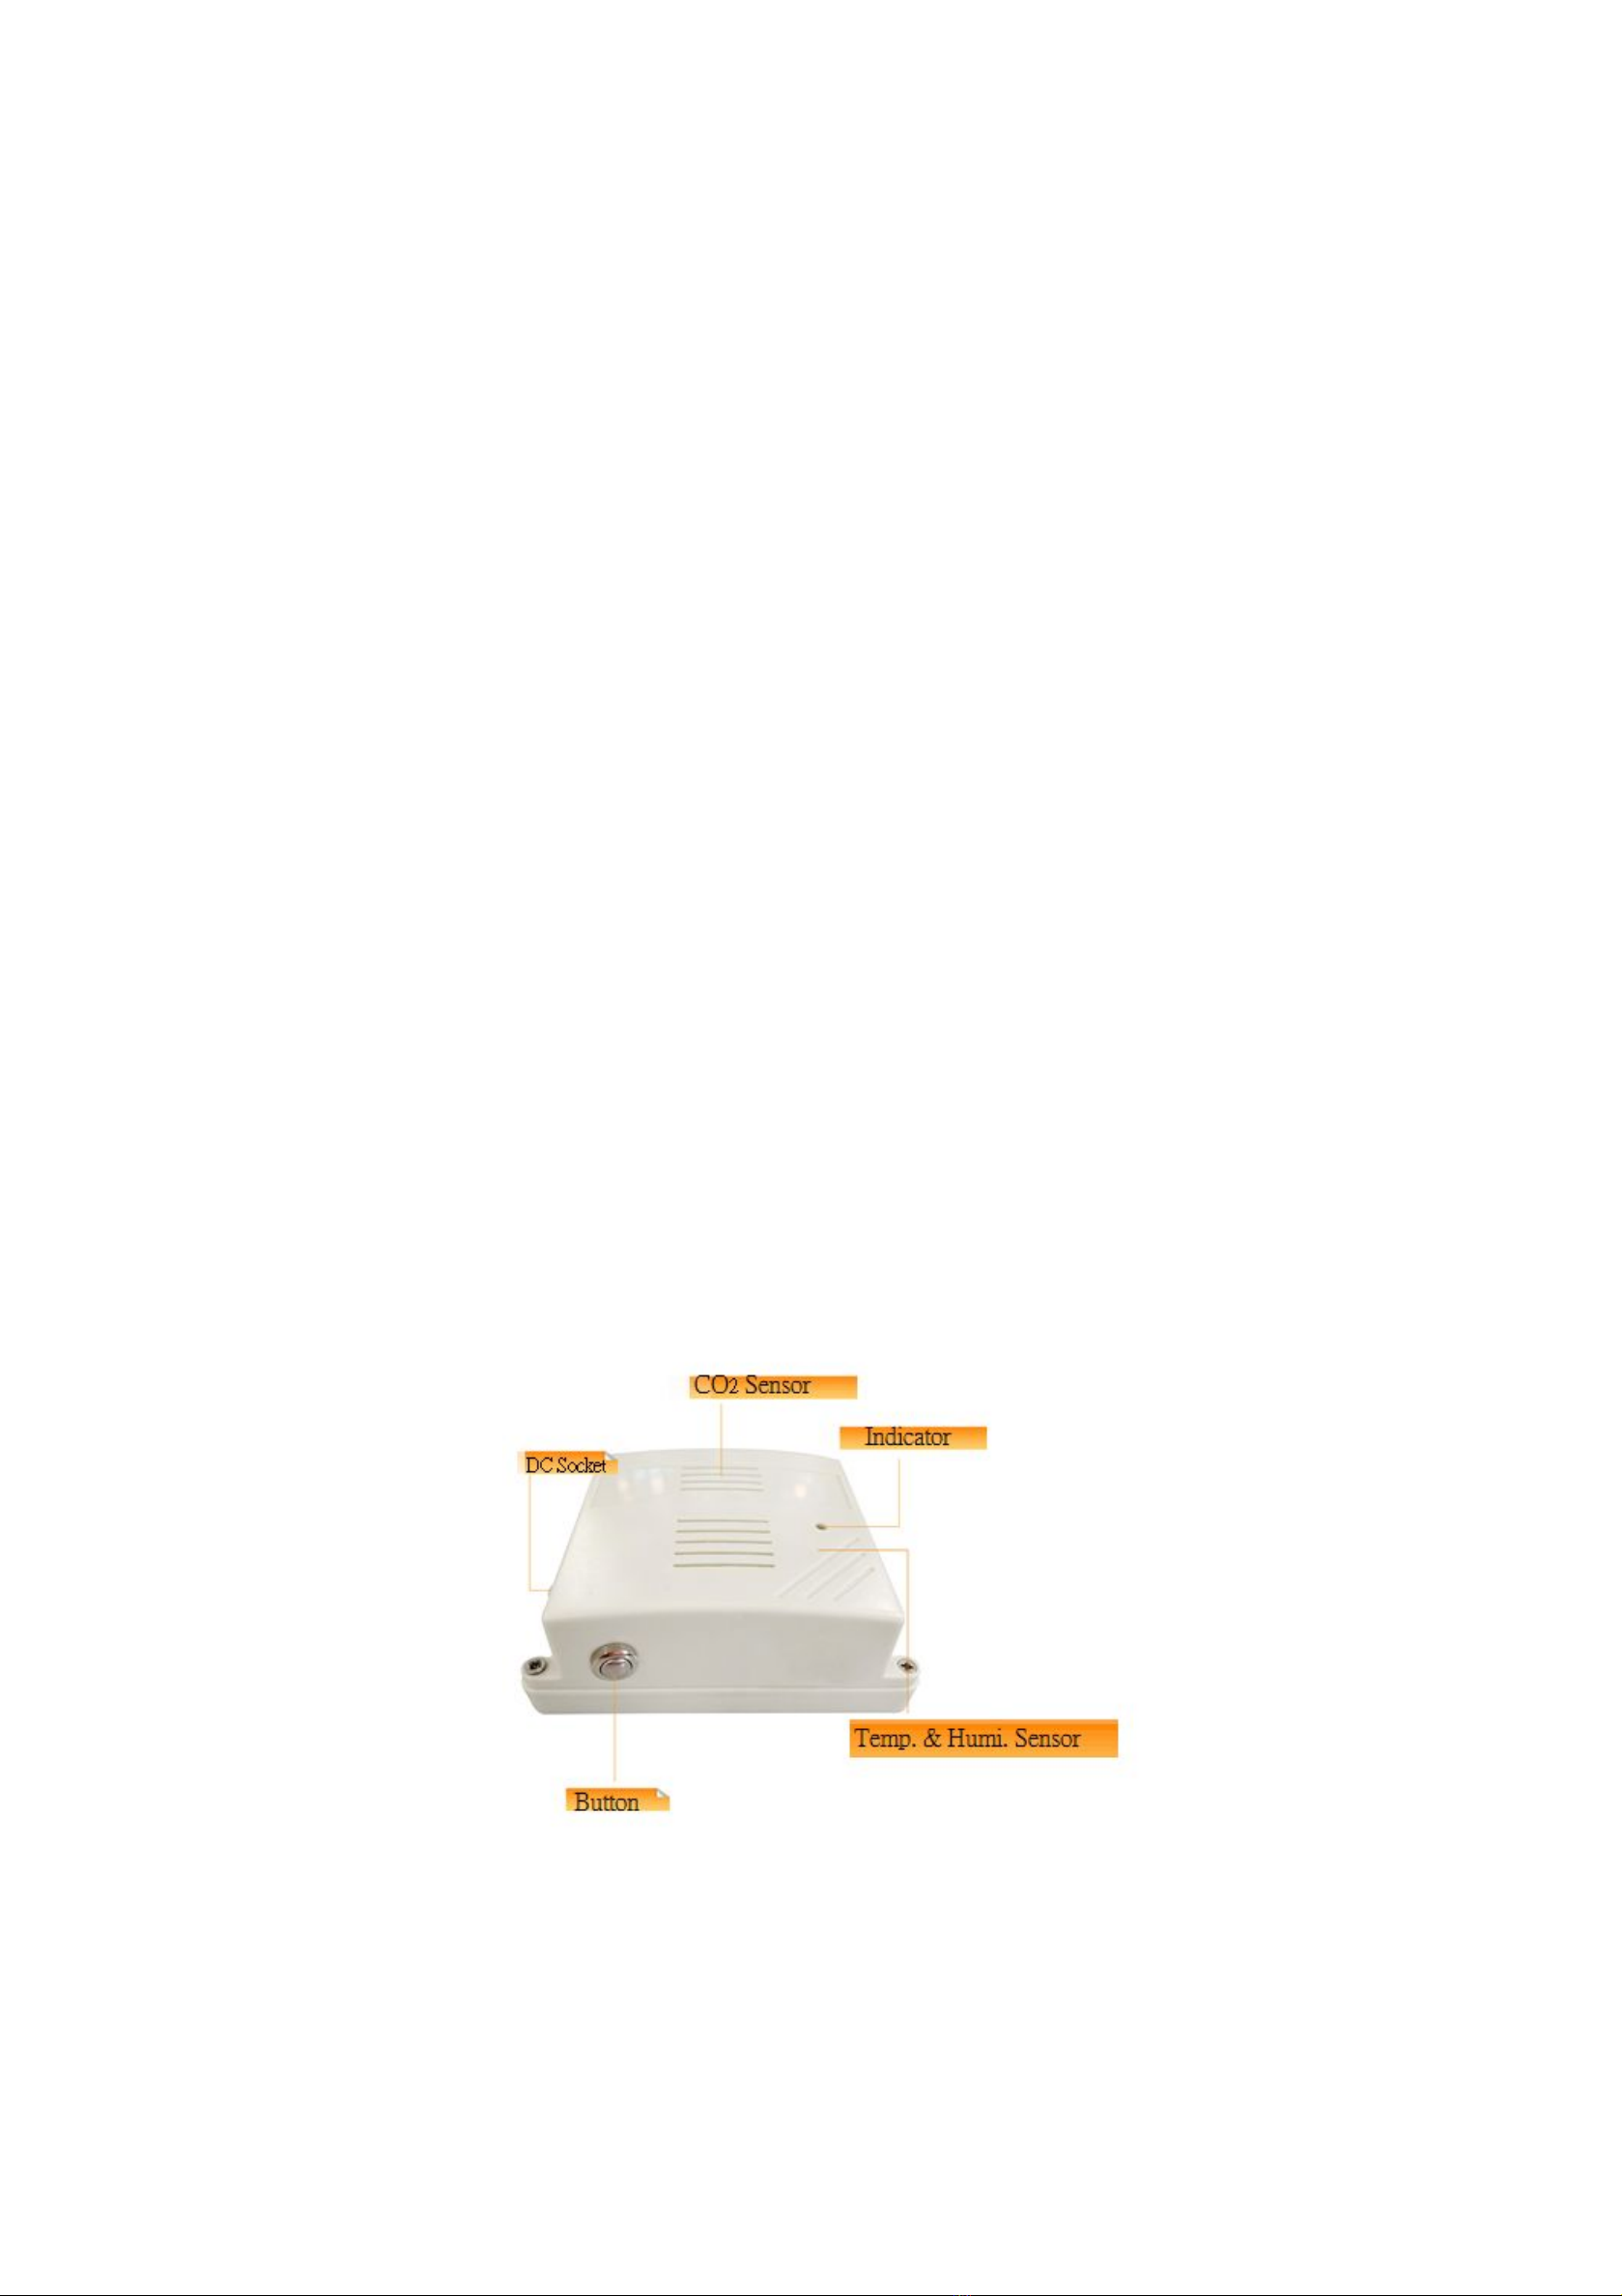
2. Appearance
Fig.1. RA0715 carries CO2/Temperature/Humidity Sensor

2
Fig.2. R72615 case connected to the internal CO2 and temperature and humidity Sensor (subject to the real thing), external solar power supply
Fig.3. RA0715Y case connected to the internal CO2 and temperature and humidity Sensor (subject to the real thing)

3
3. Main Features
Compatible with LoRaWAN
RA0715 and RA0715Y applies DC 12V adapters
R72615 applies solar and rechargeable lithium batteries
Simple operation and setting
CO2 detection
Adopt SX1276 wireless communication module
4.Set up Instruction
On/Off
Power on RA0715 和 RA0715Y are connected to the DC 12V adapter for power-on;
R72615 applies solar and rechargeable lithium batteries.
Turn on Power on to turn on.
Restore to factory setting Press and hold the function key for 5 seconds till green indicator flashes for 20 times.
Power off Remove power
Note:
1. Engineering test modes require the program engineering test software.
2. On/off interval is suggested to be about 10 seconds to avoid the interference of capacitor inductance and other
energy storage components.
Network Joining
Never joined the network
(Or at factory setting )
Turn on the device to search the network.
The green indicator stays on for 5 seconds: success
The green indicator remains off: fail
Had joined the network
(Not at factory setting.)
Turn on the device to search the previous network.
The green indicator stays on for 5 seconds: success
The green indicator remains off: fail
Fail to join the network
(when the device is on)
First two mins: wake up every 15 seconds to send request.
After two mins: enter sleeping mode and wake up every 15 minutes to send request.
Note: Suggest to remove batteries if the device is not used to save power.
Suggest to check the device verification information on the gateway
or consult your platform server provider.
Function Key
Press and hold for 5 seconds
Restore to factory setting / Turn off
The green indicator flashes for 20 times: success
The green indicator remains off: fail
Press once The device is in the network: the green indicator flashes once and the device sends a data report
The device is not in the network: green indicator remains off
Low Voltage Threshold
Low Voltage Threshold 10.5 V
Threshold Restore to Factory Setting
Description
RA0715_R72615_RA0715Y has the power-down save network information memory function. This feature is
turned off by default, that is, it will be re-joined every time it is powered back on. It can be turned on by the
ResumeNetOnOff command. At this time, each time the power is rewritten, the last networking information will
be recorded (including saving the network address information assigned to it, etc., if users want to join a new
network, they need to perform a factory reset operation before that.), will not re-join.
Operation
1. Press and hold the binding button for 5 seconds to release (release the binding button when the LED flashes),
and the LED flashes 20 times.
2. The device automatically restarts to start re-join.

4
5. Data Report
The device will immediately send a version package Report and a report data with temperature and humidity and voltage
Values. The device sends data in the default configuration before any configuration is done.
ReportMaxTime: RA0715_ RA0715Y is 180s and R72615 is 900s; (subject to factory settings)
ReportMinTime: 30s;
ReportChange: 0;
Note: The device send data cycle has been programmed to be correct.
The interval between two reports must be the maximum time
RA0715_R72615_RA0715Y device does not support the ReportChange function, that is, the function is invalid.
The sent report data string is always sent according to the ReportMaxTime period
(starting to the end of the first data as a period).
The data of the device Report is: air temperature and humidity and CO2, ReportType count = 2;
Note: 1. The value of ReportMaxTime is greater than (ReportType count *ReportMinTime + 10 units: seconds);
2. Since the CO2 (MH-14) works stably, it requires about 35 seconds after power-on. Therefore, in the device model that uses
the CO2 (MH-14), the report data will be sent at about 35 seconds after power-on.
3. The device also supports Cayenne's TxPeriod cycle configuration instructions. Therefore, the device can also perform a report
according to the cycle time of the TxPeriod value; and at a certain time, the report period is ReportMaxTime or TxPeriod,
depending on which cycle time is configured last time;
4. After pressing the button, the device needs few seconds to process the sensor information, please be patient.
The data parsing reported by the device is referenced by the Netvox LoraWAN Application Command document and
http://www.netvox.com.cn:8888/page/index
Report Configuration:
(1) Configure RA0715 device parameters MinTime = 30s, MaxTime = 120s (120>30*1+10)
Downlink: 0105001E00780000000000
Device returns:
8105000000000000000000 (configuration is successful)
8105010000000000000000 (configuration failed)
(2) Read RA0715 device parameters
Downlink: 0205000000000000000000
Device returns:
Description Device CmdID DeviceTy
pe NetvoxPayLoadData
ConfigReportRe
q
RA07
Series/
R726
Series/
R727
Series
0x01
0x05/0x0
9/0x0D
MinTime(2
bytes
Unit:s)
MaxTime(2by
tes Unit:s)
Reserved (5Bytes,Fixed 0x00)
ConfigReportRs
p
0x81 Status(0x00
_success) Reserved (8Bytes,Fixed 0x00)
ReadConfigRepo
rtReq
0x02 Reserved (9Bytes,Fixed 0x00)
ReadConfigRepo
rtRsp
0x82 MinTime(2
bytes
Unit:s)
MaxTime(2by
tes Unit:s)
Reserved

5
8205001E00780000000000 (device current parameter)
6. Installation
1. RA0715 does not have a waterproof function. After the network joining is completed, please place it indoor. Please pay attention to the direction
when installing the sensor, keep the pickup ring facing down.
2. The R72615 product is waterproof. After the network-joining is completed, please leave it outdoors.
(1) In the position to be installed, loosen the U-shaped screw of the bottom of the R72615 and the mating washer nut, and fix the U-shaped screw
through the appropriate size cylinder on the R72615 fixed strut piece. Install the washer nut in order, lock the nut till R72615 body is stable and does
not shake.
(2) At the upper side of the fixed position of R72615, loosen the two U-shaped screws on the side of the solar panel and the mating washer nut. Fix the
U-shaped screw through the appropriate size cylinder on the main bracket of the solar panel, and install the gasket in sequence. Lock nut till the solar
panel is stable and does not shake.
(3) Adjust the angle of the solar panel. After the adjustment is completed, lock the nut.
(4) Connect the R72615 top waterproof cable to the solar panel wiring and lock it tight.
(5) R726X has a battery compartment inside, users can buy and install rechargeable 18650 lithium battery, a total of 3 sections, a single rechargeable
lithium battery voltage 3.7V, capacity recommended 5000mah, the installation of rechargeable lithium battery steps are as follows:
1: Remove the four battery box screws and install three rechargeable lithium batteries.
2: Press the activation button on the battery box for the first time.
3: After activation, close the cover and lock the 4 box screws.
Rechargeable lithium battery installation instructions.
3. The RA0715Y product is waterproof and can be placed outdoors after the network-joining is completed.
(1) In the position to be installed, loosen the bottom U-shaped screw of the RA0715Y and the mating washer nut, and fix the U-shaped screw through
the appropriate size cylinder on the RA0715Y fixed strut piece. Install the washer nut in order, lock the nut till RA0715Y body is stable and does not
shake.
(2) Loosen the M5 nut at the bottom of the 727 matte and take the matte together with the screw.
(3) Insert the power DC plug from the center through hole of the RA0715Y bottom cover, insert it into the RA0715Y DC socket, and then return the
mating screw to the original position and lock the N5 nut tight.

6
7. Important Maintenance Instruction
Your device is a product of superior design and craftsmanship and should be used with care. The
following suggestions will help you use the warranty service effectively.
• Keep the equipment dry. Rain, moisture, and various liquids or moisture may contain minerals
that can corrode electronic circuits. In case the device is wet, please dry it completely.
• Do not use or store in dusty or dirty areas. This can damage its detachable parts and electronic
components.
• Do not store in excessive heat. High temperatures can shorten the life of electronic devices,
destroy batteries, and deform or melt some plastic parts.
•Do not store in excessive cold place. Otherwise, when the temperature rises to normal temperature,
moisture will form inside, which will destroy the board.
• Do not throw, knock or shake the device. Rough handling of equipment can destroy internal
circuit boards and delicate structures.
• Do not wash with strong chemicals, detergents or strong detergents.
• Do not apply with paint. Smudges can block debris in detachable parts and affect normal
operation.
• Do not throw the battery into a fire to prevent the battery from exploding. Damaged batteries
may also explode.
All of the above suggestions apply equally to your device, battery and accessories. If any device is
not working properly.
Please take it to the nearest authorized service facility for repair.
This manual suits for next models
2
Table of contents
Other netvox Accessories manuals

netvox
netvox R816B User manual

netvox
netvox R718PQA User manual

netvox
netvox ZB11A1 User manual

netvox
netvox R718DA2 User manual

netvox
netvox R718EB User manual

netvox
netvox ZigBee Z801WLS User manual

netvox
netvox R718DB User manual

netvox
netvox R718PA1 User manual

netvox
netvox R311FD User manual

netvox
netvox R718PA5 User manual

netvox
netvox R311CA User manual

netvox
netvox Z809B User manual

netvox
netvox R315 Series User manual

netvox
netvox R718PE01 User manual

netvox
netvox R718AD User manual

netvox
netvox R720FLD User manual

netvox
netvox R313DB User manual

netvox
netvox R718PA8 User manual

netvox
netvox R718PB13 User manual

netvox
netvox R712 User manual













