MTU 12 V 4000 T95 x User manual

Operating Instructions
Diesel engine
12 V 4000 T95
12 V 4000 T95 x
MS150120/00E

Engine model kW/cyl. Application group
12V4000T95 155.3 kW/cyl. 4D, frac. operation (continuous operation at low
load)
12V4000T95L 161.6 kW/cyl. 4D, frac. operation (continuous operation at low
load)
12V4000T95R 139.8 kW/cyl. 4D, frac. operation (continuous operation at low
load)
Table 1: Overview of validity
© 2014 Copyright MTU Friedrichshafen GmbH
This publication is protected by copyright and may not be used in any way, whether in whole or in part, without the prior
written consent of MTU Friedrichshafen GmbH. This particularly applies to its reproduction, distribution, editing, transla-
tion, microfilming and storage or processing in electronic systems including databases and online services.
All information in this publication was the latest information available at the time of going to print. MTU Friedrichshafen
GmbH reserves the right to change, delete or supplement the information provided as and when required.

Table of Contents
1 Safety
1.1 Important requirements for all products 5
1.2 Personnel and organizational requirements 6
1.3 Transport 7
1.4 Crankshaft transport locking device 8
1.5 Safety requirements for startup and
operation 12
1.6 Safety requirements for maintenance and
repair work 13
1.7 Fire prevention and environmental
protection, fluids and lubricants, auxiliary
materials 16
1.8 Standards for safety notices in the text 18
2 General Information
2.1 Engine side and cylinder designations 19
2.2 Engine layout 20
2.3 Back Pack – Overview 22
2.4 Sensors and actuators – Overview 23
3 Technical Data
3.1 12 V 4000 T95/T95L/T95R engine data 27
3.2 Firing order 31
3.3 Engine – Main dimensions 32
4 Operation
4.1 Putting the engine into operation after
extended out-of-service periods (>3 months) 33
4.2 Putting the engine into operation after
scheduled out-of-service-period 34
4.3 Operational checks 35
4.4 Starting the engine in manual mode 36
4.5 Stopping the engine in manual mode 37
4.6 After stopping the engine – Putting the
engine out of operation 38
4.7 Plant – Cleaning 39
5 Maintenance
5.1 Maintenance task reference table [QL1] 40
6 Troubleshooting
6.1 Troubleshooting 42
6.2 Fault messages of Engine Control Unit ECU
9 for Series 4000 45
7 Task Description
7.1 Engine 107
7.1.1 Engine – Barring manually 107
7.1.2 Barring engine with starting system 109
7.1.3 Engine – Test run 110
7.2 Cylinder Liner 111
7.2.1 Cylinder liner – Endoscopic examination 111
7.2.2 Instructions and comments on endoscopic and
visual examination of cylinder liners 113
7.3 Crankcase Breather 115
7.3.1 Oil mist fine separator – Replacement 115
7.4 Valve Drive 117
7.4.1 Valve gear – Lubrication 117
7.4.2 Valve clearance – Check and adjustment 118
7.4.3 Cylinder head cover – Removal and
installation 121
7.5 Injection Pump / HP Pump 123
7.5.1 HP pump – Filling with engine oil 123
7.6 Injector 125
7.6.1 Injector – Replacement 125
7.6.2 Injector – Removal and installation 126
7.7 Fuel System 132
7.7.1 Fuel system – Venting 132
7.8 Fuel Filter 133
7.8.1 Fuel filter – Replacement 133
7.8.2 Additional fuel filter – Replacement 134
7.8.3 Fuel prefilter – Draining 135
7.8.4 Fuel prefilter – Filter element replacement 136
7.9 Exhaust Turbocharger 137
7.9.1 Exhaust turbocharger – Turbine housing
check 137
7.9.2 Exhaust turbocharger (LP) – Turbine housing
check 138
7.9.3 Exhaust turbocharger (HP) – Turbine housing
check 143
7.10 Charge-Air Cooling 149
7.10.1 Intercooler – Leak check 149
7.11 Air Filter 150
7.11.1 Air filter – Replacement 150
7.12 Air Intake 151
7.12.1 Service indicator – Signal ring position check 151
7.12.2 Emergency air-shutoff flaps – Functional
check with electric actuation 152
7.13 Exhaust Gas Recirculation 154
7.13.1 Exhaust flaps – Overview 154
7.13.2 Exhaust flaps – Checking coupling rods
operability and play 156
MS150120/00E 2014-11 | Table of Contents | 3
DCL-ID: 0000033031 - 002

7.13.3 Exhaust flaps – Coupling rod replacement 158
7.14 Starting Equipment 161
7.14.1 Starter – Condition check 161
7.15 Lube Oil System, Lube Oil Circuit 162
7.15.1 Engine oil level – Check at sight glass 162
7.15.2 Engine oil – Level check with oil dipstick 163
7.15.3 Engine oil – Change 164
7.15.4 Engine oil – Sample extraction and analysis 166
7.16 Oil Filtration / Cooling 167
7.16.1 Engine oil filter – Replacement 167
7.16.2 Centrifugal oil filter and filter sleeve –
Cleaning and replacement 169
7.17 High-Temperature Circuit 171
7.17.1 Engine coolant – Level check 171
7.17.2 Engine coolant – Change 172
7.17.3 Engine coolant – Draining 173
7.17.4 Engine coolant – Filling 175
7.17.5 Engine coolant pump – Relief bore check 178
7.17.6 Engine coolant – Sample extraction and
analysis 179
7.18 Low-Temperature Circuit 180
7.18.1 Charge-air coolant – Level check 180
7.18.2 Charge-air coolant – Change 181
7.18.3 Charge-air coolant – Draining 182
7.18.4 Charge-air coolant – Filling 185
7.18.5 Checking charge-air coolant pump pressure
relief port 188
7.19 Belt Drive 189
7.19.1 Drive belt – Condition check 189
7.20 Battery-Charging Generator 190
7.20.1 Checking battery-charging generator 190
7.20.2 Battery-charging generator drive – Drive belt
tension adjustment 191
7.20.3 Battery-charging generator drive – Drive belt
replacement 192
7.21 Engine Mounting / Support 193
7.21.1 Engine mounting – Check 193
7.22 Wiring (General) for Engine/Gearbox/Unit 194
7.22.1 Еngine cabling ‒ Check 194
7.23 Accessories for (Electronic) Engine
Governor / Control System 195
7.23.1 Resetting CDC parameter and entering IIG
with DiaSys® 195
7.23.2 Actuators – Visual inspection and test 196
7.23.3 Engine governor and connectors – Cleaning 198
7.23.4 Engine governor plug connections – Check 199
7.23.5 NOx sensor – Replacement 200
7.23.6 Lambda sensor – Replacement 202
7.24 Exhaust System 204
7.24.1 Exhaust silencer – Condensate drain check 204
7.24.2 Back Pack – Visual inspection of securing
screws 205
7.24.3 Back Pack – Checking securing screws for
firm seating 206
8 Appendix A
8.1 Abbreviations 208
8.2 MTU contact persons/service partners 211
9 Appendix B
9.1 Special Tools 212
9.2 Index 220
4 | Table of Contents | MS150120/00E 2014-11
DCL-ID: 0000033031 - 002

1 Safety
1.1 Important requirements for all products
Nameplate
The product is identified by a nameplate, model designation or serial number which must match the
information on the title page of this manual.
Nameplate, model designation or serial number can be found on the product.
General information
This product may pose a risk of injury or damage in the following cases:
• Improper use
• Operation, maintenance and repair by unqualified personnel
• Changes or modifications
• Noncompliance with the safety instructions and warning notices
Intended use
The product is intended for use in accordance with its contractually-defined purpose as described in the
relevant technical documents only.
Intended use entails operation:
• Within the permissible operating parameters in accordance with the (→ Technical data)
• With fluids and lubricants approved by the manufacturer in accordance with the (→ Fluids and Lubri-
cants Specifications of the manufacturer)
• With spare parts approved by the manufacturer in accordance with the (→ Spare Parts Catalog/MTU
contact/Service partner)
• In the original as-delivered configuration or in a configuration approved by the manufacturer in writ-
ing (including engine management/parameters)
• In compliance with all safety regulations and in accordance with all warning notices in this manual
• With maintenance work performed in accordance with the (→ Maintenance Schedule) throughout the
useful life of the product
• In compliance with the maintenance and repair instructions contained in this manual, in particular
with regard to the specified tightening torques
• With the exclusive use of technical personnel trained in commissioning, operation, maintenance and
repair
• By contracting only workshops authorized by the manufacturer to carry out repair and overhaul
Any other use shall be considered non-intended. Such improper use increases the risk of injury and
damage when working with the product. The manufacturer shall not be held liable for any damage re-
sulting from improper, non-intended use.
Changes or modifications
Unauthorized changes to the product represent a contravention of its intended use and compromise
safety.
Changes or modifications shall only be considered to comply with the intended use when expressly au-
thorized by the manufacturer. The manufacturer shall not be held liable for any damage resulting from
unauthorized changes or modifications.
MS150120/00E 2014-11 | Safety | 5
TIM-ID: 0000040530 - 005

1.2 Personnel and organizational requirements
Organizational measures of the operator
This manual must be issued to all personnel involved in operation, maintenance, repair or transporta-
tion.
Keep this manual handy in the vicinity of the product such that it is accessible to operating, mainte-
nance, repair and transport personnel at all times.
Use this manual as a basis for instructing personnel on product operation and repair, whereby the safe-
ty-relevant instructions, in particular, must be read and understood.
This is particularly important in the case of personnel who only occasionally perform work on or around
the product. This personnel must be instructed repeatedly.
Personnel requirements
All work on the product shall be carried out by trained and qualified personnel only.
• Training at the Training Center of the manufacturer
• Qualified personnel specialized in mechanical and plant engineering
The operator must define the responsibilities of the personnel involved in operation, maintenance, re-
pair and transport.
Working clothes and personal protective equipment
Wear proper protective clothing for all work.
When working, always wear the necessary personal protective equipment (e.g. ear protectors, protec-
tive gloves, goggles, breathing protection). Observe the information on personal protective equipment
in the respective activity description.
6 | Safety | MS150120/00E 2014-11
TIM-ID: 0000040531 - 003

1.3 Transport
Taking the engine's center of gravity into account
For information regarding the center of gravity of the engine, refer to the installation/arrangement
drawing of the engine/genset/system.
Transport
• Lift the engine/genset/system only with the lifting eyes provided.
• Only use transport and lifting devices approved by MTU.
• The engine/genset/system must only be transported in installation position.
• Max. permissible diagonal pull 10°.
• If the engine/genset/system is supplied with special aluminum foil packing, lift it at the lifting eyes
of the trestle or use a means of transportation which is appropriate for the given weight (forklift
truck).
• Prior to transporting the engine/genset/system, it is imperative to install the transport locking de-
vice for the crankshaft.
• Prior to transporting the engine/genset/system, it is imperative to install the transport locks for the
engine mounts.
• Secure the engine/genset/system such as to preclude tipping during transport.
• Secure the engine/system/genset as to preclude slipping and tipping when driving up or down in-
clines and ramps.
Setting the engine down after transport
• Make sure that the consistency and load-bearing capacity of the ground or support surface is ade-
quate.
• Never set an engine/genset/system down on the oil pan unless expressively authorized to do so by
MTU on a case-to-case basis.
• Place the engine/genset/system on a firm, flat surface only.
MS150120/00E 2014-11 | Safety | 7
TIM-ID: 0000002614 - 004
1.4 Crankshaft transport locking device
Special tools, Material, Spare parts
Designation / Use Part No. Qty.
Torque wrench, 10-60 Nm F30452769 1
Torque wrench, 60-320 Nm F30452768 1
Engine oil
Transport locking device
Note: The locking device protects the crankshaft bearings from possible shocks and vibration damage during
engine transport.
For installation and removal of the transport locking device, observe the following instructions:
• The transport locking device must remain installed as long as possible during engine installation in
order to avoid damage.
• Starting or barring the engine is allowed only with the transport locking device removed. If the gener-
ator/gearbox is flanged on, make sure that the transport locking device of the generator/gearbox is
removed as well.
• The transport locking device must be reinstalled according to the instructions prior to every engine
transport.
• If the generator/gearbox is flanged on and is also going to be moved, install the transport locking
device of the generator/gearbox as well.
Removing the transport locking
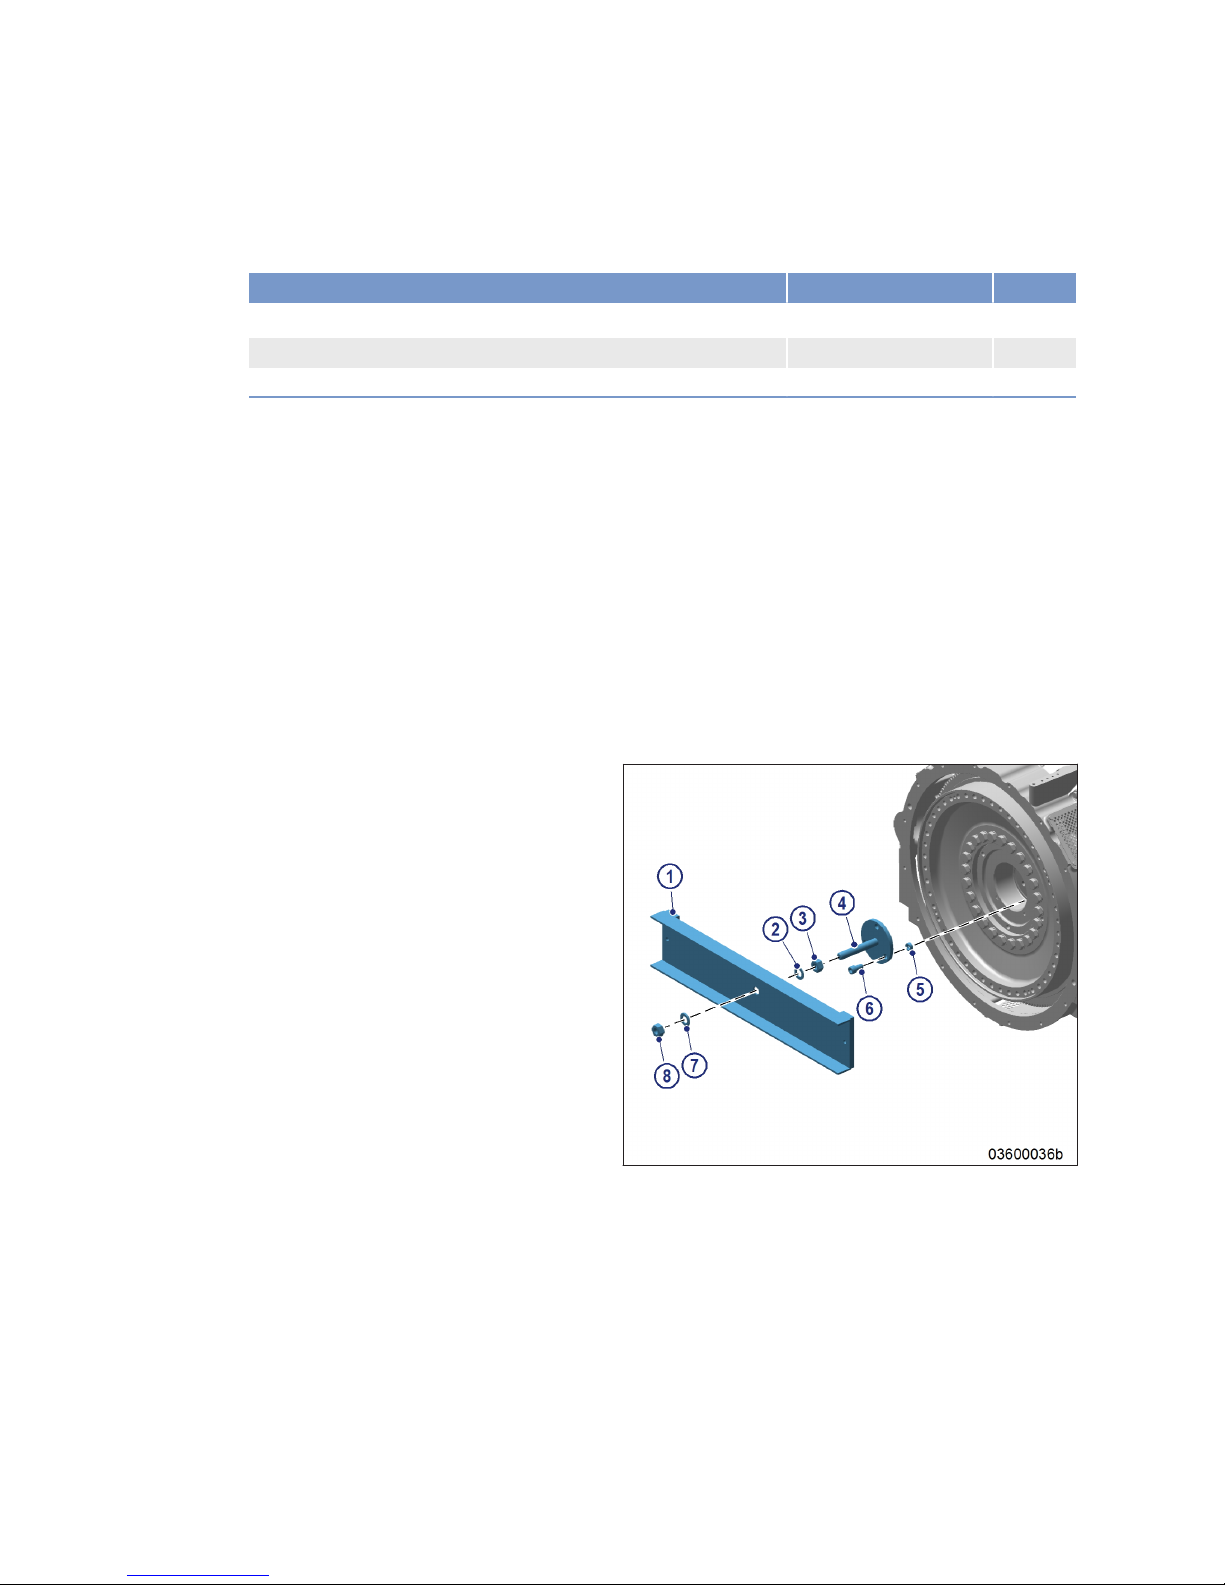
device from driving end (KS),
version A
1. Remove parts (1) to (8) from engine.
Spacer sleeves (5) are optional.
2. Store the removed parts of the transport
locking device carefully for possible reuse.
8 | Safety | MS150120/00E 2014-11
TIM-ID: 0000027593 - 005
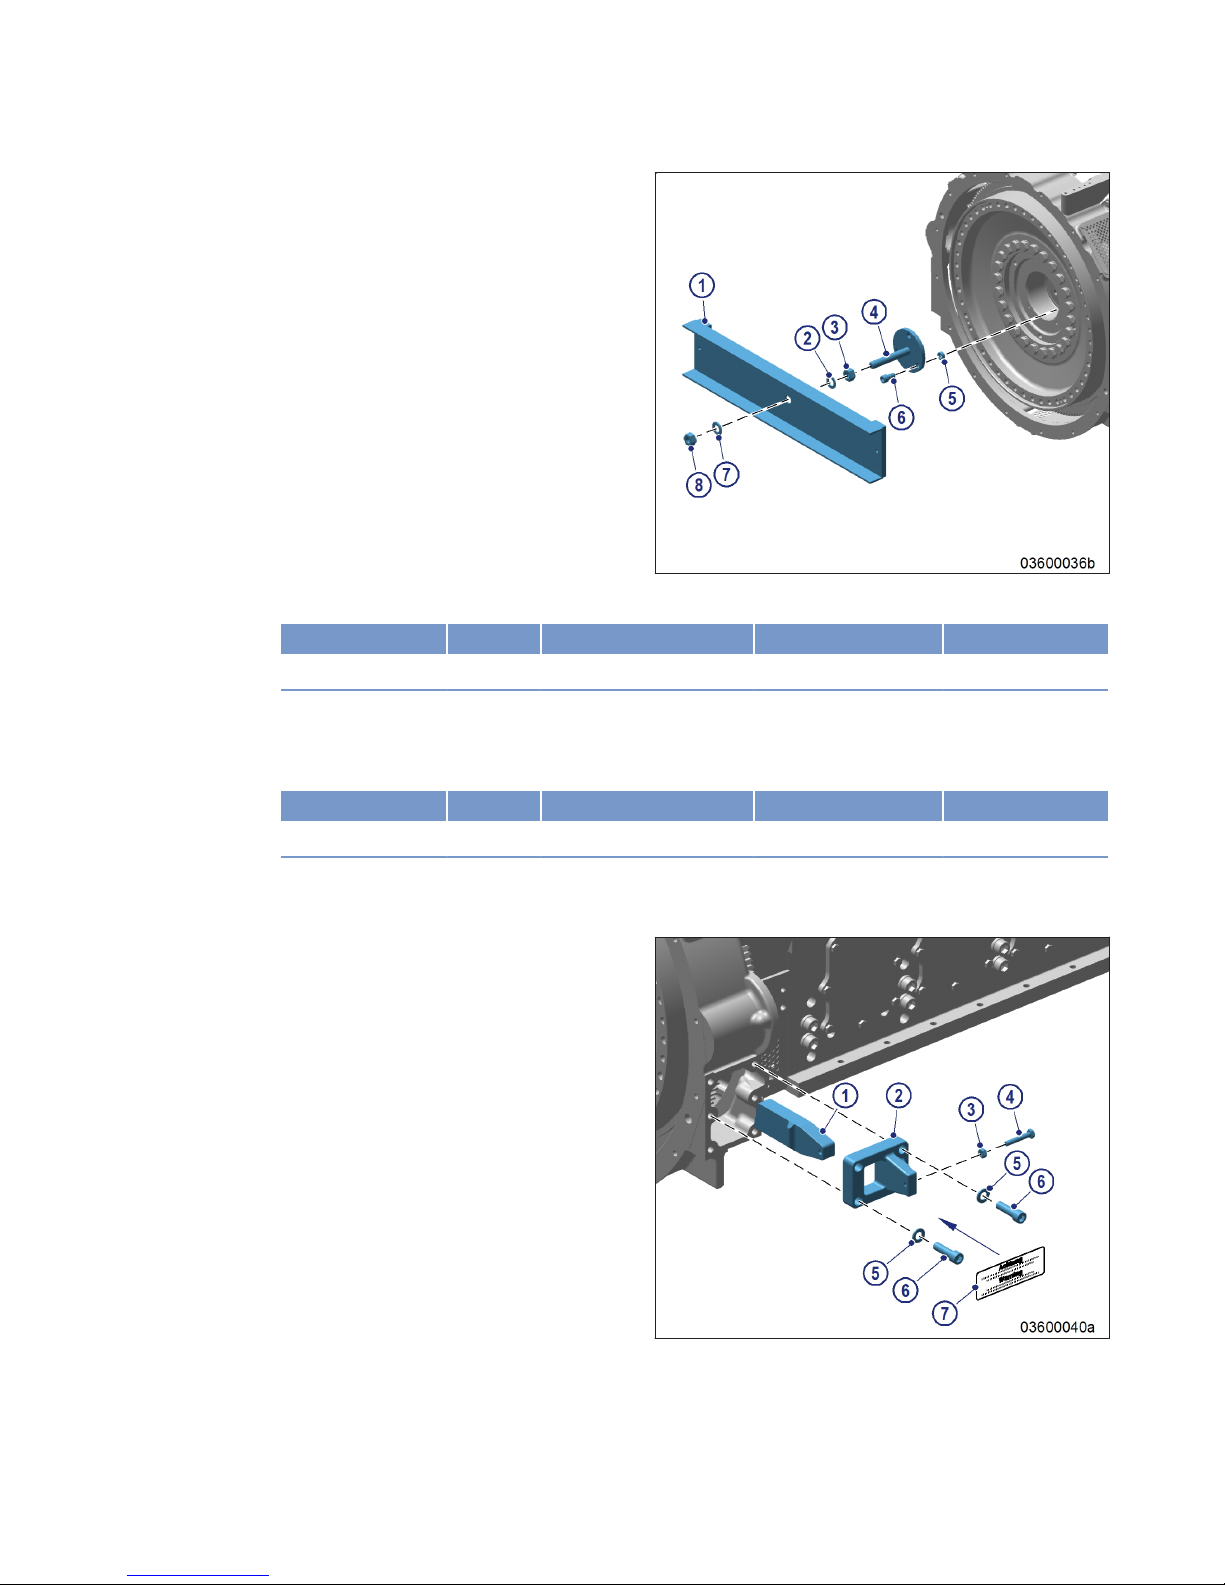
Installing the transport locking
device on driving end (KS), ver-
sion A
1. Screw holder (4) with spacer sleeves (5)
and screws (6) onto crankshaft. Spacer
sleeves (5) are optional.
2. Tighten screws (6) with torque wrench to specified tightening torque.
Name Size Type Lubricant Value/Standard
Screw M16 Tightening torque (Engine oil) 160 Nm +16 Nm
3. Screw nut (3) with washer (2) onto holder (4).
4. Fit carrier (1) with washer (7) and nut (8) and tighten to the specified tightening torque using the torque
wrench.
Name Size Type Lubricant Value/Standard
Nut M24 Tightening torque (Engine oil) 100 Nm +10 Nm
5. Lock with nut (3).
6. Mark the engine as "Fitted with transportation locking device".
Removing the transport locking
device from driving end (KS),
version B
1. Release locknuts (3) on both sides of the
flywheel housing, remove screws (4) and
take off the two holders (1).
2. Remove screws (6) with washers (5), la-
bel (7) and plates (2).
3. Store the removed parts carefully for possi-
ble reuse.
MS150120/00E 2014-11 | Safety | 9
TIM-ID: 0000027593 - 005
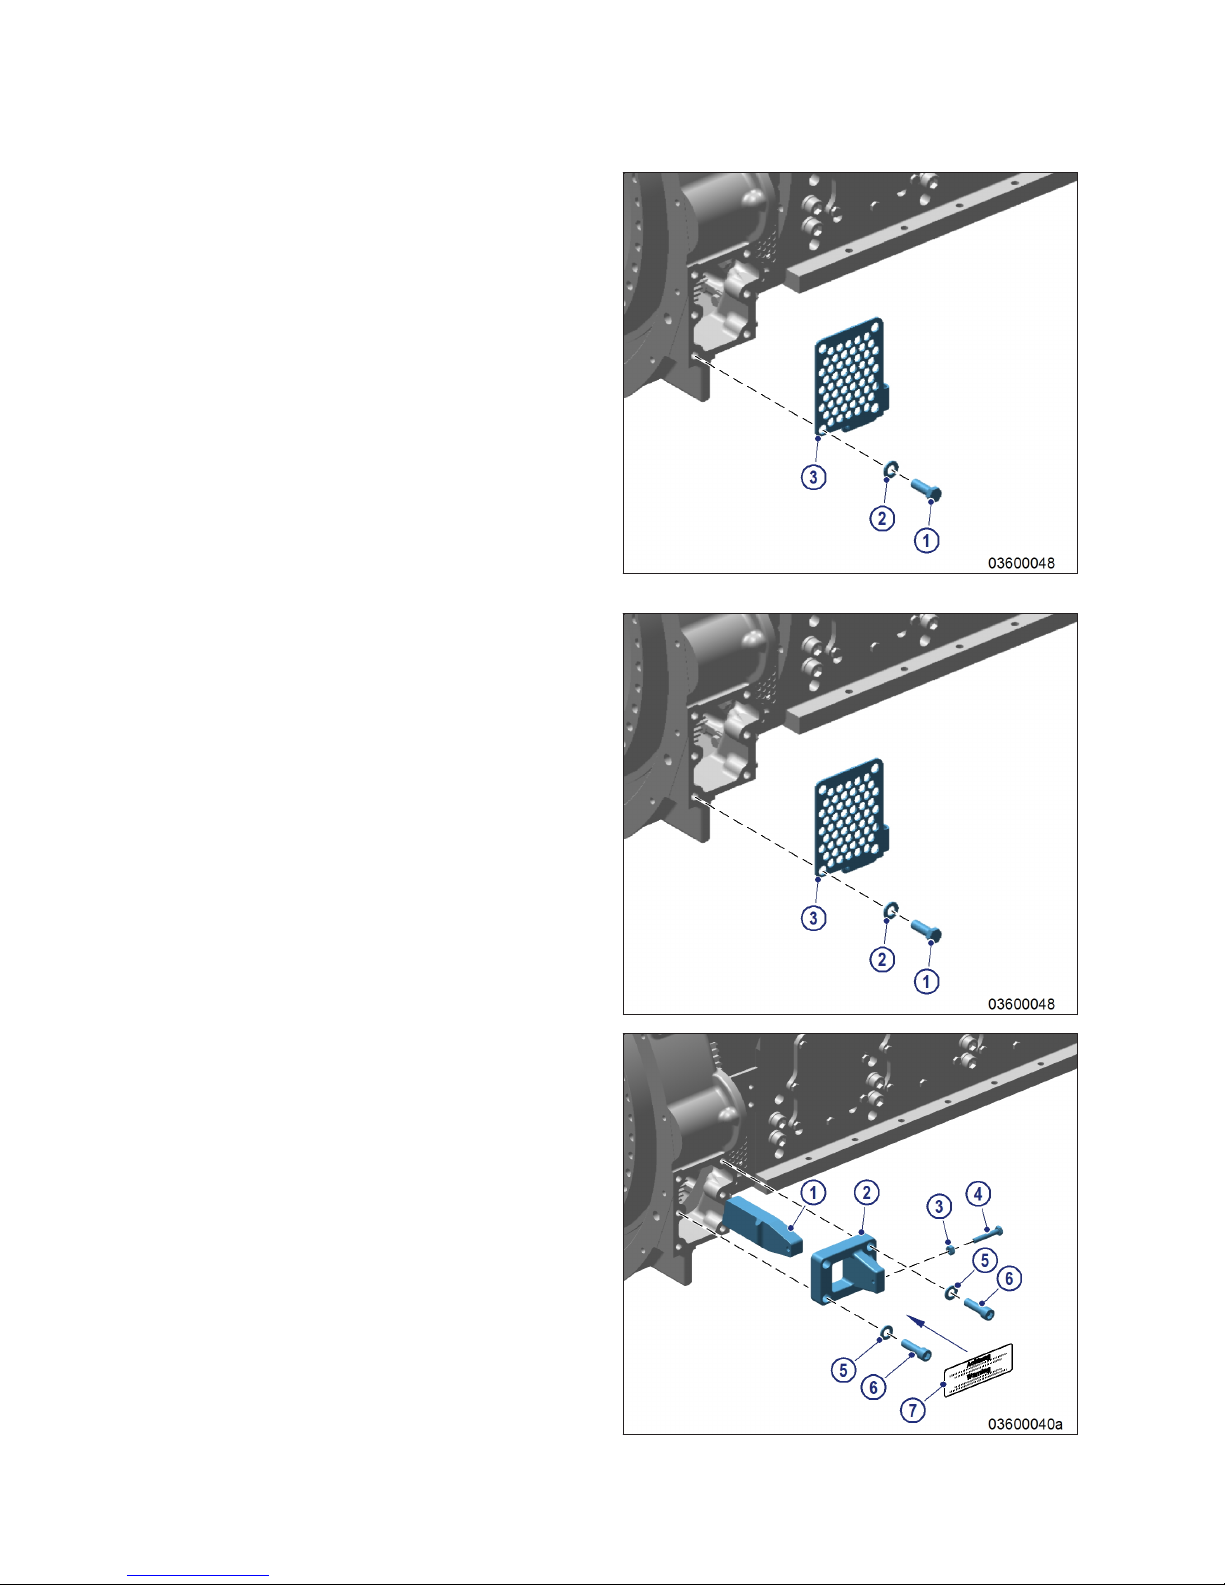
Note: Use only the screws supplied with or re-
moved from the guard plates to secure the
guard plates.
4. Install guard plates (3), washers (2) and
screws (1) on both sides.
5. Tighten screws (1).
Fitting the transport locking de-
vice on driving end (KS), version
B
1. Remove screws (1) with washers (2) and
take off guard plates (3).
2. Store the removed parts carefully for possi-
ble reuse.
10 | Safety | MS150120/00E 2014-11
TIM-ID: 0000027593 - 005
Table of contents
Other MTU Engine manuals

MTU
MTU 12V 2000 C66 User manual

MTU
MTU 8V4000L63 User manual

MTU
MTU 20V4000G44F User manual

MTU
MTU 12V4000Bx4 User manual

MTU
MTU 16V2000M72 User manual

MTU
MTU 12V2000G series User manual

MTU
MTU 12 V 4000 Lx4 User manual

MTU
MTU 10V1600C Series User manual

MTU
MTU 16V4000M73 series User manual

MTU
MTU 12V 2000 G23 User manual

MTU
MTU 8 V 2000 M50A User manual

MTU
MTU 16V4000R43 User manual

MTU
MTU 8V4000L33F User manual

MTU
MTU 12 V 4000 S83L User manual

MTU
MTU 12 V 4000 L63 User manual

MTU
MTU M015710/04E User manual

MTU
MTU 20 V 4000 M93 User manual

MTU
MTU 20V4000M93 series User manual

MTU
MTU 12 V 4000 M73 x User manual

MTU
MTU 12 V 4000 G73 User manual