
Moe's TV01 User manual

TV01 Zigbee
Thermostat Radiator Valve
User Guide
HOME, SMART MOES HOME

1. Information about this manual........................
2. Product Description.........................................
3. Device Overview...............................................
4. Start-up.............................................................
4.1 Before we get started..............................
4.2 Inserting(replacing) batteries..................
4.3 Set date and time.....................................
5. Installation of the radiator thermostat..........
5.1 Unscrew your existing radiator thermostat..
5.2 M30 x 1.5...................................................
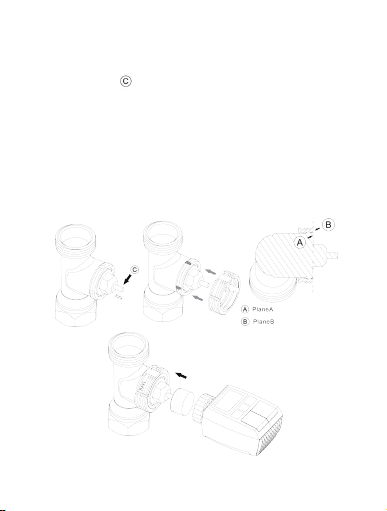
5.3 Danfoss RAVL Valve.................................
5.4 Danfoss RAV Valve...................................
5.5 Danfoss RA Valve.....................................
5.6 M28x1.5mm.............................................
5.7 Giacomini.................................................
5.8 Caleffi.......................................................
5.9 Use the Ejector rod................................
6. Interface screen.............................................
7. Software Installation......................................
8. Product features............................................
8.1 Auto Mode...............................................
8.2 Manual Mode...........................................
8.3 Holiday Mode...........................................
8.4 Open Window Detection........................
1
1
2
2
2
3
4
5
5
6
7
8
9
10
11
11
12
13
13
14
14
15
15
16
Table of contents

8.5 Offset Temperature................................
8.6 Eco and Comfortable Temprerature....
8.7 Child Lock................................................
8.8 Anti-Freezing Mode...............................
8.9 Heating stop(Power Saving)Mode.........
8.10 Anti-Calification(Descaling)Protection.....
8.11 Boost.........................................................
9. Setting................................................................
9.1 Date.............................................................
9.2 Week Programming Stage......................
9.3 Open Window............................................
9.4 Comfortable Temperature......................
9.5 ECO Temperature....................................
9.6 Offset..........................................................
9.7 Holiday Setting..........................................
10. Vioce Control.................................................
10.1 Amazon Alexa.........................................
10.2 Google Home..........................................
11. Set an automation scenarios linkage........
12. Low Battery....................................................
13. Reset................................................................
14. Troubleshooting and maintenance.............
15. Technical Data...............................................
16. Package contents..........................................
17. Safety Information.........................................
18. Storage..............................................................
17. Instructions for disposal...............................
16
17
18
18
19
19
19
20
20
21
22
22
23
23
24
25
25
27
28
29
29
29
30
30
31
31
32

Please read this manual completely and carefully
before starting to use the device. The manual
contains important information about the intended
use of the device. Especially observe the safety
notes. Keep the manual for later consultation. If you
hand over the device to other persons for use,
please hand over the operating manual as well.
1. Information about this manual
The device moves a valve to intelligently control the
flow of heat to the radiator. With the Thermostat
Radiator Valve TV01 you can conveniently adjust the
room temperature between 5-30°C, and save more
than 15% of energy.
The device is part of the Tuya smart home system
and works with the ZigBee 3.0 protocol. All devices
on the system can be configured comfortably and
individually with the Tuya smartphone app.
The temperature can be controlled individually, room
by room.
The radiator thermostat fits to all common radiator
valves and is easy to mount-without having to drain
any water or intervene in the heating system.
1
2. Product Description

The additional boost function enables the radiator
to be heated up quickly for a brief period of time by
opening the valve for 5 minutes. There will be a
pleasant room temperature right away because of
the radiated heat.
Date/Temperature display
ZigBee signal
Boost
Auto mode
Manual mode
Holiday mode
Switching auto/manual
/holiday mode
Pair/Boost/Return key
Ring nut
Indicator icon in week
programming stage
9 Set date/time
Prg:Programming
Open window
Comfortable temperature
Low battery
ECO temperature
Offset temperature
Week display
Switching comfortable and
energy-saving mode/ confirm key
Adjust temperature/date/time
(Press or hold press)
4.1 Before we get started
•2×AA batteries are required for TV01 to work,
please get prepared.
•A smart gateway hub is required for the TV01 to
work.
2
3. Device Overview
4. Start-up

The service life of new alkaline batteries is
approximately 1.5 years. A battery symbol( )on
the display indicates that the batteries need to be
replaced. After removing the empty batteries, wait
approx.1 minute before inserting the new ones.
This device does not support operation with
rechargeable batteries.
•Temperature is shown in degrees Celsius.
4.2 Inserting(replacing) batteries.
•Pull off the battery compartment cover on the
underside of the device.
•Insert 2 new LR6(mignon/AA) batteries in the
battery compartment making sure they are the right
way round.
•Reattach the battery compartment cover and latch
it into place.
3

4.3 Set date and time
If batteries are inserted or replaced, the date and
time is automatically requested after a brief display
of the fimware version number.
•Set the year, month, dayhour and minute with the
+/- button, and confim with Menu button. You can
press the Boost button to retum to the previous
menu during the setting of date and time.
•The display of ‘InS’ with the rotating ‘ ’ shows
that the motor is still travelling back.
•When ‘AdA’ is shown in the display, the radiator
thermostat can be installed on the valve. After
installation, press the Boost button to run adaptive.
•The display of ‘AdA’ with the rotating ‘ ’ shows
that an adapting run to adapt the thermostat to the
valve.
If the adapting runs is initiated before installation,
press Boost button and the motor travels back to
the ‘InS’position. If an error message (F1,F2,F3) is
displayed, press the Pair/Boost button and the
motor similarly travels back to the ‘InS’ position.
4

The radiator thermostat is easy to install and can
be done without draining heating water or
intervening in the heating system. No special tools
are required, nor does the heating have to be
switched off.
The ring nut attached to the radiator thermostat
can be used universally and without accessories for
all valves with a thread size of M30×1.5 from the
most popular manufacturers such as.
By means of the adapters in the delivery, the device
can be installed on radiator valves of type Danfoss
RA, Danfoss RAV and Danfoss RAVL.
•Danfoss •Heimeier •MNG •Junkers
•Landis&Gyr(Duodyr) •Honeywell-Braukmann
•Oventrop • Schlösser •Comap •Valf Sanayi
•Mertik Maxitrol •Watts •Wingenroth(Wiroflex)
•R.B.M •Tiemme •Jaga •Siemens •ldmar54
5. Installation of the radiator
thermostat
5.1 Unscrew your existing radiator thermostat
No worries, water will not leak during this process.
5

5.2 M30×1.5
•Screw the TV01 smart radiator thermostat
directly onto the radiator if the connector type is
M30x 1.5(picture shown as below). You can adjust
the angle to make the screen facing the viewer
properly.
•Rotate the thermostat dial to the maximum value,
themaxvaluemaybe6or8.
•Check the is active.
•Install the device.
6
1.5mm
30mm
M30 × 1.5
5.3 Danfoss RAVL Valve
•Check the is active.
•The valve bodied have elongated notches around
their circumference, which ensure that the adapter
is properly seated when it snaps on: snap on the
adapter completely, so that the pins inside the
adapter are lined up with the notches on the valve.
•Install the adapter, Plane A is aligned with Plane B.
•Install the round tube into the device.
•Install the device.
7
Other manuals for TV01
1
Table of contents
Languages:
Other Moe's Thermostat manuals


Popular Thermostat manuals by other brands


Saswell
Saswell SAS920XWHB-7-S-RF User manual and warranty card

Aircalo
Aircalo TFP1-ET85P2 operating manual

Honeywell
Honeywell CM721 user manual

Carrier
Carrier DEBONAIR 33CS Installation and operating instructions

Lennox
Lennox iHarmony Zone Thermostat Installation and setup guide

Gemtech
Gemtech GT7000 Operation


