Milre MI-7800 User manual

USER MANUAL
Notice
Please receive the entry certainly and get introduction
from installing store and its installer. If there is no exact
entry on warranty form, you should be disadvantaged
on A/S. The function and design will be changed without
notice to improve the performance.
Thank you for purchasing this product.
Please use properly after reading this instruction carefully.
Free Direction
Push-Pull Handle
Smart Auto
Safety function
Voice Guide
Status Checking
Guide
Trespass Alarm
Function
Wireless Interlock
Function
(only MI-7000T)

Safety precautions
Do not disassemble or alter the lock. Assembling or disassembling the doorlock
may damage the product. Damages to the product caused by unauthorized
persons may result in damages to your property. Please contact our Customer
Service.
If the product generates harmful gases or smoke, please re move the batteries
immediately form the product, If you do not take this step immediately, the
product may suffer severe damage.
Please keep the product away from water or any liquids. If the product is
exposed to salty water or liquids, please wipe off the moisture with a soft cloth.
If moisture or foreign materials penetrate the product, remove the batteries
immediately and contact the Service Agency or Customer Service Center
for advice. Using a product contaminated with foreign materials may cause
problems.
Please check the batteries every 6 months to see if the batteries are leaking and
to check the cleanliness of battery terminals. If leakage is discovered, please
wipe out with a dry cloth and replace the new batteries. In case of exposure to
leakage, wash with soap and water immediately.
Do not clean the product with flammable materials such as alcohol, benzene or
thinners. Such materials may damage the surface or cause a fire.
Batteries should not be exposed directly to heat sources or flames, or
submerged in water, because they may leak or explode, resulting in severe
damage. Please do not use damaged batteries.
Do not allow the battery electrodes to make contact with metals such as keys,
as the battery may overheat, causing explosion or severe damage.
Please do not close the door with the deadbolt in the locked position. It may
damage the product or cause a malfunction.
Do not force to pull the front cover. It may damage the product or cause a
malfunction.
Please do not mix old with new batteries or use different types. Always use new
alkaline batteries. Please make sure the batteries are inserted correctly(+/-)
as indicated in the battery compartment. Otherwise, it may cause a leaks or
explosions.
Please do not hang the heavy things or bag, etc on the handle.
It is may damage the handle or cause a malfunction

Contents
Product features .................................................................... 04
Product composition and components .................................... 06
Name and function of each part............................................... 08
Description shortcut icons........................................................ 10
How to replace battery............................................................. 10
How to apply external power in the emergency ......................... 10
How to use mechanical override key ......................................... 10
How to use random security coding function ............................ 10
How to unlock / to lock from outdoor ........................................ 11
How to set auto-locking/manual-locking ................................. 11
How to select the language ...................................................... 11
How to unlock / to lock from indoor ......................................... 11
How to set double locking function ........................................... 12
Safety handle function ............................................................. 12
Auto-locking function / Auto-relocking function........................ 12
How to change normal mode / safety mode ............................. 13
How to register / to delete the secret code in normal mode......... 13
How to register / to delete the card key in normal mode.............. 13
How to register / to delete the nger print in normal mode .......... 13
How to register / to delete the secret code in safety mode ......... 14
How to register / to delete the card key in safety mode.............. 14
How to register / to delete the nger print in safety mode............ 14
To change manage code in safety mode ................................... 14
To register manager card in safety mode ................................... 14
To delete all manager card in safety mode................................. 14
How to control voice guide volume .......................................... 15
Guest secret code (Temporary use) .......................................... 15
How to control operation volume .............................................. 15
Status checking guide.............................................................. 15
Check battery capacity............................................................. 15
Safety handle function ............................................................. 15
Warning function against mischief or hacking ............................ 15
Warning alarm function against trespassing by force.................. 15
How to install the communication pack...................................... 16
How to register / to delete remote key & to unlock / to lock......... 16
Simplied Chinese characters................................................... 18
Traditional Chinese characters .................................................. 33
Product Warranty..................................................................... 47
Ⅰ. Before using
Ⅱ. Basic function
Ⅲ. Normal Mode
& Safety Mode
Ⅳ.Applications
Ⅴ.Others

Ⅰ. Before using
4
Product features
Convenient Push ↔ Pull Handle Convert Function
Direction of push and pull may be freely adjusted according to the door
opening direction.
Smart Auto Safety Handle
Operation of the handle inside is restricted for preventing outside intrusion.
Bi-direction Installation Method : Motorized Mortise Lock
The mortise of this product is convenient for installing as left/right direction
is adjustable.
A↔M Automatic/Manual Locking Set Function
Automatic and manual locking mode set is possible with simple switch
operation from inside.
Auto-relock function
If users do not open the door after unlocking, it is to be locked automatically for
higher security
Double lock function
When double lock function is activated, the door cannot be opened
from outside even with the registered card, secret code or finger print.
(only override key)
Mute function
You can open the door in quite not to interrupt neighbor without any
operating sound temporarily.
Battery level indicator & alarm for battery replacement time
Easy to check battery status with 3 step level indicator and alarming battery
replacement time with sound & lamp
Trespass alarm function
When the door is opened by force with hammer or other lock is suspended
with alarm sound

Ⅰ. Before using
5
Prevent mischief & hacking
With applying wrong code 3 times, unregistered card for 3 times or
unregistered finger print for 5 times, alarm system is activated with warning
sound and all the function of door lock is suspended for 3 minutes.
Random security coding function
When you enter your home with friends or other people, you don't want
to show secret code to them. In his case, you may press any number
randomly without limitation and then enter your secret code at final.
Then, you can open the door without revealing your secret code.
Normal mode / Security mode
Normal mode : Easy to use for normal user
Safety Mode : High security mode with manager function added,
provides individual register and delete function which is not provided in
normal mode.
Option Function
Option button : To use for register or setting change of optional functions.
1. Register and setting for RF connection option
2. Change setting of Language option
Ⅰ. Before using
6
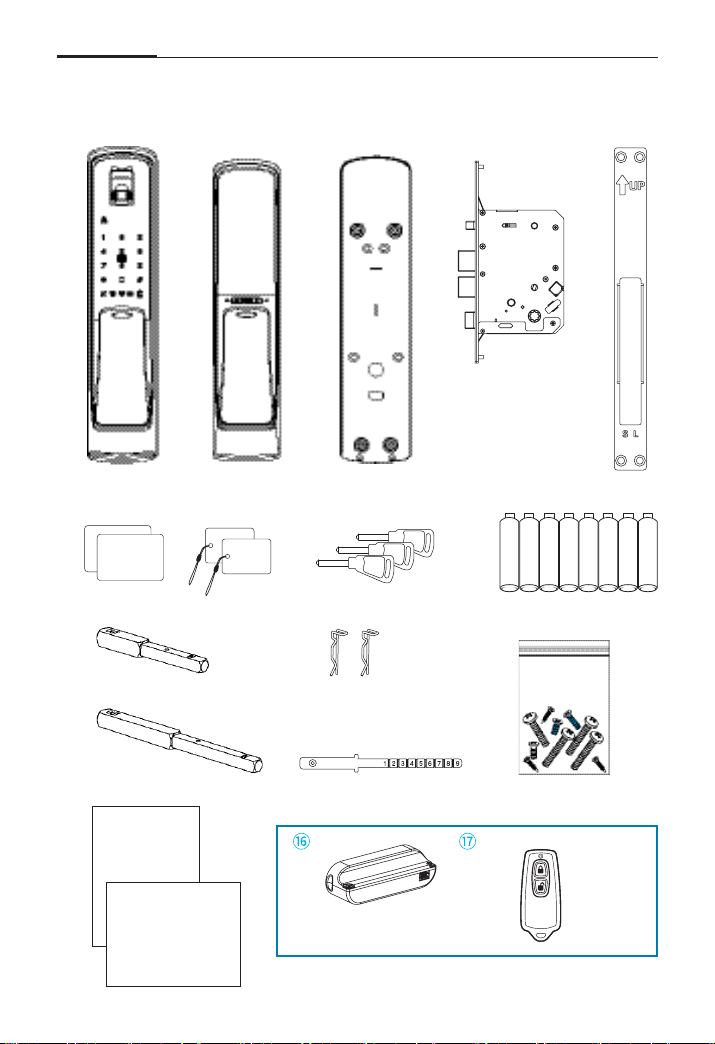
Product composition and components
① ② ③ ④ ⑤
⑧⑥
⑨
⑩
⑪
⑭
⑬
⑮
User
Manual
Installation
template Remote key
(Optional)
Communication pack
(Optional)
⑦
⑫
Screws
ISO
CARD
Tag
key

Ⅰ. Before using
7
Name Product specication Remark
①
Front Ass'y
88mm(W) X 396mm(H) X 40mm(D)
Including rubber pad
②
Back Ass'y
83.7mm(W) X 373mm(H) X 38.7mm(D)
③ Back Cover 88mm(W) X 381mm(H) X 8.7mm(D)
Including rubber pad
④ Mortise lock 105.4mm(W) X 240mm(H) X 24mm(D)
⑤ Strike 24mm(W) X 240mm(H) X 4.5mm(D)
⑥ Card key ISO Card, Tag key
⑦
Mechanical key Mechanical key
⑧ Battery 6V (1.5V 'AA' Size LR6 Alkaline, 8ea)
⑨ Handle shaft 70.5mm(W) X 8mm(H) X 8mm(D) 40~50mm Door
⑩ Handle shaft(M) 101.7mm(W) X 8mm(H) X 8mm(D) 70~90mm Door
⑪
Handle shaft stop-ring
2ea
⑫ Key tail plate 1ea
⑬ Screws 1set
⑭ User Manual Main user manual
Including warranty form
⑮ Installation template English, Chinese
Communication Pack Communication Pack Optional
Remote key Remote key Optional
※ Door thickness For 40~90mm
Factory setting
Item Setting status Ref. page
Auto/Manual lock mode [Auto-lock]11
Language (English/Chinese) English 11
Normal mode / Security mode Normal mode 13
Voice guide volume (1~3 level) 3 level [Maximum]15
Beef sound level (1~8 level) 8 level 15
Handle direction (Push/Pull)
Front cabinet - Pull / Back cabinet - Push

Ⅰ. Before using
8
Name and function of each part
Finger print sensor
Touch the registered finger print
on sensor, and then open the door
Card key touch plate
Touch the registered card
key to open the door.
Lock/Unlock lamp
Indicate lock/unlock status
Handle
You can open the door by
pushing or pulling it after
pressing secret code, touching
card key, or finger print.
Status indicator
Indicate operation status and
checking battery capacity.
Touch type numeric pad
Emergency Cover
Window icon
Mute function
Safety handle
Battery replacement indicator
Trespass alarm function
Wireless interlock
Card key
(ISO Card, Tag key)
Mechanical key
External Emergency Power SupplyTerminal
When battery does not operate, product may
be operated and unlocked by contacting 9V on
terminal located outside.
Emergency Key Insert Part
Door may be opened through emergency key.
Emergency Cover (External Emergency Power Supply Terminal & Emergency Key Insert Part)
1. Front ass'y
ISO
CARD
Tag
key

Ⅰ. Before using
9
2. Back Ass'y
Battery cover
Push up to open the battery
cover
[N ]
button
Registration/Delete of code, card,
finger print in normal mode
[S ]
button
Registration/Delete of code, card,
finger print in safety mode
indicator lamp to set
the safety handle
LED indicator (Locking status)
Handle
Cover
Auto/Manual mode switch
A : Auto mode
M : Manual mode
[Option] button
To register or delete optional RF
communication module
[Manual locking] button
Button to lock the door by manual
at manual locking mode
[Double lock function] button
Button to set double locking mode
Safety handle jog button
(Refer to the below explanation)
Manual safety handle switch
To release safety handle
function manually when Safety
handle jog button is out of
order or no battery
How to set the safety handle function
: When maintaining lower part
[CLOSE] for 5 seconds
The safety handle function is set
: When maintaining lower part
[OPEN] for 3 seconds
The safety handle function is
temporarily canceled.
Caution : The safety handle
function is a security function to
prevent any physical intrusion
from outside. Please use once
method of use is familiar enough.
In push handle type,
please do not put
your finger between
handle and door lock body.
Finger can be jammed or hurt
when you try to open the door.
Caution

Ⅰ. Before using
10
Description shortcut icons
How to apply external power in the emergency
/ How to use mechanical override key
How to use random security coding function
External power in the emergency
Secret
code
C
Card
key
Mechanical override key
Usage
Open the
cover
Push or pull the handle
and open the door
How to use random security coding function
Usage
RAN
DOM
CODE C
How to replace battery
If battery lamp in RED is flickering with sound,
separate battery cover, and replace all 8 batteries to new one, 6V(1.5V'AA' Size LR6 Alkaline)
:
[N] button
:
[S] button
: [Option] button
: Press [ ]
#
: Press [#] : Touch the front pad
C
: Secret code : Card key
: Finger print
UC
: User code
MC : Manager code
RC
: Registration code
: Trespass alarm : Unlock : Lock
※ Normal mode : [N] button / Safety mode : [S] button
Other manuals for MI-7800
1
Table of contents
Other Milre Door Lock manuals


