Mede8er MED500X User manual
High Definition Multimedia Player
MED500X
Quick Start Guide
V4

Page1
INDEX
page 1
page 2
page 3
page 4
page 5
page 6
page 7
page 8
page 9
page10
page11
page12
page13
page14
page15
page16
page17
page18
page19
page20
page21
page22
page23
Index
Introduction
General Overview
Installing a Hard Drive
Connections
Connections continued
Formatting the Hard Drive - USB Connection
Remote Functionality
Home Network Samba Server
Wired Network Connection and Setup
Wireless Network Setup / Firmware Update
Media Library
Media Library continued
Quick Playlist - m3u Playlist
Cover Art Preview
File / Folder Jump to
Time Bar Jump
Time Bar FF/RW - Goto Screen
Screen Calibration
File Manager
Internet Radio
NFS (Network File System)
Specifications

Thank you for purchasing the Mede8er Multimedia Player.
Warranty
Mede8er products carry a 24 month from date of purchase warranty. In the event of warranty service please
provide proof of purchase. Return your product to the store that it was purchased from or return it directly to
Sanji Electronics (Pty) Ltd 106, 16th Rd Midrand, Gauteng, South Africa.
Warranty does not cover damage by
a) Lightning or over voltage
b) Water damage or liquid spill
c) Misuse or abuse
d) User tampering
Sanji Electronics is not responsible for any loss of data irrespective of the cause.
Important Safety Instructions
· Read these instructions for all components before using this product.
· Do not use this apparatus near water or moisture. Do not use this product near a bathtub, washbowl,
kitchen sink, laundry tub, in a wet basement, near a swimming pool, or anywhere else that water or
moisture are present.
· Clean only with a soft dry cloth and as directed by the manufacturer. Unplug this product from the wall
outlet before cleaning.
· Do not block any ventilation openings. Install in accordance with the manufacturer instructions. To
ensure reliable operation of the product and to protect it from overheating, put the product in a position
and location that will not interfere with its proper ventilation. For example, do not place the product on
a bed, sofa, or similar surface that may block the ventilation openings. Do not put it in a built-in system,
such as a bookcase or a cabinet that may keep air from flowing through its ventilation openings.
· Do not install near any heat sources, such as radiators, heat registers, stoves or other apparatus that
produce heat.
· Protect the power cord from being walked on or pinched, particularly at plugs, convenience
receptacles, and the point where they exit from the apparatus.
· Only use attachments or accessories specified by the manufacturer.
· Unplug this apparatus during lightning storms or when unused for long periods of time to prevent
damage to this product.
Refer all servicing to qualified service personnel
The MED500X is the latest generation multimedia player specially developed by Sanji for today’s demanding
media enthusiast. The Mede8er has been designed for good solid media playback from a hard drive, USB
device, SD Card, Internet or Local Network source. The User Interface is neat and intuitive without being
complicated. Sanji has more than achieved their design goals by offering a media player that supports most
of the popular media formats at a very affordable price.
Due to the ever changing nature of Multimedia Players features and functions, Sanji has decided to only
include a Quick Start Guide with the product. An up-to-date User Manual will be available for download from
www.mede8er.com
Page2

Up Down Left Right Enter Return Stop On/OffTV Out
GENERAL OVERVIEW
Component Video
Out
DC - 12Volt 3 Amp input
HDMI Connector
RJ45 - Lan connector
Coax Digital Audio Out
Optical Audio Out
Cooling Fan
Composite Video Out
Analogue Audio Out
LR
SD Card
USB Host
USB Slave
Status Led
Page3

Page4
INSTALLING A HARD DRIVE
Lift cover from
this side
a) b)
c)
Make sure that the DC cable is unplugged.
cover screws x and y. Lift the hard drive cover and remove it, place it on a flat surface with the mounting
tabs facing upright. Fit a compatible SATA hard drive into place with the label facing upwards and the
connectors facing the side with the air vents. Secure the hard drive with the four screws provided.
Connect the hard drive power connector and the red SATA data connector from the player to the hard drive
diagram c. Re fit the hard drive cover into the Mede8er body and tighten the two securing screws x and y.
To reduce hard drive vibration noise you can use the supplied Neoprene pads. Just peel of the adhesive
side and stick onto the base as indicated in diagram d.
Turn the Mede8er upside down and unscrew the hard drive
SATA
x
y
d)

CONNECTIONS
Analogue Audio and Composite Video connection to TV.
Composite Video offers the most basic picture quality connection and should only be used if your TV does
not have a HDMI or Component input. Use RCA analogue audio outputs in the absence of HDMI or Digital
Audio inputs on your TV or Home Theatre system. RCA analogue outputs will output a downmix from mutli-
channel to stereo.
AUDIO IN
L R
VIDEO IN
HDMI Coax Digital
Connect LAN cable to router or switch
Optical Digital
HDMI - RJ45 Network - Coax Digital - Toslink Connection to a TV or Amplifier
For digital audio connection to your Home Theatre System you can either use the TOSLINK Optical or the
Coax Digital output. The MED500X supports both Passthrough and Downmix for both Dolby Digital and
DTS signals. If you want your Home TheatreAmplifier to decode the surround sound stream you should
use either Digital Audio output and set the Audio Output to SPDIF RAW in the Setup menu.
Page5
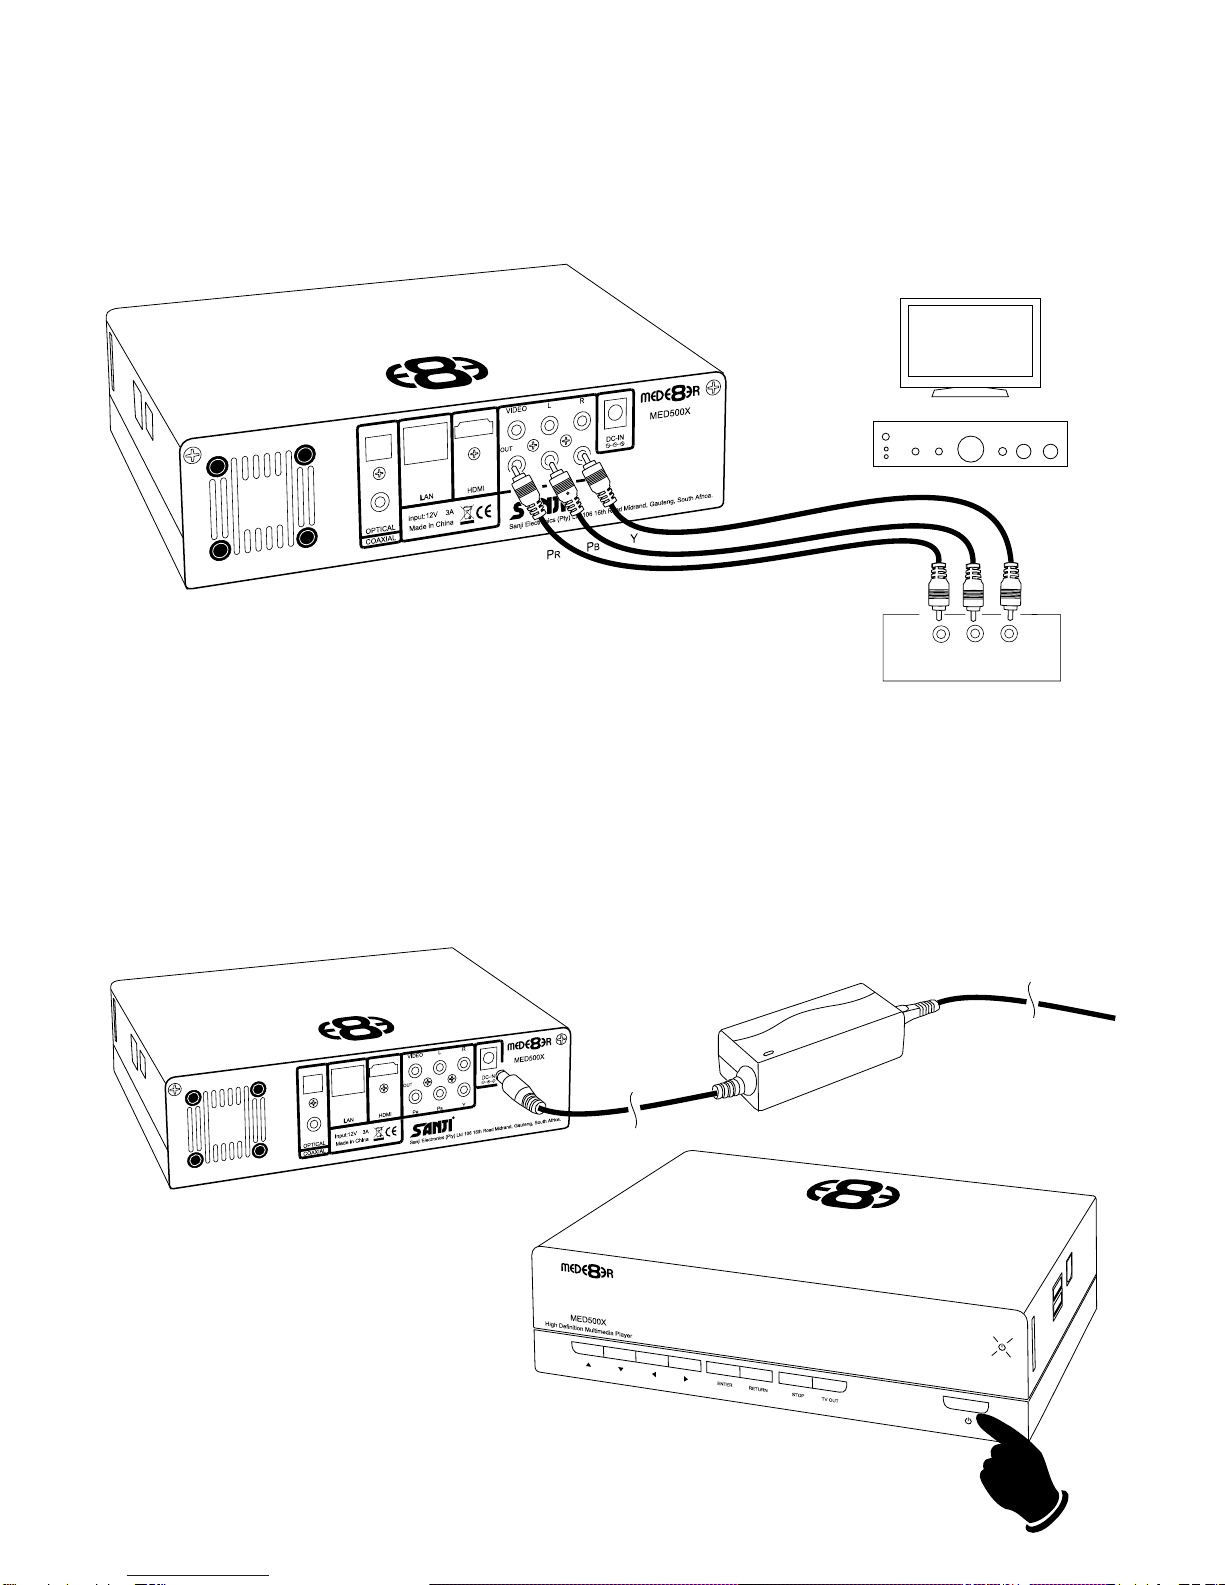
Component Video Connection to Amp or TV
Component Video offers the next best picture quality to HDMI so if your system does not have a HDMI
input we suggest you use the Component Video Connection.
Pr Pb Y
Power up and Standby
Plug the AC/DC adapter into the mains outlet and plug the DC Jack into the DC IN at the rear of the
MED500X. DO NOT USEANY AC/DC ADAPTER AND ONLY USE THE ONE SUPPLIED otherwise you
may cause damage to the unit. Press the On/ Off button on the Mede8ers front panel and front facia LED
will turn on Blue. You can put your Mede8er into standby by pressing the On/ Off button on the remote.
When in standby the front facia LED will turn Red.
Page6
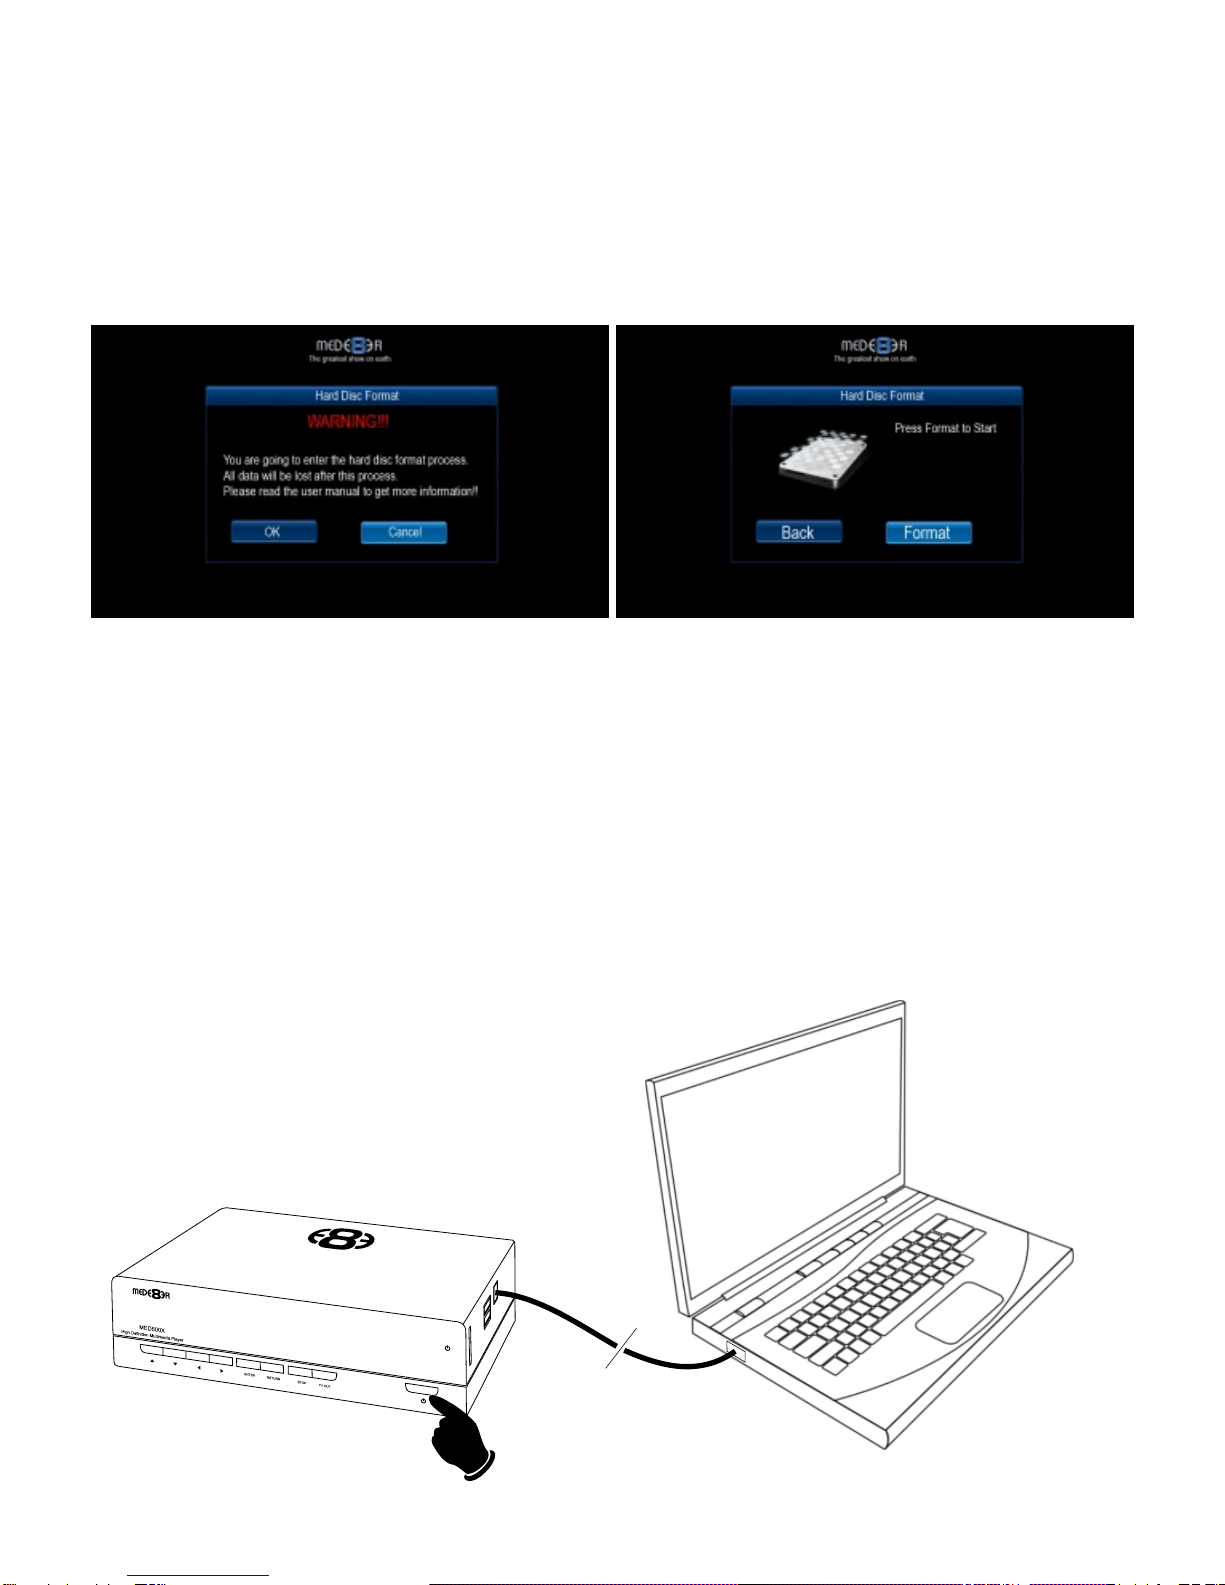
FORMATTING THE HARD DRIVE
The MED500X has a built in Hard Drive format feature that formats the hard drive with a main NTFS
partition and other small internal partitions for propriety use.
The Hard Drive should be formatted in the Mede8er MED500X to ensure full functionality.Apre formatted
Hard Drive can be used but you may not be able to use all the internal features of the MED500X.
To Format the internal Hard Drive select SETUP menu and then HDD Format.
WARNING: FORMATTING THE HARD DRIVE WILL ERASE ALL DATA
Formatting ...
Page7
USB CONNECTION TO PC
You can transfer files to and from the Mede8er via fast USB2.0 transfer. Use the included USB cable to
connect the Mede8er MED500X to your PC. As soon as the cable from the Mede8er is connected to your
PC the front LED on the Mede8er will switch off. To make the USB connection press the on/off button on
the Mede8er and the LED will pulse blue then red then blue and switch off. The Mede8er will now connect.
The computer will automatically install the correct drivers and then you will be able to navigate the Mede8er
like any normal external USB drive.
EXTERNAL USB DEVICE DRIVER NOT REQUIRED

Page8
Audio Selection
Subtitle
Picture Zoom
Angle DVD
Repeat A - B
Setup Menu
Navigation Down - Volume Down in Video File (not DVD)
Navigation Right - FF in Video File (not DVD)
Navigation Enter - Pause / Play in Video File (not DVD)
Return
Navigation Up - Volume Up in Video File (not DVD)
Next
Previous
Play Stop
Volume Up/Down
Goto
Numbers
Shortcuts - Media Library - File Copy - Music Playlist
Info Screen
Audio Mute
LED
On / Off
TV System
Repeat Shuffle
Rewind
Fast Forward
Home Page
DVD Menu
Slow / Zoom
Pause
Skip Forward/Back
Select
Confirm
Volume Down
Volume Up
Fast Forward
Fast Forward
Pause / Play
Navigation Buttons Additional Functionality
To assist ease of use operation - The Mede8er remote has been designed to be ergonomic and simple to
use. Now while watching your Videos you can intuitively navigate and change certain function without the
need to look down at the remote control.
During Video Playback (excluding DVD files) you can use the navigation buttons for operational functions like
Fast Forward, Rewind, Pause, Stop, Volume Up and Volume Down.
*Navigation Left
* Rewind in Video File (not DVD)
REMOTE FUNCTIONALITY

HOME NETWORK SAMBA SERVER
The Mede8er has NAS (Network Attached Storage) functionality built in. And although it is limited in transfer
speed compared to standalone NAS servers it performs very well if speed is not your major requirement.
You can also use the MED500X as a Media Server and stream content to other Mede8er’s on your home
network.
The Samba function is enabled or disabled in the System menu under Network. Should the Samba stop
working for any reason we suggest you re-boot the Mede8er ie Disconnect the DC Jack at the rear and re
connect and press the on/off button on the front panel.
MED500X with internal Hard Drive
acting as Media Server
Router
Mede8er without Hard Drive
Room1 Mede8er without Hard Drive
Room 2
Cat5
Cat5
Cat5
Page9
Other manuals for MED500X
2
Table of contents
Other Mede8er Media Player manuals

Mede8er
Mede8er MED500X2 User manual

Mede8er
Mede8er MED600X3D User manual

Mede8er
Mede8er MED300X User manual

Mede8er
Mede8er MED200X User manual

Mede8er
Mede8er MED600X3D User manual

Mede8er
Mede8er MED500X User manual

Mede8er
Mede8er MED400X2 User manual

Mede8er
Mede8er Med1000X3D User manual

Mede8er
Mede8er MED250X User manual

Mede8er
Mede8er MED500X User manual


