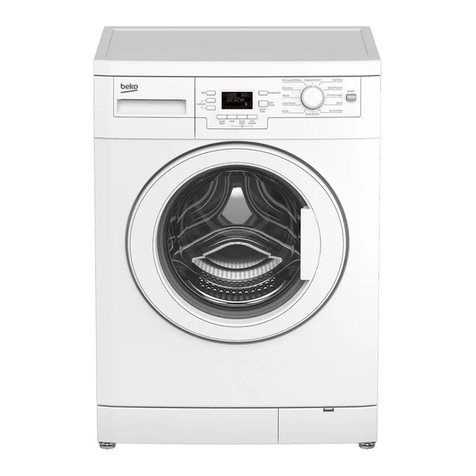
LG WM2101HW User manual
Owner's Manual
WM2101H*
Please read this manual carefully. It provides
instructions on safe installation, use, and maintenance.
Retain it for future reference.
Record the model and serial numbers of your machine
and report this information to your dealer if your machine
requires service.
Washing Machine
☎☎1-800-243-0000
24 HOURS A DAY, 7 DAYS A WEEK FOR LG CUSTOMER SERVICE
☎☎1-800-243-0000
para el Servicio LG (Atención al Cliente) 24 horas al día, 7 días a la semana
Designed specially to use only
HE (High Efficiency) detergent
Protocol P17
Sanitization Performance of Residential and
Commercial, Family Sized Clothes Washers
Protocolo P17
Ejecucion de Saneamiento en la zona
residencial y comercial, lavodoras del uso del hogar
Protocole P17
Performance en matière d'assainissement des laveuses
résidentielles et commerciales de grande taille
MANUAL DEL
PROPIETARIO
Lavadora
Lea este manual cuidadosamente. Le proveerá
instrucciones para una instalación, uso y mantenimiento
seguros. Consérvelo para futuras referencias. Cite esta
información a su proveedor si requiere de servicio.
Diseñada especialmente para utilizar
solamente detergente HE (Alta eficiencia)
Conçu exclusivement pour les
détersifs HE (haute efficacité)
PRODUCT FEATURES
2
CONTENTS
Important Safety Information ..........................................................................................................................3
Specifications..................................................................................................................................................4
Installation Instr ctions ...................................................................................................................................5
Preparation Before Washing.........................................................................................................................10
Using the Dispenser......................................................................................................................................11
Cycles...........................................................................................................................................................13
How to Use the Washer................................................................................................................................14
Maintenance .................................................................................................................................................17
Tro bleshooting G ide..................................................................................................................................20
Warranty ..................................................................................................................................................23-24
WASH
EST. TIME
SPIN
WASH
EST. TIME
SPIN
WASH
EST. TIME
SPIN
WASH
EST. TIME
SPIN
추가선택, 예약,
WASH
EST. TIME
SPIN
WASH
EST. TIME
SPIN
WASH
EST. TIME
SPIN
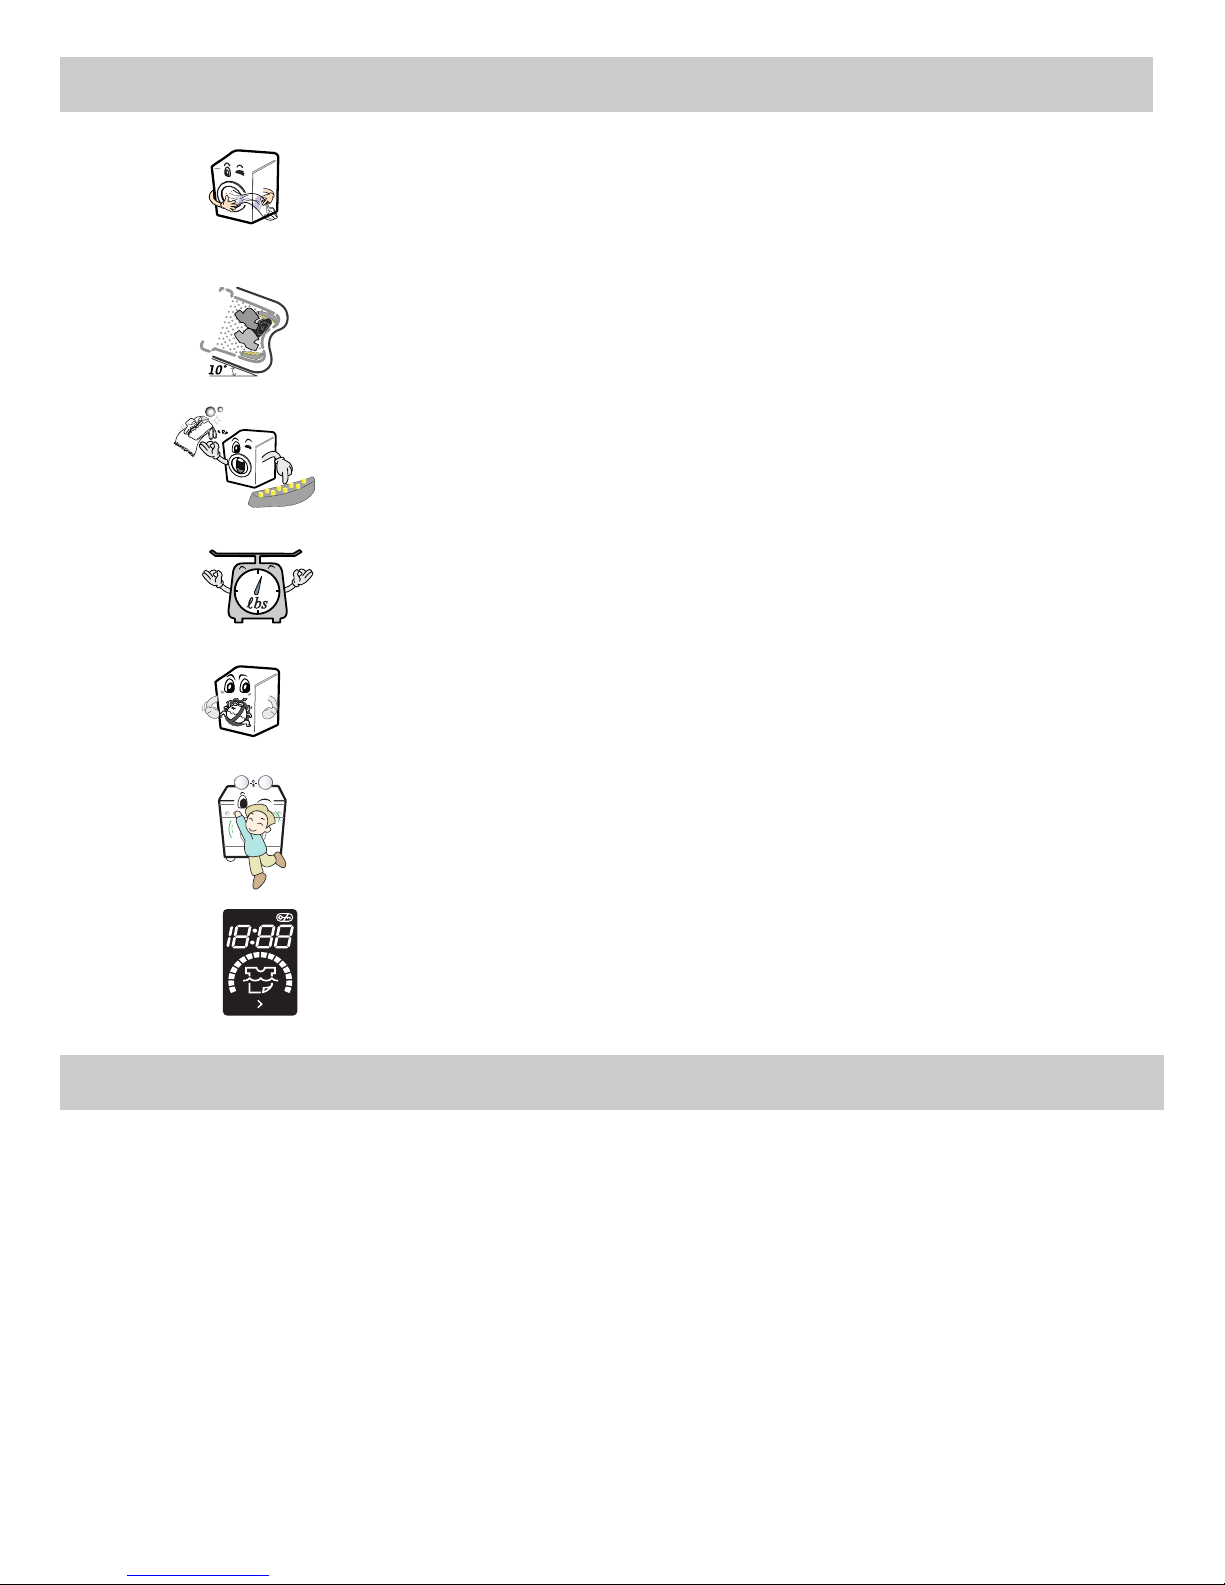
■Direct Drive System
The advanced Br shless DC motor directly drives the dr m witho t
belt and p lley.
■Tilted Drum and Extra Large Door Opening
Tilted dr m and extra large opening make it possible to load
and nload clothing more easily.
■RollerJets
Washing ball enhances the wash performance and red ces damage
to the clothing. The jets spray and help t mble clothes to enhance
washing performance while maintaining fabric care.
■Automatic Wash Load Detection
A tomatically detects the load and optimizes the washing time.
■Built-in Heater
Internal heater helps to maintain water temperat re at its optim m level for
selected cycles.
■Child Lock
The Child lock prevents children from pressing any b tton to change the
settings d ring operation.
■The LED Display
The LED display shows the settings, estimated time remaining, options,
and stat s messages for yo r washer. When the washer is t rned on, the
light in the display will ill minate.
IMPORTANT SAFETY INFORMATION
ENGLISH
3
READ ALL INSTRUCTIONS BEFORE USE
WARNING!
For your safety, the information in this manual must be followed to minimize the risk of fire or
explosion, electric shock, or to prevent property damage, personal injury, or loss of life.
IIMMPPOORRTTAANNTT SSAAFFEETTYY IINNSSTTRRUUCCTTIIOONNSS
• Read all instructions before using the washer.
• Do not wash articles that have been previously
cleaned in, washed in, soaked in, or spotted with
gasoline, dry cleaning solvents, or other
flammable or explosive substances, as they give
off vapors that could ignite or explode.
• Do not add gasoline, dry cleaning solvents, or
other flammable or explosive substances to the
wash water. These substances give off vapors that
could ignite or explode.
• Under certain conditions, hydrogen gas may be
produced in a hot water system that has not been
used for weeks or more. HYDROGEN GAS IS
EXPLOSIVE. If the hot water system has not been
used for such a period, before using the washing
machine, turn on all hot water faucets and let the
water flow from each for several minutes. This will
release any accumulated hydrogen gas. As the gas
is flammable, do not smoke or use an open flame
during this time.
• Do not allow children to play on or in the washer.
Close supervision of children is necessary when
the washer is used near children.
• Before the washer is removed from service or
discarded, remove the door to prevent children
from hiding inside.
• Do not install or store the washer where it will be
exposed to the weather.
• Do not tamper with controls.
• Do not repair or replace any part of the washer or
attempt any servicing unless specifically
recommended in the user-maintenance
instructions or published user-repair instructions
that you understand and have the skills to carry
out.
• See Installation Instructions for grounding
requirements.
• ALWAYS follow the fabric care instructions
supplied by the garment manufacturer.
• Do not place items exposed to cooking oil in your
washer. Items contaminated with cooking oils may
contribute to a chemical reaction that could cause
a load to catch fire.
• Do not use fabric softeners or products to
eliminate static unless recommended by the
manufacturer of the fabric softener or product.
WARNING
: To red ce the risk of fire, electric shock, or inj ry to persons when sing the washer, follow basic
preca tions, incl ding the following:
SSAAVVEE TTHHEESSEE IINNSSTTRRUUCCTTIIOONNSS
This appliance must be grounded. In the event of malfunction or breakdown, grounding will reduce the risk
of electric shock by providing a path of least resistance for electric current. This appliance is equipped with
a cord having an equipment-grounding conductor and grounding plug. The plug must be plugged into an
appropriate outlet that is properly installed and grounded in accordance with all local codes and ordinances.
• Do not use an adapter or extension cord.
• Do not remove ground prong.
• If you don’t have the proper outlet, consult an electrician.
GROUNDING INSTRUCTIONS
WARNING
: Improper connection of the eq ipment-gro nding cond ctor can res lt in risk of electric shock.
Check with a q alified electrician or serviceman if yo are in do bt as to whether the appliance is
properly gro nded. Do not modify the pl g provided with the appliance - if it does not fit the o tlet,
have a proper o tlet installed by a q alified electrician.
!
!
!
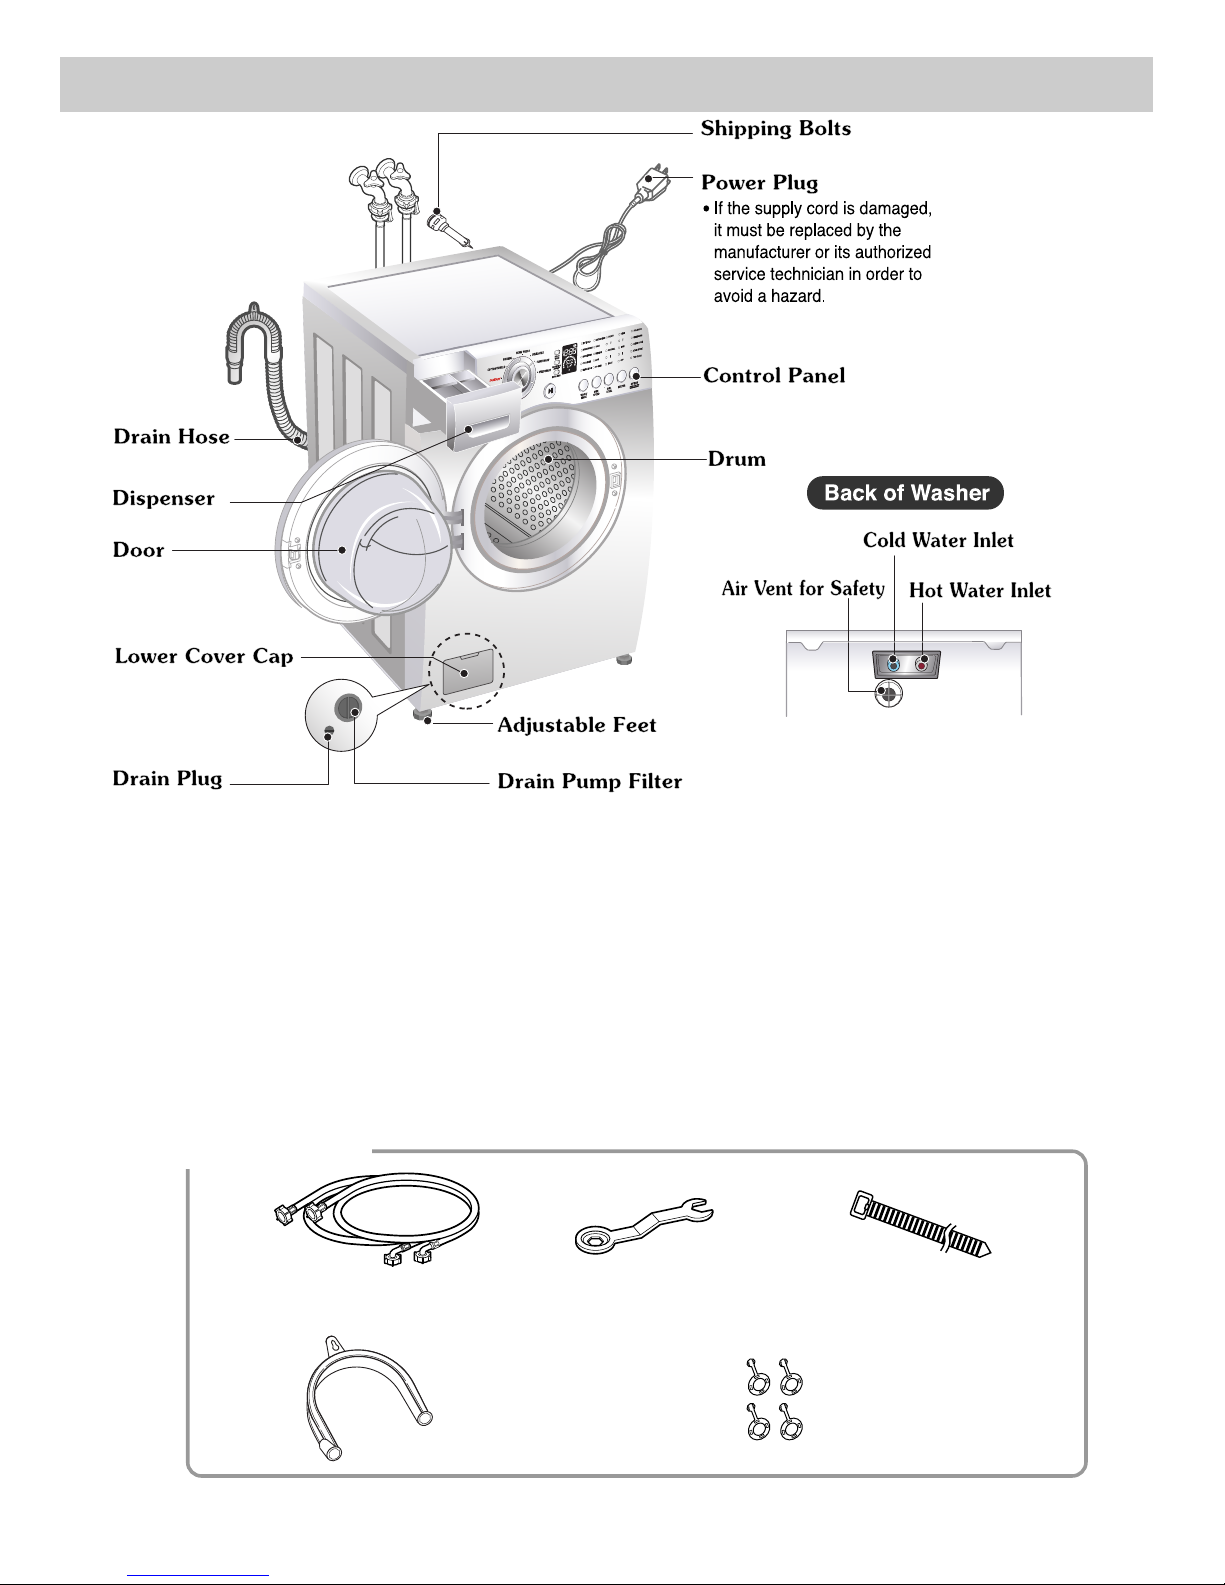
Hose retainer
Hot/Cold (1 each)
Hose
Wrench
Tide
for removing shipping bolts
and leveling the washer
Tie strap
to sec re drain hose to standpipe,
inlet hose, or la ndry t b
Cap (4 each)
to cover the holes created after
removing the shipping bolts
WASH
WASH
EST. TIMEEST. TIME
SPINSPIN
울
란제리란제리
SPECIFICATIONS
4
■
Accessories
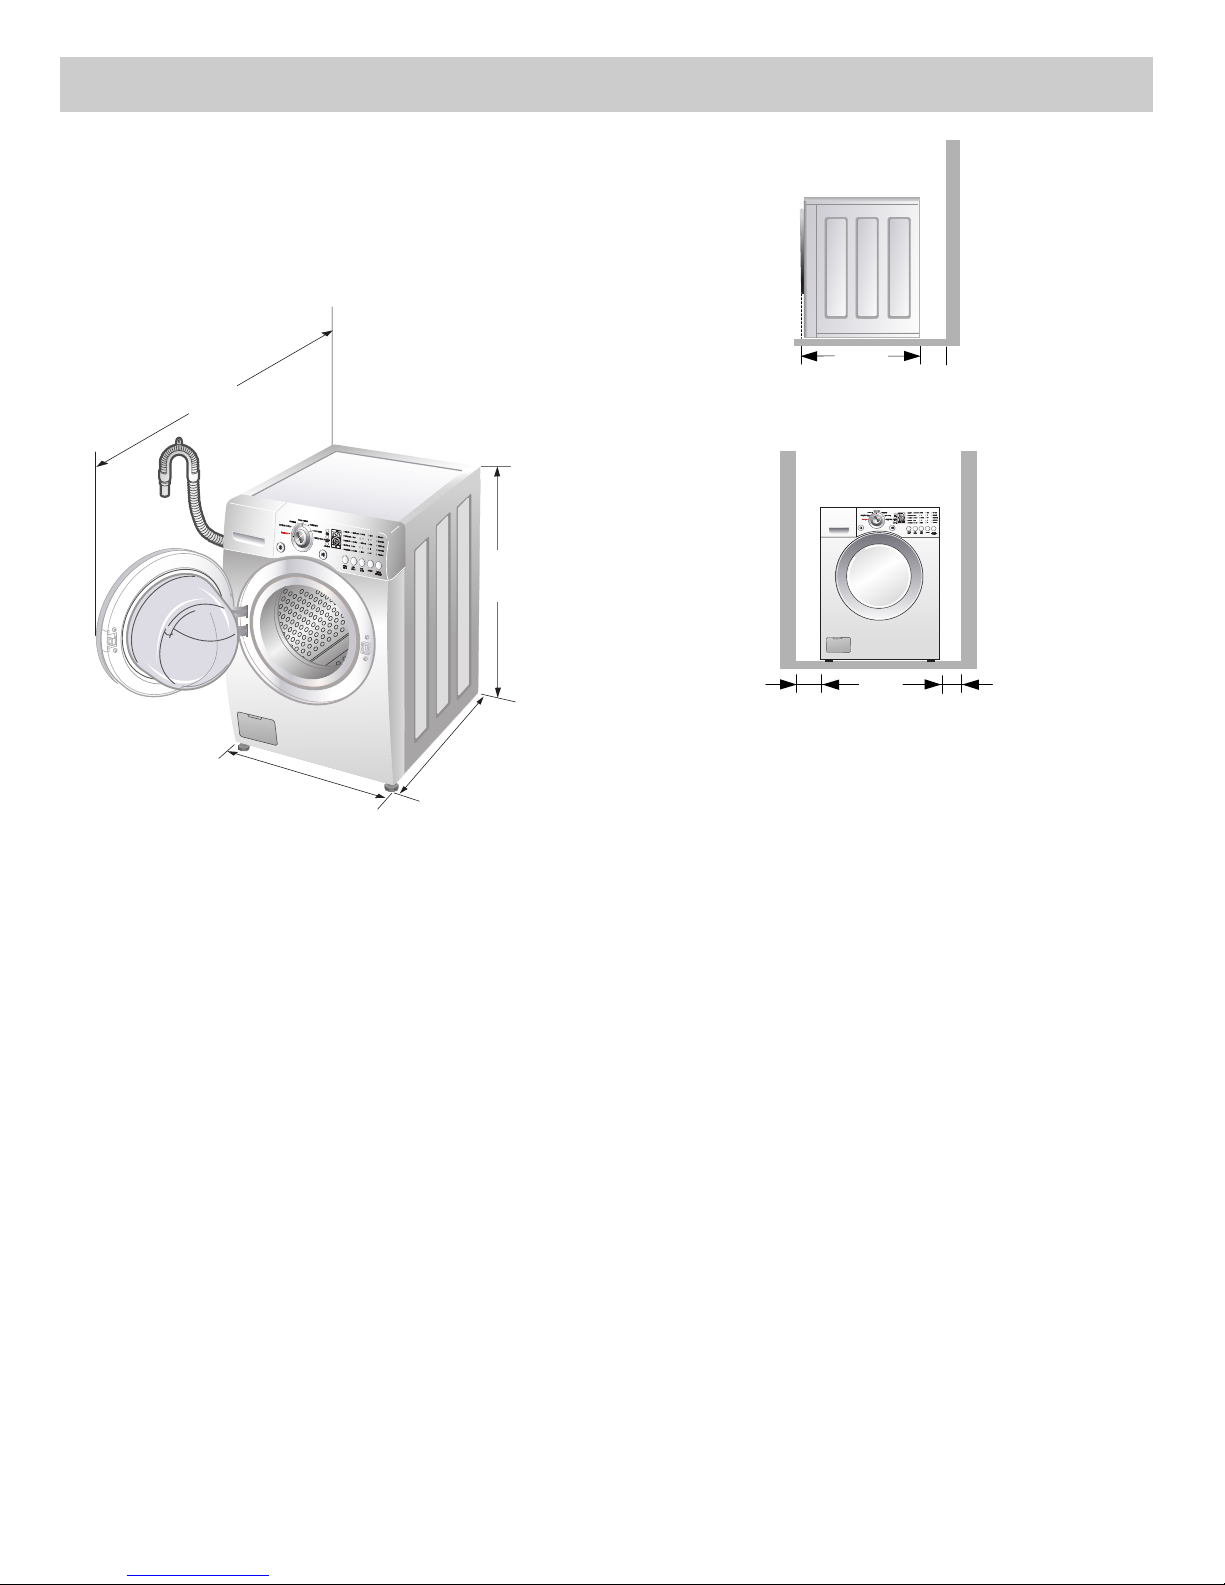
■Name: Front-loading Washing Machine
■Power s
s pply: 120V~ 60Hz
■Size: 68.6 cm (W) X 75.6 cm (D) X 98.3 cm (H), 129.1 cm (D, door open)
27”(W) X 293/4”(D) X 3811/16”(H), 5013/16”(D, door open)
■Weight: 190 lbs. (86 kg)
■Spin speed: 1100 rpm max.
■Permissible water press re: 14.5~116 psi(100~800kPa)
Specifications subject to change by manufacturer.

5
INSTALLATION INSTRUCTIONS
ENGLISH
1. To prevent internal damage d ring transport,
4 locking bolts are installed. Before operating
the washer, remove the bolts and braces.
• If they are not removed, it may ca se severe
vibration, noise, and malf nction.
3. Take o t the 4 bolts and braces by twisting
the braces slightly. Keep the 4 bolts, braces
and the wrench for f t re se.
• Whenever the appliance is transported, the
shipping bolts and braces m st be reinstalled.
2. Unscrew the 4 bolts with the wrench s pplied.
Do first lower side to remove easily. One of the
bolts retains the power cord of the washer to
prevent operating witho t removing bolts.
4. Close the holes with the caps s pplied.
The appliance is fitted with shipping bolts to prevent
internal damage d ring transportation.
Packing and all shipping bolts m st be removed
before sing the washer.
When npacking the base, be s re to remove
the additional packing s pport in the middle of
the base packing.
: Two or more people may be need to install and move the appliance.
■Shipping bolts
Install or store unit where it will not be exposed to temperatures below freezing or
exposed to outside weather conditions.
Properly ground washer to conform with all governing codes and ordinances.
To reduce the risk of electric shock, do not install the washer in humid spaces.
The base opening must not be obstructed by carpeting when the washing machine is installed on a carpeted floor.
In countries where there are areas which may be subject to infestation by cockroaches or other vermin, pay
particular attention to keeping the appliance and its surroundings in clean condition at all times.
amage caused by cockroaches or other vermin will not be covered by the appliance warranty.
■Removing shipping bolts
cap
!
WARNING
INSTALLATION INSTRUCTIONS
6
■Installation clearances
The location m st be large eno gh to f lly open
the washer door.
■Washer dimensions
• Most installations req ire a minim m 4 in.
(10 cm) clearance behind the washer.
■Minimum installation spacing for
recessed area installation.
The following dimensions shown are for the minim m
spacing allowed.
Additional spacing sho ld be considered for
installation and servicing.
• Additional clearances might be req ired for wall,
door and floor moldings.
• Additional spacing of 1 in. (2.5 cm) on all sides of
the washer is recommended to red ce noise
transfer.
Companion appliance spacing sho ld also be
considered.
■evel floor
• Allowable slope nder entire washer is 1°.
• To minimize noise and vibration, the washer
MUST be installed on a solidly constructed
floor.
• Carpeting and soft tile s rfaces are not
recommended.
• Never install the washer on a platform or weakly
s pported str ct re.
NOTE: A firm, solid floor is even more critical to a
front-loading washer than to a top-loader.
If your floor is wood and/or frame
construction, you may need to reinforce it.
Front-loaders use substantially faster spin
speeds than top-loaders, causing greater
vibration. If the floor is not solid, your washer
will vibrate. You will hear and feel the
vibration throughout your house.
■Power outlet
• M st be within 60 in. (1.5 m) of either side of the
washer. Do not overload the o tlet with more
than one appliance.
• Time-delay f se or circ it breaker is recommended.
NOTE: It is the personal responsibility and obligation
of the customer to have a proper outlet
installed by a qualified electrician.
[Front view]
[Side view]
27"
(68.6 cm)
29
3/4
"
(75.6 cm)
3811/16"
(98.3 cm)
50
13/16
"
(129.1 cm)
29
3
/4"
(75.6 cm)
4"
(10 cm)
WASH
EST. TIME
SPIN
27"
(68.6 cm)
1"
(2.5 cm)
1"
(2.5 cm)
WASHWASH
EST. TIMEEST. TIME
SPINSPIN
INSTALLATION INSTRUCTIONS
ENGLISH
7
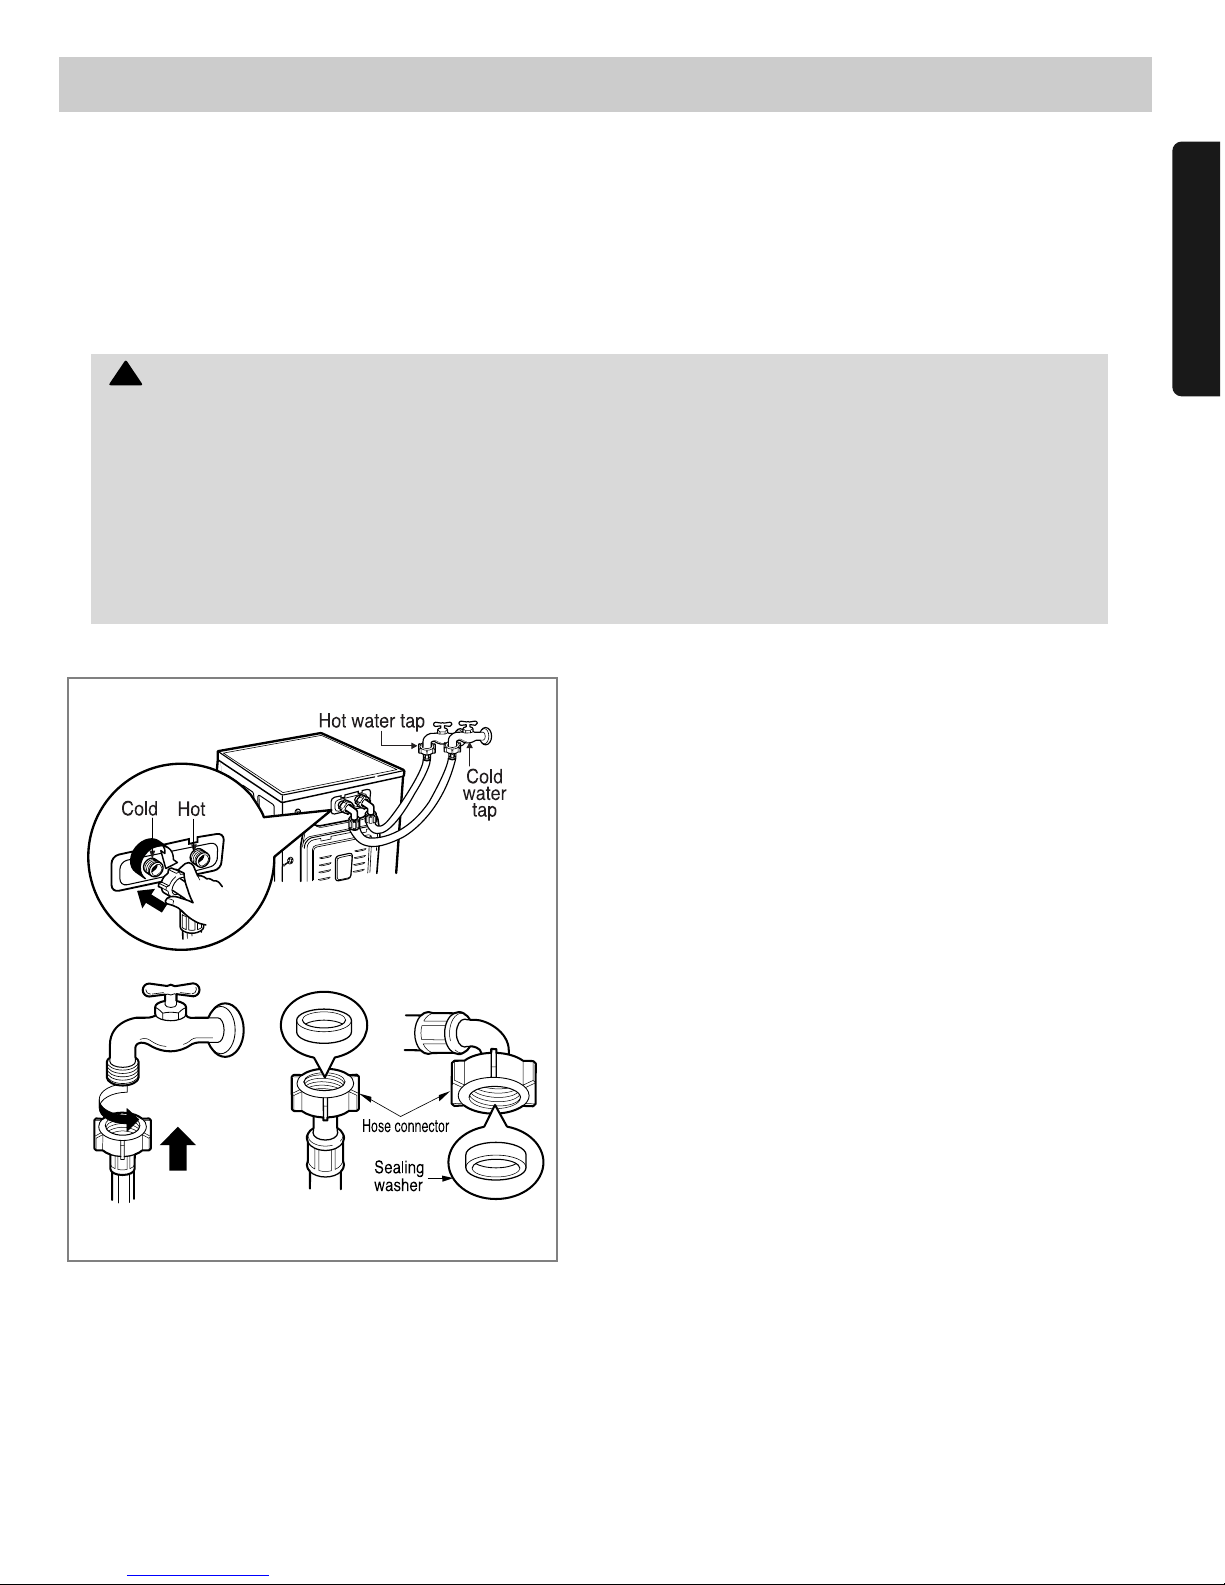
• Water s pply press re m st be between
14.5 and 116 psi(100~800 kPa).
• Do not crossthread when connecting inlet hose to the
valve.
• If the water s pply press re is more than 116 psi,
a press re red cing device sho ld be installed.
• Two Sealing washers are s pplied with the water inlet
hoses to prevent water leaks.
• Check for leakage of washing machine connections by
t rning the tap completely on.
• Periodically check the condition of the hose and replace
the hose if necessary.
• Make s re that there is no kink in the hose and that it is
not cr shed.
• Be s re that the two water inp t ports are connected to
the correct water fa cets. The connector for hot water is
colored red.
• Use ONLY the inlet hoses provided by LG with this
la ndry prod ct. Aftermarket hoses are not g aranteed to
fit or f nction correctly. Other hoses may not tighten
correctly and co ldca se leaks. S bseq ent damage to
prod ct or property will not be covered nder the terms of
LG's warranty.
■Connecting water supply hose
NOTE: Washing Machine is to be connected to the water mains using new hoses.
Old hoses should not be used.
■Electrical connection
• Do not se an extension cord or do ble adapter.
• If the s pply cord is damaged, it m st be replaced by a q alified person in order to avoid a hazard.
• If the machine will not be sed for an extended time, npl g it and sh t off the water s pply.
• Connect the machine to a gro nded o tlet in accordance with c rrent wiring reg lations.
• The appliance m st be positioned so that the pl g is easily accessible.
Repairs to the washing machine must only be carried out by qualified personnel. Repairs carried out by
inexperienced persons may cause injury or serious malfunctioning. Contact your local service center.
o not install your washing machine in a room where temperatures below freezing may occur.
Frozen hoses may burst under pressure. The reliability of the electronic control unit may be impaired
at temperatures below the freezing point.
If the appliance is delivered in the winter months and temperatures are below freezing,
store the washing machine at room temperature for a few hours before putting it into operation.
!
CAUTION! Concerning the Power Cord
Most appliances recommend they be placed pon a dedicated circ it; that is, a single o tlet circ it which powers only that
appliance and has no additional o tlets or branch circ its. Check the specification page of this owner's man al to be
certain.
Do not overload wall o tlets. Overloaded wall o tlets, loose or damaged wall o tlets, extension cords, frayed power cords,
or damaged or cracked wire ins lation are dangero s. Any of these conditions co ld res lt in electric shock or fire.
Periodically examine the cord of yo r appliance, and if its appearance indicates damage or deterioration, npl g it,
discontin e se of the appliance, and have the cord replaced with an exact replacement part by an a thorized servicer.
Protect the power cord from physical or mechanical ab se, s ch as being twisted, kinked, pinched, closed in a door, or
walked pon. Pay partic lar attention to pl gs, wall o tlets, and the point where the cord exits the appliance.
INSTALLATION INSTRUCTIONS
8
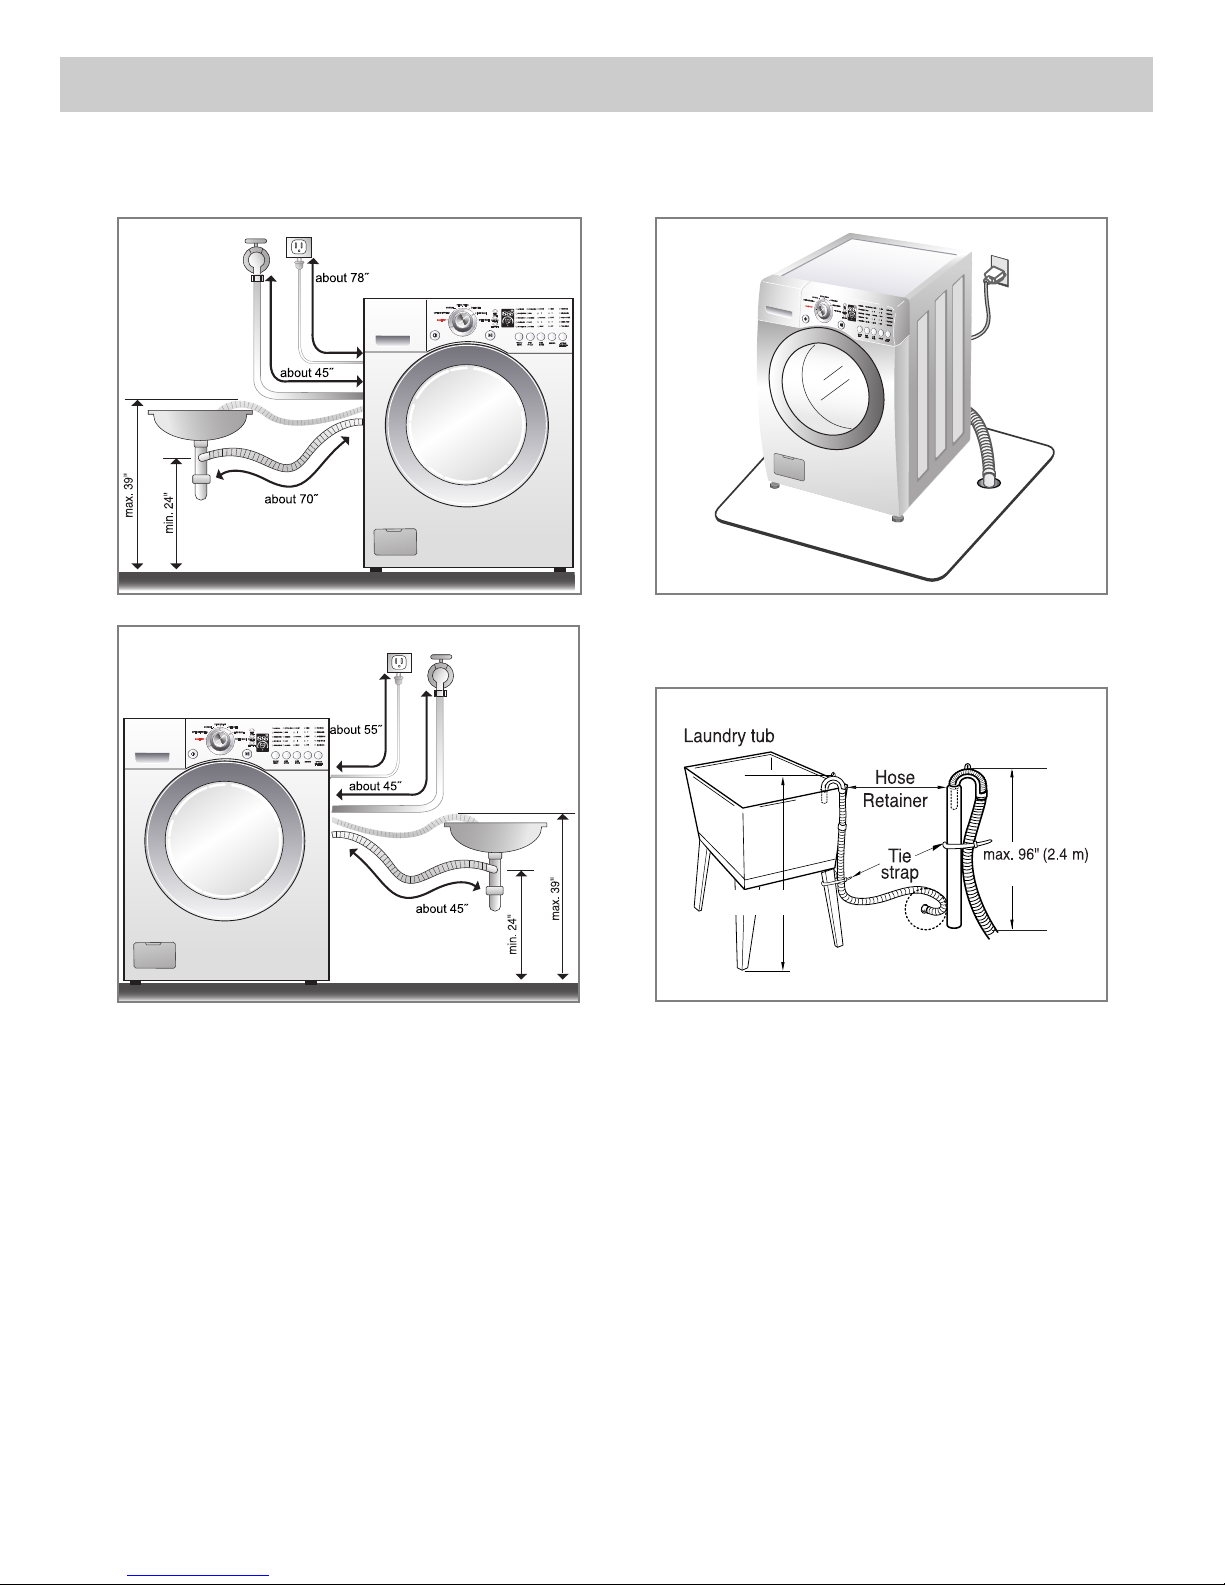
■Installation of drain hose
WASH
EST. TIME
SPIN
WASHWASH
EST. TIMEEST. TIME
SPINSPIN
WASH
WASH
EST. TIME
EST. TIME
SPIN
SPIN
WASH
EST. TIME
SPIN
WASH
WASH
EST. TIME
EST. TIME
SPIN
SPIN
min. 30" (76.2cm)
• The drain hose sho ld not be placed higher than
96 in. from the bottom of the washer.
• Properly sec ring the drain hose will protect the
floor from damage d e to water leakage.
• Place the end of the drain hose in the hole of the
floor drain system.
• When installing the drain hose at a sink, sec re it
so it cannot break away and ca se flooding and
damage.
• Properly sec ring the drain hose will protect the
floor from damage d e to water leakage.
This equipment is not designed for maritime use or for mobile installations such as in RV’s, aircraft, etc.
Turn off the faucet if the machine is to be left for an extended period of time (e.g. holiday).
When disposing of the appliance, cut off the power cable, and destroy the plug.
isable the door lock to prevent young children being trapped inside.
Packaging material (e.g. Films, Styrofoam) can be dangerous for children. There is a risk of suffocation! Keep all
packaging from children.
INSTALLATION INSTRUCTIONS
ENGLISH
9
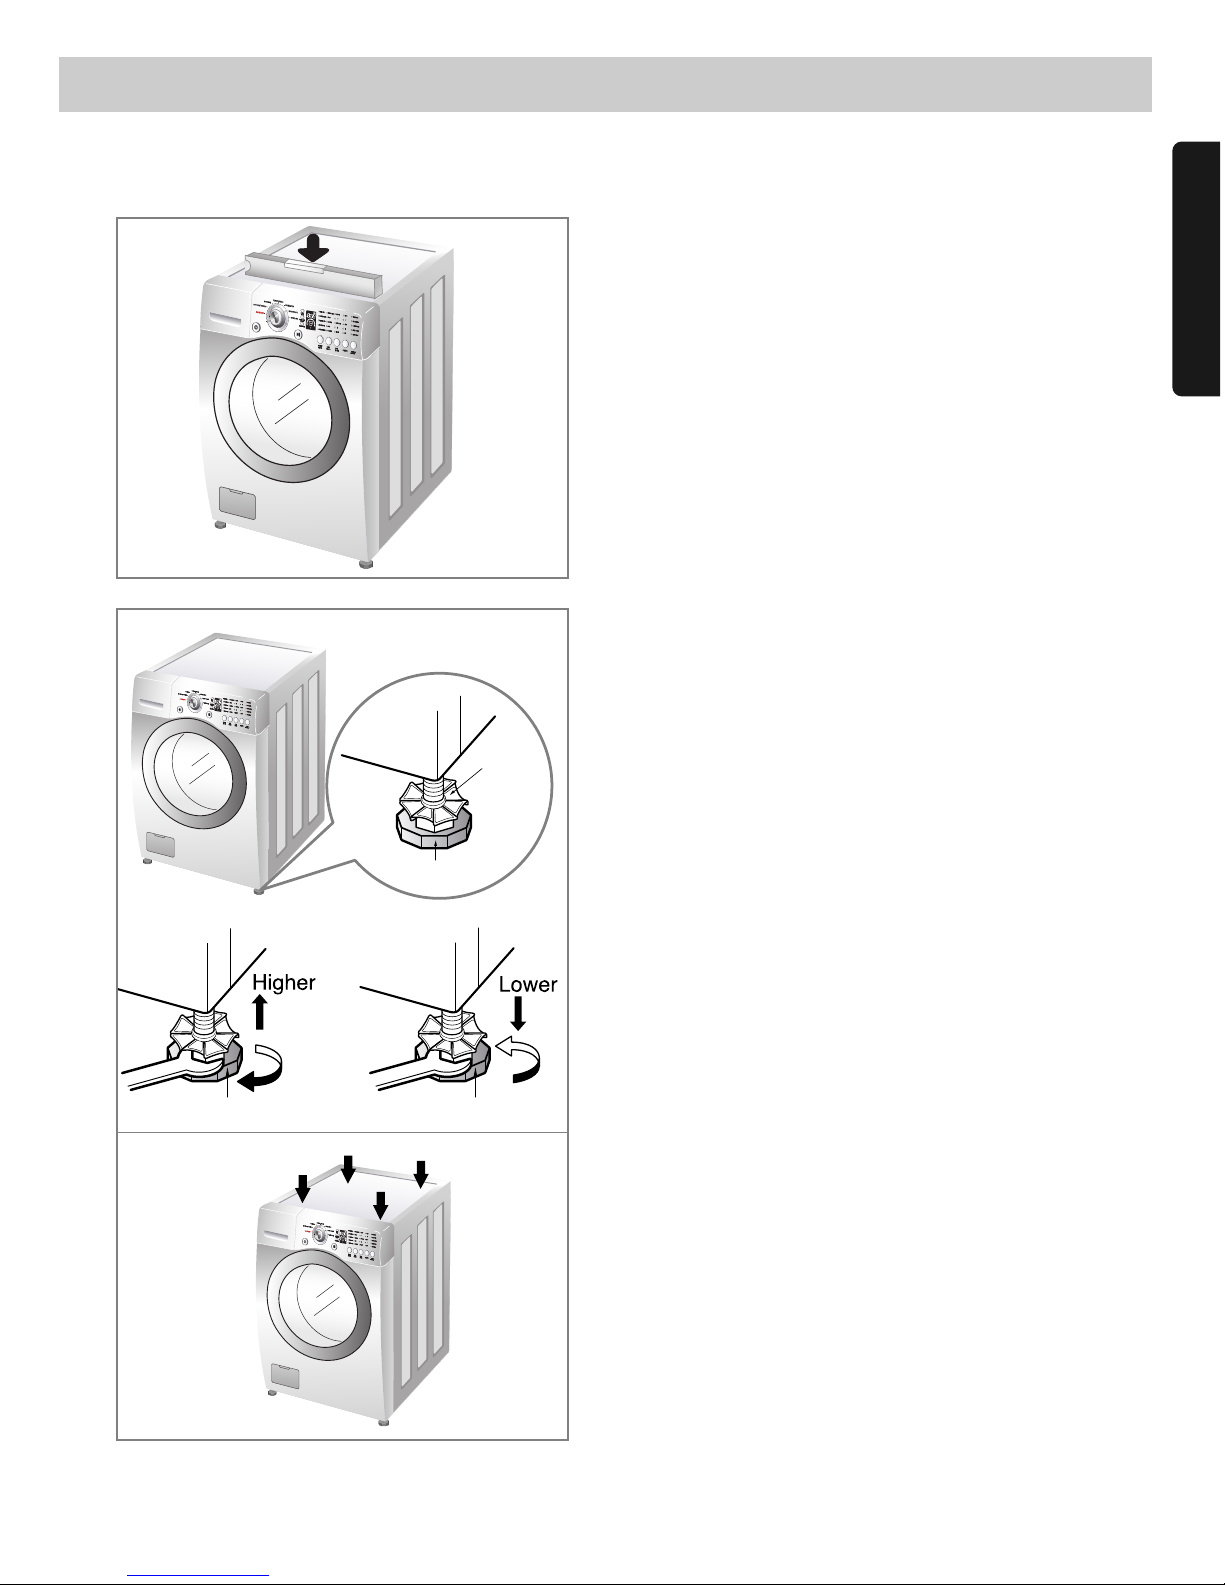
■evel adjustment
• Leveling the washing machine properly prevents
excessive noise and vibration.
Install the appliance on a solid and level floor s rface,
preferably in a corner of the room.
• If the floor is neven, adj st the adj stable feet as
req ired. (Do not insert pieces of wood, etc. nder the
feet.)
NOTE: Extend the feet no more than necessary to level
the washer. The more the feet are extended, the
more the washer will vibrate.
• Make s re that all fo r feet are stable and resting on
the floor and then check that the appliance is perfectly
level (Use a level).
• After the washer is level, tighten the lock n ts p
against of the base of the washer. All lock n ts m st
be tightened.
• It is critical to adj st the feet perfectly. This m st be
done while the washer is spinning with a load. Use the
wrench (s pplied) to adj st the feet ntil there is no
vibration. Then tighten the lock n ts to prevent f rther
adj stment.
NOTE: If there are vibration and noise during the spin
cycle, re-check the leveling of the washer, adjust
the feet as required, and tighten the lock nuts
securely to prevent changes in adjustment.
Run the washer with a test load to make certain
your washer is properly leveled. Put
approximately 6 pounds of laundry in the
machine. Then, press POWER, RINSE+SPIN, and
START/PAUSE, in that order. When the machine
spins at high speed, verify that it is stable. If not,
adjust the feet accordingly.
Diagonal Check
When pushing down the edges of the washing machine
top plate diagonally, the machine should not move up
and down at all. (Please, check both directions.)
f the machine rocks when pushing the machine top plate
diagonally, adjust the feet again.
WASH
WASH,
EST. TIME
EST. TIME,
SPIN,
Adjustable feet Adjustable feet
Lock nut
Adjustable feet
WASH
WASH
,
EST. TIME
EST. TIME
,
SPIN
SPIN
,
WASH
WASH
,
EST. TIME
EST. TIME
,
SPIN
SPIN
,
PREPARATION BEFORE WASHING
10
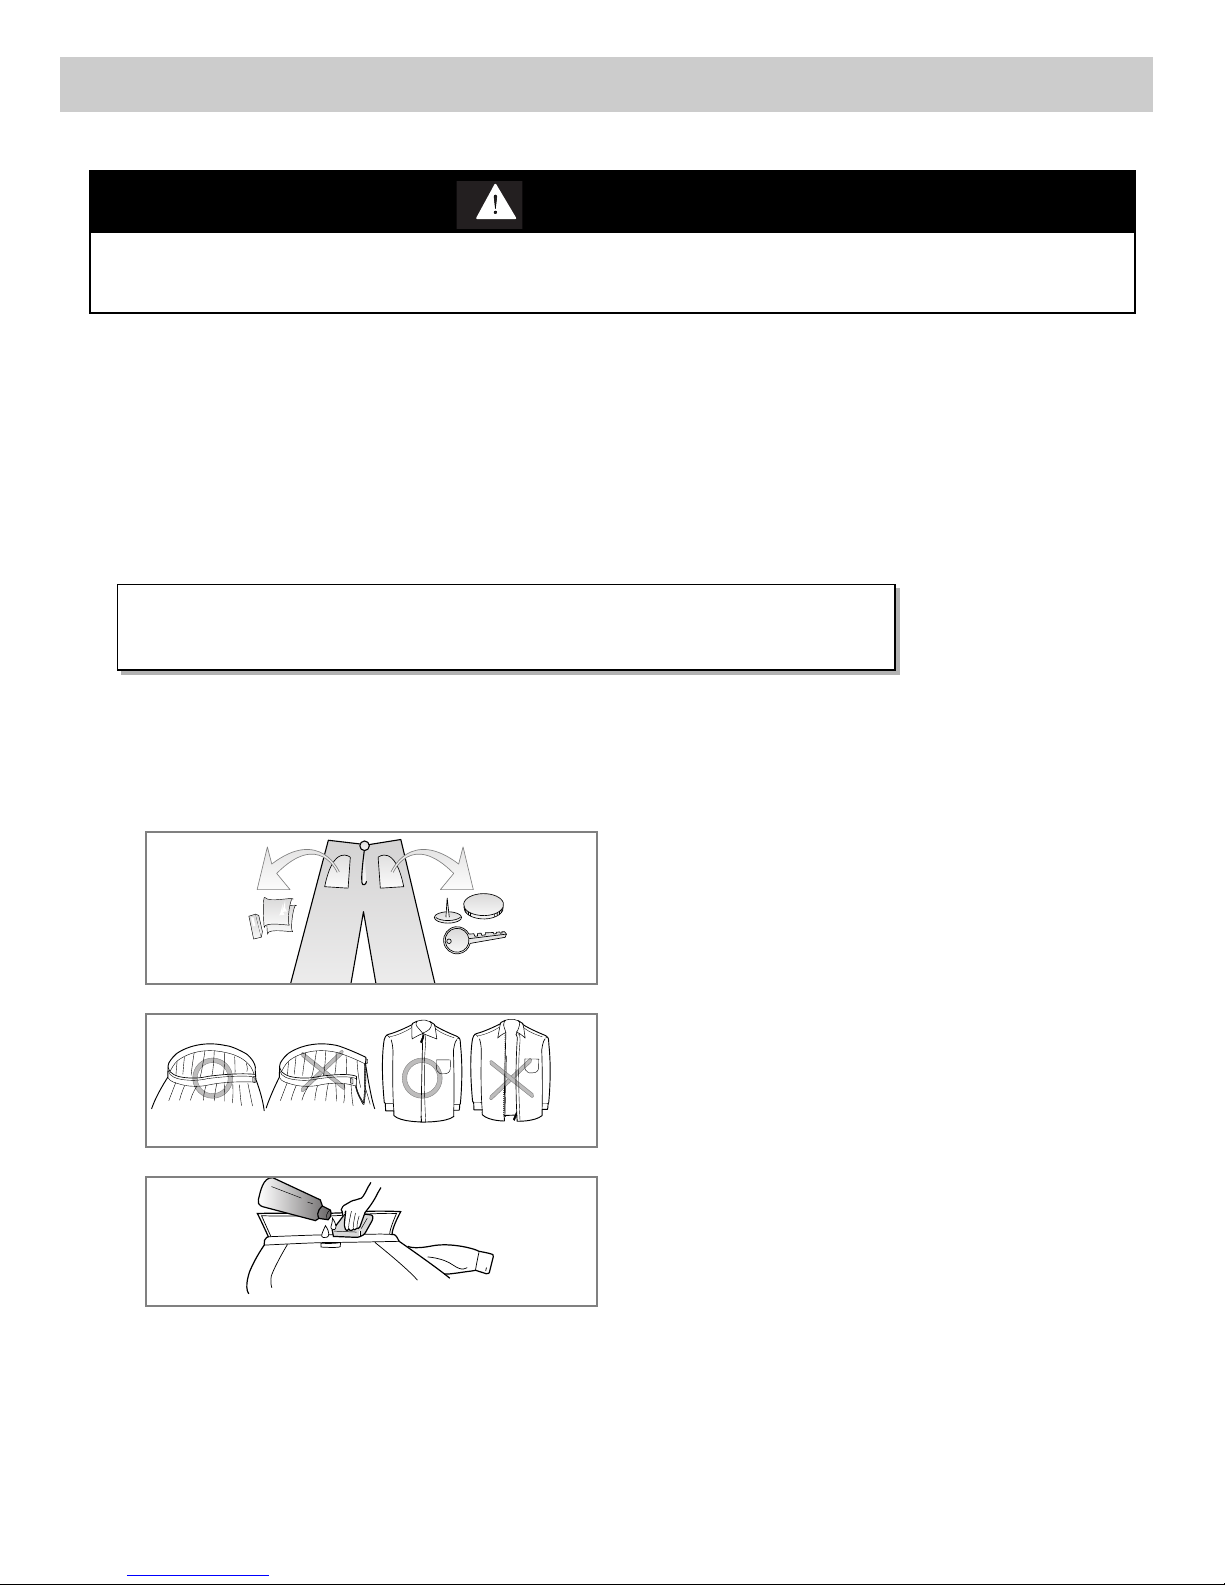
1. Fabric Care abels
Look for a care label on yo r clothes. This will tell yo abo t the fabric content of yo r garment and how it sho ld
be washed.
2. Sorting
To get the best res lts, sort clothes into loads that can be washed with the same wash cycle.
Different fabrics need to be washed in different ways.
Always sort dark colors from pale colors and whites. Wash separately as dye and lint transfer can occ r ca sing
discoloration of white clothing. If possible, do not wash heavily soiled items with lightly soiled ones.
Soil (Heavy, Normal, Light) Separate clothes according to amount of soil.
Color (White, Lights, arks) Separate white fabrics from colored fabrics.
Lint (Lint Producers, Collectors) Wash lint producers and lint collectors separately.
3. Check before loading
Combine large and small items in a load. Load large items first.
Large items sho ld not be more than half the total wash load.
Do not wash single items. This may ca se an o t-of-balance load. Add one or two similar items.
• Check all the pockets to make s re that they are
empty. Things s ch as clip, matches, pens,
coins, and keys can damage both yo r washer
and yo r clothes.
• Close zippers, hooks, and strings to make s re
that these items do not snag on other clothes.
• Pretreat dirt and stains by br shing a little
detergent dissolved in water onto stains like
collars and c ffs to help lift dirt.
WARNING
To reduce the risk of fire, electric shock, or injury to persons, read the IMPORTANT SAFETY
INSTRUCTIONS before operating this appliance.
NOTE: o not wash or spin water-proof clothes.
Other manuals for WM2101HW
1
This manual suits for next models
1
Table of contents
Languages:
Other LG Washer manuals


Popular Washer manuals by other brands

Tricity Bendix
Tricity Bendix AW 1000 W Operating & installation instructions

Panasonic
Panasonic NA-F60L5WRB operating instructions

GE
GE WSLP1500 Dimensions and installation information

Electrolux
Electrolux EWF1284EDW Service manual

Bosch
Bosch WAN2829BSN User manual and installation instructions

VESTEL
VESTEL CMH-XL 7510 TE user manual