LG F14U2TDHN User manual

WASHING MACHINESERVICE MANUALCAUTIONREAD THIS MANUAL CAREFULLY TO DIAGNOSE PROBLEMSCORRECTLY BEFORE OFFERING SERVICE.BEFORE SERVICING THE WASHING MACHINE, UNPLUG THE POWERCORD TO AVOID THE RISK OF AN ELECTRIC SHOCK. WHEN SERVICING INTERNAL PARTS, USE ONLY SERVICE PARTS SUPPLIED FROM LG. AFTER SERVICING THE ELECTRIC WIRE, INSURE THAT INSULATIONTAPE IS APPLIED TO PREVENT AN ELECTRIC SHORT.MODEL : F14U2TDH(P)(0~9)Nwebsite : http://biz.lgservice.come-mail : http://LGEservice.com/techsup.html

CONTENTS1.SPECIFICATIONS.................................................................................................................................................32.FEATURES & TECHNICAL EXPALNATION.......................................................................................................43.PARTS IDENTIFICATION ....................................................................................................................................64.INSTALLATION....................................................................................................................................................75.OPERATION .........................................................................................................................................................126.WIRING DIAGRAM / PCB LAYOUT...................................................................................................................197.TROUBLESHOOTING.........................................................................................................................................227-1.CHECK BEFORE SERVICE ...........................................................................................................................227-2.LOAD TEST MODE......................................................................................................................................227-3.HOW TO CHECK THE WATER LEVEL FREQUENCY ...............................................................................237-4.ERROR DISPLAY ..........................................................................................................................................247-5.TROUBLESHOOTING WITH ERROR .........................................................................................................26IE(Water Inlet Error) .............................................................................................................................
26
UE (Unbalanced Error) .........................................................................................................................27OE(Water Outlet Error) .......................................................................................................................28 FE (Over Flow Error) .............................................................................................................................30 PE (Pressure Sensor S/W Error) ..........................................................................................................31 dE2 (Door open Error).........................................................................................................................32 dE1 (Door switch Error) .......................................................................................................................32 tE (Thermistor (Heating) Error) .........................................................................................................33 LE (Motor Lock Error) ..........................................................................................................................348.TROUBLESHOOTINGWITHOUT ERROR CODES...........................................................................................36 Power Failure or no power...............................................................................................................36 Vibration & Noise during spin ...........................................................................................................37 Detergent & Softener does not flow in ...........................................................................................38 Before using the Tag On function....................................................................................................41 Water Leak ............................................................................................................................................399. DISASSEMBLY INSTRUCTIONS.....................................................................................................................435110.EXPLODED VIEW AND PART LIST ...............................................................................................................
3
1.SPECIFICATION
ITEM
POWER SUPPLY
PRODUCT WEIGHT
WASHING
SPIN
REVOLUTION
SPEED
DRY
WASH
SPIN
CONTROL TYPE
WASH CAPACITY
DIMENSION
WASH COURSE
TEMP
DOOR SWITCH TYPE
INTELLIGENT DRYING
Automatic
Adapted
Adapted
Adapted
Adapted
11 Items
Adapted
Adapted
Adapted
Adapted
3~19Hours
Cotton,Cotton Large,Mix,Easy Care,Duvet,Allergy Care,
Steam Refresh,Sports Wear,Gentle Care,Stain Care,
Direct Wear,Quick 30,Wash+Dry(5kg),Download Cycle
Electronic
OPERATION WATER PRESSURE
WASH HEATER
STEAM
DRIAN MOTOR
ELECTRICITY
CONSUMPTION
220V~,60Hz
F14U2TDH(P)(0~9)N
PRESERVATION
SENSING LAUNDRY AMOUNT
FUZZYLOGIC
ERROR DIAGNOSIS
POWER AUTO OFF
AUTO RESTART
TIME SAVE
CHILD LOCK
DISPLAY REMIANING TIME
No Spin/400/800/1000/1200/1400rpm
50rpm
0.3-10kgf/cm2(30-1000kPa)
8.0kg
600mm(W)x560mm(D)x850mm(H)
Cold/20/30/40/60/95℃
170W
550W
35W
2100W
67kg
1250W
1250W
42.FEATURES & TECHNICAL EXPLANATION2-1.Product FeaturesInverter Direct Drive system
The advanced Brushless DC motor directly drives the drum without belt and pulley.Low noise speed control system
By sensing the amount of load and balance, it evenly distributes loadto minimize the spinning noise level.Child Lock
The Child Lock prevents children from pressing any button to changethe settings during operation.More economical with Intelligent Wash system
Intelligent Wash System detects the size of load and water temperature,and then determines the optimum water level and washing time tominimize energy and water consumption.Turbo Wash
Wash the laundries in 1 hour with energy and water saving.Tag on
This is a function that may use Diagnosis, Download Course, WashingCoach, One Touch Washing, etc. when you touch the Tag On logo ofthe washing machine by using your smartphone with NFC. 6 Motion
Washer is able to perform various drum actions or a combination ofdifferent actions depending on the wash program selected. Combined with a controlled spin speed and the ability of the drum torotate both left and right, the wash performance of the machine is greatlyimproved, giving you perfect results every time.Auto Restart
Auto Restart allows the program to restart all by itself in case of powerfailure. It does from the stage where it stopped.SmartDiagnosis™
Should you experience any technical difficulty with your washingmachine, it has the capability of transmitting data by phone to theCustomer Information Center. The call center agent records the datatransmitted from your machine and uses it to analyze the issue,providing a fast and effective diagnosis. Steam Wash & Steam Refresh
The characteristics of steam washing is rising washing performanceby low-energy ascension. Steam refresh process can reduce the creasesin clothes.
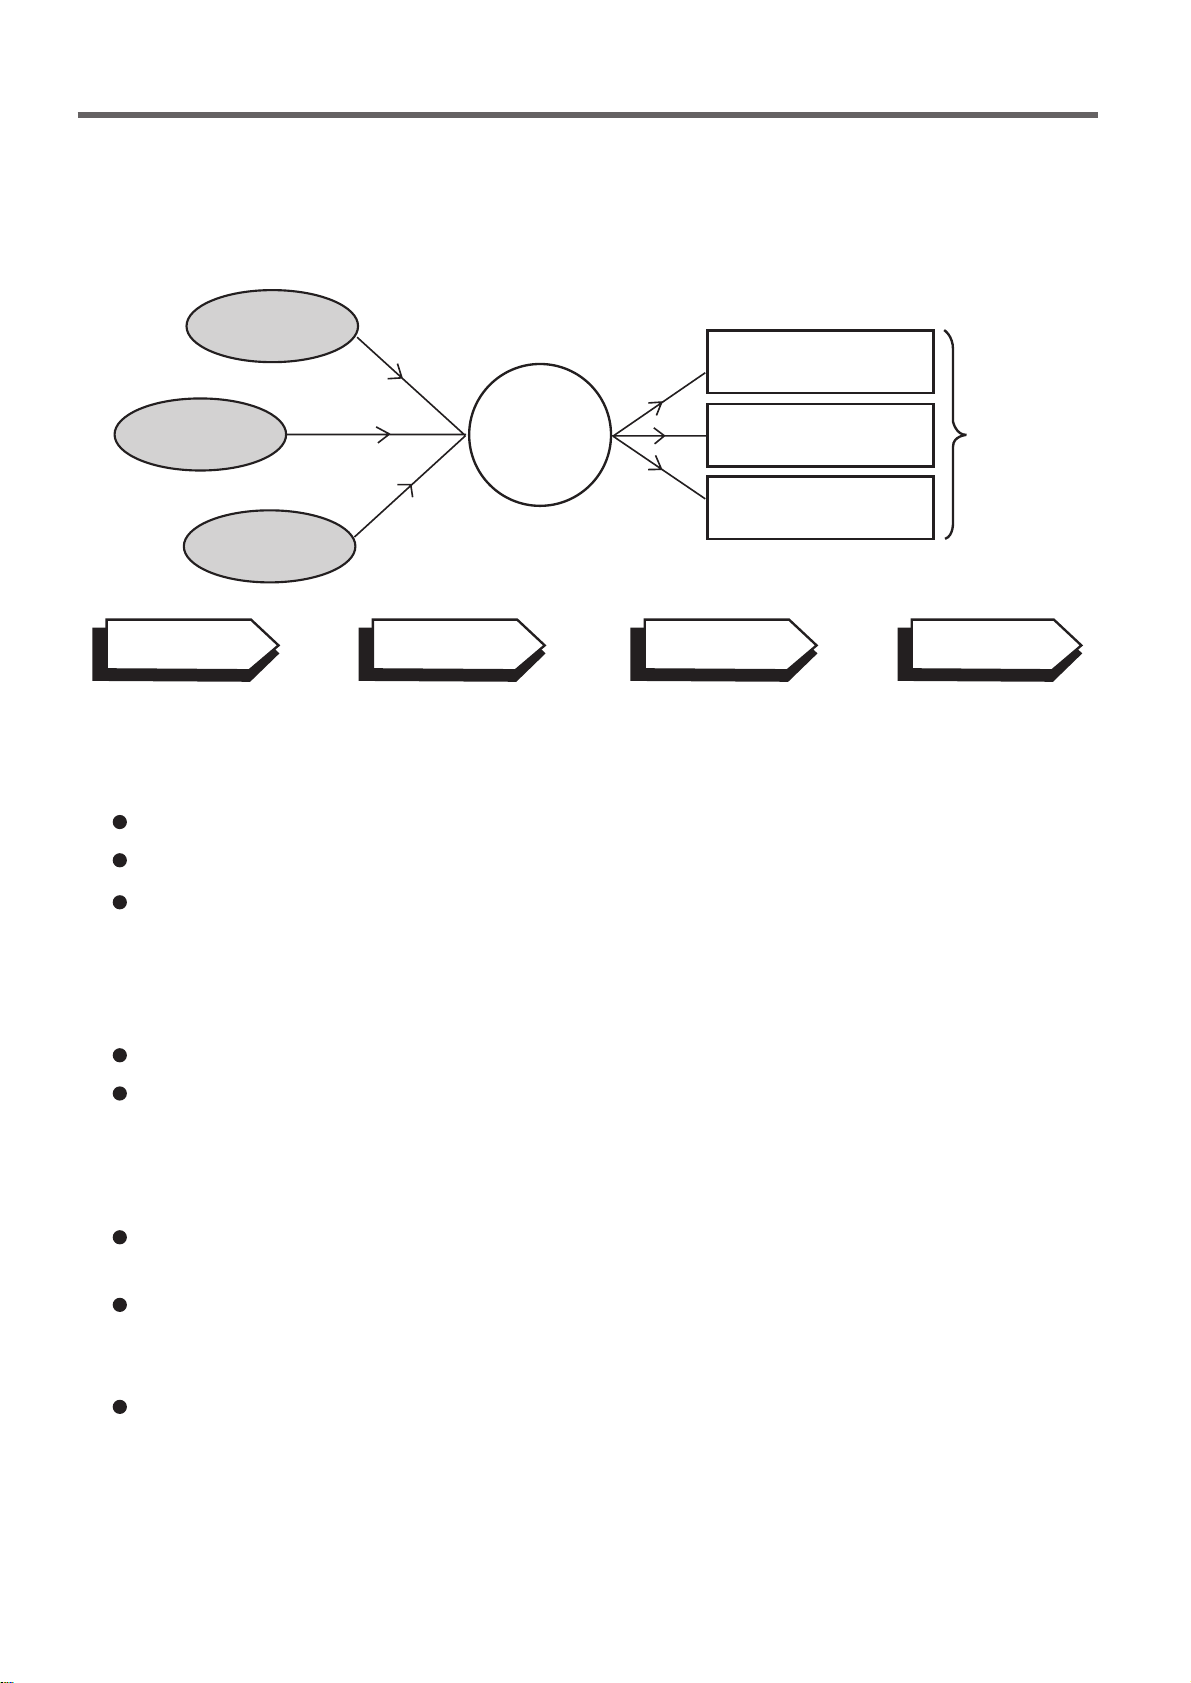
52-2. DETERMINE WASHING TIME BY FUZZY LOGICTo get the best washing performance optimal time is determined by sensing the watertemperature, selected washing temperature and laundry amount.2-3. WATER LEVEL CONTROLThis model adopts a pressure sensor which can sense the water level in the tub.
Water supply is stopped when the water level reach the preset level, then washing program proceeds.
Spinning does not proceed until the water in the tub reduces to a certain level.watertemperaturewashing timerinse timethe bestwashingperformancespin rhythm, timelaundryamountFUZZYLOGICselectedwashingtemperatureSENSINGEFFECTPROCESSING
DETERMINATION
2-4. THE DOOR CAN NOT BE OPENEDWhile program is operating.WhileDoor Locklight is on.2-5. NFC (Tag On Function)The Tag On function can only be used with smart phones equipped with the NFC function and based on the Android operating system (OS).Position your smart phone so that the NFC antenna on the back of your smart phone matches the position of the Tag On icon on the appliance.NFC reading performance of your smart phone must be higher thana certain level for using this function.

63.PARTS IDENTIFICATION
Power supply : 220 V~, 60 HzSize: 600 mm (W) X 560 mm (D) X 850 mm (H)Weight: 67 kgName: Front loading washing machineMax.Watt : 2100 W0.45 W (The off-mode, The left-on mode)Wash capacity: 8 kg Permissible water pressure: 30 - 1000 kPa (0.3 - 10.0 kgf / cm )
2
The appearance and specifications may vary without notice to improve the quality of the unit.
(For detergent and fabric softener)
DrawerDrain hoseTransit boltsPower plugControl panelDrain pump filterLower cover cap
• If the supply cord is damaged,it must be replaced by themanufacturer or its service agentsor a similarly qualified person in order to avoid a hazard.
DrumDoorDrain plugAdjustable feet
Accessories
Inlet hoseSpanner
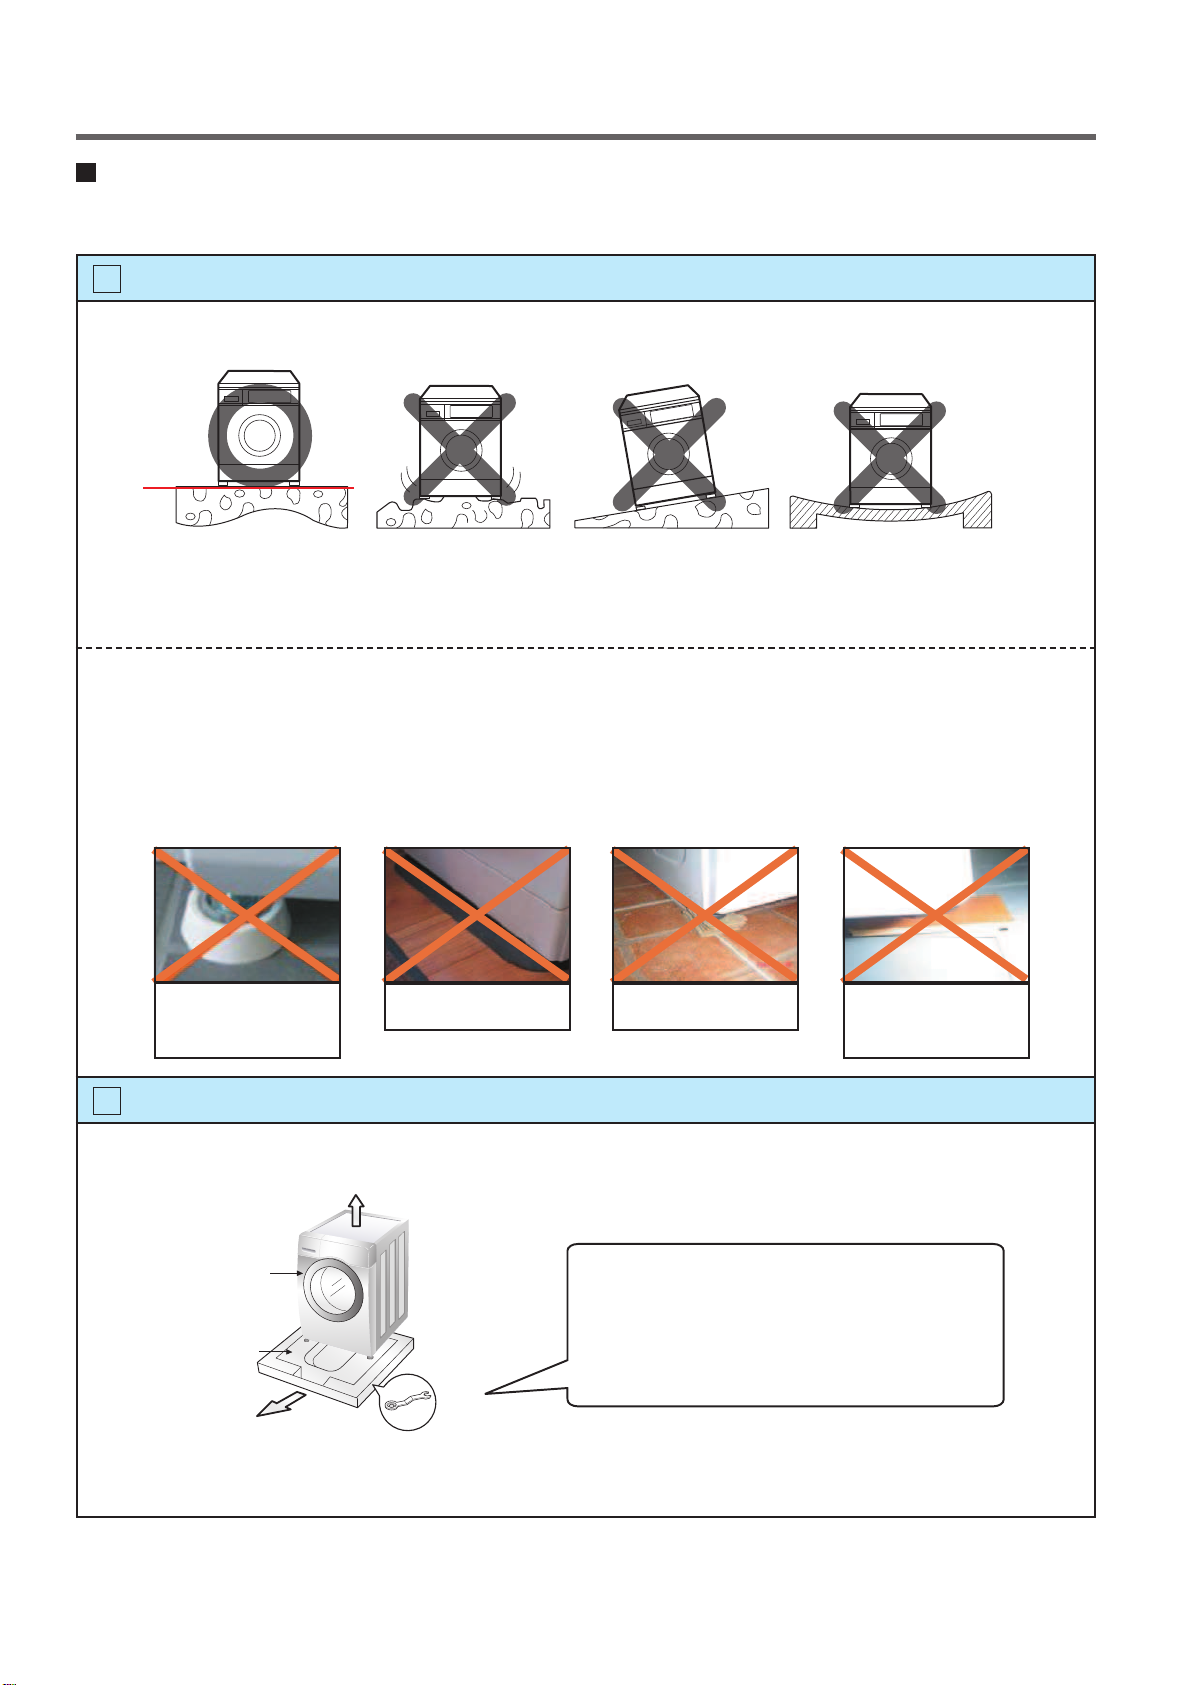
74.INSTALLATIONINSTALLATIONThe appliance should be installed as follows.Check the conditions of installation area.1. Check level ground.On raised foundations or upper level homes, the vibrationscan be caused by the type of flooring. It may be necessary to movethemachineto a different area in the home or have the floorreinforced to properly support the operation of the unit.2. Check for humidity or any foreign objects under the feet.Clean the floor, there should be no foreign objects under the feet.If the unit has foreign objects underneath the feet, this will prevent the unit from being leveled properly and will cause vibrationsandslipping.Remove any foreign objects, if any from underneath the machine and level unit properly.See below for examples of foreign objects.1Open the box and check appliance condition.2horizontalCarpetPaperLaminatedpaperPurchasedstopper
Base PackingWasherSpanner
This leveling (or spanner) wrench mustbe used to remove the shipping boltsand level the unit. This should be keptfor future use.

8
1.2.3.1.2.3.

9Connect Drain Hose.6Connect power plug.7If the drain hose is not installed properly, the unit will not drain properly.This allows water to back flow into the unit which can cause odors.Refer to Owner Manual for proper drain hose installation.The odor could also be coming from the home’s drain to which the drain hose is attached.In this type of drain hose installation, the odor could be coming from the standpipe.This odor can come up the drain hose and into the unit.Pour a cup or two of bleach or vinegar down the home drain and let it sit for 24 hours before running another cycle.This will help eliminate odor from the home drain. If a cycle is started too soon after doing this, it will not help the issue.Connect the power plug to the wall outlet.Avoid connecting several electric devices, it may be the cause of a fire.about 100 cmabout 145 cmabout 105 cmLaundry tubMax. 100cmmin. 60cmMax. 100cmmin. 60cmRetainerTiestrapHose
min. 60 cmmax. 100 cm
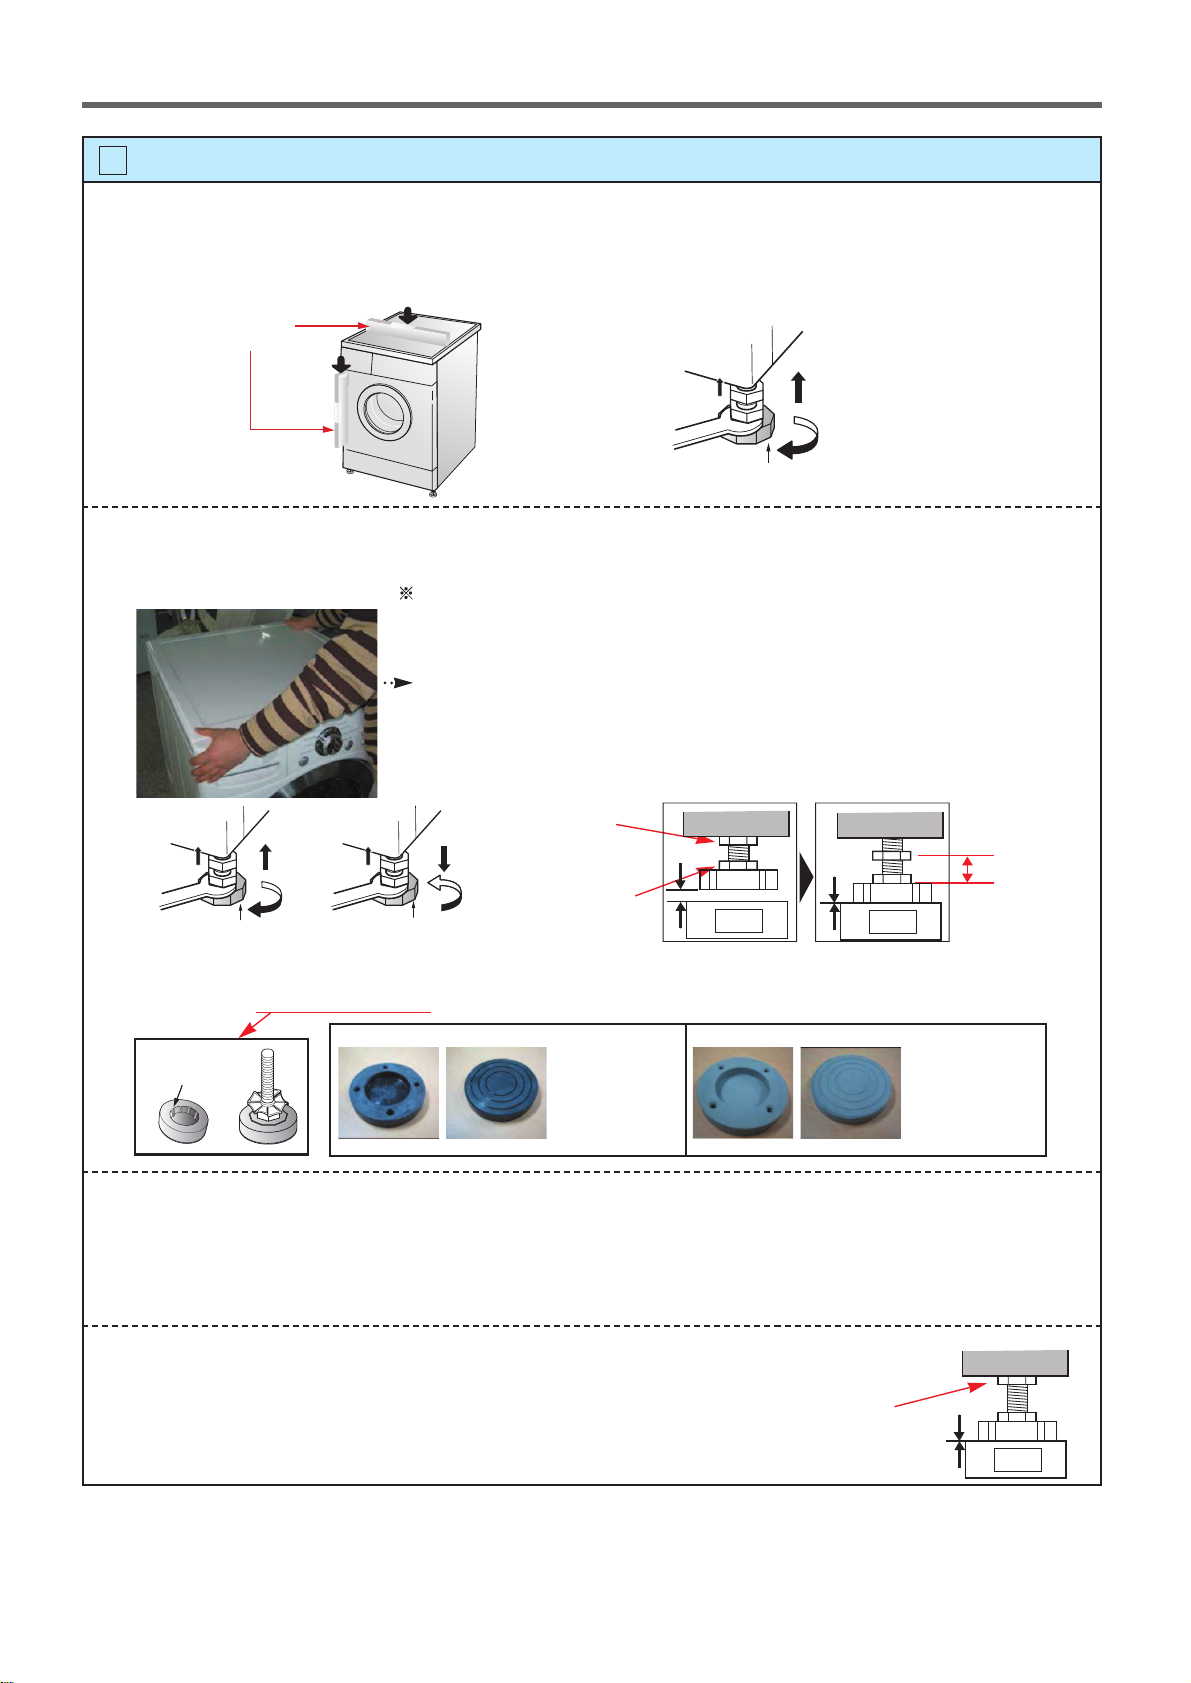
10Rubber CupCheck the horizontality with a level (Gage).8Step 1If washing machine legs are loose or not Screwed in, then tightenwith the spanner wrench. Using the level, level the washing machine from front to back and side to side.Step 2Use the spanner wrench to adjust Legs until level and try the Diagonal test.Step 3Perform a Rinse and Spin with some clothing in the machine.To do this, put 2~3kg of clothing in the unit, turn on the unit, Select the Rinse+Spin and then start. When the unit reaches the spin cycle, watch for vibrations.If the unit is vibrating, make small adjustments to the leg until they subside. (Repeat step 2)Step 4Tightenthe lock nut against the base of the machine to locktheposition leg.Lower the foot until there is no gap between floor and foot.And only use adjustment rubberwhen difference at the leg adjustment is more than 10mm.
Place your right hand on the back, right corner and your left hand on the front,left corner of the unit, then attempt to rock the unit from corner to corner.Then, move your right hand to the front, right side and your left hand to theback, left corner and attempt to rock the unit from corner to corner.If the unit is level, it will not rock. However, if the unit is not level, it will rock.If the unit rocks, it will be necessary to adjust the leveling feet of the unit.Adjust the foot under the hand that is on the front of the machine.
How to perform a diagonal test:A levelHigherTightenAdjustable feetDiagonal testTightenAdjustable feetHigherTightenAdjustable feetLower
4620ER4002B(Gray)for Wooden floors
Rubber Cup
4620ER4002A(Black)for Tile floors
Lock nut10mmAdjustable boltTighen the lock nutFloorNo GapFloorNo GapFloorGap
This manual suits for next models
20
Table of contents
Other LG Washer manuals


Popular Washer manuals by other brands

Tricity Bendix
Tricity Bendix AW 1000 W Operating & installation instructions

Panasonic
Panasonic NA-F60L5WRB operating instructions

GE
GE WSLP1500 Dimensions and installation information

Electrolux
Electrolux EWF1284EDW Service manual

Bosch
Bosch WAN2829BSN User manual and installation instructions

VESTEL
VESTEL CMH-XL 7510 TE user manual


