Kuppersbusch ESW Series User manual

Valid: 10/2001
OPERATING AND
INSTALLATION
INSTRUCTIONS
for honeycomb cooking areas with sensor control
Series ESW/EKW

Conditions of guarantee
The conditions of guarantee applicable for this product are
subjeci to those published by the representative in the
relevant country.
Details regarding same may be obtained from the dealer
from whom the appliance was purchased. For claims under
guarantee the sales receipt must be produced.

Contents
Safety instructions ................................... 4
for connection and functions . . .................................... 4
for the cooking zones ......................................... 4
What to do before using the appliance for the first time ................ 5
Advice on the right type of saucepans ................................... 5
Sensor operation of the control honeycomb .......................6
Switching on the appliance . . . .................................... 7
Switching all functions off . . . .................................... 7
Setting the cooking zones . . . .................................... 7
Cooking without the automatic boost function . . .............................. 7
Cooking with the automatic boost function . . . .............................. 8
Switching off the cooking zones . .................................... 8
Switching on the dual-circuit cooking zone (EKW 306.1) . . . ........................ 8
Switching off the dual-circuit cooking zone . . .............................. 8
Activating the childproof lock . . .................................... 9
Cancelling the childproof lock . . .................................... 9
The minute minder ..........................................10
Automatic switch-off .........................................10
The residual heat display ........................................11
Other functions . . ..........................................11
Cleaning and caring for your appliance ........................12
Troubleshooting ....................................12
The honeycomb dimensions at a glance ........................13
Honeycomb cooking element EKW 307.0 / 306.0 / 306.1 . . . ........................13
Honeycomb sensor element ESW 308.6 . . . ..............................13
Cutting an opening in the worktop ...........................14
Cutting an opening in worktops made of wood or synthetic materials .......................14
An example of the dimensions of the honeycomb hob system . ........................14
The opening for the heating element controls . . ..............................15
Notes on installation ..........................................15
Cutting an opening in worktops made of stone . ..............................16
Bonding the honeycomb cooking zones in place . ..............................17
Notes on further information material ...................................17
Electrical connection ..................................18
Connecting the cooking honeycombs to the control honeycomb . ........................18
Connecting the appliance to the mains ..................................18
Connecting the cooking honeycombs to the built-in oven or control element . . ..................19
Examples of the correct allocation of the control units .............................19
3

Safety instructions
for connection and functions
"Küppersbusch cookers are manufactured in accordance
with the applicable safety regulations.
"The cookers may only be connected up to the mains,
serviced and repaired by a qualified electrician according
to the valid safety regulations. Work carried out incorrectly
will endanger your safety.
"When the appliance is connected up it must be ensured
that there is a device which makes it possible to disconnect
it from the mains at all poles with a contact opening width
of at least 3 mm. Line-protecting switches, fuses or
contactors are suitable cut-out devices.
"For honeycomb combinations with a depth of more than
500 mm, use only worktops with a depth of at least
650 mm.
"Caution:
The honeycomb sensor control element must not be
exposed to severe mechanical shocks!
"The surfaces of the heating and cooking zones become
very hot when in operation.
Therefore always take care and make sure to keep
children away.
for the cooking zones
"Overheated fat and oil may ignite spontaneously. Food
cooked in fat and oil, e.g. chipped potatoes, should not be
left unattended. Never use water to extinguish burning fat
and oil! Place the lid on the pan, switch off the cooking
zone and remove the pan from the cooking zone.
"If cracks, fractures or any other defects appear on your
glass ceramic hob, switch off the honeycomb combination
as quickly as possible. Disconnect the mains fuse imme-
diately and call Customer Service.
"If a cooking zone cannot be switched off due to a fault in
the sensor control, disconnect the mains fuse immediate-
ly and call Customer Service.
"Be careful when using other kitchen appliances. Electric
cables must not be allowed to come into contact with the
hot cooking zones.
"Do not deposit items on the honeycomb hob which do no
belong there.
"Do not place combustible or inflammable objects onto the
hob as this might present a potential hazard if the applian-
ce is switched on unintentionally.
"Do not switch on the cooking zones if you are not cooking
anything. Never use the honeycomb cooking zone to heat
the room! This would result in improper operating con-
ditions.
"Do not place aluminium foil or plastic onto the cooking
zones. Keep everything away from hot cooking zones
which is likely to melt, e.g. plastic, foil, and in particular
sugar and foods with a high sugar content. Immediately
remove any sugar while it is still hot with the help of a
razor blade scraper in order to prevent damage.
"Do not allow dirt or food which has boiled over to become
encrusted by repeated use of the hob.
"Calcium deposits will damage the honeycomb hob.
"If you keep any pets which could come near the hob, the
childproof lock must be activated.
4

What to do before
using the appliance
for the first time
Remove excess materials and packaging. Before preparing
food for the first time, clean the honeycomb hob with a
damp cloth and a small amount of washing up liquid.
The hob is resistant to temperature shocks (cold and heat)
and is also otherwise highly resistant.
Make sure that no hard objects are dropped onto the hob.
Impacts concentrated on a small point may result in fracture.
Please follow the cleaning and maintenance instructions.
Above all, keep the sensor pads clean as soiling may
otherwise be interpreted as finger contact. Never place
objects (pans, tea-cloths, etc.) on the sensor pads! If the
contents of saucepans boil over onto the sensor pads, we
recommend that you operate the central ON-OFF sensor.
When the cooking zones are switched on, the heating may
hum for a short while. This is due to technical reasons and
has no influence on the appliance’s quality or functions.
Hot saucepans must not be allowed to cover the sensor
pads, as this will cause the appliance to switch off
automatically.
Hot saucepans should only be placed onto stone worktops.
Never pull hot saucepans onto or across worktops with
surfaces made of synthetic materials, e.g. Resopal, Duropal,
etc., or worktops made of
CORIAN. Always place
saucepans on the honey-
comb saucepan stands,
item no. 041.
Advice on the right type of saucepans
Only use pots and pans with a flat, smooth base.
Saucepans with concave bases take considerably
longer to heat up and also increase energy
consumption. Saucepans with rough bases
will scratch the surface of the ceramic hob if
they are slid about. When using kitchenware
made of heat-resistant glass or china, please
observe the manufacturer’s instructions.
Choose a pot or saucepan whose diameter matches that
of the cooking zone.
This will save energy, reduce cooking times
and avoid overheating the cooking zone.
When cooking, always put a lid on the sau-
cepan.
This will save a lot of energy. Food and liquids
only boil over when the temperature is too
high. You can adjust the temperature precisely
for the individual cooking zones. With a little
experience you will soon find the right heat
setting, so that nothing will boil over, even when a lid is on
the saucepan.
5

Sensor operation of the control honeycomb
As you can individually select the number and position of
the honeycomb cooking zones, the sensor honeycombs also
have to conform to the configuration you design. Your creativity
can be given free rein. The markings in the control
honeycomb repeat the layout of the cooking zones on the
worktop, so operation is as clear and simple as possible.
Aand B
Control fields for the minute minder with plus and
minus pads
CMinute minder
DControl fields for the cooking zones with plus and minus-
sensors (the layout is only shown as an example)
A sensor honeycomb can control up to 6 honeycomb
cooking zones. If more than 6 honeycomb cooking zones
are to be combined, a second sensor honeycomb will be
required. The sensor honeycomb always includes a control
for dual-circuit cooking zones and the automatic boost
function as well as a childproof lock which functions by
deactivating the electronic system.
ELock pad
F Lock pad for childproof lock
(Sensor-lock)
GON-OFF pad
HThis field has no control functions.
It merely indicates the position of the control honeycomb.
6

Cooking
setting 1-3 4-5 6-8 9
Suitable
for
heating,
warming,
soaking and
swelling,
defrosting
steaming,
poaching,
boiling
roasting
heating
large
quantities
Switching on the appliance
Touch the ON-OFF pad for about 2 seconds. A vertical bar
will light up above the lock pad (sensor lock).
The appliance is now ready to be put into operation (standby
mode).
Each cooking zone can now be controlled individually.
Switching all functions off
Briefly touch the ON-OFF pad (for about 0.3 seconds). The
vertical bar will be extinguished.
The control honeycomb switches off again automatically:
– if no further pad is touched within 20 seconds *,
– if it is left unused for 10 minutes after operation or
– if the sensor pad of a cooking zone is touched for longer
than 20 seconds *.
* An acoustic signal already sounds after 10 seconds to
warn you that the appliance will switch off after another
10 seconds.
Setting the cooking zones
One cooking zone has 9 settings (1-9).
The settings are shown in the displays for the individual
cooking zones.
The required setting is selected by touching the plus pad
(cooking without the automatic boost) or by touching the
minus pad (cooking with the automatic boost).
There is no zero setting.
All the cooking zones are provided with an automatic boost
function.
Cooking without the automatic
boost function
Touch the plus pad. The cooking zone switches on at
setting 5. Now select the desired setting.
2 secs.
0.3 secs.
7

Cooking with the automatic boost
function
Touch the minus pad. The cooking zone switches on at
setting 9 and the automatic boost function is activated. Now
turn the heat down to the required setting. When the auto-
matic boost has finished, the cooking zone automatically
switches back to the selected setting.
During automatic operation, an ”A” blinks in the display
alternately with the selected setting.
At the same time, it is possible to switch backwards and
forwards between the individual heat settings; the remaining
time for the automatic boost function remains unaltered.
Switching off the cooking zones
Touch the plus pad and the minus pad simultaneously for
about 3.5 seconds.
Make sure that the display goes out,
or
Touch the minus pad.
The settings count down.
After setting 1, setting 0 is displayed for 2 seconds. Then
the cooking zone will switch off.
Switching on the dual-circuit
cooking zone (EKW 306.1)
The standard function is for the cooking zone with the
smaller diameter to heat up. If you are using larger sauce-
pans, you can also switch on the outer zone with the larger
diameter.
Dual-circuit cooking zones are indicated by a flashing dot in
the relevant display.
Touch the plus pad and the minus pad at the simultaneously
for about 1 second. The pilot light next to the display for the
cooking setting lights up and an acoustic signal will be
heard.
Switching off the dual-circuit
cooking zone
Touch the plus pad and the minus pad simultaneously for
about 1 second. The pilot light next to the display for the
cooking setting will go out and an acoustic signal will
indicate that the outer cooking zone has been switched off.
3.5 secs.
1 sec.
1 sec.
8
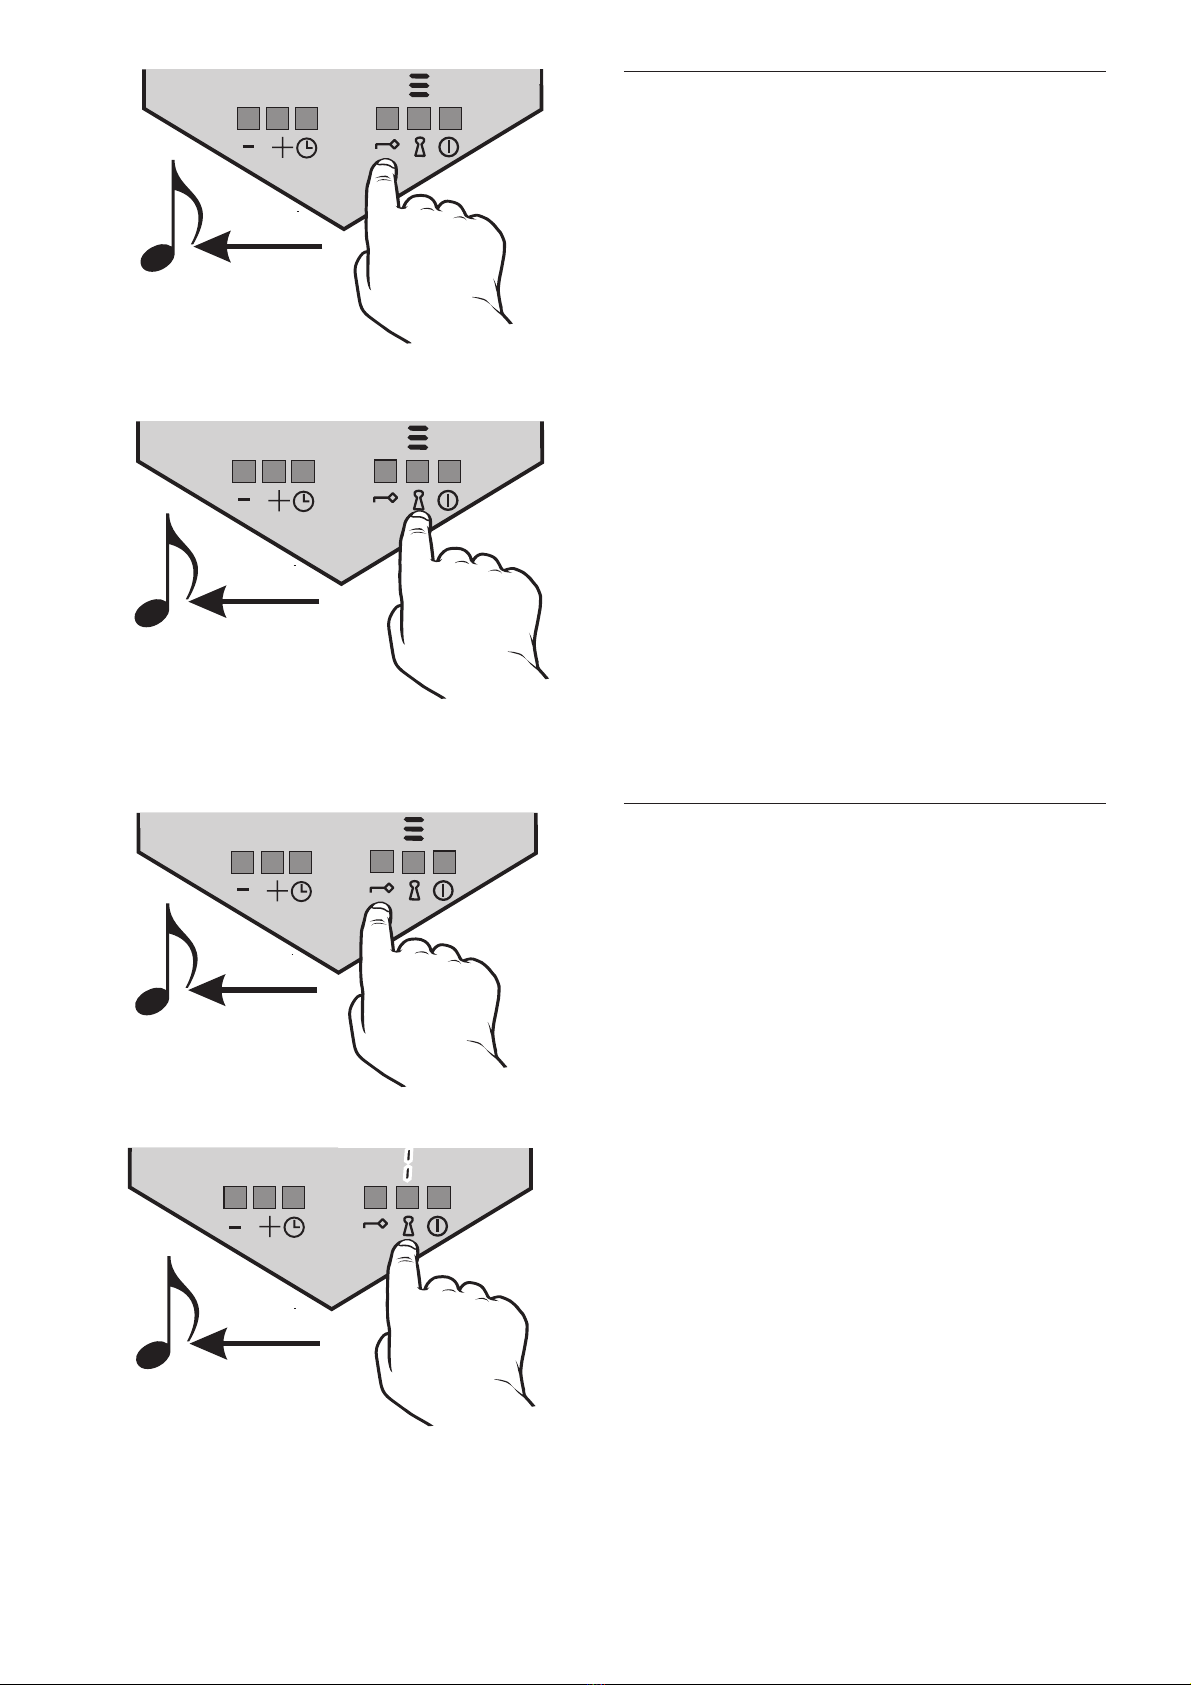
Activating the childproof lock
The childproof lock, which consists of a key and a lock
sensor, can be used to protect the appliance against un-
authorised use by locking the settings. In order to use the
childproof lock the hob must be switched on.
First of all, touch the key pad until you hear an acoustic
signal.
Then touch the lock pad until you hear an acoustic signal.
When the childproof lock is activated, this is indicated by
3 vertical bars instead of the standby indicator.
The childproof lock can also be activated while you are
cooking. The cooking settings of the cooking zones then
cannot be turned down or turned up.
The childproof lock will remain active even after the appliance
has been switched off.
Cancelling the childproof lock
To put the appliance back into standby status, you must
cancel the childproof lock.
To do this, first touch the key pad until you hear an acoustic
signal.
Then touch the lock pad until you hear an acoustic signal.
When the childproof lock has been cancelled, the standby
indicator will appear in the vertical bar.
9

ei
The minute minder
The minute minder has two purposes: to switch off func-
tions and to serve as a reminder. It can be set for a maxi-
mum of 99 minutes. It is activated by touching the plus pad
or the minus pad.
The time can be set by touching the plus pad (starting at 0)
and the minus pad (starting at 99).
Touching both the plus pad and the minus pad simultaneously
will reset the minute minder to 0.
When the set time has come to an end, a signal will sound
for about 30 seconds.
”00" will flash in the display.
The signal can be interrupted before it has come to an end
by simultaneously pressing the plus pad and the minus pad.
Automatic switch-off
Set the minute minder to the desired time period.
The cooking zone which is to be switched on is selected via
the Minute Minder pad. A pilot light in the clock symbol of
the corresponding operation field shows which cooking zone
is currently selected.
If the pad is touched for a longer period of time, the next
cooking zone will be selected.
When you have reached the desired cooking zone, remove
your finger from the pad.
After 5 seconds the selection is confirmed by an acoustic
signal.
The cooking zone is now set, but the time can still be
varied.
If the plus pad and the minus pad are touched simultaneous-
ly, this will deactivate the automatic switch-off function and
reset the clock to 0.
When the time has expired, the selected cooking zone will
switch off automatically. A signal will sound for about
30 seconds.
10
This manual suits for next models
1
Table of contents
Other Kuppersbusch Cooker manuals

Kuppersbusch
Kuppersbusch EKDG 6800.0-75 User manual

Kuppersbusch
Kuppersbusch CM6330.0 User manual

Kuppersbusch
Kuppersbusch KEH 650.0 Quick setup guide

Kuppersbusch
Kuppersbusch EEH 7375.0 Quick setup guide

Kuppersbusch
Kuppersbusch CBM6330 0 Series Instruction Manual

Kuppersbusch
Kuppersbusch GEH 640.0 Quick setup guide

Kuppersbusch
Kuppersbusch GEH 630.0 Quick setup guide

Kuppersbusch
Kuppersbusch KEH 652 Quick setup guide

Kuppersbusch
Kuppersbusch GH 606.0 E User manual


