KitchenAid KHGL 7510/B User manual

KHGL 7510/B
Instructions for use


Product description and symbols 4
Using the burners 4
Practical advice on using the hob 5
Positioning the pan supports and WOK pan adapter 6
Installation distances and measurements (mm) 7
Injectors table 7
Warning and suggestions 8
Safeguarding the environment 9
Installation 10
Gas connection 10
Electrical connection 11
Installation 11
Adaption to a different type of gas supply 12
Replacing the injectors 12
Regulating the minimum flow level of the gas taps 12
General cleaning and maintenance 13
Care and maintenance of the hob parts 13
Troubleshooting guide 14
After Sales Service 14

1. Central removable pan support
2. Right removable pan support
3. Left removable pan support
4. Auxiliary burner
5. Semi-fast burner
6. Semi-fast burner
7. Professional WOK burner dual crown
8. Auxiliary burner control button
9. Semi-fast burner control button
10. Semi-fast burner control button
11. Professional WOK burner
control button dual crown
Control Symbols
Off
Maximum flame
Minimum flame
Product description and symbols
To turn on one of the burners:
1. Turn the corresponding control knob
anticlockwise until the indicator coincides with
the maximum flame symbol .
2. Press the control knob to ignite the burner.
3. Once the burner has been lit, keep the control
knob pressed for 5 seconds, allowing the safety
thermocouple to fitted to the gas burner to
engage. The safety thermocouple switches off
the gas supply to the burner should the flame
accidentally go out (a gust of wind or spillage, or
temporary interuption of the gas supply).
If the burner does not ignite within about 15
seconds, switch off the burner, check the
fitting of the burner cap and plate for correct
fitting. Wait at least 1 minute before trying
again.
If the burner goes out when the control knob
is released, the thermocouple did not engage.
wait al least 1 minute before repeating strps 1
to 3.
Using the burners
4

Read these instructions to get the best from your
hob:
- Use pans with a diameter suitable for the burner
you are using ( see table opposite)
- Only use plat bottomed pans
- Use the right amount of water for cooking the food.
Prevent unnecessary water loss by using the lid.
- Do not use pans that protrude over the edge of
the hob.
You should never use:
- Cast iron or steatite stone griddles or terracotta
pots or pans.
- Convectors such as metal netting or other.
- The use of two burners simultaneously with just
one container such as a fish kettle.
Important:
Do not rest and/or drag the pan supports upside
down on the hob as this could scratch it.
Failure to comply with these
recommendations could lead to your glass
ceramic hob getting damaged or broken and
the safety of your equipment being
compromised.
Burner Pan diameter
wok from 24 to 26 cm
semi fast from 16 to 24 cm
auxiliary from 8 to 14 cm
Practical advice on using the hob
5

To facilitate positioning of the pan supports on the hob, it is recommended to start by fitting the
right side one (1).
Right side pan support (1)
Fit the right side pan support ensuring that the burners’ caps pins are correctly centred (recesses for
the pins are provided on the underside of the pan support).
Central pan support (2)
Place the central pan support by the side of the right one. Slightly lift the right side pan support and
hook the central pan support underneath (recesses for the pins are provided on the underside of the
pan support).
Left side pan support (3)
Fit the left pan support, ensuring that the burner’s cap pin and the hooks on the side of the central
pan support are correctly positioned.
Positioning the pan supports and WOK pan adapter
321
6

If a hood is installed above the hob, read the instructions for fitting the hood where it indicates the correct
distances to be complied with.
Note: If the distance “A” between the kitchen wall cabinets is between 600 and 730 mm, height “B" shall
be at least 530 mm.
If the distance “A” between the kitchen wall cabinets is wider than the hob’s width, height “B” shall be at
least 400 mm.
Installation distances and measurements (mm)
560
+2
- 0
490 +2
-
0
730
510
45
min. R 6,5
max R 16
63 min.
Category II2H3+
Type of gas used Type of Injector
Control primary
Nominal heat Nominal Reduced heat Gas pressure (mbar)
burner label air (X) mm flow kW consumption flow kW min. nom. max
NATURAL GAS wok 145 6 4,20 400 l/h 1,50 17 20 25
(Methane) G20 semi-fast 95 - 1,65 157 l/h 0,35
auxiliary 78 - 1,00 95 l/h 0,30
LIQUID wok 95 11 3,80 276 g/h 1,50 20 28-30 35
PETROLEUM GAS semi-fast 67 - 1,65 120 g/h 0,35
(Butane) G30 auxiliary 50 - 1,00 73 g/h 0,30
LIQUID wok 95 11 3,80 272 g/h 1,50 25 37 45
PETROLEUM GAS semi-fast 67 - 1,65 118 g/h 0,35
(Propane) G31 auxiliary 50 - 1,00 71 g/h 0,30
Type of gas used Configuration Nominal heat Overall nominal Required air (m3)
model flow kW consumption for the combustion 1 m3of gas
G20 20 mbar 4 burners 8,5 809 l/h 9,52
G30 28-30 mbar 4 burners 8,1 589 g/h 30,94
G31 37 mbar 4 burners 8,1 579 g/h 23,80
Electric Power: 230 V - 50 Hz
Injectors table
7
181,6
274
22 16

To get the most out of your hob, please read
the instructions carefully and keep them for
future consultation.
• These instructions are only valid in the countries
whose destination symbol is shown on the serial
number plate on the hob.
• The packing (plastic bags, expanded
polyurethane, etc) pose a potential threat to
children and should be disposed of carefully.
• Check the appliance has not been damaged
during transportation and remove all
protective packing and films before
installation.
• This hob (cat. 3) was designed to be used
exclusively for cooking food in household
surroundings. Any other use (for example
heating rooms) should be regarded as
improper and dangerous.
• The installation and connection of this
appliance to a gas or electrical supply must
be carried out by a competant, qualified
person in compliance with current
legislation.
• This appliance should be installed in
compliance with standards in force and
only used in well ventilated rooms. Read
the instructions before installing and using
this appliance.
• The pre-fitted gas connector and it's supply
pressure are shown on the label attached
to the bottom of the hob. If this type of gas
supply is not being used, please refer to
the section called Adaption to different
types of gas supply on page 11.
Note:
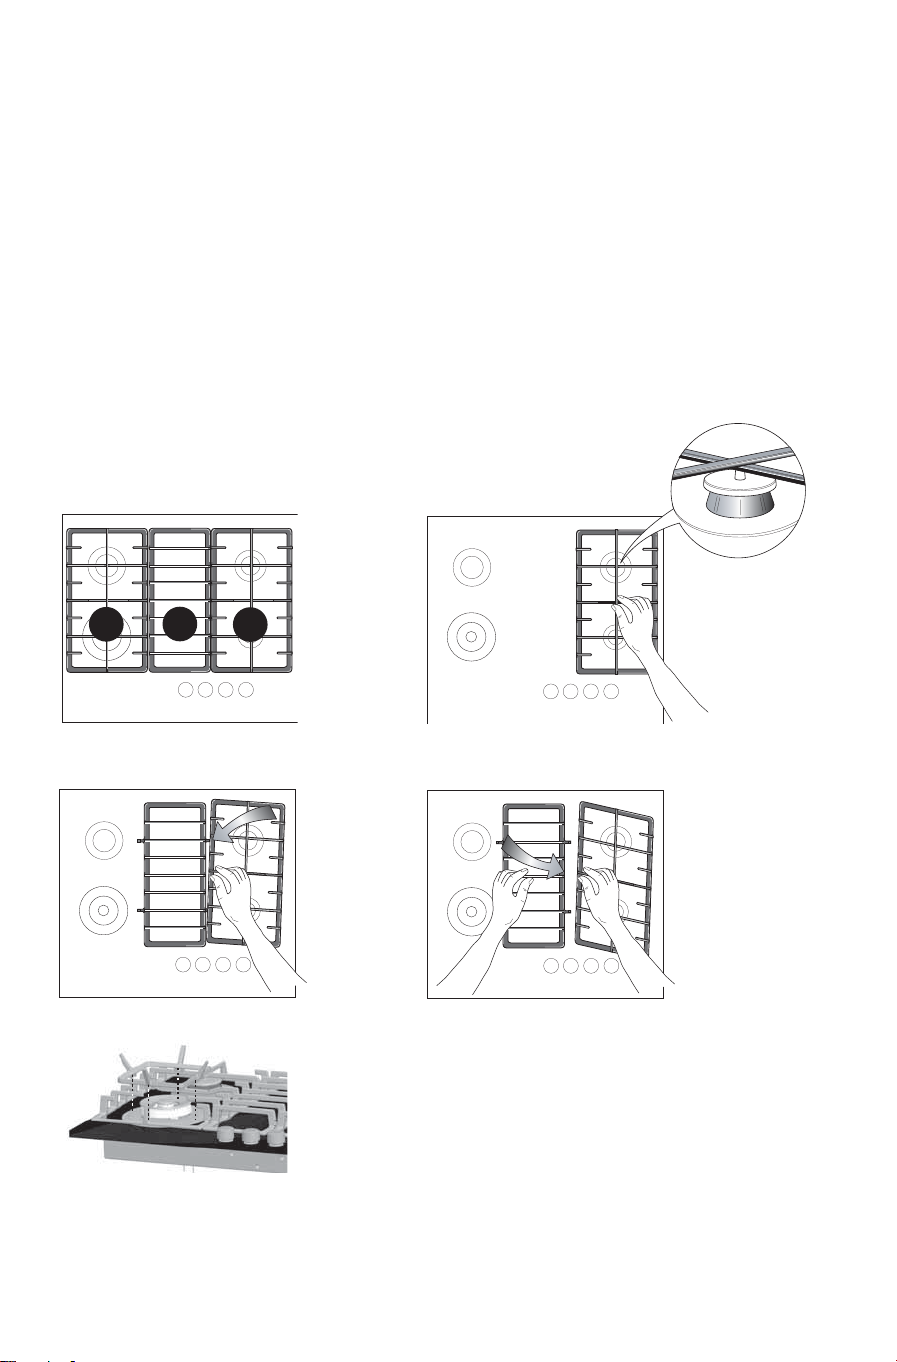
• Incorrect placement of the pans supports can
scratch the hob. To avoid this always ensure
that the rubber feet on the bottom of the pan
supports are the only part of the pan supports
that touch the hob and do not drag the pan
supports accross the hob surface.
• On the glass surface do not use:
- Cast iron grills, terracotta pots or pans.
- Heat convectors (e.g. metal netting).
- Using two burners to cook 1 pan.
• In the event of prolonged usage, additional
ventilation may be required (opening a window
or increasing the extration speed of the hood).
Warning
• Keep children away from the hob when in use
and don't let them play with the control knobs
or any other part of the appliance.
• This appliance is not intended for use by
persons (including children) with reduced
physical, sensor or mental capabilities or lack of
experience and knowledge unless they have
been given initial supervision or instruction
concerning use of the applaince by a person
responsible for their safety.
• Do not let children play with the pan supports.
The rubber feet on the underneath of the pan
supports could be swallowed by small and cause
serious injury or suffocation.
• Before replacing the pan supports on the hob,
please check that all the rubber feet are in
place.
• Each time you finish using the hob, always check
that the control buttons are in the off position
and shut off the tap to the gas mains or cylinder.
• Do not obstruct the air vents at the back of the
appliance in any way.
Warnings and suggestions
8

Packing
The packing material is 100% recyclable and is
labelled with the recycling symbol . Please
dispose of all packing responsibly and carefully.
Product
This appliance is marked according to the
European Directive 2002/96/EC, Waste Electrical
and Electronic Equipment (WEEE).
By ensuring that this product is disposed of
correctly, you will help prevent potentially negative
consequences for the environment and human
health. The symbol on the product, or on
the documents accompanying this appliance
indicates that this product should not be disposed
of as household waste. Please dispose of this
appliance at an Electrical & Electronic Equipment
Collection point as in accordance with local
environmental regulations for waste disposal. For
details of your local Collection Point please contact
your Local Authority.
Conformity declaration
This hob was designed, built and marketed in
compliance with:
• the safety requirements in the “Gas” CEE
Directive 90/396.
• safety objectives of the “Low Voltage” Directive
2006/95/CE (wich replaces 73/23/CEE and
subsequent amendments).
• the protection requirements of the “EMC” CEE
Directive 89/336
• the requirements in CEE Directive 93/68.
• this cooktop is suitable for contact with
foodstuffs and complies with EEC (CE)
Regulation n. 1935/2004.
Safeguarding the environment
9

Technical information for the installer
• This appliance can be built into a 20mm to
40mm thick worktop.
• If no oven is to be installed below the hob, a
panel must be fitted under the hob to prevent
hob damage and protect the cupboard contents.
This panel must cover the whole of the
underside of the hob and must be positioned so
that an air gap of at least 20mm between the
panel and hob underside is maintained, as a
minimum, and as a maximum 150mm to the
underneath of the work surface.
• This hob is designed to operate perfectly with
any oven in the KitchenAid range. The
Manufacturer declines all responsibility should
any other make of oven be installed.
The manufacturer declines all responsibility
should another make of oven be installed.
Before installation, please ensure that:
•Warning: this is a heavy products which
requires the installation to be carried out
by two people.
• The gas supply (type and pressure) and the
calibration on the hob are compatible ( see
serial number plate on the hob and the table on
page 7).
• The cabinetry and appliances surrounding/next
to the hob are heat resistant and in compliance
with local regulations.
• The products of combustion are removed from
the atmoshere in the room by using an
extraction hood or electrical fan installed to the
walls and or windows, in line with current
regulations.
• The air circulates naturally through a suitable
opening that is no less than 100cm2in cross
section, which must be:
- permanent and accessible on the walls of the
room being ventilated and extracting towards
the outside.
- created in such a way that the openings both
inside and out cannot be obstructed, even in
error.
- Protected by plastic grill, metallic netting etc
that should not reduce the 100cm2cross section
- Located in such a position so as not to
interfere with the extraction of the products of
combustion.
Installation
Connection to the mains gas system must be carried out by a
competant, registered person, in compliance with current
legislation.
• The connection of the hob to the gas mains network or gas
cylinder must be done using a rigid copper or steel pipe with parts
that comply with local standards, or using a flexible stainless steel
pipe with continuous surfaces that comply with local standards.
The flexible metallic pipe should be no longer than 2 linear
metres.
• Before connecting the pipe with the rubber part (A), ensure that
seal (B) is in place (this part, provided complies with EN549).
Warning: if you use a stainless steel flexible pipe, it must be installed
in such a way that it does not come into contact with mobile parts
like drawers or kitchen cupboards and passes at a point free of
obstacles where it can be examined in its entirety.
• After connecting to the gas mains, use soap and water to check
there are no leaks.
Gas connection
10
Table of contents
Other KitchenAid Cooker manuals


