JVC KD-DV4206 User manual

ENGLISH
INDONESIA
DVD/CD RECEIVER KD-DV4206/KD-DV4205
ALAT PENERIMA DVD/CD KD-DV4206/KD-DV4205
For canceling the display demonstration, see page 5.
Untuk membatalkan tampilan demonstrasi, lihat halaman 5.
For installation and connections, refer to the separate manual.
Untuk instalasi dan penyambungan, lihat buku pedoman terpisah.
INSTRUCTIONS
BUKU PETUNJUK
GET0369-003A
[UN]
Cover_KD-DV4206_003A_f.indd 2Cover_KD-DV4206_003A_f.indd 2 12/23/05 2:38:02 PM12/23/05 2:38:02 PM

ENGLISH
2
This product incorporates copyright
protection technology that is protected
by U.S. patents and other intellectual
property rights. Use of this copyright
protection technology must be authorized
by Macrovision, and is intended for home
and other limited viewing uses only unless
otherwise authorized by Macrovision.
Reverse engineering or disassembly is
prohibited.
How to reset your unit
• Your preset adjustments will also be erased.
How to forcibly eject a disc
• If this does not work, reset your unit.
• Be careful not to drop the disc when it
ejects.
Thank you for purchasing a VC product.
Please read all instructions carefully before operation, to ensure your complete understanding and to
obtain the best possible performance from the unit.
IMPORTANT FOR LASER PRO UCTS
1. CLASS 1 LASER PRODUCT
2. CAUTION: Do not open the top cover. There are no user serviceable parts inside the unit; leave
all servicing to qualified service personnel.
3. CAUTION: Visible and invisible laser radiation when open and interlock failed or defeated.
Avoid direct exposure to beam.
4. REPRODUCTION OF LABEL: CAUTION LABEL, PLACED OUTSIDE THE UNIT.
How to use functions mode
If you press MODE, the unit goes into
functions mode, then the number buttons
and 5/∞ buttons work as different function
buttons.
How to detach/attach the control panel
Detaching...
Attaching...
[Within 5 seconds...]
EN02-05_KD-DV4206_001A_3.indd 2EN02-05_KD-DV4206_001A_3.indd 2 12/10/05 2:16:19 PM12/10/05 2:16:19 PM

ENGLISH
3
WARNINGS:
To prevent accidents and damage
• DO NOT install any unit in locations w ere;
– it may obstruct t e steering w eel and
gears ift lever operations.
– it may obstruct t e operation of safety devices
suc as air bags.
– it may obstruct visibility.
• DO NOT operate t e unit w ile driving.
• If you need to operate t e unit w ile driving, be
sure to look a ead carefully.
• T e driver must not watc t e monitor w ile
driving.
If t e parking brake is not engaged, “DRIVER
MUST NOT WATCH THE MONITOR WHILE DRIVING.”
appears on t e monitor, and no playback picture
will be s own.
– T is warning appears only w en t e parking
brake wire is connected to t e parking brake
system built in t e car (refer to t e Installation/
Connection Manual).
For safety...
• Do not raise the volume level too much, as
this will block outside sounds, making driving
dangerous.
• Stop the car before performing any
complicated operations.
Temperature inside the car...
If you have parked the car for a long time in hot
or cold weather, wait until the temperature in
the car becomes normal before operating the
unit.
CONTENTS
Introduction ............................................. 4
OPERATIONS
Basic operations
• Control panel .......................................... 6
• Remote controller (RM-RK230) ................ 7
Listening to the radio ................................ 9
isc operations ......................................... 10
EXTERNAL DEVICES
Listening to the C changer ....................... 16
Listening to the iPod®/ . player ................. 17
Listening to the other external
components .......................................... 18
SETTINGS
Selecting a preset sound mode—C-EQ ........ 19
General settings—PSM ............................ 20
V setup menu ....................................... 21
Assigning names to the stations ................. 24
Maintenance ............................................ 25
More about this unit ................................. 26
Troubleshooting ....................................... 29
Specifications ........................................... 32
EN02-05_KD-DV4206_001A_3.indd 3EN02-05_KD-DV4206_001A_3.indd 3 12/10/05 2:16:22 PM12/10/05 2:16:22 PM
ENGLISH
4
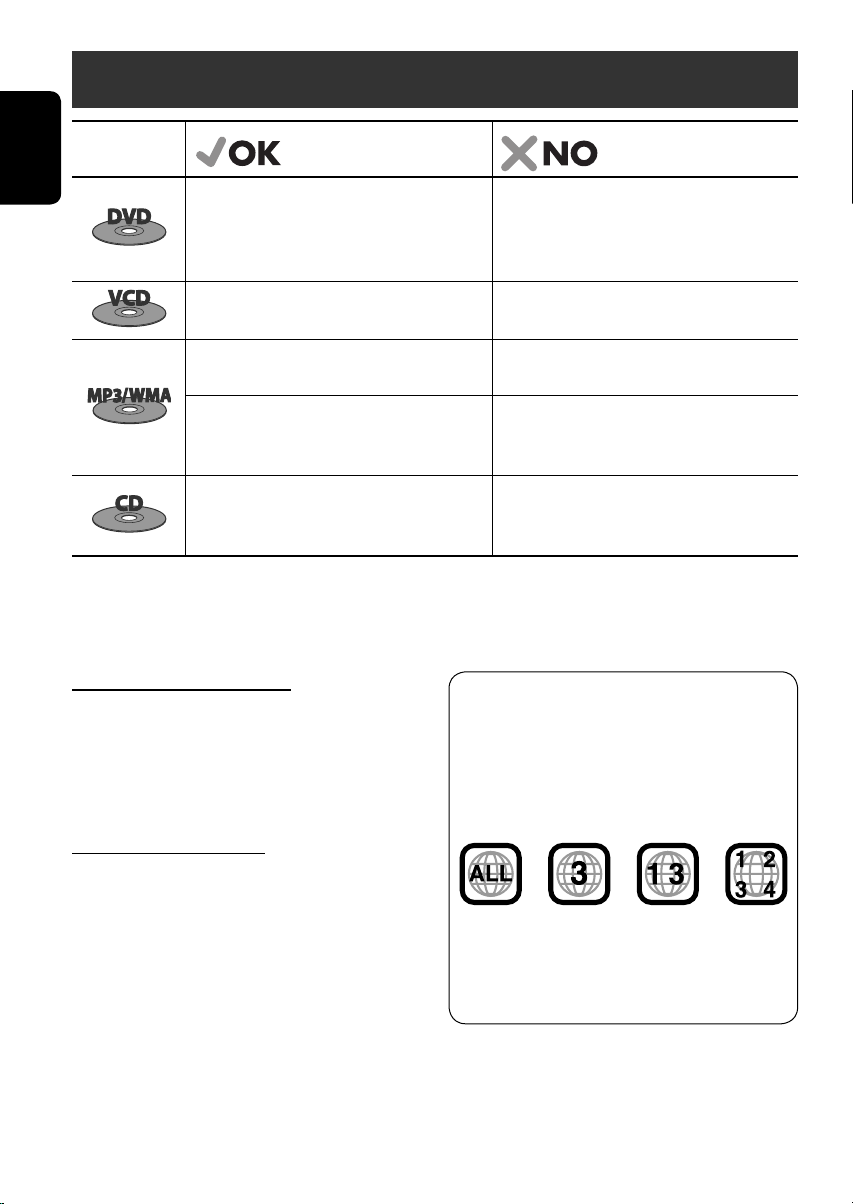
Disc type Playable Unplayable
DVD Video, Dual Disc (DVD side only),
DVD-R*/-RW, +R/+RW
• Recorded in DVD-Video format only and in
PAL/ TSC color system
DVD Audio, Dual Disc (non-DVD side),
DVD-RAM, DVD-ROM, DVD-R/-RW, +R/+RW
• Recorded in DVD-VR format
Video CD
CD-R/-RW
SVCD (Super Video CD)
DVD-R/-RW, +R/+RW, DVD-ROM
• Compliant to UDF bridge format —
CD-R/-RW
• Compliant to ISO 9660 level 1, ISO 9660
level 2, Romeo, Joliet
—
Audio CD, CD Text
CD-R/-RW
• Compliant to CD-DA format
CD-ROM, CD-I (CD-I Ready), Photo CD
• It is possible to play back finalized +R/+RW (Video mode only) discs. However the use of +R double layer disc on this unit is not
recommended.
* DVD-R recorded in multi-border format is also playable (except for dual layer discs).
Introduction
Caution for DualDisc playback
The Non-DVD side of a “DualDisc” does not
comply with the “Compact Disc Digital Audio”
standard. Therefore, the use of Non-DVD
side of a DualDisc on this product may not e
recommended.
Caution on volume setting
Discs produce very little noise compared with
other sources. Lower the volume efore playing
a disc to avoid damaging the speakers y the
sudden increase of the output level.
Note on Region Code:
DVD players and DVD Video discs have
their own Region Code num ers. This unit
can only play ack DVD discs whose Region
Code num ers include “3.”
Examples:
If you insert a DVD Video disc of an
incorrect Region Code
“REGION CODE ERROR!” appears on the
monitor.
EN02-05_KD-DV4206_001A_f.indd 4EN02-05_KD-DV4206_001A_f.indd 4 12/14/05 8:27:41 PM12/14/05 8:27:41 PM

ENGLISH
5
Before operating the unit — Cancel the display demonstration and set the clock
• See also page 20.
~ Turn on t e power.
Ÿ Enter t e PSM settings.
! ] ⁄ Cancel t e display demonstrations
Select “DEMO,” then “DEMO OFF.”
Set t e clock
Select “CLOCK H” (hour), then adjust the hour.
Select “CLOCK M” (minute), then adjust the minute.
@ Finis t e procedure.
When the power is turned off:
Check the current clock ti e
When the power is turned on:
Change the display infor ation
EN02-05_KD-DV4206_001A_3.indd 5EN02-05_KD-DV4206_001A_3.indd 5 12/10/05 2:16:24 PM12/10/05 2:16:24 PM

6
ENGLISH
Basic operations — Control panel
• FM/AM: Select the bands.
• DISC: Start playback.
Select the source.
FM/AM = DISC* = CD-CH*/IP D*/D.PLAYER* (or
EXT IN) = (back to the beginning)
* You cannot select these sources if they are not ready.
Change the display information.
Display window
• FM/AM: Select preset station.
• DISC: Select folder.
Also functions as +10/–10 buttons after pressing MODE
to skip 10 chapters/tracks at a time
• IP D/D.PLAYER: Enter the main menu/Pause
or stop playback/Confirm selection.
Select the sound mode.
Eject disc.
Detach the panel.
Adjust the sound mode.
Hold to enter the PSM settings
Enter functions mode.
Press MODE, then one of the following buttons (within
5 seconds)
M : Turn on/off monaural reception
SSM: Automatic station presetting
RPT: Select repeat play
RND: Select random play
• FM/AM: Select preset station.
• DISC: Select chapter/title/folder/
track/disc (for CD changer).
• FM/AM: Search for station.
• DISC: Select chapter/track.
• IP D/D.PLAYER: Select track.
• Turn on the power.
• Turn off the power [Hold].
• Attenuate the sound (if the power is on).
Insert disc.Volume control
EN06-09_KD-DV4206_001A_f.indd 6EN06-09_KD-DV4206_001A_f.indd 6 12/14/05 1:03:13 PM12/14/05 1:03:13 PM

ENGLISH
OPERATIONS
7
Display window
Basic operations — Remote controller (RM-RK230)
Installing the lithium coin battery (CR2025)
Before using the remote controller:
• Aim the remote controller directly at the
remote sensor on the unit.
• DO NOT expose the remote sensor to bright
light (direct sunlight or artificial lighting).
Remote sensor Continued on the next page
Track information indicators
Tuner reception indicators
Main display
(Time, menu, playback information)
Source display/Preset No./Track No./
Folder No./Disc No./Chapter No.
Loudness indicatorDisc type indicators
Playback source indicators Equalizer indicator
Sound mode indicators
Playback mode/item indicators
(Random/Repeat)
Warning:
To prevent accidents and damage
• Do not install any battery other than
C 2025 or its equivalent.
• Store the battery in a place where children
cannot reach.
• Do not recharge, short, disassemble, heat
the battery, or dispose of it in a fire.
• Do not leave the battery with other
metallic materials.
• Do not poke the battery with tweezers or
similar tools.
• Wrap the battery with tape and insulate
when throwing away or saving it.
Track indicator
EN06-09_KD-DV4206_001A_3.indd 7EN06-09_KD-DV4206_001A_3.indd 7 12/10/05 2:17:21 PM12/10/05 2:17:21 PM

8
ENGLISH
For FM/AM tuner operations:
• PRESET 5 / ∞
Changes the preset stations.
• 4 / ¢
– Searches for the stations if pressed
briefly.
– Manual searches if pressed and held.
For iPod/D. player operations:
• 5 / ∞
∞: Pauses/stops or resu es playback.
5: Enters the ain enu.
(Now 5/∞/4 / ¢ work as the
enu selecting buttons.)*3
• 4 / ¢ (in enu selecting ode)
– Selects an ite if pressed briefly.
(Then, press ∞ to confir the
selection.)
– Skips 10 ite s at a ti e if pressed and
held.
w • Shows the on-screen bar.
• Also function as the /TITLE button
when pressed with SHIFT button (see
pages 12 and 13).
e*1 • DVD: Shows the DVD disc enu.
• VCD: Starts PBC playback.
r*1 • Makes selection/settings.
• DISC +/– buttons: Changes discs when
the source is “CD-CH.”
t*1 RETURN button
y • DVD: Selects audio language ( ),
subtitles ( ), angle ( ).
• VCD: Selects audio channel ( ).
*1 Functions as number buttons when pressed
with SHIFT button.
– FM/AM: Selects preset stations.
– DISC: Selects chapter/title/folder/trac .
*2 Functions as +10/–10/+100/–100 buttons
when pressed with SHIFT button.
*3 5 : Returns to the previous menu.
∞ : Confirms the selection.
MONITOR CONTROL
1 Monitor control buttons
• Used for a JVC onitor—KV-MR9010,
KV-MH6510, KV-M706, or KV-M705.
DVD/RECEIVER CONTROL
2 Turns on/off the power.
• Attenuates the sound if the power is on.
3 Selects the source.
4 Selects the FM/AM bands.
5*1 • DVD: Shows the DVD disc enu.
• VCD: Starts PBC playback.
6 Not applicable for this unit.
7 Adjusts the volu e level.
• 2nd VOL:
Not applicable for this unit.
8*1 Enters DVD setup enu.
9 SHIFT button
p 7 (stop), 3 (play), 8 (pause)
• 3 (play) also function as ZOOM button
when pressed with SHIFT button (see
page 12).
•
Not applicable for CD changer/iPod/
D. player operations.
q*2 For advanced disc operations:
• /TITLE 5 / ∞
DVD: Selects the titles.
MP3/WMA: Selects the folders if
included.
• 4 / ¢: Reverse skip/forward skip.
• 1 / ¡: Reverse search/forward
search (not applicable for CD changer
operations).
EN06-09_KD-DV4206_001A_f.indd 8EN06-09_KD-DV4206_001A_f.indd 8 12/14/05 8:29:48 PM12/14/05 8:29:48 PM

ENGLISH
OPERATIONS
9
When an F stereo broadcast is hard to
receive
1
2
eception improves, but stereo effect will be
lost.
• MO indicator lights up.
F station automatic presetting —SS
(Strong-station Sequential emory)
You can preset six stations for each band.
1
2
Listening to the radio
Change the display information
~ Select “FM/AM.”
Ÿ Select the bands.
! Search for a station to listen—Auto Search.
• Manual Search: Hold either one of the buttons until “M” flashes on the display, then press it
repeatedly.
Select preset station.
3
Local FM stations with the strongest signals
are searched and stored automatically in the
FM band.
anual presetting
Ex.: Storing FM station of 92.5 MHz into preset
number 4 of the FM1 band.
1
2
3
Lights up when receiving an FM stereo
broadcast with sufficient signal strength
* If no name is assigned to a station, “NO NAME”
appears. To assign a name, see page 4.
EN06-09_KD-DV4206_001A_3.indd 9EN06-09_KD-DV4206_001A_3.indd 9 12/10/05 2:17:23 PM12/10/05 2:17:23 PM

*1 If the file does not have Tag information or “TAG
DISP” is set to “TAG OFF” (see page 20 , folder
name and file name appear. TAG indicator will
not light up.
*2 “NO NAME” appears for an audio CD.
10
ENGLISH
Disc operations
Before performing any operations...
Turn on the monitor for playing a DVD or VCD. If you turn on the monitor, you can also control
playback of other discs by referring to the monitor screen. ( ee pages 13 – 15.)
The disc type is automatically detected, and playback starts automatically (for DVD: automatic start
depends on its internal program).
If the current disc does not have any disc menu (when playback stops), all tracks will be played
repeatedly until you change the source or eject the disc.
If “ ” appears on the monitor when pressing a button, the unit cannot accept the operation you
have tried to do.
• In some cases, without showing “ ,” operations will not be accepted.
Insert disc.
Playback starts automatically with most of the discs. Eject disc.
Change the display information
Start playback if necessary.
Prohibiting disc ejection
To cancel the prohibition, repeat
the same procedure.
EN10-15_KD-DV4206_001A_3.indd 10EN10-15_KD-DV4206_001A_3.indd 10 12/10/05 2:16:55 PM12/10/05 2:16:55 PM
Other manuals for KD-DV4206
2
This manual suits for next models
1
Table of contents
Languages:
Other JVC Car Stereo System manuals

JVC
JVC KD-G427 Guide

JVC
JVC EXAD KW-AVX826 Guide

JVC
JVC G210 - KD Radio / CD Player User manual

JVC
JVC KD-DV6102 User manual

JVC
JVC KD-G343 User manual

JVC
JVC KW-AVX710 - DVD Player With LCD Monitor Guide

JVC
JVC KW-X840BTS User manual

JVC
JVC KD SH1000 - Radio / CD User manual

JVC
JVC KS-fx270e Guide

JVC
JVC KD-G505 User manual

JVC
JVC CS-VP528 User manual

JVC
JVC KSSRA100 - Vehicle Sirius Satellite Radio... User manual

JVC
JVC KW-XR411 User manual

JVC
JVC KD-R826BT Guide

JVC
JVC FSUN3117-312 KD-S8R User manual

JVC
JVC KD-S79BT User manual

JVC
JVC KD-R322 User manual

JVC
JVC KD-R404 Guide

JVC
JVC KD-AR765S User manual

JVC
JVC KD-SH707 User manual


