Jimmy BX6 Pro User manual
User Guide Anti-mite Vacuum Cleaner
Instrukcja obsługi Odkurzacz do roztoczy
Bedienungsanleitung Staubsauger
Manuel d'utilisation Aspirateur anti-acariens
Manuale d’Uso Aspiratore Anti-Acaro
Manual del usuario Aspirador antiácaros
Руководство пользователя Пылесос для удаления пылевых клещей
BX6 Pro


Contents
English 2
Polski 9
Deutsch 17
Français 24
Italiano 32
Español 40
русский язык 47

2
Cautions
Please read this instruction manual carefully before use, properly save and store it for future
use.
The product design and spec in the manual may slightly vary from the actual product. Please
take physical product shall prevail.
Never leave the machine working without supervision.
Please turn off the power switch and unplug the power cord if the machine is to be idled. Do Not
unplug the power cord with humid hand in case of electric shock.
Cut off power when machine is under cleaning, repairing or is not used.
Keep the power cord away from sharp objects and do not drag the cord to move the machine in
case of cord damage.
For safety reasons, please do not use the product to clean hot objects such as carbon, cigarette
butts, sharp objects such as broken glass, corrosive liquids, ammable and explosive materials
such as gasoline and alcohol. Otherwise it may cause product damage or re.
Do not use this machine to pick up water or wet dust, and avoid the machine from being
exposed to rain, water or being used in wet places (such as bathrooms, washrooms, laundry
rooms, etc.) to avoid failure.
Avoid the product approaching heating appliances or being exposed to the sun to avoid re.
Do not let children play with or operate the product to avoid accidents.
Avoid product running for a long time when the suction port is blocked to avoid damage.
The product is equipped with UV light.Do not view the bottom of the machine when the power is
turned on to prevent UV rays from causing harm to human body.
Please do not let UV light shine on plants to avoid damaging them. Do not concentrate UV light
in one place for continuous use, which may cause damage to the cleaned objects.
Do not sit on the product to avoid damage.
Do not remove brushroll when machine is powered on or running to avoid damage.
This product can only use for cleaning of textiles such as mattresses, blankets, pillows, sofas,
etc.
If there is damage on power cord, to avoid danger, it should be replaced or repaired by
manufacturer, repairing agency or professional person.
3
Products Installation
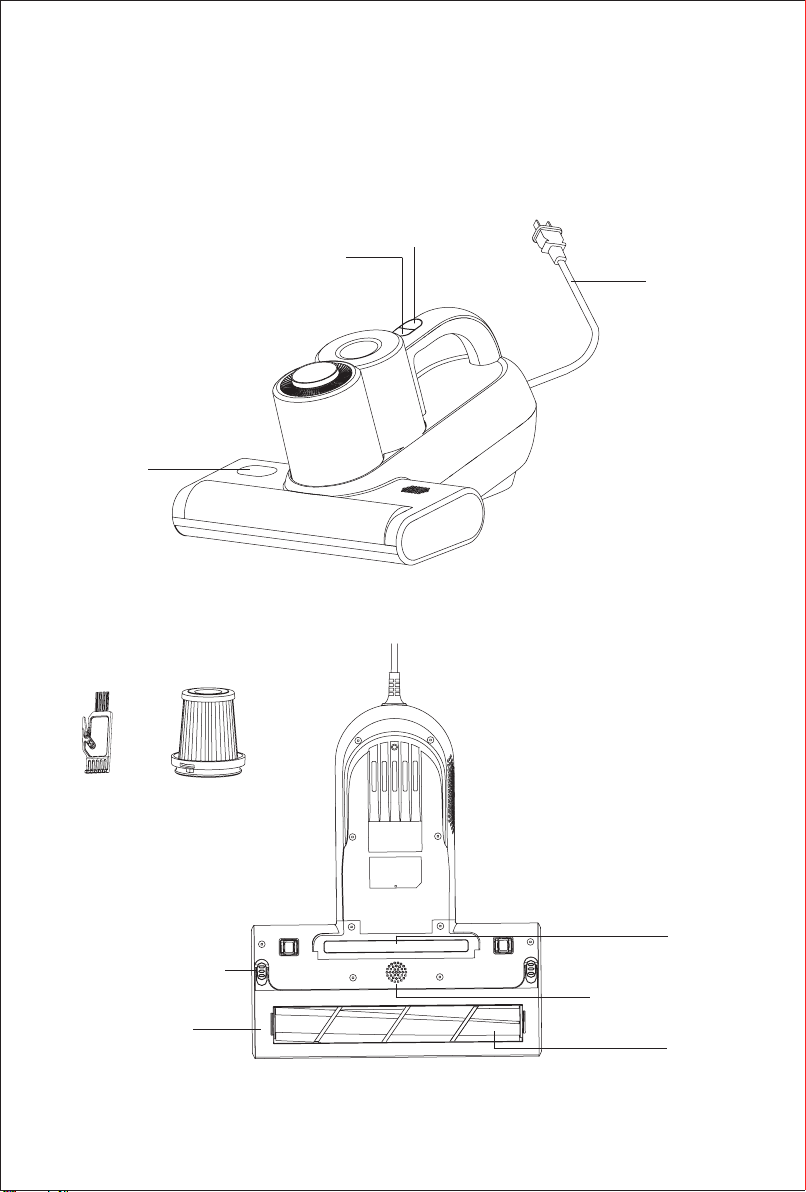
Parts Name
Mode Button
On/Off Button
LED screen
Brushroll cover latch
Brushroll cover
Brushroll
UV light
Ultrasonic generator
Power cord
Mini Brush HEPA lter
4
Packing List
Anti-mite vacuum
cleaner Mini-brush HEPA lter User manual
1 1 1 1
Use of the Product
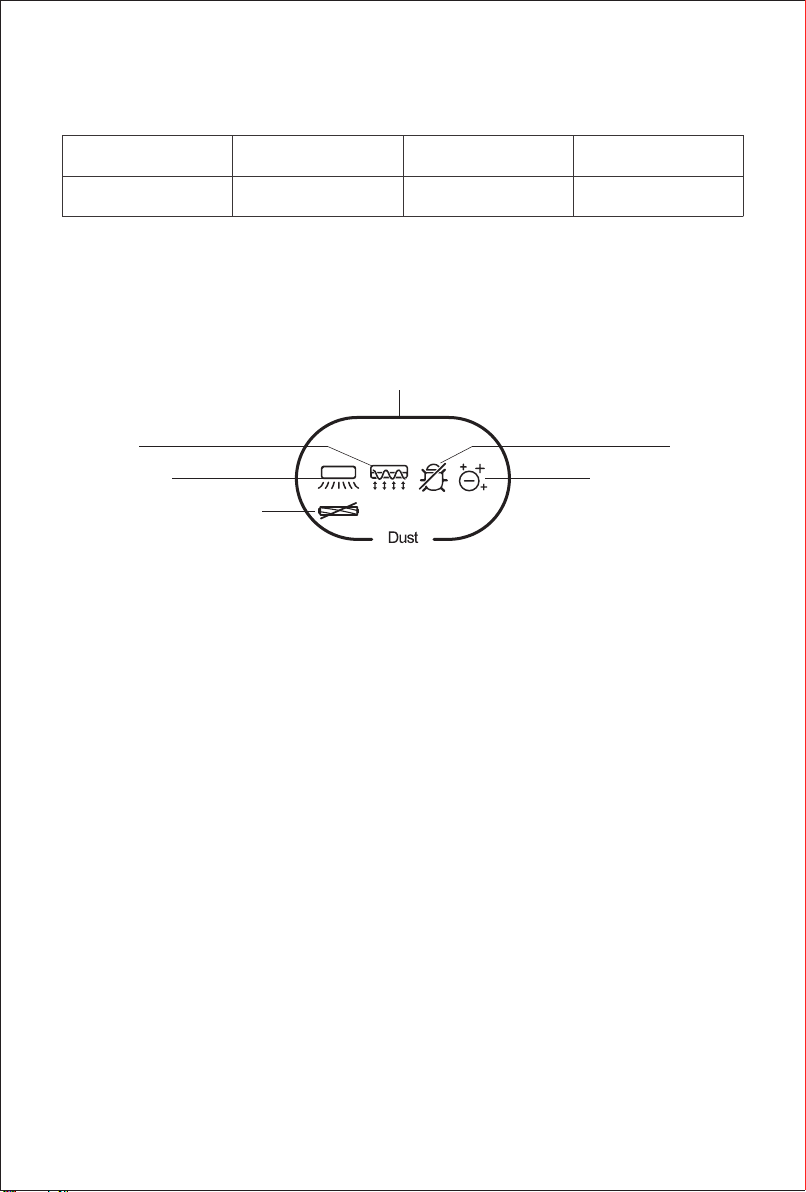
Function description
Vacuum+Tap+UV Mode
After power on, the anti-mite vacuum cleaner starts with Vacuum +Tap +UV mode by default, the
corresponding indicator light will be on, and the machine will start vacuuming function, brushroll
tapping function, the UV light dust mite-removal function and the negative ion function.
Vacuum+Tap Mode
When the machine is in Vacuum+Tap+UV Mode, press mode button once to change to
Vacuum+Tap mode. Corresponding indicator will be one and the machine will start vacuuming
function, brushroll tapping function and the negative ion function
Vacuum+UV Mode
When the machine is in Vacuum+Tap Mode, press mode button once, press mode button once
to change to Vacuum+UV mode.Corresponding indicator will be one and the machine will start
vacuuming function,the UV light dust mite-removal function and the negative ion function.
Dust level display
When the cleaned surface is in a clean state, the dust level bar is blue.When it is in a dirty state,
the dust level bar is red.When it is in a slightly dirty state, the dust level bar is yellow. As the dust
level increases,the dust level bar slowly changes from blue to yellow,nd nally to red.As the dust
level decreases, the dust level bar slowly changes from red to yellow until it is all blue.
Brushroll blockage indicator
This indicator ashes when the brushroll is blocked.
Vacuum mode
Brushroll blockage indicator
Tap mode
Negative ions display
Dust level display
UV mode

5
Cleaning and maintenance
Note:
1. HEPA lter is available for sale at JIMMY distributor.
2. It is recommended to clean the dust cup in time after each use. When there is too much dust to cause
HEPA blockage, it needs to be cleaned in time or replaced if necessary.
Cleaning of dust cup
Turn off the product, remove the dust cup
according to the instruction label on the dust cup;
Align the dust cup with the garbage can, press
the bottom cover release button, open the bottom
cover, and pour out the garbage. (Figure 1)
HEPA lter cleaning
Hold the dust cup with one hand and pull out the
filter assembly with the other hand.Turn HEPA
bottom cover clockwise; Take out the HEPA
assembly downward, tap the HEPA assembly
downward to clean the dust, or use a brush to
clean the dust and other debris on the HEPA
assembly. (Figure 2 -Figure 4)
After cleaning the dust cup and HEPA assembly,
put the HEPA into the lter assembly and then rotate it anticlockwise to x it. After the "click"
sound is heard when rotating, and the HEPA is assembled in place without loosening.Then put
the lter assembly back into the dust cup and press it to the bottom, the dust cup assembly is in
place.
Note:
1. Do not miss HEPA lter!
2. If too much dust is accumulated in the dust cup, clean the dust cup and lter assembly with water, and wipe
them with dry cloth. Pay attention that HEPA lter need to be washed as less as possible. Clean the dust and
foreign matters on HEPA lter by tapping, and ensure that the dust cup and lter assembly are completely dry
before installation.
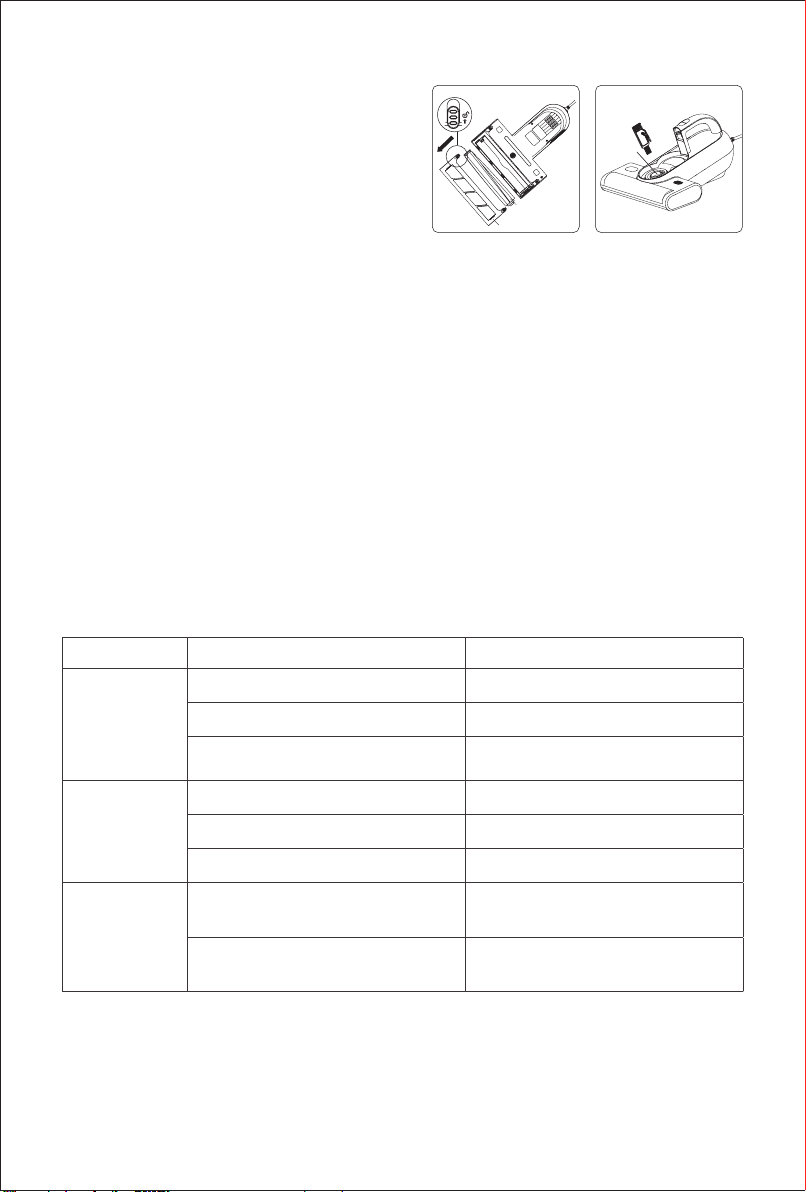
Brushroll cleaning and assembly
Note:
When cleaning the brushroll, be sure to disconnect the power supply to prevent the brushroll from starting by
mistake and cause human injury.
Turn off the machine, unplug the power supply, push the brushroll cover latch. Turn it from the
closed state to the open state, and then remove brushroll cover and take out brushroll. Clean
brushroll with cleaning brush. After cleaning the brushroll, install the brushroll and brushroll
cover back to mainbody in turn, and lock the brushroll latch. (Figures 5)
1
3
2
4
Bottom cover
release button
HEPA
lter
Filter
assembly
6
Dust sensor cleaning
Dust sensor is installed inside of air inlet. Use
mini brush to clean inner wall of air inlet to avoid
too much dust accumulating on dust sensor and
cause abnormal display of dust level. (Figure 6)
Maintenance and Storage
Please clean dust cup and HEPA filter after each use for further use. It is recommended to
replace a lter after 30-50 hours of working time(depending on specic situation) for better use.
Any paper, lead glass, plastic will greatly affect the effect of UV light. Dust or stain on UV light
cover will affect the effect of UV light. Please wipe and clean the UV light cover regularly for
better use.
Do not touch the UV light cover as dirt will affect UV light effect.
Put the machine in cool and dry place if the machine is to be idled. Do Not leave it in direct
sunlight or humid environment.
Trouble Shooting
Please check the following trouble points before contacting after service.
Problems Possible Reasons Solution
Product does
not turn on
On/off switch is not pressed down Press down on/off switch
No power on socket Check the socket
Power cord is not rmly inserted Check whether the power plug is
rmly inserted
Weak suction
Air inlet blocked Clean air inlet
HEPA blocked Clean dust cup and HEPA
Cyclone blocked Clean cyclone
UV light does
not work
Machine tilt and micro switch left
cleaning surface
Machine tilting degree cannot ex-
ceed 30 degree
UV light defect Contact after service to replace UV
light
6
5
Brushroll cover
Brushroll
Air inlet

7
Problems Possible Reasons Solution
Machine
stop working
suddenly
Dust cup full Stop using the product and clean
blockage and use the machine af-
ter 2 hours
Machine air inlet blocked
HEPA blocked
Brushroll
stop working
suddenly
Brushroll entangled Take out brushroll, clean it and re-
assemble
Belt loose or broken Contact after service to replace
belt
Note: If there are other faults, special tools must be used, please contact after sales service for guidance.
Product Specications
Technical Parameter
Model No BX6 Pro
Rated voltage 220-240V~
Rated frequency 50-60Hz
Rated power 600W
Circuit Diagram
UV Light
PCB
On/off
switch
Micro
switch
Ultrasonic
wave activator
Negative ions
activator
Vacuum motor
Brushroll motor
Power supply PCB
Main PCB
Dust
sensor
M1
M2
220-240V~ 50-60Hz

8
Manufacturer Kingclean Electric Co., Ltd
Address No.1 Xiangyang Road, Suzhou New District,
Jiangsu Province 215009,China
Manufacturer Information
Disposal
The machine, accessories and packaging should be sorted for environmental-friendly recycling.
Do not dispose of the machine into household waste!
Only for EC countries: According to the European Guideline 2012/19/EU, machine that are no
longer usable, and according to the European Guideline 2006/66/EC, defective or used battery
packs/batteries, must be collected separately and disposed of in an environmentally correct
manner.
Subject to change without notice.
Warranty Information
This product enjoys one year warranty from the date of purchase.
Excluded from the guarantee is normal wear, commercial use, alterations to the appliance as
purchased, cleaning activities, consequences of improper use or damage by the purchaser or a
third person, damage that can be attributed to external circumstances.
Other manuals for BX6 Pro
1
Table of contents
Languages:
Other Jimmy Vacuum Cleaner manuals


