iXsystems TrueNAS R Series Manual

TrueNAS® R-Series Unied Storage Arrays
Basic Setup Guide
Version 1.1

Support: 855-473-7449 or 408-943-4100 Email: [email protected]
Copyright © 2021 iXsystems, Inc. All rights reserved. All trademarks are the property of their respective owners.
TrueNAS® units are carefully packed and shipped with trusted carriers to arrive in perfect condition. If there is any shipping dam-
age or any parts are missing, please take photos and contact iXsystems support immediately at [email protected] or
855-GREP4-iX (855-473-7449) or 408-943-4100.
Please locate and record the hardware serial numbers on the back of each chassis for quick reference.
Contents
1 Introducing the TrueNAS R-Series ....................................................... 1
1.1 Safety ............................................................................................. 1
1.2 Requirements ................................................................................... 1
2 R10 ............................................................................................ 2
2.1 R10 Components ............................................................................... 2
2.2 Ports and Indicators ........................................................................... 3
3 R20 ............................................................................................ 4
3.1 R20 Components ............................................................................... 4
3.2 Ports and Indicators ........................................................................... 5
4 R40 ............................................................................................ 6
4.1 R40 Components ............................................................................... 6
4.2 Ports and Indicators ........................................................................... 7
5 Racking the R10, R20, or R40 ............................................................. 8
5.1 Rack Requirements ............................................................................ 8
5.2 Attach the Chassis Rails ....................................................................... 8
5.3 Install the Rack Rails ........................................................................... 9
5.4 Push the System into the Rack ............................................................... 9
6 Handling Drive Trays ...................................................................... 10
6.1 SSD Drive Trays (R10, R20, R40) ............................................................ 10
6.2 Hard Drive Trays (R20) ...................................................................... 11
7 Bezel ......................................................................................... 12
8 R50 ........................................................................................... 13
8.1 R50 Components ............................................................................. 13
8.2 Ports and Indicators ......................................................................... 14
8.3 Racking the R50 ............................................................................... 15
8.4 Managing Drives ............................................................................. 17
9 Cabling an R-Series System .............................................................. 20
9.1 R50 SAS Connections ........................................................................ 20
10 Connecting to the TrueNAS Web Interface .......................................... 21
11 Documentation ........................................................................... 21
12 Contacting iXsystems .................................................................... 21

Support: 855-473-7449 or 408-943-4100 Email: [email protected]
Page 1
TrueNAS R-Series systems are a variety of hard disk, hybrid, and all-ash storage arrays available in 1U, 2U, and 4U
congurations. R-Series systems have the latest version of TrueNAS CORE preloaded. You will receive the system
and all installation components carefully packed and ready for installation. The packed system and components
vary by what was purchased.
Take a moment to review the safety considerations and hardware requirements before installing an R-Series system
into a rack.
1 Introducing the TrueNAS R-Series
1.1 Safety
1.2 Requirements
1.1.1 Static Discharge
1.1.2 Handling the System
R-Series systems are sensitive electronic devices. Be sure to take full safety precautions when installing or servicing
a system.
Static electricity can build up in your body and discharge when touching conductive materials. Electrostatic Dis-
charge (ESD) is very harmful to sensitive electronic devices and components. Keep these safety recommendations in
mind before opening the system case or handling system components:
1. Turn o the system and remove the power cable before opening the system case or touching any internal com-
ponents.
2. Place the system on a clean, hard work surface like a wooden tabletop. Using an ESD dissipative mat can also
help protect the internal components.
3. Touch the metal chassis with your bare hand before touching any internal component, including components
not yet installed in the system. This redirects static electricity in your body away from the sensitive internal com-
ponents. Using an anti-static wristband and grounding cable is another option.
4. Store all system components in anti-static bags.
More details about ESD and preventative tips can be found at https://www.wikihow.com/Ground-Your-
self-to-Avoid-Destroying-a-Computer-with-Electrostatic-Discharge.
It is recommended to have these tools available when installing an R-Series system in a rack:
• #2 Philips head screwdriver
• Flat head screwdriver
• Tape measure
• Level
Two people are recommended to lift an R-Series system.
Do not attempt to lift an R-Series system when it is fully populated with drives! It is recommended to install the
system in a rack before adding drives and then removing the drives before de-racking an R-Series system.
Hold the system from the sides or bottom whenever possible. Always be mindful of loose cabling or connectors and
avoid pinching or bumping these elements whenever possible.
These instructions use “left” and “right” according to your perspective when facing the front of a system or rack.

Support: 855-473-7449 or 408-943-4100 Email: [email protected]
Page 2
2 R10
2.1 R10 Components
The R10 is a 1U All-Flash Storage Array that has 16 SSD drive bays, redundant power supplies, and a single TrueNAS
controller. You will nd these items when opening the R10 packaging:
16 SSD drive trays with up to 16 drives
installed
Accessory kit with 2 IEC C13 to NEMA 5-15P
power cords, 2 IEC C13 to C14 cords, and a
set of velcro cable ties
Set of rackmount rails and mounting hard-
ware
R10 All-Flash Storage Array

Support: 855-473-7449 or 408-943-4100 Email: [email protected]
Page 3
2.2 Ports and Indicators
1. Power supplies #1 and #2
2. Serial port
3. 1Gb Ethernet Out of Band Management port and two USB 2.0 ports
4. Two USB 3.0 ports
5. Two 10Gb SFP+ networking ports
6. VGA monitor port
There are lighted buttons for system ID (1) and power (4). There is also a USB 2.0 port (2) and lights for network and
controller activity (3).
The back panel has the power supplies and connection ports:
The right side of the R10 front panel has buttons, ports and indicators for controlling the system.
Support: 855-473-7449 or 408-943-4100 Email: [email protected]
Page 4
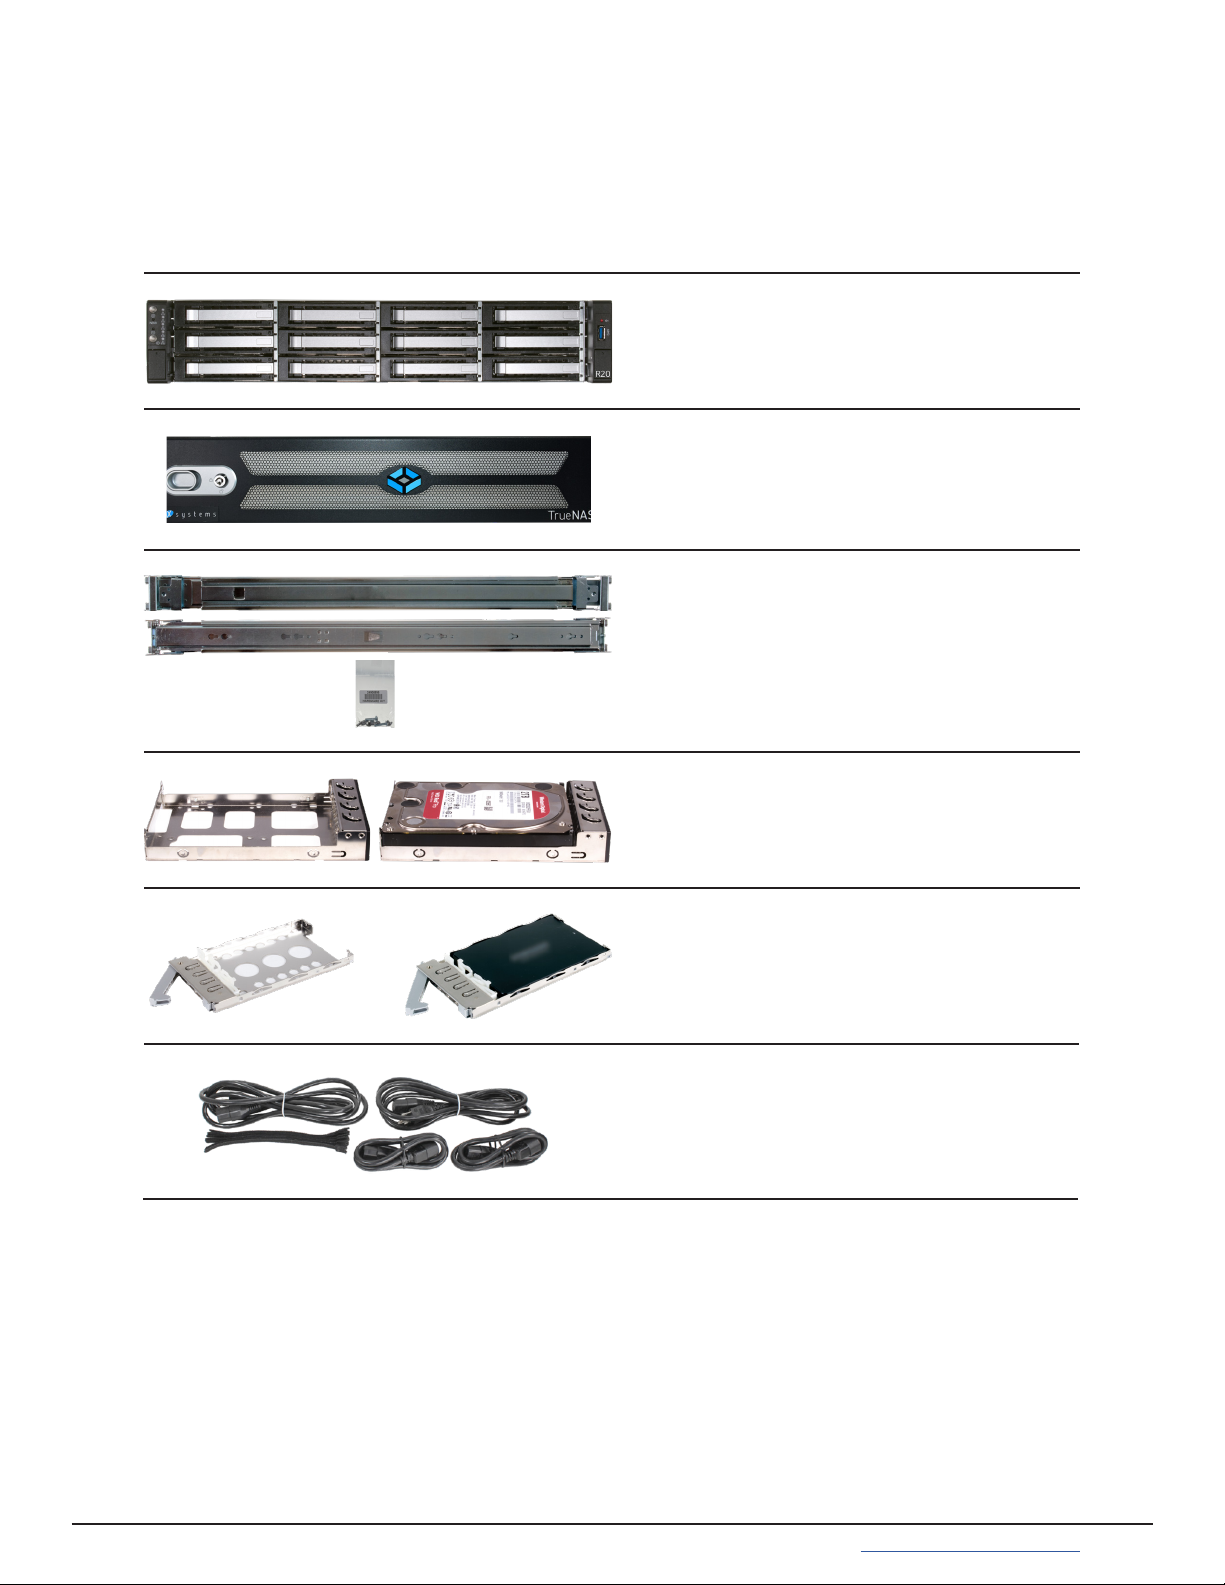
3 R20
The R20 is a 2U Hybrid Storage Array that has 12 3.5” drive bays and 2 SSD drive bays, redundant power supplies,
and a single TrueNAS controller. You will nd these items when opening the R20 packaging:
3.1 R20 Components
2 SSD drive trays with up to 2 SSDs installed
Locking Bezel
12 3.5” drive trays with up to 12 hard drives
installed
Set of rackmount rails with mounting hard-
ware
R20 Hybrid Storage Array
Accessory kit with 2 IEC C13 to NEMA 5-15P
power cords, 2 IEC C13 to C14 cords, and a
set of velcro cable ties

Support: 855-473-7449 or 408-943-4100 Email: [email protected]
Page 5
3.2 Ports and Indicators
R20 buttons and indicators are located on the “ears” on the right and left edge of the system front.
The left ear has lighted buttons for power (1) and system ID (2). There are also fault (3) and network activity (4)
indicators. Both ears have hinged covers over screw holes for securing the system to a rack (5). The right ear has a
single USB 3.0 port (6).
The fault indicator is on during the initial power-on self-test (POST) and o during normal operation. It also turns on
if the TrueNAS software issues an alert. For details about software alerts and how to congure them, see “Alerts” in
the TrueNAS Documentation Hub.
The back panel has the power supplies and connection ports:
1. Power supplies #1 and #2
2. Serial port
3. 1Gb Ethernet Out of Band Management port and two USB 2.0 ports
4. Two USB 3.0 ports
5. Two 10Gb SFP+ networking ports
6. VGA monitor port
7. SSD Drive Bays

Support: 855-473-7449 or 408-943-4100 Email: [email protected]
Page 6
4 R40
4.1 R40 Components
48 SSD drive trays with up to 48 drives
installed
The R40 is a 2U All-Flash Storage Array that has 48 SSD drive bays, redundant power supplies, and a single TrueNAS
controller. You will nd these items when opening the R40 packaging:
R40 All-Flash Storage Array
Locking Bezel
Set of rackmount rails with mounting
hardware
Accessory kit with 2 IEC C13 to NEMA
5-15P power cords, 2 IEC C13 to C14 cords,
and a set of velcro cable ties

Support: 855-473-7449 or 408-943-4100 Email: [email protected]
Page 7
4.2 Ports and Indicators
Buttons and indicators are on the front ears of the R40:
1. Power supplies #1 and #2
2. Serial port
3. 1Gb Ethernet Out of Band Management port and two USB 2.0 ports
4. Two USB 3.0 ports
5. Two 10Gb SFP+ networking ports
6. VGA monitor port
The left ear has lighted buttons for power (1) and system ID (2). There are also fault (3) and network activity (4)
indicators. Both ears have hinged covers over screw holes for securing the system to a rack (5). The right ear has a
single USB 3.0 port (6).
The fault indicator is on during the initial power-on self-test (POST) and o during normal operation. It also turns on
if the TrueNAS software issues an alert. For details about software alerts and how to congure them, see “Alerts” in
the TrueNAS Documentation Hub.
The back panel has the power supplies and connection ports:

Support: 855-473-7449 or 408-943-4100 Email: [email protected]
Page 8
5 Racking the R10, R20, or R40
The R10, R20, and R40 share the same rail kit and racking process. Because each system has slightly dierent di-
mensions, it is recommended to double check the rack rail placement for the purchased system.
Drives should only be installed in a system after it has been placed in the rack. It is also recommended to remove all
installed drives before unracking a system.
Always team-lift a system when installing to a rack.
5.1 Rack Requirements
5.2 Attach the Chassis Rails
Each rail has two components, the outer rack rail and the inner chassis rail. To protect it during shipping, the chassis
rail is inserted into the rack rail and must be removed before attaching to a system. Slide the chassis rail forward
until the metal catch stops it in place. Push in the catch and continue to slide the chassis rail forward until it is free
of the rack rail.
PUSH SLIDE
Take the chassis rail and align the end stamped “FRONT” with the front of the system. Fit the rail keyholes over the
mounting pegs on the side of the system and slide it into place. Use one of the included short M4 screws to secure
the rail to the system.
The image shows attaching the rail to an R20, but the R10 and R40 follow the same procedure. For the R20 and R40,
use the screw hole at the back of the chassis for securing the rail. Follow this procedure to slide out and attach the
second chassis rail to the other side of the system.
The R10, R20, or R40 requires an EIA-310 compliant rack. To properly install the rack rails, the front and rear vertical
rack posts need to be spaced between 23” - 35.75” (584mm-908mm) apart.
Short M4 Screw
This manual suits for next models
4
Table of contents
Other iXsystems Storage manuals

iXsystems
iXsystems TrueNAS M Series User manual

iXsystems
iXsystems TrueNAS Mini Series Manual

iXsystems
iXsystems TrueNAS F Series User manual

iXsystems
iXsystems TrueNAS F Series User manual

iXsystems
iXsystems TrueNAS R50 Manual

iXsystems
iXsystems TrueNAS ES12 Manual

iXsystems
iXsystems TrueNAS ES24 Manual

iXsystems
iXsystems TrueNAS X Series Manual

iXsystems
iXsystems FreeNAS Mini User manual

iXsystems
iXsystems TrueNAS 11.3-U5 User manual


