Invictus Active Trackside User manual

Congratulations on purchasing the Invictus Active Trackside. Your Trackside is manufactured using
the very highest standard of materials and is produced by experienced craftsmen. When used in
accordance with these operating instructions it will offer years of reliable service.
Warning:
Read and follow all instructions carefully, the first time you use the Trackside it is strongly
recommended you have someone else in attendance and that they position themselves in a manner
that can help you on and off the Trackside should you need the support. The Trackside comes with a
retaining strap which we strongly recommend you use until such time that you are completely
confident that you will not flip out of the back of your race chair.
Safety Recommendations:
*NEVER use the Trackside on uneven surfaces, always setup your trainer on flat, even surface
*ALWAYS make sure parts are tightened and that all equipment is in good working order, including
your race chair!
*ALWAYS allow sufficient space to operate your Trackside safely
*KEEP CHILDREN AND PETS CLEAR of the Trackside when in use
*NEVER touch the rollers when they are in motion
*USE the retaining strap until you are confident that you will not flip out of the back of your race chair
*ALWAYS warm up properly before working out. Consult your Doctor before starting any workout
regime
For best results make sure that your tyres are inflated to the
maximum pressure stated on your tyres!
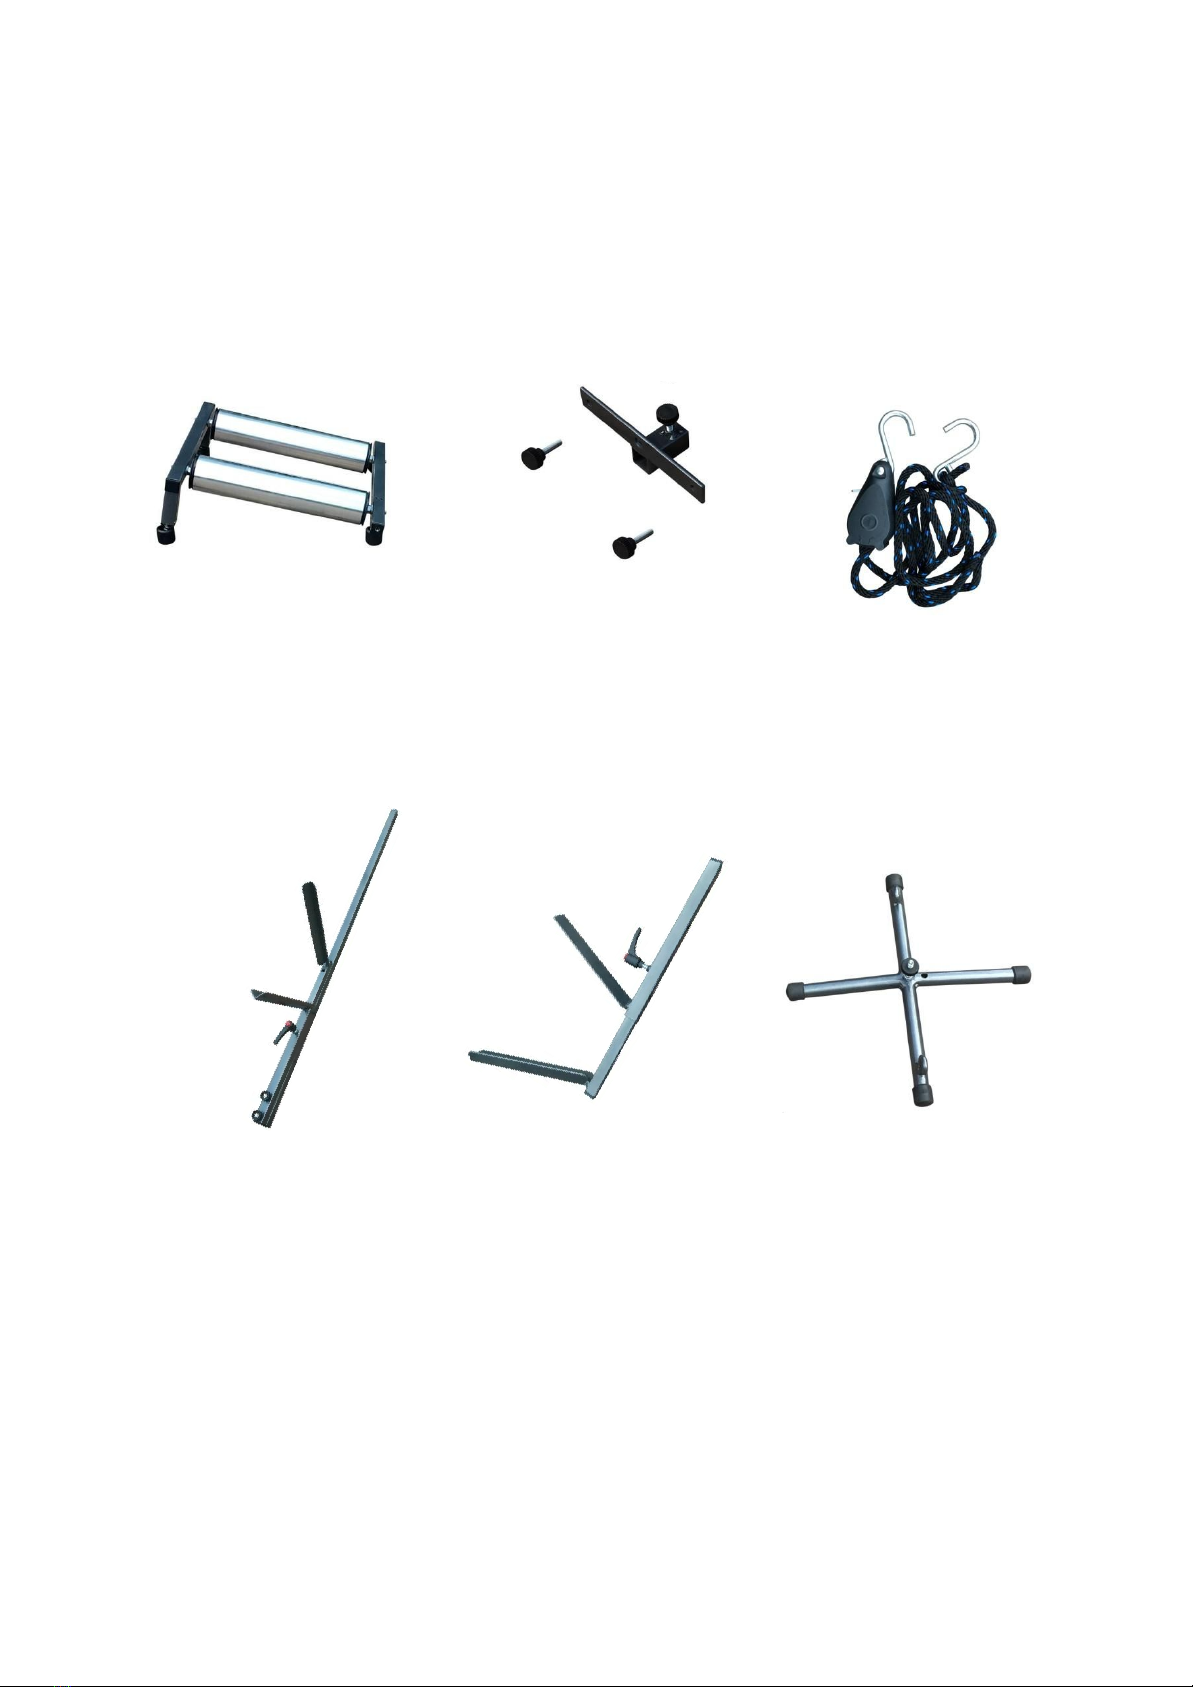
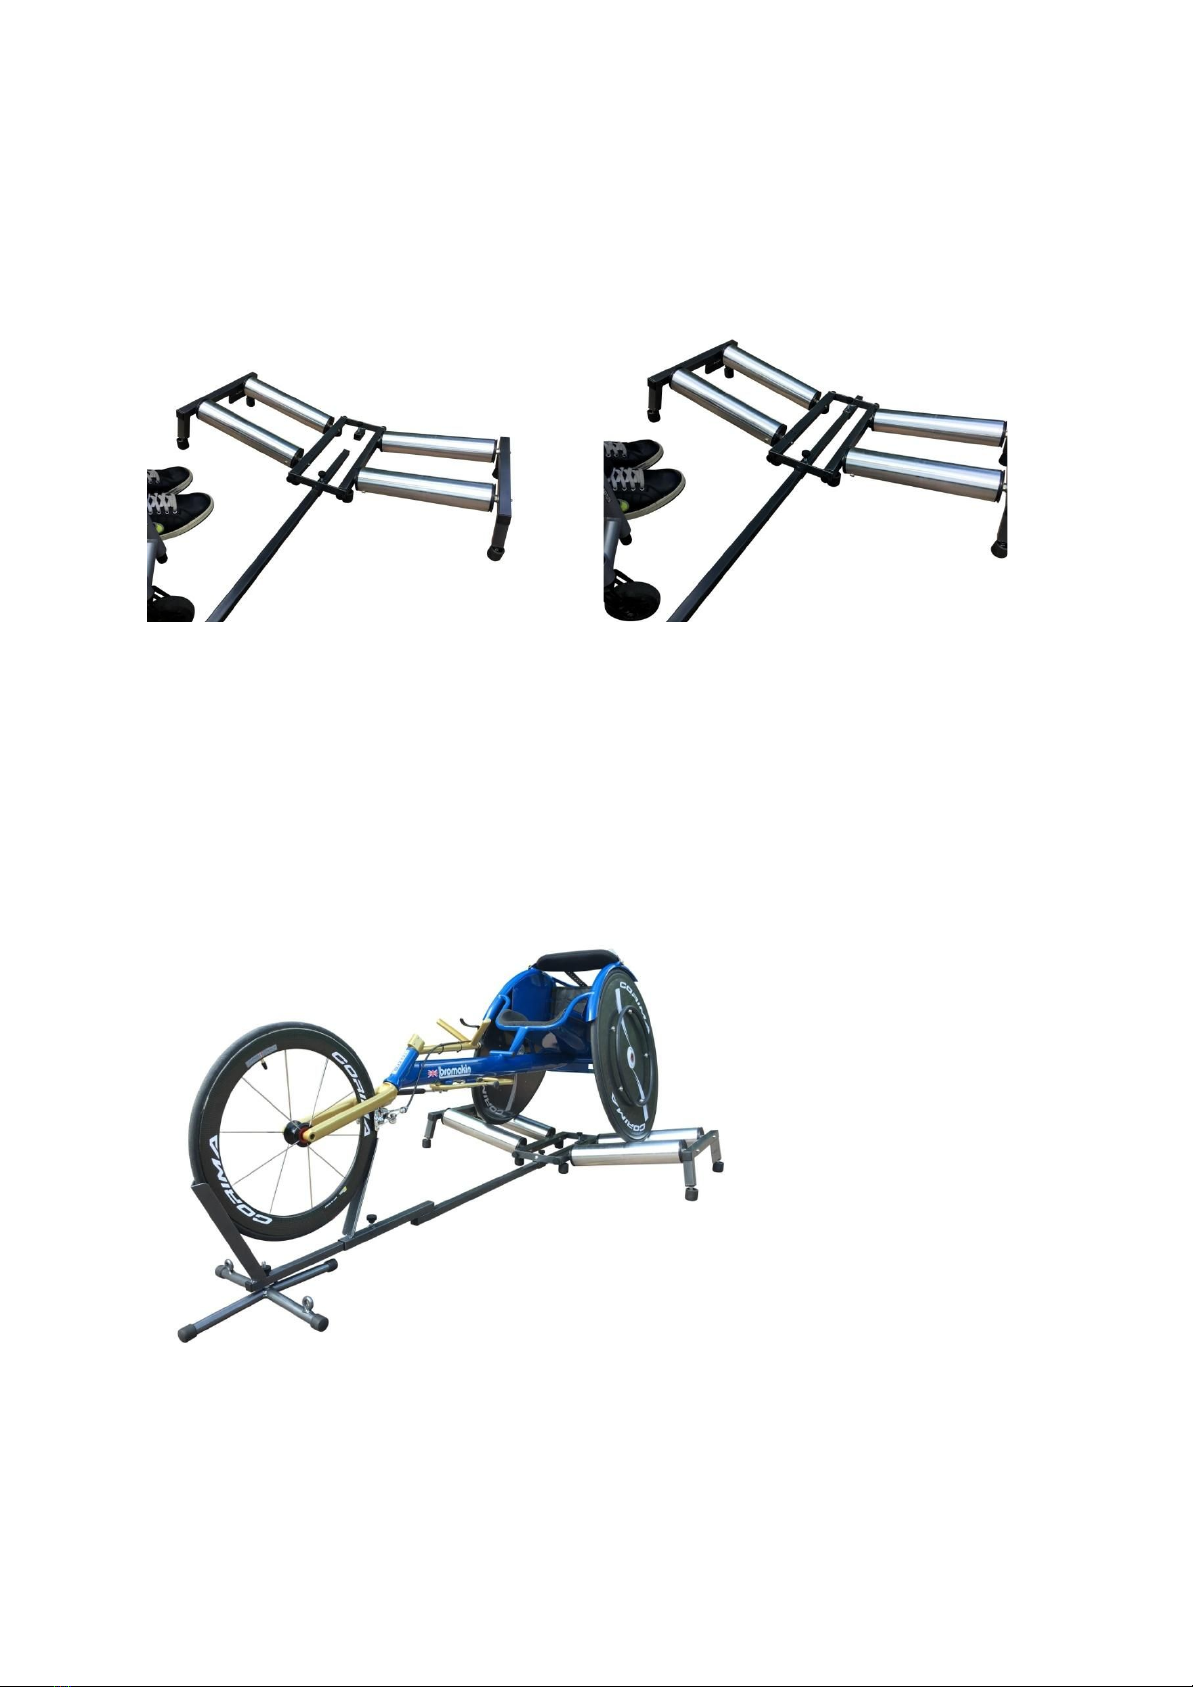
What’s in the box?
Trackside:
You should find the following items in your newly opened Invictus Active Trackside box:
(Note some of these items may be supplied pre-assembled)
Roller unit
x 2
Spacer lock & thumb nuts
x 2
Retaining strap
x 1
Clamping bar
x 1
Front wheel clamp
x 1 (attached to clamping bar)
Stand
x 1
2
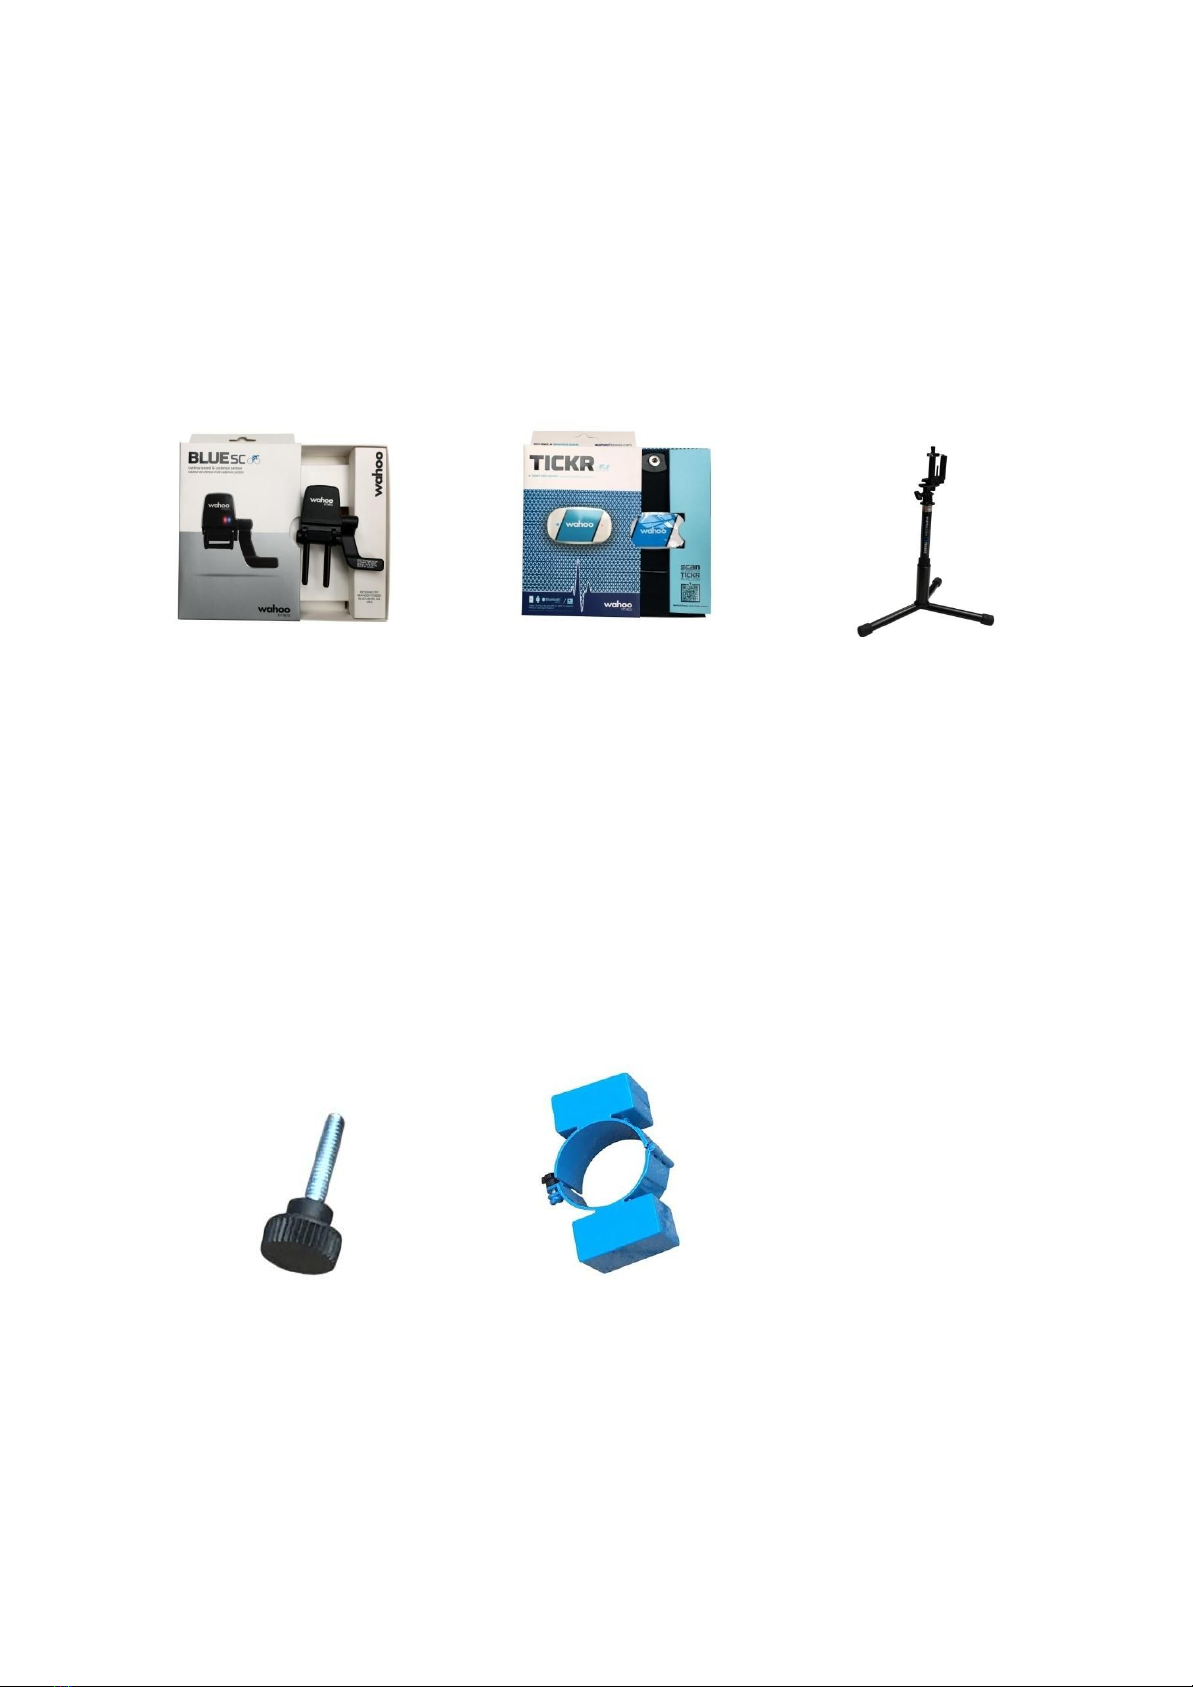
What’s in the box continued
Smart / Smart Plus pack:
Record your speed, distance and heart rate – available to upgrade at any time!
Wahoo speed sensor
x 1
Wahoo heart rate sensor
x 1
Phone stand & holder
x 1
Momentum pack:
Increase the weight and momentum of your wheels with 1kg or 2kg weights – available to upgrade at
any time!
Thumb Nuts x 4 Weight x 2
3
First time setup
You only need to undertake the following procedure the first time you fit your race chair to the
trackside. It’s worth taking your time to get this bit right as it will help optimise the performance of the
trackside.
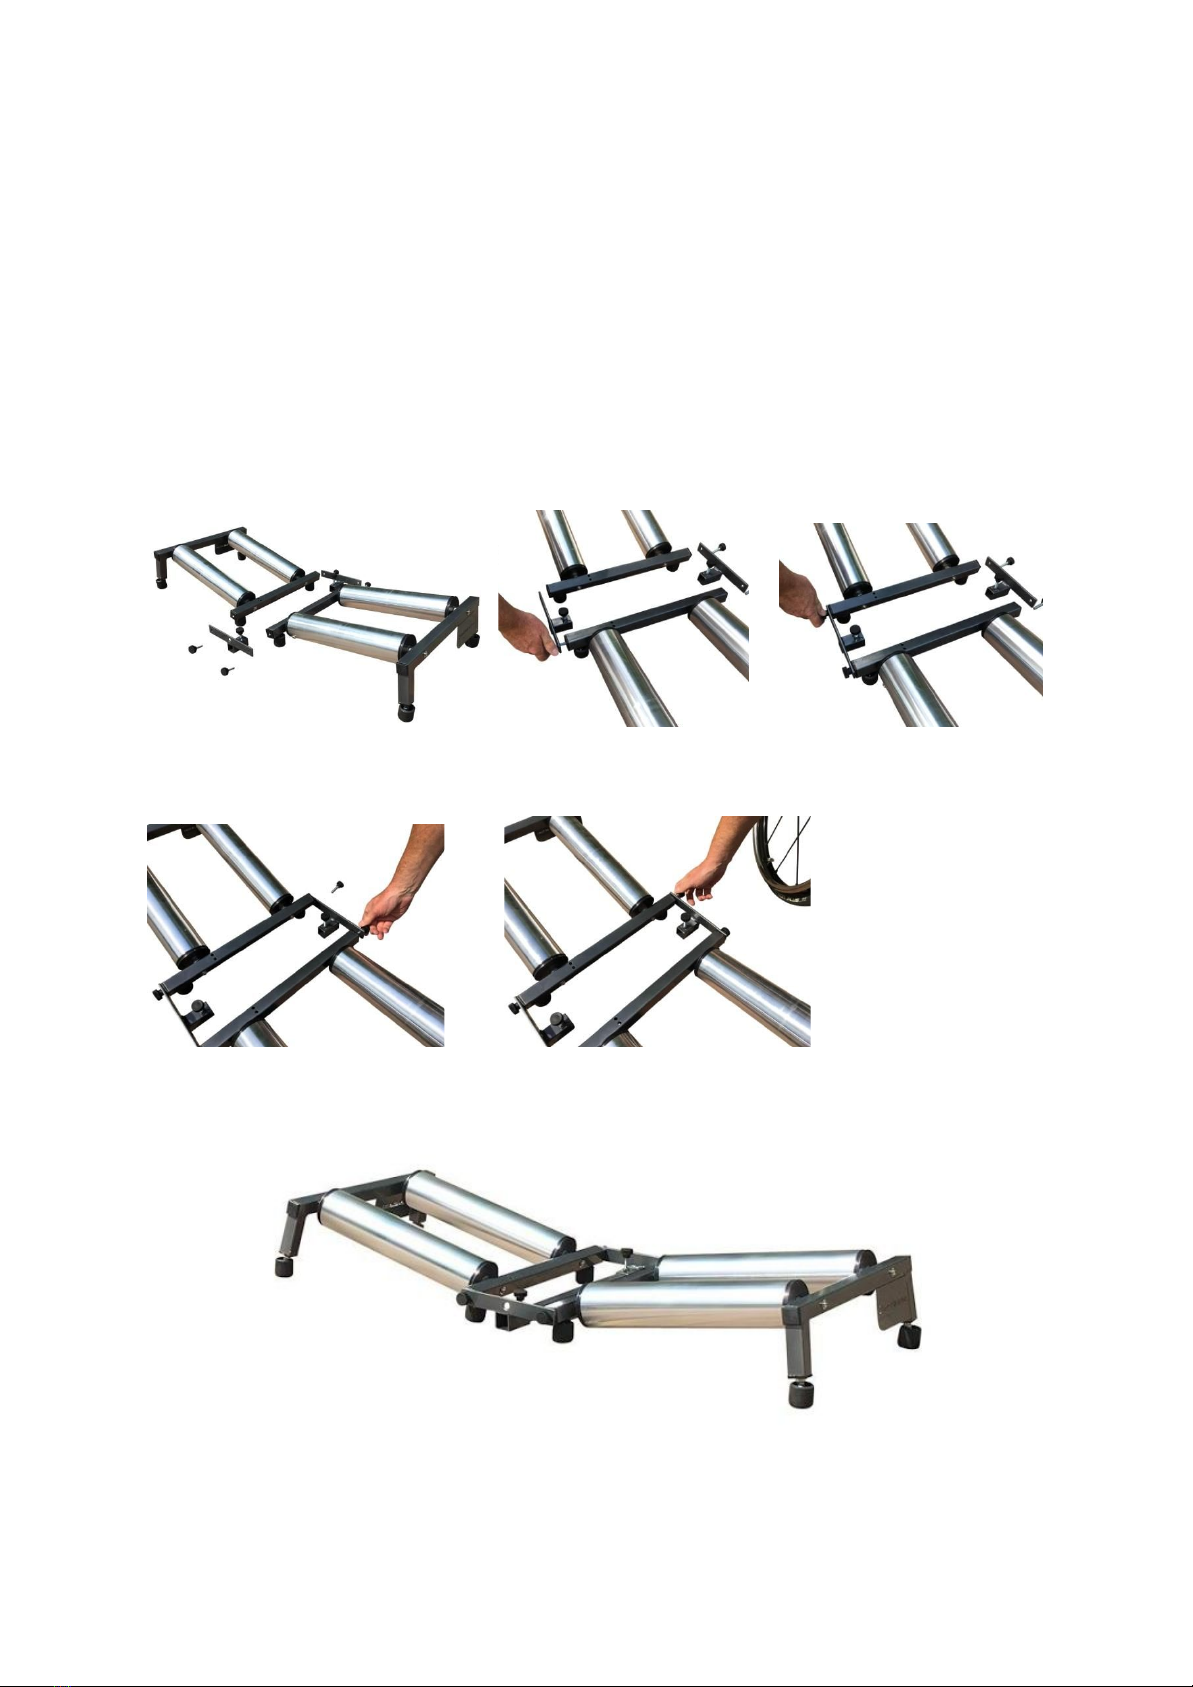
Roller assembly:
1) Place the two units on a flat level surface side by side with the longer legs on the outside.
2) Align the two units and locate the spacer lock in the position shown (The spacer lock is universal
fitting either the front or rear), screw in two of the thumb nuts locking the front of the Trackside
together. (The front of the Trackside has the blank end cap inserted in the outer rail)
3) Repeat this process on the rear of the Trackside.
4) Roller Assembly
4

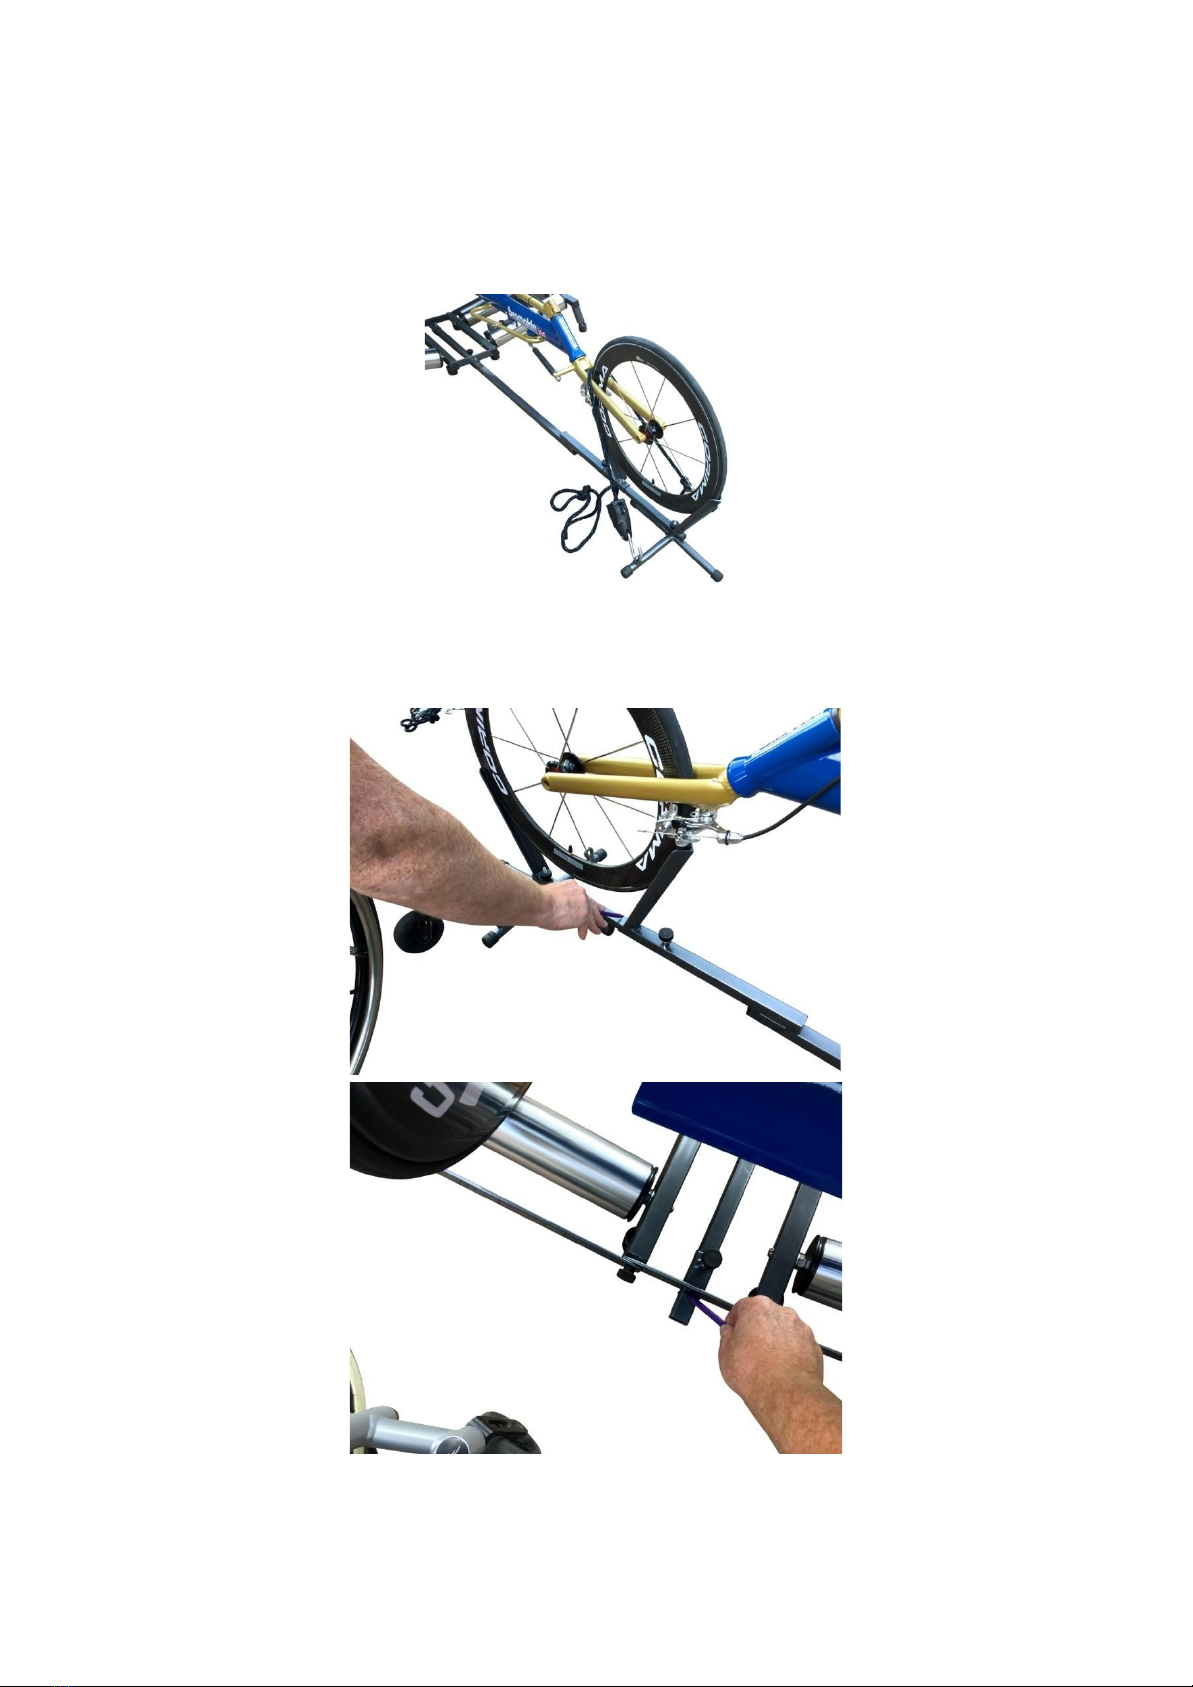
First time setup - continued
Front wheel clamp assembly:
1) Remove the two thumb nuts from the clamping bar, detach the front wheel clamp. Loosen off the
clamp lever and split the front wheel clamp into its front and rear parts( rear has clamp lever)
2) Insert the stand into the front half of the wheel clamp, the stand has two bars that align with the
two holes in the front wheel clamp, insert the stand so that the threaded bar is in the front hole of the
clamp, screw the thumb nut onto the stand thread.
3) Front wheel clamp assembly.
5
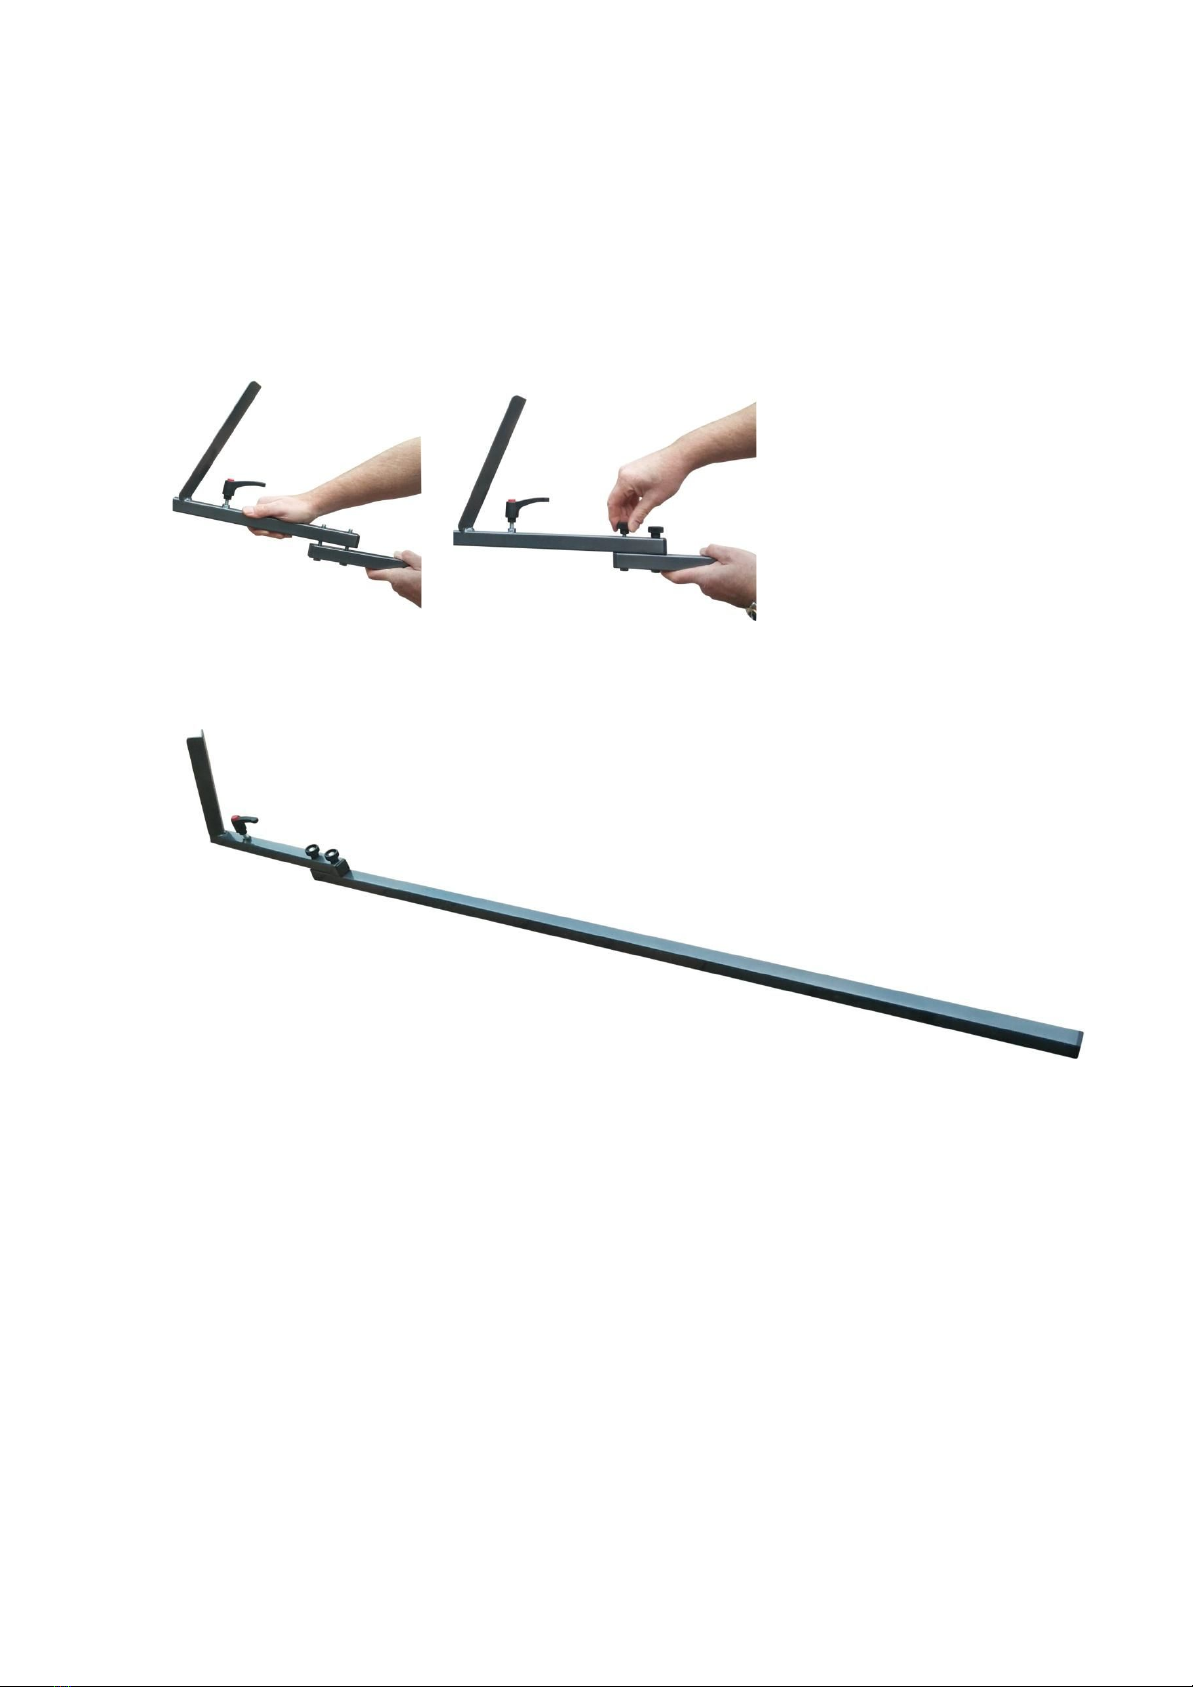
First time fit continued
Clamping bar assembly:
1) Insert the two threaded bars of the long bar into the rear part of the front wheel clamp assembly
and secure in position by tightening the two thumb nuts.
2) Clamping bar assembly
6

Race chair alignment:
1) With your front wheel sat on the ground place the rear wheels of your race chair in the center of the
roller assembly.
2) Measure the height from the ground to bottom of your tyre.
3) Insert the front wheel clamp assembly into clamping bar assembly
4) Remove rear wheels from the roller assembly, place front wheel in the front wheel clamp, adjust the
clamp so that the height of the front wheel matches that of the rear wheels. Tighten the clamp lever.
7
First time fit continued
Clamping Bar assembly:
1) Slide the long clamping bar into the front and rear spacer locks.
2) Place the race chair on the Trackside.
3) With the race chair sat centrally on the rollers slide the clamping bar in and out until both rear
wheels nessel evenly between all 4 rollers. Gently rotate the one rear wheel, do both rollers rotate
equally? Are they in constant contact with the rear wheel when it’s being rotated? Rotate the rear
roller do the rear wheel and the front roller rotate when you do this? Now do the same with the front
roller, is it now causing the rear roller to rotate? Continue with minor adjustments in and out of the
clamping bar until you feel you have achieved the optimum contact with both rollers.
4) Repeat operation 3 on the other wheel until you feel you have optimum contact on all 4 rollers.
5) Tighten the two thumb nuts on top of the two spacer locks so that the long clamping bar is held
securely in position.
8
First time fit continued
1) Secure the race chair with the anti flip retaining strap and then try using your Trackside.
2) Having aligned your Trackside for your future reference take a permanent marker and draw a
reference line on both the front wheel clamp and the clamping bar.
9
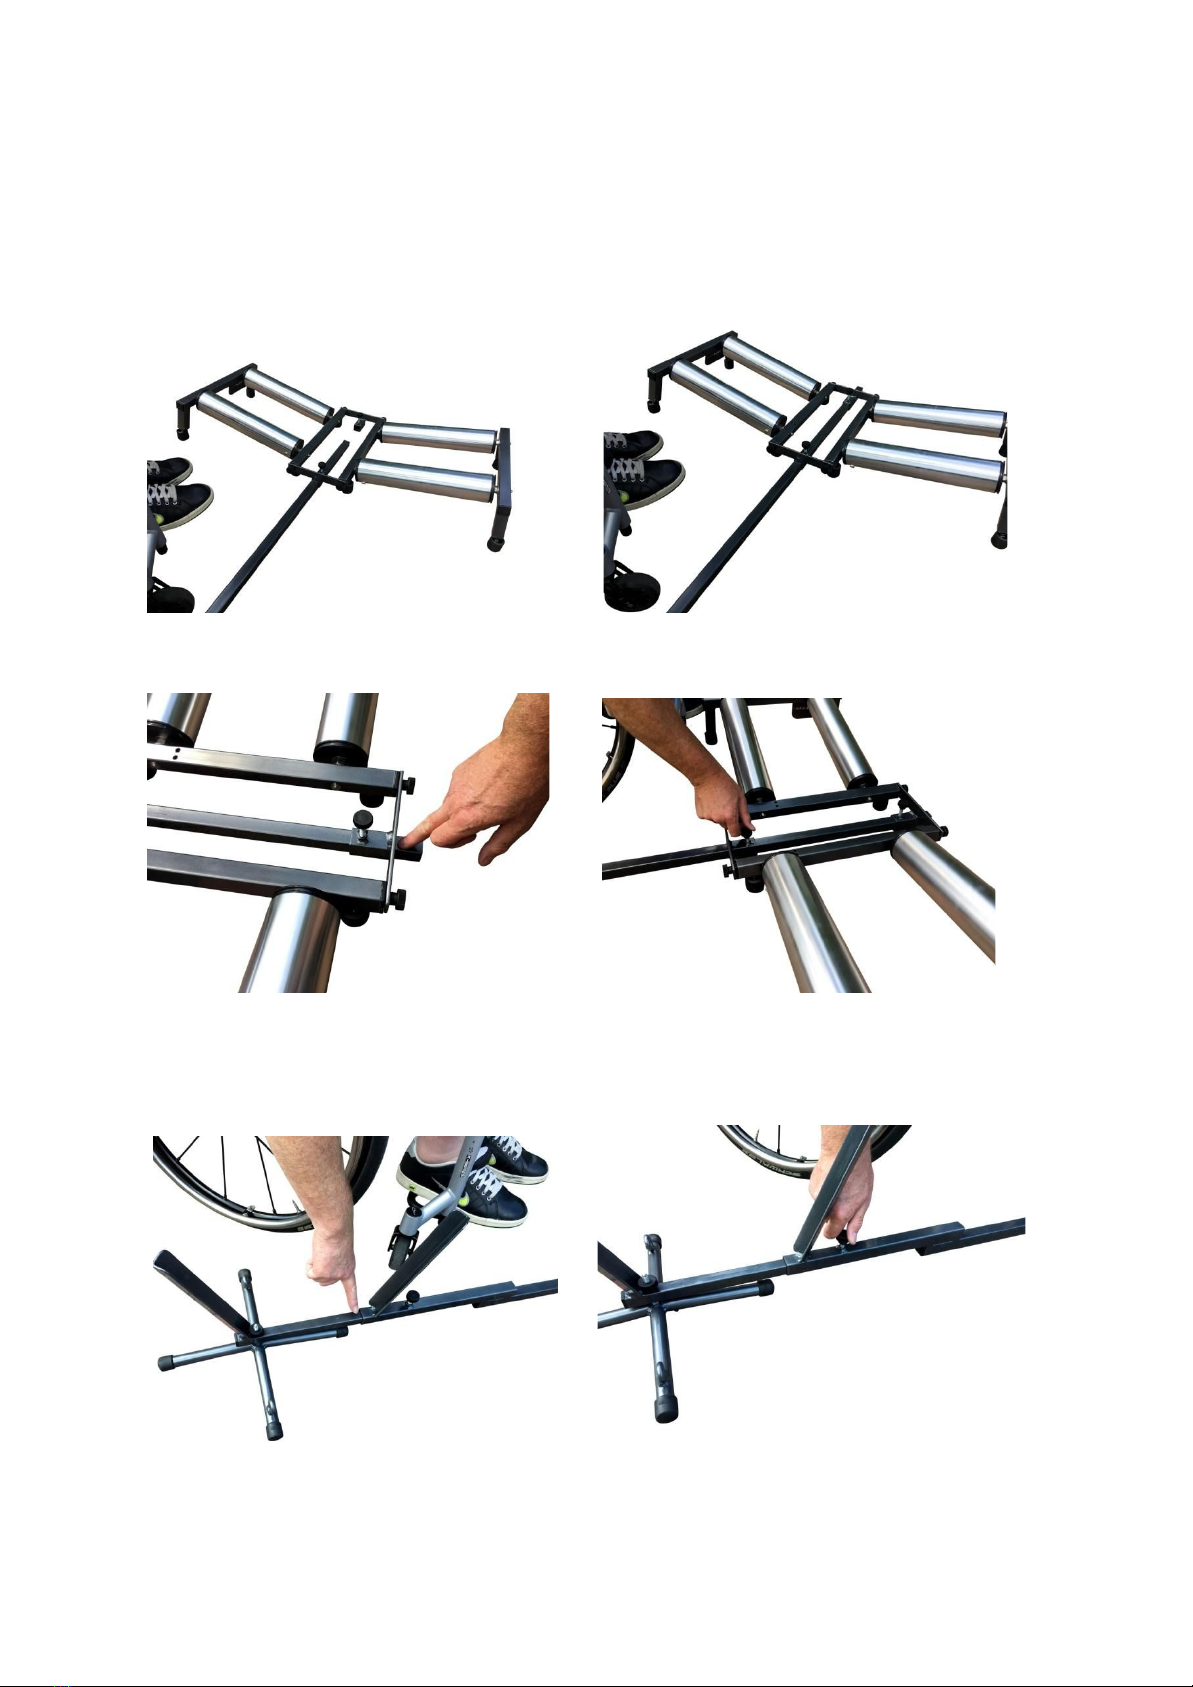
Setting up your Trackside
Clamping Bar :
1) Insert the long clamping bar into the front and rear spacer locks.
2) Align your mark with the outside of the rear spacer lock and tighten both thumb nuts.
3) Insert the front wheel clamp into clamping bar, align your mark with the front edge of the clamping
bar, tighten the clamping lever on the clamping bar.
10
This manual suits for next models
1
Table of contents
Other Invictus Active Fitness Equipment manuals


