
Integrated Pool Products Poolmaid User manual

Automatic Pool Cleaner
Nettoyant Piscine Automatique
Automatischer Schwimmbadreiniger
Pulitore Automatico per Piscina
Limpiador Automático de Piscinas
Limpador automático de piscinas
Your Poolcare Solution Instruction Manual
Votre Solution Entretien Piscine Manuel d’Instructions
Ihre Lösung zur Schwimmbadpflege Betriebsanleitung
La Soluzione per la Cura della Vostra Piscina Manuale di
Istruzioni
Su Solución para el Cuidado de su Piscina Manual de
Instrucciones
Manual de instruções da solução para cuidar da sua piscina

2
English Instructions 3
Instructions Françaises 9
Deutsche Anweisungen 15
Istruzioni Italiane 21
Instrucciones Españolas 27
Instruções Portuguesas 33

2 3
English Instructions
Contents & Components
Components 3
Pre-installation Checklist 4 - 5
Poolmaid Weir Valve 6
Trouble Shooting 7
Other Poolmaid Products include:
Filters, Hoses, Pool Lights, Chlorinators•
Accessories:
45 Degree Elbow
Use to de-stress the hose at the weir
Foot Pad for Vinyl Pools
A softer foot pad can be purchased for vinyl pools or slippery
fibreglass pools
•
•
Please note: No guarantee is given on vinyl liners when used with a Poolmaid cleaner
Swivel Nut
Hose
Swivel
Swivel
Insert
Main Body
Bump Strip
Clip-on
Weight
Float
Hammer
Flapper
Hammer
Flapper
Cover
Foot Pad
Disc
Pool Hose
Weir adaptor
(Australia only)
45° elbow
(Australia only)
Flo n Show
weir valve
Weir adap-
tor
45° elbow
4
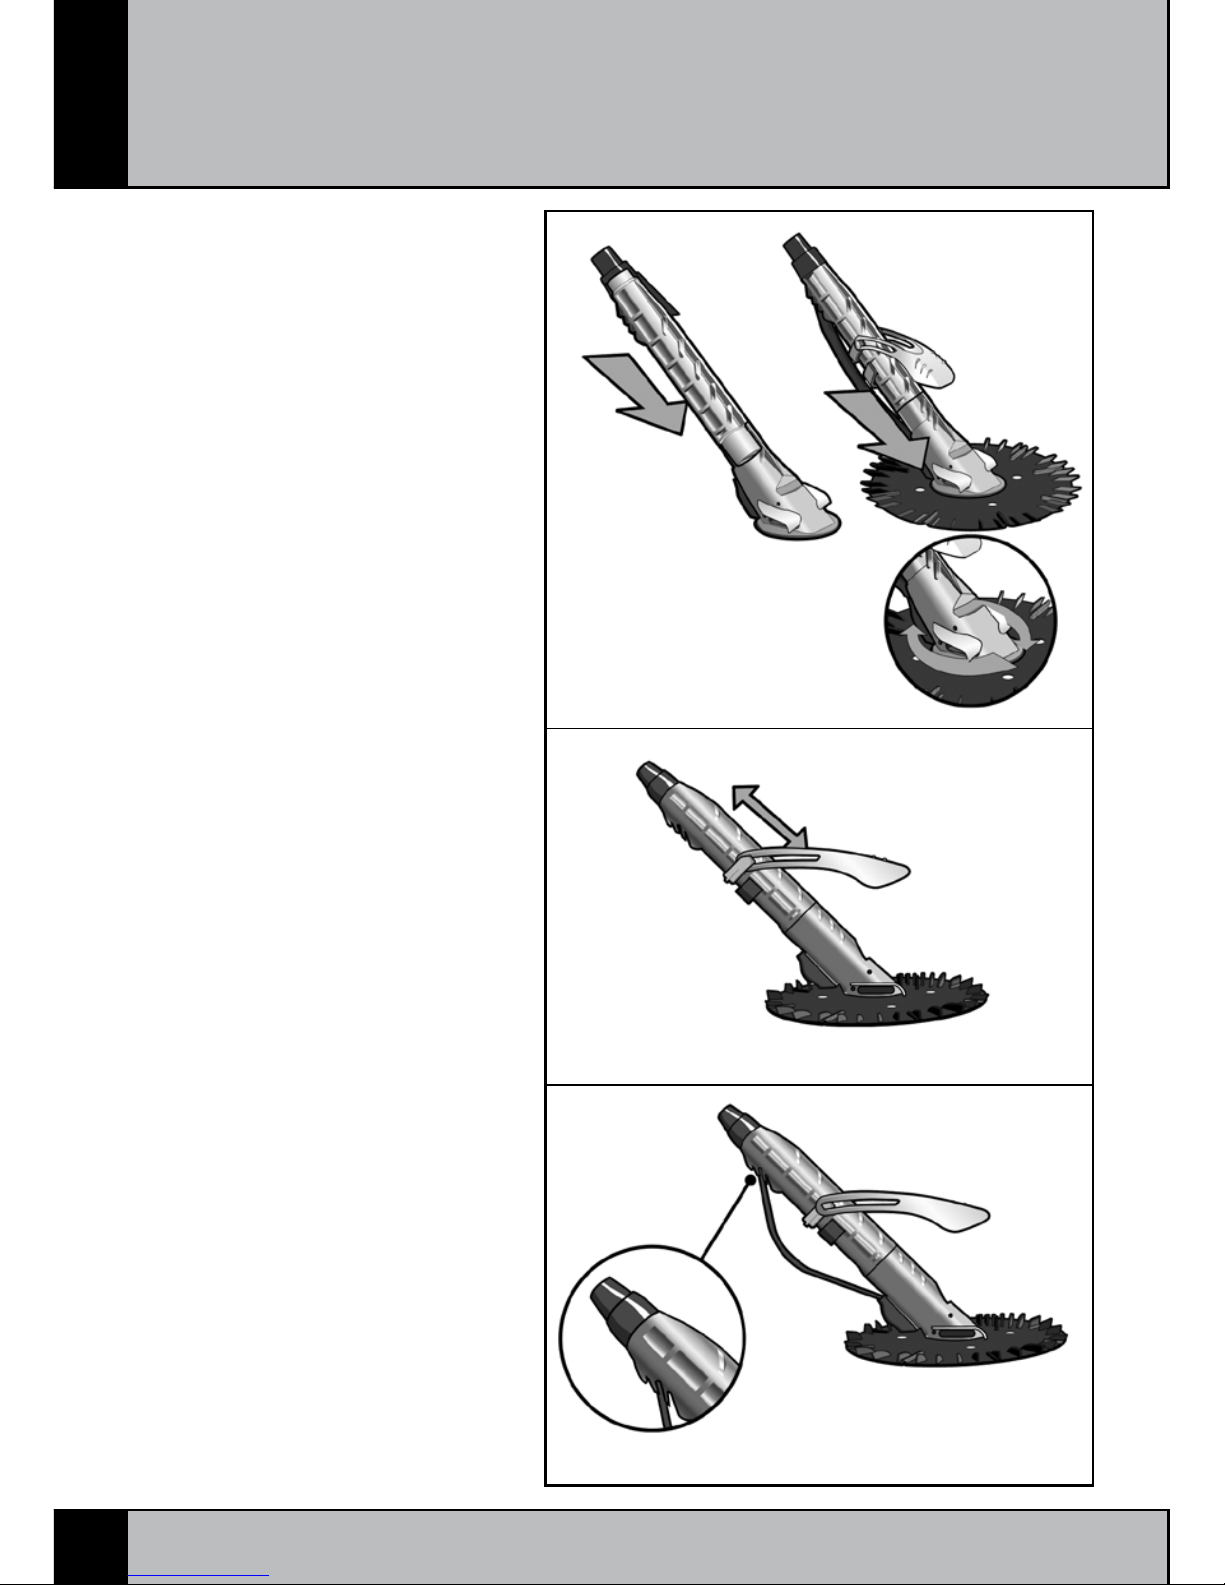
Once unpacked:
Step 1
Attach the Poolmaid disc by
placing the disc over the body
(see figure 1) and positioning it
below the wings (figure 2).
The disc must be attached
with the fins on top and the flat
surface facing down. Disc is
marked “Top”.
The disc should rotate freely.
1.
2.
3.
Step 2
The float and clip-on weight
have been set by the factory for
most pools. However, the float
and clip-on weight can be ad-
justed for the optimal setting for
your pool by doing the following:
put the cleaner, with the hoses
attached, in the deep end of the
pool.
Please ensure that all the air is
out of the hoses. Start adjust-
ment with the float first. When
the cleaner and disc sit flat on
the pool floor, then the adjust-
ment is correct. Changing the
weight and float settings gives
the Poolmaid Pool Cleaner a dif-
ferent random pattern.
1.
2.
Step 3
Insert the bump strip into the
slots provided. Insert bottom
end first and adjust top end ac-
cording to the obstacles in your
pool
1.
Step 1
Step 2
Step 3
(Fig. 1)
(Fig. 2)
Pre-installation Checklist

5
Step 4
Assemble sufficient lengths of
hoses to cover the distance from
weir to furthest point away from
the weir plus one extra length of
hose (fig 5)
Remove the air from the hoses
by pushing the hoses vertically
into the pool
Install the Poolmaid Weir Valve in
the weir/skimmer box inlet and
attach the pool hoses (please
refer to page 3)
Switch on your filtration unit
1.
2.
3.
4.
Step 4
Return
nozzle
Weir/Skimmer box
Pre-installation Check list
(Fig. 5)

6
To ensure your Poolmaid’s optimum
performance, we have included a
Poolmaid Weir Valve. This valve will
immediately give you the state of
your filter system. Should your filter
require backwashing, this will be
clearly visible by observing the posi-
tion of the flow indicator.
Installing the Valve
The valve should be fitted to the
inlet/suction in your pool weir/skim-
mer box.
Turn off the pump
Disconnect the pool hose from
the weir box
Ensure the baskets contain no
debris
Backwash the filter, with the
hose removed, before installing
the weir valve
Install the valve in the weir
Turn on the filtration system
Attach the Poolmaid to the cor-
rect length of hoses (refer to
page 2) taking care to purge the
air out of the hoses by holding
the end of the first hose over the
water return outlet/aim flow
Connect hose to weir valve
Close the flow equalizer.
If the suction is too high, open
the flow equalizer until the flap
operates between “low” and
“high”
i.
ii.
iii.
iv.
v.
vi.
vii.
viii.
ix.
x.
The Poolmaid Weir Valve
Decrease
Flow
(Fig. 6)
Tip:
Always follow instruction i) & ii) when
backwashing in the future
Increase
Flow
Flow
Equalizer
Flow
Indicator

7
Trouble Shooting
Problem Probable Cause Suggested Solution
1. Poolmaid does not move
with the pump running
i. Hose is disconnected
ii. Leaf basket is full
iii. Filter is not backwashed
iv. Obstacle in the flapper
chamber
v. Hose has a hole
vi. Disc does not rotate freely
SWITCH OFF PUMP
Reconnect hose
Empty leaf basket; and
Backwash filter
Pull any visible obstacles
out - If it does not solve
the problem, remove flap-
per cover, remove flapper,
inspect chamber and
remove any obstacles,
rinse. Refit flapper, then
flapper, cover by placing
the left location pins into
the left holes push the
right side of the flapper
cover, clicking the pins
into their corresponding
holes. Inspect the outside
of the body to see if all
four pins have located
Replace section of dam-
aged hose
Ensure disc is installed as
outlined on page 2
i.
ii.
iii.
iv.
v.
vi.
2. Obstacle in hose Remove obstaclei.
3. Poolmaid is stuck in a spe-
cific place
Stuck in a corner or on a
light fitting
i. Remove from the obstacle
Adjust bump strip lower
or higher
Decrease suction slowly
by slightly opening the
flow equalizer
Adjust the return nozzle
to drive the poolmaid
cleaner away from the
obstacle, by turning the
return nozzle toward the
hose.
i.
ii.
iii.
iv.
4. Cleaner climbs out of the
pool
Open flow equalizer
slowly or adjust float to
a lower position.
i.
5. Air flowing out of the
return nozzle
Hose has a leaki. Check hose for leaks
Ensure hose sections
are tightly connected.
Check o-ring at pump,
replace if worn.
i.
ii.
iii.

8
Connection to Skimmer
Points (Only Australia)
Flo n Show
weir valve
45° elbow
Pool Hose
Weir adaptor
Water Level
Vacuum
Plate

9
Instructions Françaises
Table des Matières
Composants 9
Liste de vérification avant installation 10 - 11
Valve de Déversement Poolmaid 12
Résolution de problèmes éventuels 13
Poolmaid propose également :
filtres, tuyaux, éclairage piscine, chlorateurs•
Accessoires:
Coude à 45 degrés :
A utiliser pour libérer le tuyau au niveau du déversoir
Pulvino pour piscines à revêtement vinyle :
Il est possible d’acheter un pulvino plus doux pour les piscines
à revêtement vinyle ou en fibre de verre et à tendance glissante
•
•
•
•
•
A noter : Aucune garantie ne peut être donnée pour les revêtements vinyles lorsqu’ils sont utilisés
avec un nettoyant Poolmaid
Ecrou
tournant
Articulation
de tuyau
Insert tour-
nant
Corps
principal
Feuillard de
sécurité
Poids fixé
Flotteur
Marteau
abattant
Bâche du
marteau
abattant
Pulvino
Disque
Tuyau de
la piscine
Adaptateur du barrage
(seulement l’Australie)
Coude de 45°
(seulement l’Australie)
Couler-montrer
soupape du
barrage
Adapteur du
barrage
Coude de 45°

10
Une fois déballé :
Etape 1
Fixez le disque du Poolmaid en
plaçant le disque au-dessus du
corps (voir Fig. 1) et positionnez-
le sous les ailes (Fig. 2)
Le disque doit être fixé les
ailettes sur le dessus, la surface
plate au-dessous. L’inscription
“haut” est indiquée sur le
disque.
Le disque devrait pivoter libre-
ment.
1.
2.
3.
Etape 2
Le flotteur et le poids fixé ont
été placé par la fabrique pour
la plupart des piscines. Néan-
moins, le flotteur et le poids fixé
peuvent être ajustés pour conve-
nir exacement à votre piscine en
suivant les pas suivants: mettez
l’appareil de nettoyage, avec les
tuyaux attachés, dans la partie
profonde de la piscine.
Assurez s’il vous plaît qu’il n’y a
pas d’air dans les tuyaux. Com-
mencez le réglage avec le flot-
teur. Quand l’appareil de nettoy-
age et le disque sont plats sur
le sol de la piscine, le réglage
est correct. En changeant les
positions du poids et du flotteur,
vous donnez au Poolmaid Pool
Cleaner un mouvement différent,
au hazard.
1.
2.
Etape 3
Insérez le feuillard de sécurité
dans les encoches prévues à cet
effet. Commencez par insérer
la partie arrière puis ajustez
l’extrémité supérieure en fonc-
tion des obstacles que présente
votre piscine.
1.
Etape 1
Etape 2
Etape 3
(Fig. 1)
(Fig. 2)
Liste de vérification avant
installation
Table of contents
Languages:


