INO-ROPE I-BONE User manual

Original textile solutions
High-tech fibers at the core of our innovations
MODE D’EMPLOI
-
USER’S MANUAL


Butée de drisse Ino-Stopper
Mode d’emploi
1/ Présenter la
butée de drisse par
son côté le moins
large sur un œil
épissé et insérer
l’œil dans la gorge
basse.
2/ Tourner d’1/4
de tour de sorte
à ce que les deux
brins de l’œil épissé
soient engagés dans
les gorges prévues à
cet eet.
3/ Bien posionner
la butée de drisse à
la perpendiculaire
du cordage pour
une meilleure
ecacité.
SPECIFICATIONS
INSTALLATION
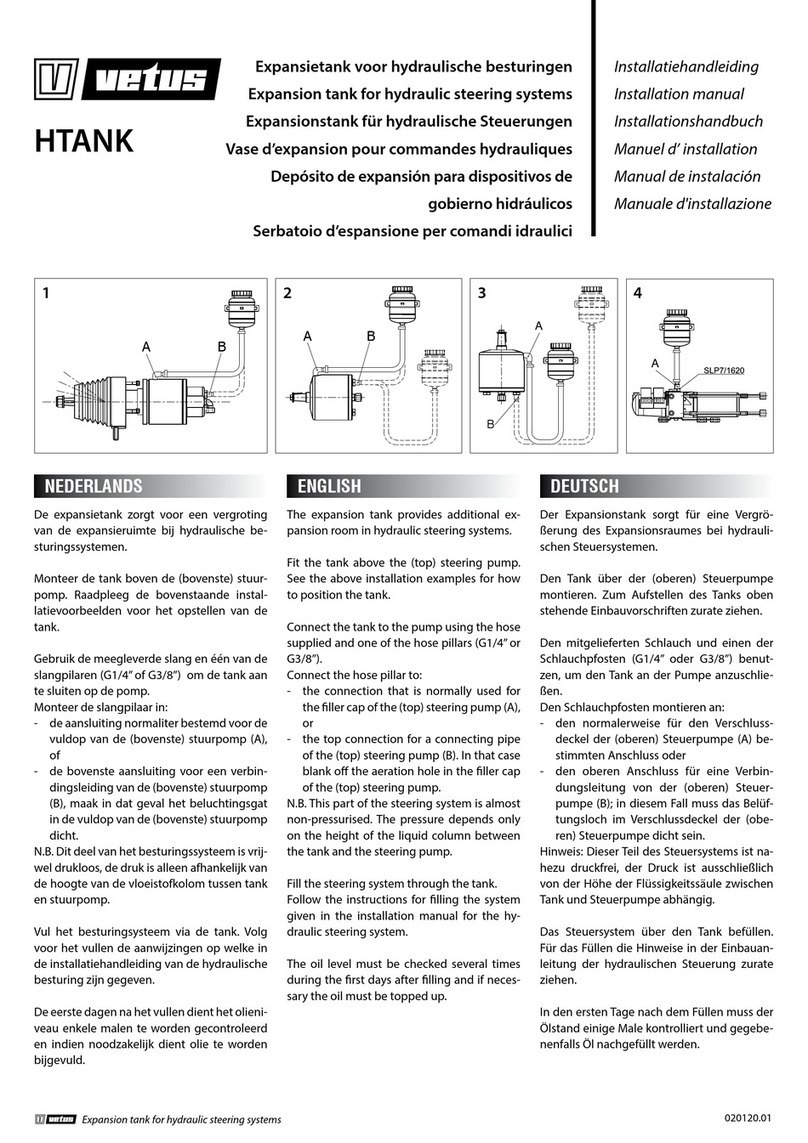
La butée de drisse Ino-Stopper doit être installée dans un œil épissé ajusté au plus
serré.
La taille de l’œil de l’œil épissé ne doit pas excéder la largeur de la butée :
- 25mm pour une drisse de diam. 6mm
- 30mm pour une drisse de diam. 8mm
- 35mm pour une drisse de diam. 10mm
- 40mm pour une drisse de diam. 12mm
Existe pour drisses de
diamètre 6, 8, 10 et
12mm
Diam. 6: 3gr
Diam. 8: 7gr
Diam.10: 16gr
Diam.12: 20gr
123
3

Ino-Stopper halyard stopper
Instrucons
1/ Place the halyard
stopper with its
narrowest side onto
a spliced eye and
insert the eye in the
lower groove.
2/ Make a ¼ turn to
let the two strands
of the spliced eye
enter the intended
groove.
3/ For the most
eciency, posion
the halyard stopper
perpendicularly to
the line.
SPECIFICATIONS
INSTALLATION
The Ino-Stopper halyard stopper must be set up in a spliced eye adjusted as ghtly
as possible.
The size of the eye of the spliced eye must not be wider than the stopper’s width:
- 25mm for a 6mm halyard
- 30mm for an 8mm halyard
- 35mm for a 10mm halyard
- 40mm for a 12mm halyard
Available for halyards
of 6, 8, 10 and 12mm
diameter
Diam. 6: 3gr
Diam. 8: 7gr
Diam.10: 16gr
Diam.12: 20gr
123
4

5
Poulie ouvrante Ino-Snatch-Block
Mode d’emploi
SPECIFICATIONS
INSTALLATION
Charge de
rupture :
1200kg
Charge de
travail :
400 kg
Diam. Max :
10 mm
Poids :
28 gr.
- Ouvrir la manille
texle en vous
servant de la ree
d’ouverture facile.
- Ouvrir la poulie en
faisant pivoter les deux
pares de la poulie de
manière à avoir accès
a la gorge du réa (une
rotaon de 90° sut).
- Insérer le cordage sur le réa.
- Refermer les joues en les posionnant bien face à
face et jusqu’au « clic ».
- Passer la manille texle autour de son point
d’accroche.
- Refermer la manille texle.
- Rincer votre Ino-Snatch-Block à l’eau claire.
SPECIFICATIONS
INSTALLATION
1 2
3
4

6
Ino-Snatch-Block
Instrucons
SPECIFICATIONS
INSTALLATION
- Open the so shackle with
the easy opening pull.
- Open the block by rotang
both parts of the block in order
to have access to the sheave’s
groove (a 90° rotaon is
enough).
- Insert the line on the sheave.
- Close cheeks making sure they align, unl
you hear the clicking sound.
- Pass the so shackle around its anchor
point.
- Close the so shackle.
- Rinse your Ino-Snatch-Block with clean
water.
3
4
1 2
BL :
1200kg
SWL :
400 kg
Diam. Max :
10 mm
Weight :
28 gr.

7
Padeye Ino-Rope-Padeye
Mode d’emploi
- A l’aide d’une scie cloche,
percer le pont au diamètre
adapté.
- Réaliser un cordon de joint
polyuréthanne autour du
perçage.
- Insérer la padeye en orientant
son accroche dans le sens de
l’eort.
- Une fois correctement
posionnée, visser l’écrou
intérieur, ce dernier est
asymétrique an de s’adapter à
plusieurs épaisseurs de pont.
- Serrer légèrement l’écrou.
- Aendre que le joint
polyuréthanne soit sec puis
serrer fermement l’écrou en
bloquant la padeye.
SPECIFICATIONS
INSTALLATION
P-4: WL 800kg
P-6: WL 1800kg
P-8: WL 3000kg
P-4: 98gr
P-6: 96gr
P-8: 26gr
1
2
1
2
2
4
3

8
Ino-Padeye
Instrucons
- Cut the appropriate size hole
in the deck.
- Fill and seal the cut surfaces
with polyurethane sealant.
- Insert the padeye by
direcng its anchor in the
intended load direcon.
- Once it is correctly
posioned, screw the inner
nut, this is asymmetrical in
order to adapt to dierent
deck widths.
- Tighten the nut lightly.
- Once the polyurethane seal
has dried, close the nut rmly
by blocking the padeye.
SPECIFICATIONS
INSTALLATION
P-4: WL 800kg
P-6: WL 1800kg
P-8: WL 3000kg
P-4: 98gr
P-6: 96gr
P-8: 26gr
1
2
1
2
2
4
3

9
Poulies Ino-Block
Mode d’emploi
SPECIFICATIONS
INSTALLATION
1
2
1
24
Rincer à
l’eau claire
après chaque
utilisation
Charge de
rupture
(tonnes)
Charge de
travail
(tonnes)
Cordage
Accepté
(mm)
Poids
(grammes)
Modèle IB
2.4
43
6-10
0.8
3.6
48
6-10
1.2
5.4
130
8-14
1.8
7.2
135
10-14
2.4
9
245
10-17
3
12
250
10-17
4
15
400
12-20
5
18
410
12-20
6
Les poulies INO-BLOCK sont vendues avec un lashing Dyneema® épissé
d’un côté. Avant de commencer, assurez-vous que la padeye n’a pas de
bord tranchant. Dans le cas contraire, le lashing peut s’user et casser
subitement, entraînant des dommages à votre bateau, à vos équipiers ou à
vous-même. La xaon de votre Ino-Block est constuée de deux boucles
sur le dessus de la poulie. Pour éviter tout dommage à votre Ino-Block,
eectuer le lashing en passant par les deux boucles simultanément.
1/ Pour xer votre Ino-Block, commencer par une tête d’alouee sur les
deux boucles du loop de la poulie.
2/ Passer ensuite dans la cadène (padeye) puis sous les deux boucles du
loop.
3/ Répéter 2 fois cee opéraon pour avoir 3 tours de lashing.
4/ Faire les demi clés avec le brin qui ressort de la poulie.
5/ Finir avec un demi nœud, couper puis brûler.
6/ Votre poulie est prête a l’emploi.
5 6
2
3
GARANTIES
La garane couvre tout défaut d’origine matérielle ou d’assemblage constaté dans un délai de un an
à compter de la date d’achat par le client nal. Le scker de marque (ex: ”3.6”) fait oce de garane.
Si le scker est décollé, le client nal sera intégralement responsable pour tout dommage.
L’axe texle doit être vérié chaque année ou tout les 10.000 miles. Commandez vos pièces de
rechange sur inorope.com
Pour bénécier d’un an d’extension de garane, pensez à notre service après vente pour la
maintenance de vos poulies. Plus d’informaons sur inorope.com.

10
Ino-Block
Instrucons
SPECIFICATIONS
INSTALLATION
1
2
1
24
NO-BLOCK are sold with a lashing already spliced at one end. Before you
start, make sure you e it to a padeye with round edges. Otherwise, it
may damage the line and break suddenly causing damage to your vessel,
personal injury or death.
The padeye on the INO-BLOCK consists in two loops on the top of the block.
You may pass under both loops simultaneously, otherwise you will damage
the INO-BLOCK.
1/ To e your block, start with a lark’s head on the two loops of the block.
2/ Then, pass through the padeye and again under the two loops of the
block.
3/ Repeat this operaon 2 mes to have 3 rounds of lashing.
4/ Tie a half hitch with the line coming from the block.
5/ Finish with an overhand knot, then cut and burn it.
6/ Your block is ready to use.
5 6
2
3
WARRANTY INFORMATION
The warranty covers any original material or workmanship defects declared within one year of the
date of receipt of the product by the end user. The brand sckers (ex: ”3.6”) is a warranty seal. If
removed, the end user will be responsible for any damage or defects.
The axle loop should be checked every year or every 10,000 miles. Spare parts can be ordered on
inorope.com.
Our aer-sales service can do the maintenance of your block and extend for one more year the
warranty. Find out more on inorope.com.
Rince with
fresh water
after use
Breaking
Load
(tons)
Safe Working
Load
(tons)
Rope Accepted
(mm)
Weight
(grams)
Model IB
2.4
43
6-10
0.8
3.6
48
6-10
1.2
5.4
130
8-14
1.8
7.2
135
10-14
2.4
9
245
10-17
3
12
250
10-17
4
15
400
12-20
5
18
410
12-20
6
This manual suits for next models
22
Table of contents
Languages:
Popular Boating Equipment manuals by other brands




Dowco
Dowco V322 CC - 2019 installation instructions

Humphree
Humphree HCS-5 installation manual

Vetus
Vetus BOW4512D Operation manual and installation instructions

Dock Doctors
Dock Doctors SLIDING BOARDING STEP Assembly instructions

Mastervolt
Mastervolt Mass Combi 12/2000-100 Quick installation
Zattini Group
Zattini Group bamar BOXTRON E14S Use and maintenance instruction manual