HP USB-C Travel Dock User manual

HP USB-C Travel Dock
User Guide

© Copyright 2016 HP Development Company,
L.P.
Windows is either a registered trademark or
trademark of Microsoft Corporation in the
United States and/or other countries.
Plug and Display
™
DisplayLink™ is an oicial software
development partner.
The information contained herein is subject to
change without notice. The only warranties for
HP products and services are set forth in the
express warranty statements accompanying
such products and services. Nothing herein
should be construed as constituting an
additional warranty. HP shall not be liable for
technical or editorial errors or omissions
contained herein.
Second Edition: April 2016
First Edition: January 2016
Document Part Number: 850684-002

Table of contents
1 Getting started ............................................................................................................................................. 1
Identifying components ........................................................................................................................................ 1
Rear components ................................................................................................................................ 1
Setting up the USB dock ........................................................................................................................................ 2
Step 1: Connecting to a computer ....................................................................................................... 2
Step 2: Prevent Sleep or Hibernation .................................................................................................. 2
Setting up the software ......................................................................................................................................... 2
Conguring an external monitor ........................................................................................................................... 3
Using HP USB Dock .............................................................................................................................. 3
Using Windows .................................................................................................................................... 3
Using additional software features ..................................................................................................... 4
Sleep, Hibernation, shutdown, and restart ......................................................................................... 4
2 Using the dock ............................................................................................................................................... 5
Dock guidelines ...................................................................................................................................................... 5
Connecting to a network ........................................................................................................................................ 6
Connecting USB devices ......................................................................................................................................... 7
Connecting video devices by using a VGA cable (select products only) ................................................................ 7
Connecting video devices using an HDMI cable (select products only) ................................................................. 8
Setting up HDMI audio ......................................................................................................................... 8
3 Disconnecting the dock .................................................................................................................................. 9
4 Troubleshooting .......................................................................................................................................... 10
Solving common problems .................................................................................................................................. 10
General use and connection problems ............................................................................................. 10
Audio problems ................................................................................................................................. 11
Video problems ................................................................................................................................. 11
Getting more information .................................................................................................................................... 11
Contacting support .............................................................................................................................................. 12
Index ............................................................................................................................................................. 13
iii

iv

1 Getting started
Identifying components
This chapter identies the visible hardware features of the HP USB-C Travel Dock and provides setup
instructions.
NOTE: Some features of the HP USB-C Travel Dock may not be available on your computer.
Rear components
Component Description
(1) USB Type-C cable Connects the dock to a notebook or tablet via a charging USB
Type-C port.
(2) USB 3.0 port Connects an optional USB device, such as a keyboard, mouse,
external drive, printer, scanner or USB hub.
(3) USB 2.0 port Connects an optional USB device, such as a keyboard, mouse,
external drive, printer, scanner or USB hub.
(4) RJ-45 (network) jack Connects a network cable.
(5) External monitor port Connects an external VGA monitor or projector.
(6) HDMI port Connects an optional video or audio device, such as a high-
denition television, any compatible digital or audio
component, or a high-speed High Denition Multimedia
Interface (HDMI) device.
Identifying components 1

Setting up the USB dock
Step 1: Connecting to a computer
▲Connect the USB Type-C cable attached to the dock to a USB Type-C charging port on the computer that
is charged or connected to an AC power source.
NOTE: The dock is bus-powered, which means that it receives power via the same connection used for
transferring data.
Step 2: Prevent Sleep or Hibernation
When using an external monitor, you might want to close the computer. For more information on conguring
an external monitor, see Conguring an external monitor on page 3.
To ensure that the computer does not initiate Sleep or Hibernation when it is closed:
1. Open the Control Panel and select the Power Options page.
2. Click Choose what closing the lid does. Click Do nothing, and then click OK.
3. Under Plugged in, select Do nothing, and then click Save changes.
NOTE: For instructions on accessing the Power Options page, see Help and Support on the computer.
Setting up the software
This section describes how to install the HP USB-C Travel Dock software on a computer running the Windows®
10, Windows 8, or Windows 7 operating system. The software is preinstalled in ash memory on the dock.
1. With the computer on, Windows running, and the Internet connected, connect the USB cable from the
dock to the computer. The device drivers should install automatically.
2. If the device drivers do not install automatically, do the following:
2 Chapter 1 Getting started

●Windows 10—Click Start, click File Explorer, click This PC, and then double-click HP Dock.
Double-click HP Dock Software Installer.exe.
●Windows 8—Click the HP Dock app. Or, click This PC, and then click HP Dock. Double-click HP Dock
Software Installer.exe.
●Windows 7—Click Start, and then click Computer. Double-click HP Dock, and then double-click HP
Dock Software Installer.exe.
3. A welcome screen appears. Click Next.
4. When the End User License Agreement appears, accept and then click Next.
5. Click Install.
6. Choose to restart now or later. The dock might not work until the next restart. If you choose to restart
the computer, rst remove all disks from the computer’s drives. Click Finish.
7. Be sure that you have the latest drivers installed. Go to http://www.hp.com/support and select your
country or region. Select Software and Drivers, type the dock model number (located on the bottom of
the dock), and then select Find my product. Click the link for your specic dock, and then download the
latest drivers.
Conguring an external monitor
Using HP USB Dock
Use the HP USB Dock software to congure the display of a monitor attached to the dock:
1. Click the HP USB Dock icon in the taskbar.
2. To set the external monitor as an extension of the primary monitor, click Extend.
– or –
To set the external monitor as a copy of the primary monitor, click Mirror.
– or –
To set the external monitor to be the only display, click Notebook monitor o.
– or –
To set the external monitor to be the primary display, click Set as main monitor.
HP USB Dock allows you to optimize the display for video, check for updates, and congure advanced
settings. HP USB Dock options might vary, depending on the operating system. For instructions on
conguring the external monitor using Windows, see Using Windows on page 3.
Using Windows
Use Windows to congure the display of a monitor attached to the dock.
NOTE: When you rst connect the dock to a computer using Windows 7, the Windows properties screen
appears, and the external display is automatically congured in Mirror mode as the default.
1. If the computer is running Windows 10, type control panel in the taskbar search box, and then
select Control Panel. Select Appearance and Personalization.
– or –
Conguring an external monitor 3

If the computer is running Windows 8, move the pointer down from the upper-right corner of the screen,
and then click Devices. Click Second screen.
– or –
If the computer is running Windows 7, right-click on the desktop, and then select Screen Resolution.
2. To set the external monitor as the primary monitor on computers running Windows 10 or Windows 8,
select Second screen only. To set the external monitor as the primary monitor on computers running
Windows 7, select Make this my main display.
– or –
To set the external monitor as an extension of the primary monitor on computers running Windows 10
or Windows 8, select Extend. To set the external monitor as an extension of the primary monitor on
computers running Windows 7, select Extend these displays.
– or –
To set the external monitor as a copy of the primary monitor on computers running Windows 10 or
Windows 8, select Duplicate. To set the external monitor as a copy of the primary monitor on computers
running Windows 7, select Duplicate these displays.
You can also access the display settings by pressing the Windows key +p.
Using additional software features
The HP USB Dock software oers additional features for conguring monitors attached to the dock:
●Screen Resolution—Changes the resolution of the external monitor.
●Screen rotation—Rotates the display of the external monitor 90, 180, or 270 degrees.
●O—Turns the external monitor o.
●Advanced—Opens the Windows properties box.
Sleep, Hibernation, shutdown, and restart
If the computer initiates Sleep or Hibernation, the monitor turns o. When the computer exits Sleep or
Hibernation, the connected monitor returns to the previous monitor settings.
If you restart or shut down the computer and then turn it back on, the connected monitor returns to the
previous monitor settings.
4 Chapter 1 Getting started

2 Using the dock
Dock guidelines
●Operating systems—For optimal performance, use the dock with a computer running the Windows 10,
Windows 8, or Windows 7 operating system. Only computers with 3-pin adapters are supported.
●Connecting and disconnecting—The dock can be connected to or disconnected from the computer
whether the computer is on or o.
●External devices—When the dock is connected to the computer, external devices can be connected to
the ports on the dock or to the ports on the computer.
Dock guidelines 5

Connecting to a network
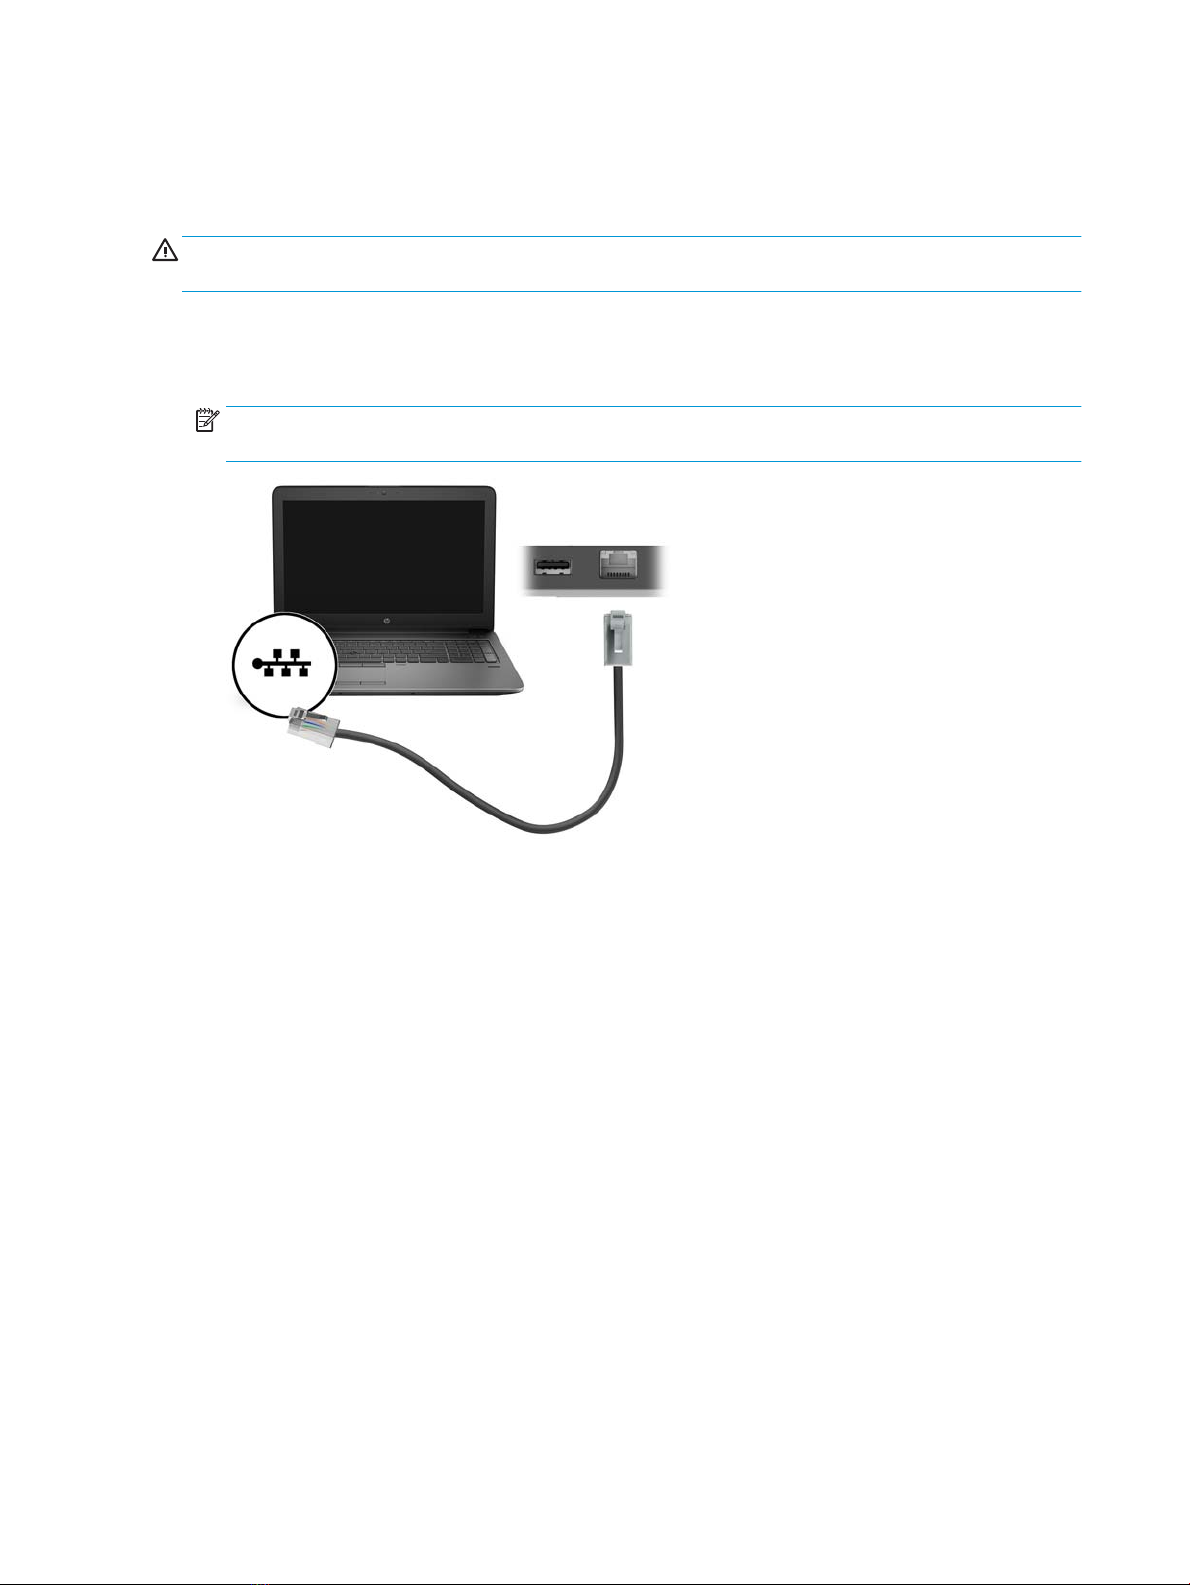
You can connect the computer to a network through the dock. This requires an Ethernet cable (purchased
separately).
WARNING! To reduce the risk of electric shock, re, or damage to the equipment, do not plug a modem
cable or telephone cable into an RJ-45 (network) jack.
1. Connect the dock to the computer.
2. Connect one end of the Ethernet cable to the RJ-45 (network) jack on the dock and connect the other
end to an RJ-45 wall jack or router.
NOTE: If the network cable contains noise suppression circuitry (3), which prevents interference from
TV and radio reception, orient the circuitry end of the cable toward the computer.
6 Chapter 2 Using the dock
Table of contents
Other HP Switch manuals

HP
HP 5830 series User manual

HP
HP 316095-B21 - StorageWorks Edge Switch 2/24 Instruction Manual

HP
HP 6127XLG Blade Series User manual

HP
HP 6127XLG Blade Series Installation manual

HP
HP J9146A - ProCurve Switch 2910al-24G-PoE User manual

HP
HP Photosmart 7500 User instructions

HP
HP 12500 Series Installation manual

HP
HP ProCurve 3500-24 User manual

HP
HP ProCurve 4204vl User manual

HP
HP A7533A - Brocade 4Gb SAN Switch Base Instruction Manual