Haier HBE18 Series User manual

Guide de l’Utilisateur-
Bottom Mount No Frost
Refrigerator
User Manual-
Manual del Usuario-
Model #
Modèle
Para Modelo de
HBE18
HBP18
HBQ18
Refrigerateur
Sans Gel Monte
de Dessous
Refrigerador
de Montaje Inferior Sin
Escarcha

SAFETY PRECAUTIONS
Read all of the instructions before using this appliance. When using this
appliance, always exercise basic safety precautions, including the fol-
lowing:
1) Use this appliance only foe its intended purpose as described in this use
and care guide.
2) This refrigerator must be properly installed in accordance with the
installation instructions before it is used. See grounding instructions in the
installation section.
3) Never unplug your refrigerator by pulling on the power cord. Always
grasp the plug firmly and pull straight out from the outlet.
4) Repair or replace immediately, all electric service cords that have become
frayed or otherwise damaged. Do not use a cord that shows cracks or
abrasion damage along its length, the plug or the connector end.
5) Unplug your refrigerator before cleaning or before making any repairs.
NOTE: If for any reason this product requires service, we strongly
recommended that a certified technician performs the service.
6) Do not use any electrical device or any sharp instrument in defrosting your
refrigerator.
7) If your old refrigerator is not being used, we recommend that you remove
the doors. This will reduce the possibility of danger to children.
8) After your refrigerator is in operation, do not touch the cold surface in the
freezer compartment, particularly when hands are damp or wet. Skin may
adhere to these extremely cold surfaces.
9) Do not refreeze foods, which have been thawed completely. The United
States Department of Agriculture in Home and Garden Bulletin No.69
reads:"...You may safely refreeze frozen foods that have thawed if they
still contain ice crystals or if they are still cold-below 40F".
“...Thawed ground meats, poultry, or fish that have any off-odor or off-color
should not be refrozen and should not be eaten. Thawed ice cream should
be discarded. If the odor or color of any food is poor or questionable,
discard it. The food may be dangerous to eat.”
“…Even partial thawing and re-freezing reduce the eating quality of foods,
particularly fruits, vegetables, and prepared foods. The eating quality of red
meats is affected less than that of many other foods. Use refrozen foods as
soon as possible, to save as much of its eating quality as you can.”
1
English

2
Thank you for using our Haier
product. This easy-to-use manual will
guide you in getting the best use of
your refrigerator.
Remember to record the model and
serial number. They are on a label in
back of the refrigerator.
Model number
Serial number
Date of purchase
Staple your receipt to your manual. You will need it to obtain
warranty service.
10) This refrigerator should not be recessed or built-in an enclosed cabinet. It
is designed for freestanding installation only.
11) Do not operate your refrigerator in the presence of explosive fumes.
SAVE THESE INSTRUCTIONS
For Future Reference
DANGER
Risk of child entrapment. Before you throw away your old
refrigerator or freezer, take off the doors. Leave the shelves
in place so that children may not easily climb inside.
As per UL 250 Standards
English

Table of Contents
PAGE
Safety Precautions ..........................................................................1
Parts And Features ..........................................................................4
Installing Your Refrigerator............................................................5
Unpacking Your Refrigerator ..................................................................5
Adjusting Your Refrigerator ....................................................................5
Proper Air Circulation ............................................................................5
Electrical Requirements............................................................................6
Use of Extension Cords ..........................................................................6
Door Handle Installation..........................................................................7
Door Alignment......................................................................................8
Reversing the Door Swing ......................................................................8
Reversing the Door Handles..................................................................11
Refrigerator Features And Use....................................................12
Setting the controls ..............................................................................12
Adjusting control settings......................................................................12
Refrigerator Interior Shelves..................................................................13
Utility Drawer And Cover......................................................................14
Crisper and Crisper Cover....................................................................15
Refrigerator Door Shelves ....................................................................17
Freezer Features ..................................................................................18
Changing the Light Bulb........................................................................20
Food Storage Information ....................................................................20
Normal Operating Sounds....................................................................22
Proper Refrigerator Care and Cleaning ....................................23
Cleaning and Maintenance ..................................................................23
Light Bulb Replacement ........................................................................24
Power Interruptions ..............................................................................24
Vacation and Moving Care ..................................................................24
Troubleshooting..............................................................................25
Warranty Information ..................................................................27
English
3
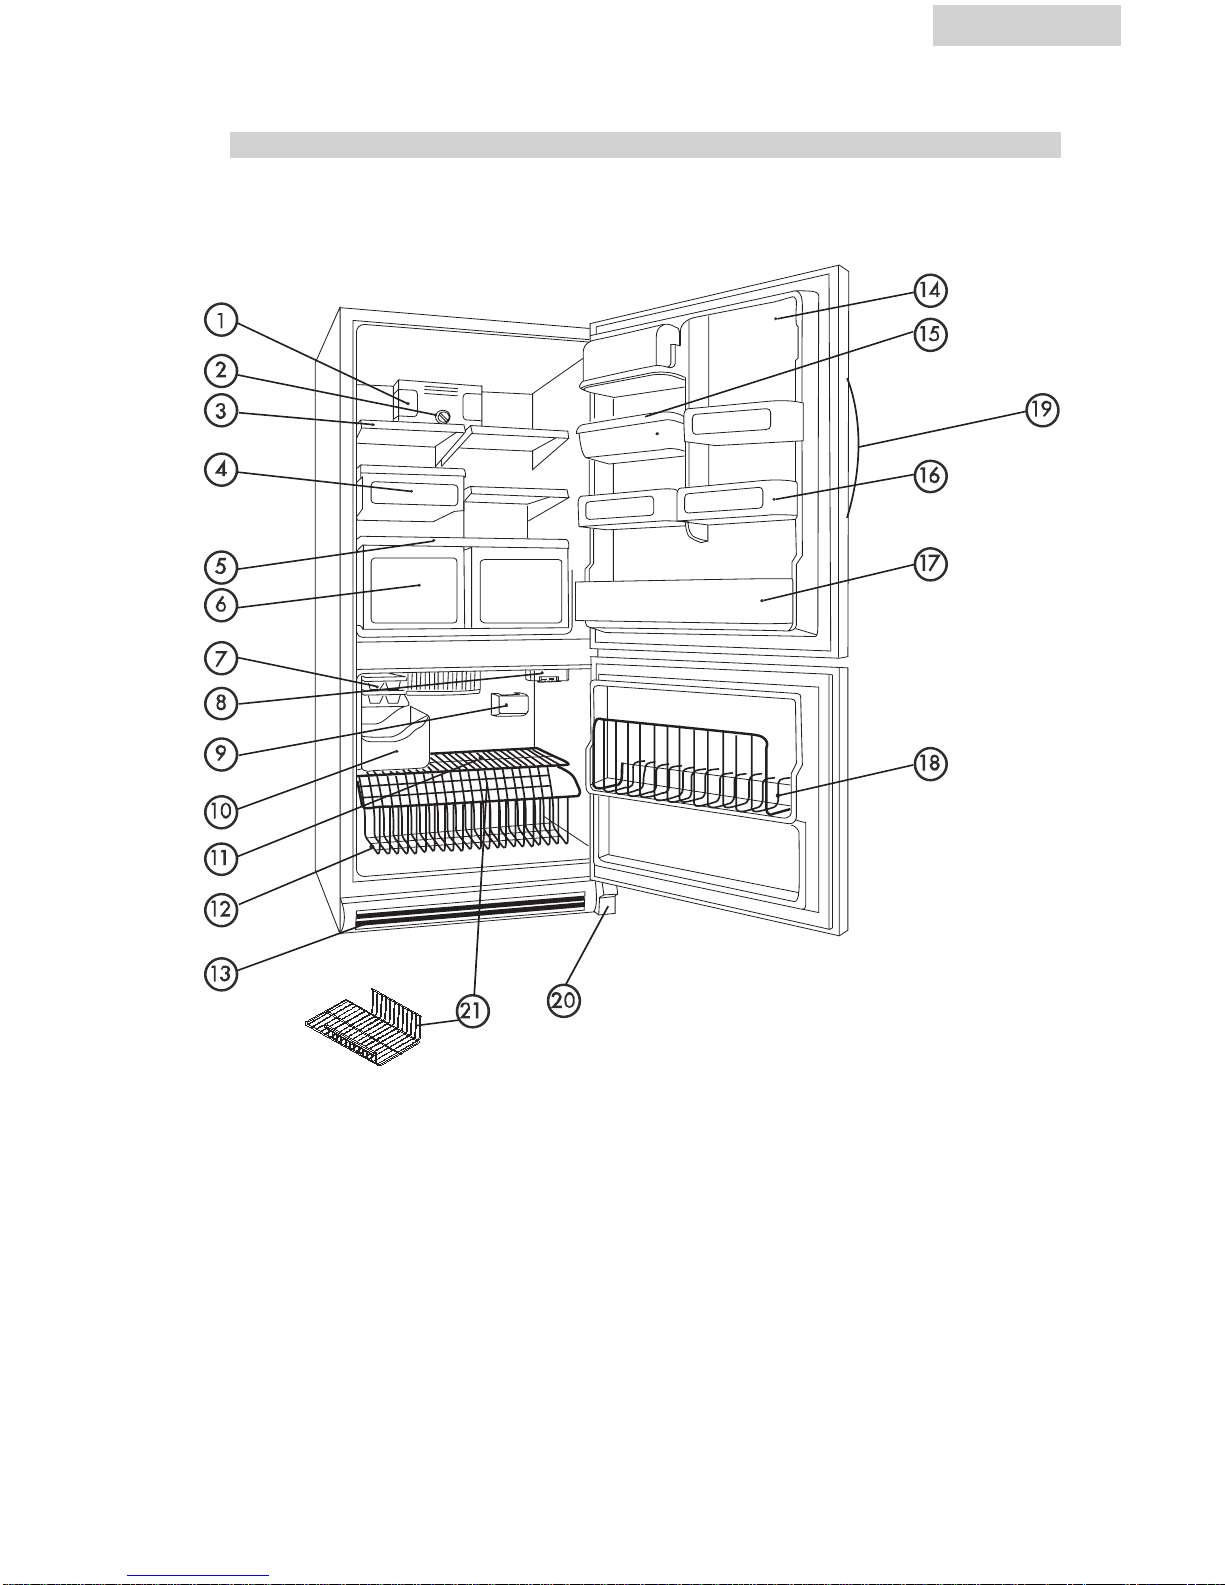
Parts And Features
1. Refrigerator Light
2. Refrigerator Control
3. Half-Width Glass Shelf
4. Deli Drawer
5. Crisper Cover
6. See-Through Crisper Drawers
7. Ice Tray
8. Freezer Control
9. Freezer Light
10. Ice Storage Container
11. Freezer Shelf
12. Wire Basket
13. Base Grille
14. Dairy Bin
15. Egg Bin
16. Door Storage Bin
17. Bin Door Shelf
18. Tilt-out Wire Door Shelf
19. Door Handle
20. Freezer Door Hinge Cover
21. Adjustable Freezer Shelf Divider
English
4
Picture for illustration purpose only
Features and quantities may vary per model

1. Remove all packaging material. This includes the foam base, all
adhesive tape holding, refrigerator accessories inside and outside, and
the plastic stoppers holding the shelves. Slide out and remove plastic or
foam guard used to secure the compressor from shipping damage due
to vibration and shock.
2. Inspect and remove any remains of packing, tape or printed materials
before powering on the refrigerator.
Leveling Your Refrigerator:
• Your refrigerator has two leveling legs, which are located in the front
comers of your refrigerator. After properly placing your refrigerator in
its final position, you can level your refrigerator.
• Levering legs can be adjusted by turning them clockwise to raise your
refrigerator or by turning them counterclockwise to lower your
refrigerator. The refrigerator door will close easier when the leveling
legs are raised.
• To assure your refrigerator works at the maximum efficiency it was
designed for, you should install it in a location where there is proper air
circulation, plumbing and electrical connections.
• The following are recommended clearances around the refrigerator:
Sides……………3/4 "(19mm)
Top....................2" (50mm)
Back..................2" (50mm)
English
Installing Your Refrigerator
Unpacking Your Refrigerator
Adjusting Your Refrigerator
Proper Air Circulation
5

English
Electrical Requirement
• Make sure there is a suitable power Outlet (115 volts, 15 amps outlet)
with proper grounding to power the refrigerator.
• Avoid the use of three plug adapters or cutting off the third grounding in
order to accommodate a two plug outlet. This is a dangerous practice
since it provides no effective grounding for the refrigerator and may
result in shock hazard.
• Avoid the use of an extension cord because of potential safety hazards
under certain conditions. If it is necessary to use an extension cord, use
only a 3-wire extension cord that has a 3-blade grounding plug and a
3-slot outlet that will accept the plug. The marked rating of the extension
cord must be equal to or greater than the electrical rating of the
appliance.
• Do not install your refrigerator in any location not properly insulated or
heated e.g. garage etc. Your refrigerator was not designed to operate in
temperature settings below 55˚ Fahrenheit.
• Select a suitable location for the refrigerator on a hard even surface
away from direct sunlight or heat source e.g. radiators, baseboard
heaters, cooking appliances etc. Any floor unevenness should be
corrected with the leveling legs located on the front bottom corners of
the refrigerator.
Use of Extension Cords
6
Install Limitations
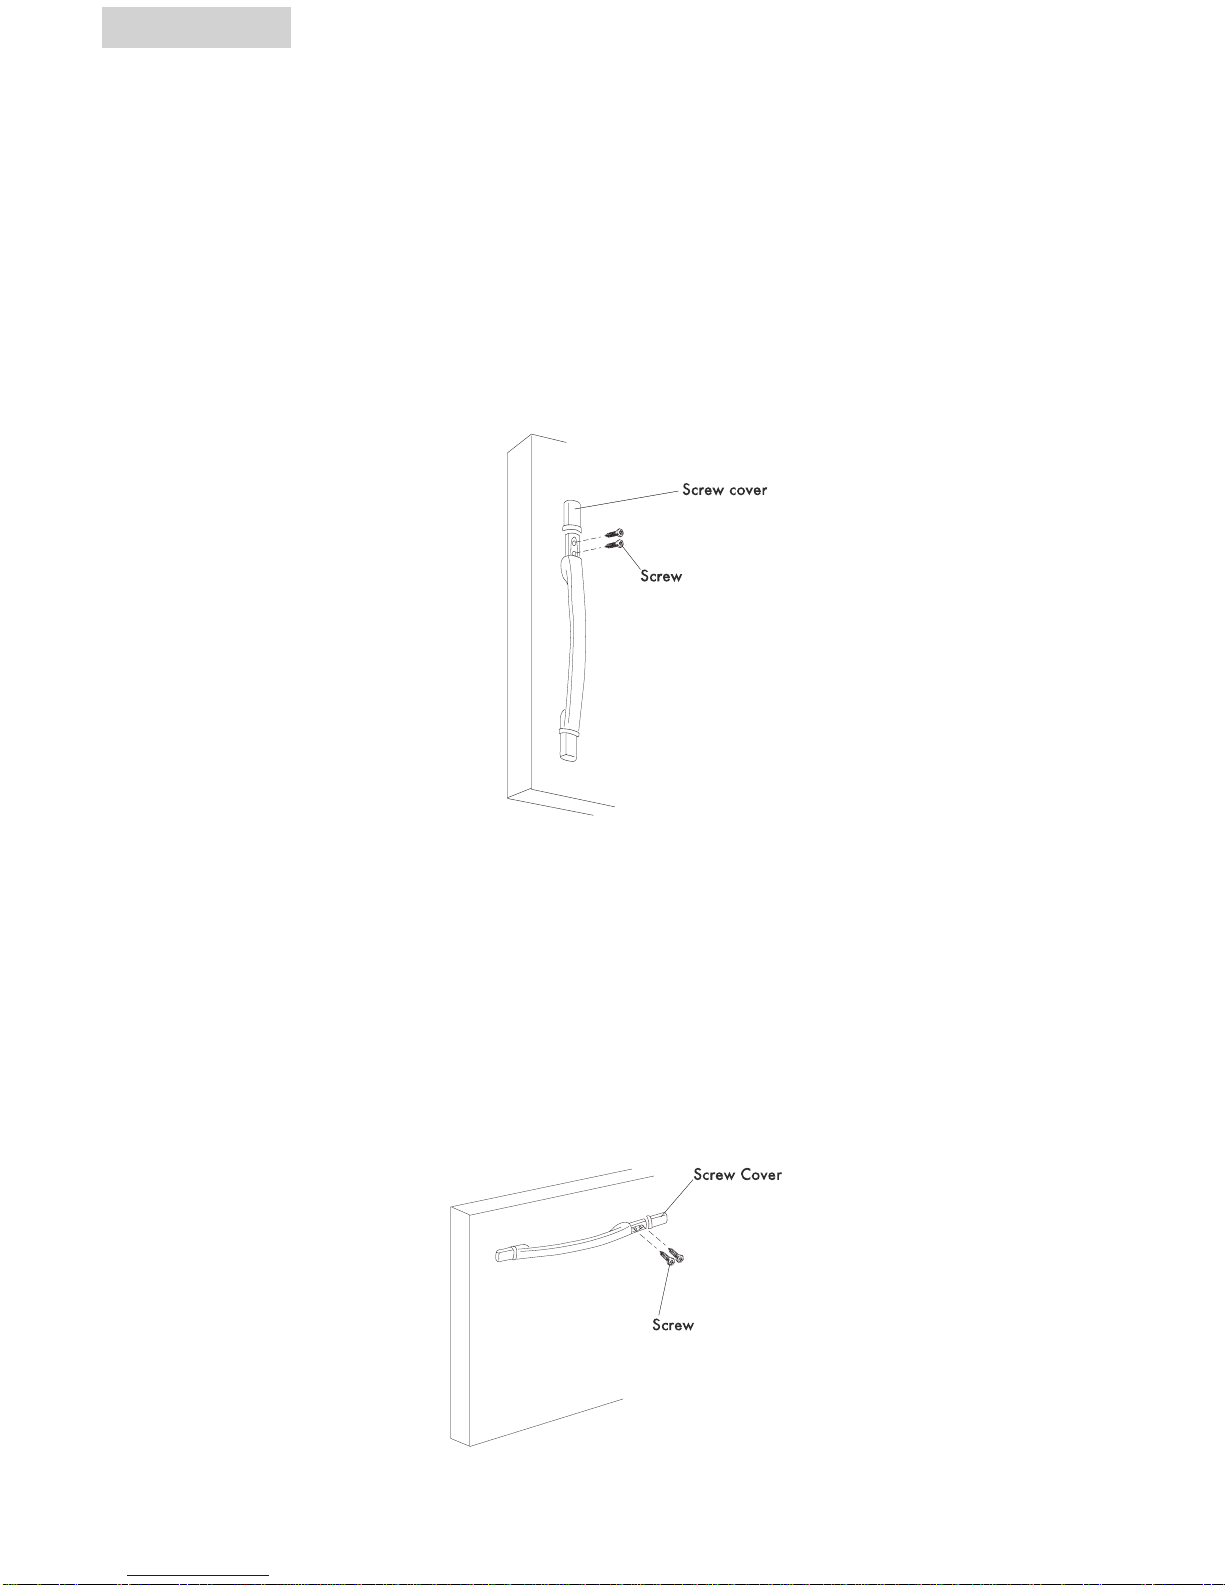
Handle Installation of Refrigerator Door:
1. Take out door handle, screws and screw covers from refrigerator
accessory bag.
2. Align the upper part of door handle with the screw hole of the upper
edge of refrigerator door, and fix them by screws.
3. Align the lower screw holes of the door handle with the holes in the
refrigerator door, fix them with screws, and cover them with screw
covers.
Handle installation of freezer door:
1. Take out door handle, screws and screw covers from refrigerator
accessory bag.
2. Align handle with the screw hole on the right side of freezer door, and
fix them by screws.
3. Align the door handle with the holes on the left side of the freezer door,
fix them with screws, and cover them with screw covers.
Door Handle Installation
English
7
fig. #1
fig. #2

English
8
1. Remove refrigerator door hinge cover screw.
2. Remove the top hinge cover.
3. Loosen the top hinge screws using a Phillips head screwdriver.
4. Adjust the door or put a spacer in between and then tighten the screws.
5. Replace the top hinge cover.
Left/right door opening method:
This product provides the reversing of the left/right door opening. You can
select your preference of door opening by following the procedure to
make the change.
Door Alignment (see fig. # 3)
Reversing the Door Swing
fig. # 3

English
9
Dismantling: (see fig. # 4)
1. Fix refrigerator and freezer door by sticking adhesive tape on both side
to hold doors in place.
2. As shown in fig.3, dismantle the hinge box cover on the upper part of
refrigerator door with a Phillips head screwdriver. Then remove the two
screws from the hinge. Take out the hinge by pulling it vertically, and
keep it in a safe place.
3. Remove the adhesive tape on refrigerator door, lift and take the door
down, and carefully put it aside.
4. As shown in fig.4, dismantle three screws of the central hinge, lift and
take down the central hinge, pad, and door stopper and keep them in
a safe place.
5. Remove the adhesive tape on freezer door, lift and take down refrigera-
tor door, and carefully put it aside.
fig. # 4
This manual suits for next models
7
Table of contents
Other Haier Refrigerator manuals

Haier
Haier HRF12WNDWW User manual

Haier
Haier HRF-368AE User manual

Haier
Haier HR-106 Instruction Manual

Haier
Haier HRF-348 Manual

Haier
Haier HYC-68 User manual

Haier
Haier HRF-628DF6 User manual

Haier
Haier HA10TG21SW User manual

Haier
Haier 9587 - 5.8 cu. Ft. Compact Refrigerator User manual

Haier
Haier HR-175U User manual

Haier
Haier HRF-660W/U User manual

Haier
Haier HRE10WNAWW User manual

Haier
Haier HRF-300R User manual

Haier
Haier ESRB03 User manual

Haier
Haier HF-108 User manual

Haier
Haier HFH-50 User manual

Haier
Haier AFD631GW User manual

Haier
Haier HSW02C User manual

Haier
Haier AFD630IX User manual

Haier
Haier BCD-539WE User manual

Haier
Haier HRF-285 User manual


