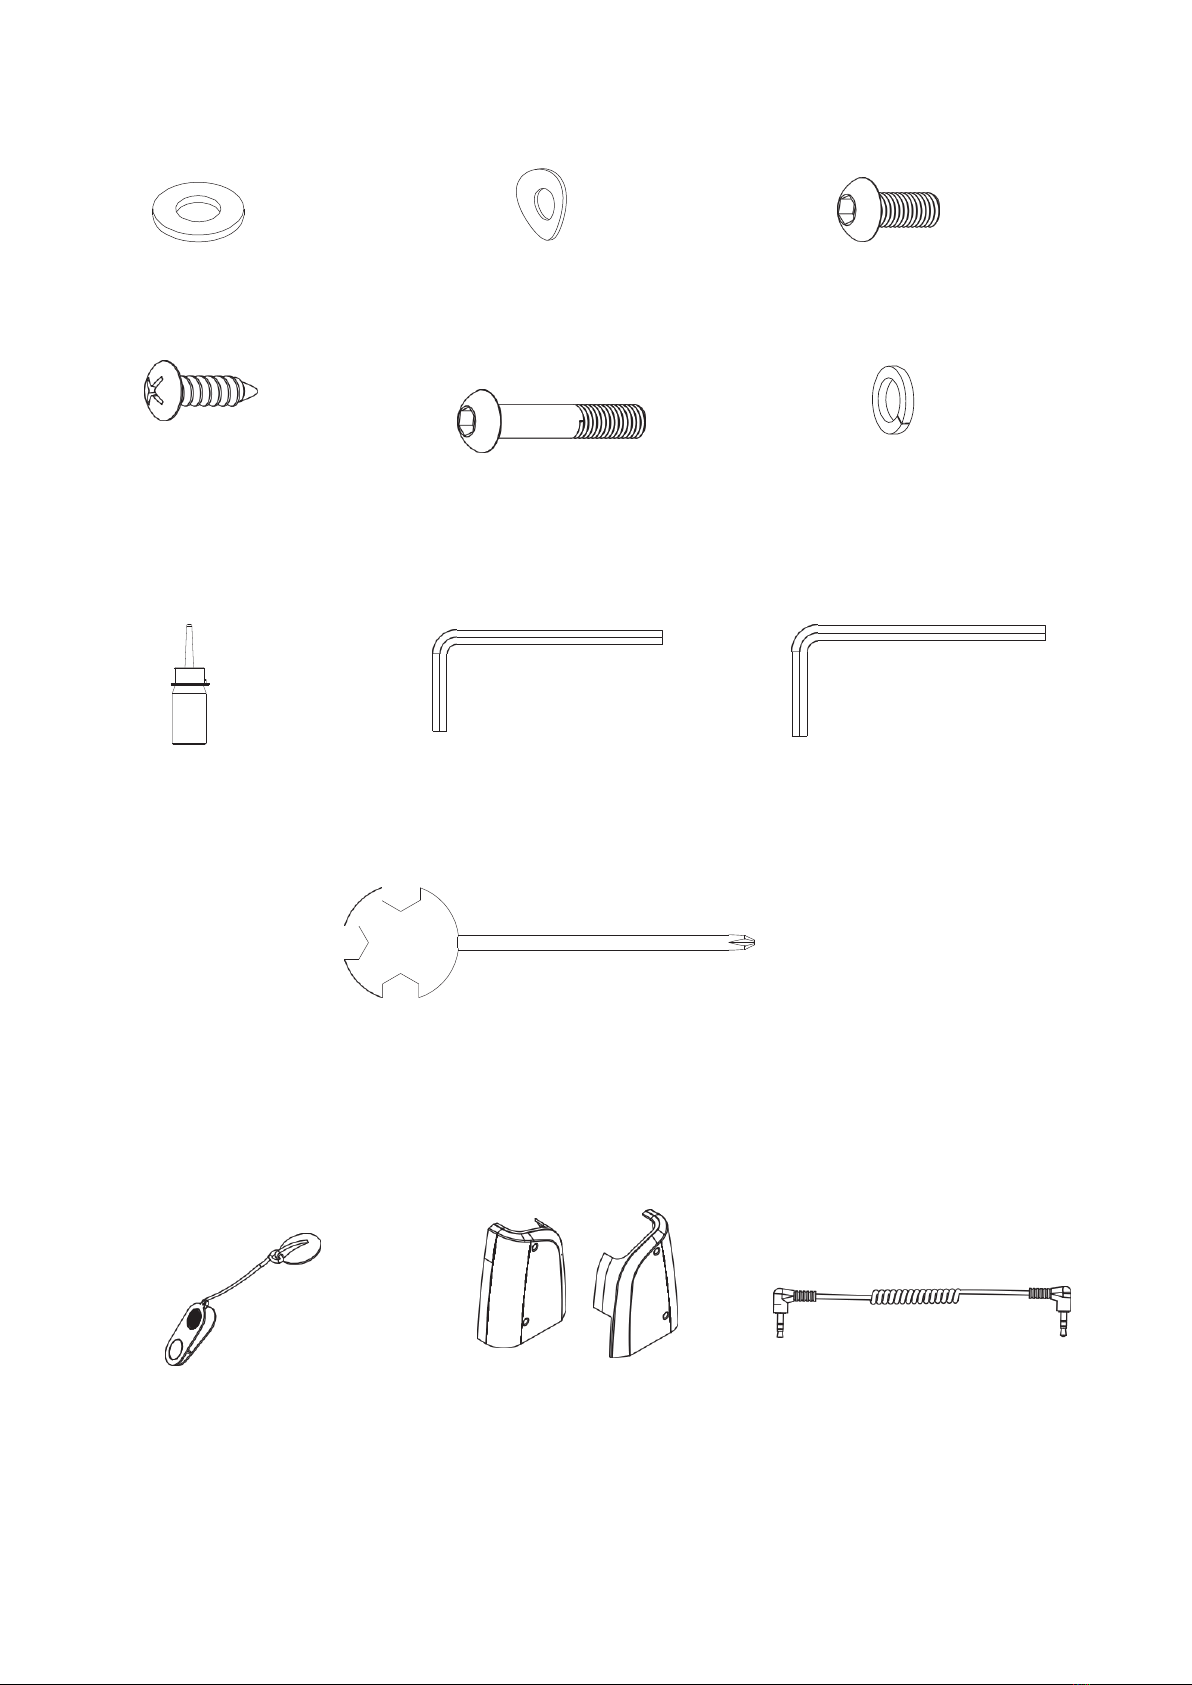
Gymstick TITANIUM RUN 2.0 User manual

TITANIUM RUN 2.0
USER MANUAL
Read all instructions carefully before operating this product. Retain this Owner’s Manual for
future reference.

1
Thank you for choosing the Gymstick Titanium RUN 2.0. We take great pride in producing
this quality product and hope it will provide many hours of effective exercise to make you
feel better, look better and enjoy life to its fullest.
TABLE OF CONTENTS
SAFETY INSTRUCTIONS ------------------------------------------------------------------------------- 2
PARTS LIST ------------------------------------------------------------------------------------------------- 3
TOOLS & HARDWARE LIST---------------------------------------------------------------------------- 4
MAIN COMPONENTS------------------------------------------------------------------------------------- 4
EXPLODED DIAGRAM ----------------------------------------------------------------------------------- 5
ASSEMBLY INSTRUCTIONS--------------------------------------------------------------------------- 6
MOVING THE TREADMILL------------------------------------------------------------------------------ 8
LIFTING UP & SETTING DOWN THE TREADMILLING THE TREADMILL---------------- 9
OPERATING THE COMPUTER---------------------------------------------------------------------- 10
CARE, MAINTENANCE & TROUBLESHOOTING GUIDE ------------------------------------ 15
BELT ADJUSTMENT ------------------------------------------------------------------------------------ 17
LUBRICATION -------------------------------------------------------------------------------------------- 18
WARM UP AND COOL DOWN ROUTINE -------------------------------------------------------- 19
IMPLIED WARRANTY ---------------------------------------------------------------------------------- 22

2
SAFETY INSTRUCTIONS
BASIC PRECAUTIONS SHOULD ALWAYS BE FOLLOWED, INCLUDING THE FOLLOWING SAFETY
INSTRUCTIONS WHEN USING THIS EQUIPMENT: READ ALL INSTRUCTIONS BEFORE USING THIS
EQUIPMENT.
•Never leave the treadmill unattended. Unplug the unit from the power outlet when it
is not in use,
•Do not allow children or those unfamiliar with its operation on or near the treadmill. Do not leave
children or persons with reduced physical or mental capabilities unsupervised around the treadmill.
•Please wear proper clothes and shoes when using this equipment; do not wear clothes that might catch
any part of the equipment.
•If you feel any chest pains, nausea, dizziness, or short of breath, you should stop exercising
immediately and consult your physician before continuing.
•Keep children and pets away from the equipment. This machine is designed for adults only.
• Only one person should be on the equipment while in use.
• Please make sure all parts are not damaged and fixed well before use.
•Never operate the unit if it is damaged, if it is not working properly
• This equipment should be placed on a flat surface when using. Using a mat or other covering material
on the ground is recommended. The minimum free space required for safe operation is 0,5 meter.
•Never block the air openings on the hood while operating the treadmill. Never drop or insert objects into
any opening.
•Use the treadmill only for its intended purpose as described in this manual.
•If the power cord of the machine is damaged, it must be replaced. Do not use the machine until the
power cord has been changed and properly attached.
• This equipment is for household use only. Do not use the equipment outdoors.
•This appliance is designed for use with ~220 - ~240 Volt rated voltage.
• The maximum weight capacity for this product is 110kgs.
DISCLAIMER: The manufacturer and its associates and partners have no liability, obligation or responsibility to
any persons or entity for any loss, damages or adverse consequence alleges to have happened directly or
indirectly as a consequent of this product.
CAUTION: Before beginning any exercise program consult your physician. This is
especially important for the persons who are over 35 years old or who have pre-existing
health problems. Read all instructions before using any fitness equipment.
WARNING: Faulty grounding of the appliance can cause the risk of electrical shocks. Do
not modify the plug provided with the appliance if it is not compatible with your socket. Ask
a qualified electrician to check the socket in case you do not know if the appliance is
grounded appropriately.

3
PARTS LIST
No. Description Qty No. Description Qty
001 Computer Console 1 028 Transport Wheel Cap 2
002 Safety Tether Key 1 029 Transport Wheel Ø46xØ18.5x8.5 2
003 Hand Pulse Sensor with Wire 2 030 Incline Motor 1
004 Lower Hand Pulse Sensor Cover 2 031 Hexagon Head Bolt M10x55 1
005 Cross Recessed Pan Head Tapping
Screw M3x15 4 032 Nylon Nut M10 4
006 Cross Recessed Truss Head Bolt M5x10 6 033 Incline Bracket 1
007 Hexagon Socket Button Head Bolt
M8x30 3 034 Spring Washer Ø8 10
008 Washer Ø20xØ8.5x1.0 17 035 Foot Lock Latch Tube 1
009 Nylon Nut M8 8 036 Upper Motor Cover 1
010 Handlebar Foam Grip Ø30xT5x225 2 037 Motor 1
011 Handlebar End Cap 2 038 Belt 185J6 1
012 Cross Recessed Pan Head Tapping
Screw M4x15 (Black) 4 039 Power Control Board 1
013 Handlebar 1 040 Motor Bracket 1
014
Curve Washer Ø20xØ8.5x1.0 2
041
Cross Recessed Pan Head Tapping
Screw with Washer M4x12 16
015 Hexagon Socket Button Head Bolt M8x15 8 042 Running Belt T1.5x430x2540 1
016 Left Handlebar Support Tube 1 043 Right Side Rail 1
017 Right Handlebar Support Tube 1 044 Left Side Rail 1
018
Cross Recessed Pan Head Tapping
Screw M4x15 (Zine Plated) 6
045 Running Deck T15x585x1120 1
019 Adjustable Leveler M8 4 046 Hexagon Socket Countersunk
Head Bolt M6x25 6
020 Hexagon Socket Button Head Bolt M8x45 5 047 Deck Bumper Ø25x18xM6 6
021 Washer Ø20xØ12.5x1.0 2 048 Cross Recessed Truss Head Bolt
M5x25 6
022 Hexagon Socket Button Head Bolt M8x40 4 049 Dish Washer Ø22xØ5x9 6
023 Hexagon Socket Button Head Bolt
M12x55 2 050 Shock Absorption Bumper 4
024 Left Fender 1 051 Rear Right End Cover 1
025 Right Fender 1 052 Rear Left End Cover 1
026 Base Frame 1 053 Rear Roller Ø42x Ø15x505 1
027 Hexagon Socket Round Head Cap Bolt
M8x12 2 054 Front Roller Ø42x Ø15x522 1
055 Hexagon Socket Round Head Cap Bolt
M8x65 3 067 Power Cord (L=1800 mm) 1
056 Wheel Ø51xØ24x8.5 2 068 Audio Cable 1
057 Main Frame 1 069 Red AC Wire (L=250 mm) 1
058 Lower Motor Cover 1 070 Black AC Wire (L=250 mm) 1
059 Ring for Cable Ø28xØ16x13 1 071 Red AC Wire (L=100 mm) 1
060 Hexagon Head Bolt M10x45 1 072 Foam Grip Ø27xT3x13 1
061 Washer Ø20xØ10.5x1.0 4 073 Incline Control Buttons with Wire 1
062 Hexagon Socket Button Head Bolt
M10x40 2 074 Speed Control Buttons with Wire 1
063 Control Cable (L= 1700 mm) 1 075 Wire Grommet Ø24xØ15x6 1
064 Fuse Box 1 076 Nut M5 6
065 Power Switch 1 077 Hexagon Head Bolt M8x75 1

4
TOOLS & HARDWARE LIST
(8) Washer (14) Curve Washer (15) Hexagon Socket
4PCS 2PCS Button Head Bolt
4PCS
(18) Cross Recessed Pan (20) Hexagon Socket (34) Spring Washer
Head Tapping Screw Button Head Bolt 2PCS
4PCS 2PCS
Lubricant 5 mm Allen Wrench 6 mm Allen Wrench
1PC 1PC 1PC
Multi Hex Tool with Phillips Screwdriver
1PC
MAIN COMPONENTS
(2)Safety Tether key Cable (24) Left Fender 1PC (68) Audio Cable
1PC (25) Right Fender 1PC 1PC

5
EXPLODED DIAGRAM
2
18
6
36
68
6
74
1
18
10
6
3
3
73
55
8
13
6
54
42
43
38
10
12
74
4
12
37
72
59
5
73
63
1
1
4
5
1
1
7
8
9
77
1
5
34
8
9
14
44
15
8
7
50
14
40
45
15
78
50
67
8
3
4
2
7
76
4
9
46
16
17
66
65
64
41
76
46
49
20
34 8
34 8
70
41
39
48
41
50
48
57
25
69
71
18
50
15
8
15
8
47
47
75
63
26
41
20
53
58
8
55
32
56
9
22
51
60 61
9
8
21
30
55
23
29
35
28
56
19
9
18
24
52
33
22
19
29
28
9
7
20
62
31
61
32
32 61
62
61 32

6
ASSEMBLY INSTRUCTIONS
STEP 1
Remove the treadmill from the carton and place it on a level flat surface. Please always use the aid of a
second person when removing the treadmill from the carton
STEP 2
Lift both Left and Right Handlebar Support Tubes (16, 17) up.
It is recommended to have a second person assist with this step. One person should hold the both Left
and Right Handlebar Support Tubes (16, 17) in place while the other person tightens the bolts.
Lift both Left and Right Handlebar Support Tubes (16, 17) up and align bolt holes. Use Two Hexagon
Socket Button Head Bolts (15), two Hexagon Socket Button Head Bolts (20), two Spring Washers (34),
and four Washers (8) to secure both Left and Right Handlebar Support Tubes (16, 17) onto the Base
Frame (26).
NOTE: Semi-tighten all bolts with the 5 mm Allen Wrench provided. Do not fully tighten bolts in
step 2 until step 3 is completed.

7
STEP 3
Pull the Handlebar (13) all the way down.
Install the Handlebar (13) onto the Left and Right Handlebar Support Tubes (16, 17) using two Curve
Washers (14) and two Hexagon Socket Button Head Bolts (15). Tighten bolts with the 5 mm Allen
Wrench provided.
NOTE: Now please fully tighten all bolts installed in step 2 with the 5mm Allen Wrench provided.
STEP 4
Install two Left and Right Fenders (24, 25) onto the Base Frame (26) and Left/Right Handlebar Support
Tubes (16, 17) using four Cross Recessed Pan Head Tapping Screws (18). Tighten bolts with the Multi
Hex Tool with Phillips Screwdriver provided.
CAUTION: Pay
attention not to
pinch the wire.

8
STEP 5
User can connect one end of Audio Cable (68) into the MP3 aux input port on the Computer Console (1)
and then connect the other end of the cable into the jack for MP3 Player / CD Player or Mobile Device.
The music plays through the two speakers on the treadmill.
Place the Safety Tether Key (2) onto the Computer Console (1).
(86) Audio Cable (2) Safety Tether Key
1 PC 1 PC
MOVING THE TREADMILL
The unit can be carefully tilted onto its transport wheels for easy moving and storage.
With the treadmill in the folded locked position (foot lock latch is engaged), firmly grasp the Handlebars
with both hands and place one foot onto the Transport Wheel Cap. Next, carefully tilt the treadmill back
until it rolls freely on the transport wheels.
To set the treadmill down, place one foot on the Transport Wheel Cap and carefully lower treadmill onto
base in the folded position.
CAUTION: The treadmill is heavy, it is suggested you always use the aid of a second person when
moving the treadmill. Do not attempt to move the treadmill while it is in the unfolded position.

9
LIFTING UP & SETTING DOWN THE TREADMILL
LIFTING UP THE TREADMILL
Firmly grasp the rear end of the Main Frame with both hands. Carefully lift the end of the treadmill up into
the upright position until the Foot Lock Latch engages and securely locks the main frame into position.
Make sure the main frame is securely latched before moving the treadmill. See figures A and B.
Store the treadmill in a clean and dry environment away from children.
A B
SETTING DOWN THE TREADMILL
To set down the treadmill, firmly grasp the rear end of the treadmill with both hands. Gently kick on the
Foot Lock Latch with your foot until the lock latch disengages. Carefully lower the deck to the ground.
See figures C and D.
NOTE: Do not stand under the deck when setting down the treadmill. to prevent injury, please make sure
you have a firm hold when lifting up or setting down the deck.
C D
Table of contents
Other Gymstick Treadmill manuals

Gymstick
Gymstick GT7.0 User manual

Gymstick
Gymstick PRO20.0 User manual

Gymstick
Gymstick RUN 3.0 User manual

Gymstick
Gymstick GT1.0 User manual

Gymstick
Gymstick PRO10.0 User manual

Gymstick
Gymstick GT4.0 User manual

Gymstick
Gymstick GT3.0 User manual

Gymstick
Gymstick PRO20.0 User manual

Gymstick
Gymstick WalkingPad TM-WPAD User manual

Gymstick
Gymstick RUN 10.0 User manual
Popular Treadmill manuals by other brands

Smooth Fitness
Smooth Fitness EVO 3i user manual

NordicTrack
NordicTrack NETL81810.0 user manual

Schwinn
Schwinn 830/Journey 8.0 Assembly manual / owner's manual

Keys Fitness
Keys Fitness HealthTrainer HT-740T owner's manual

Spirit
Spirit XT8 Service manual

NordicTrack
NordicTrack T 14.0 Treadmill Manuel de l'utilisateur


