GoVideo T2040 User manual


2
FCC & Safety Information ...................................................................3
Important Safety Instructions .............................................................4
1 - Welcome ..........................................................................................5
Unpacking your LCD TV .................................................................................................5
Rear Panel Overview .....................................................................................................6
Remote Control Overview ..............................................................................................7
TV Control Overview ......................................................................................................8
2 - Getting Started ...............................................................................9
Step 1 - Insert Remote Control Batteries .......................................................................9
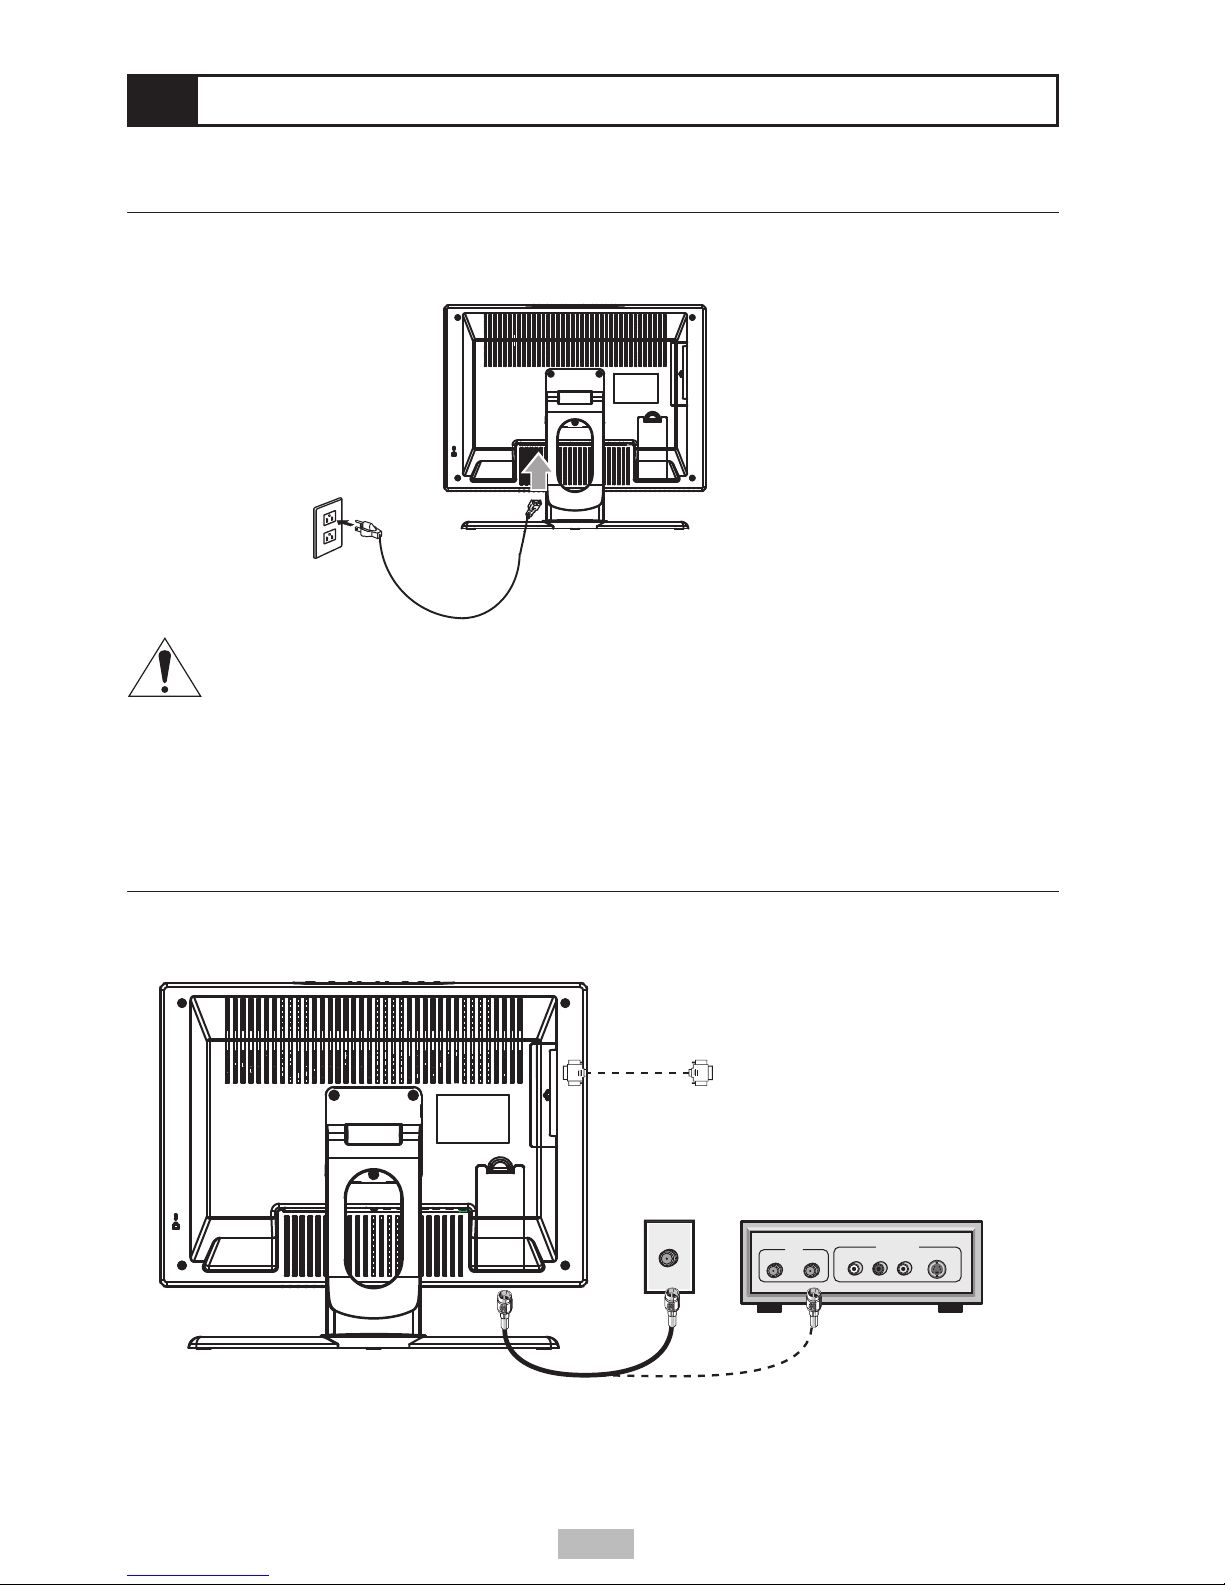
Step 2 - Connect Power Cable .....................................................................................10
Step 3 - Connect to Antenna/Cable ..............................................................................10
Step 4 - Turn on TV ...................................................................................................... 11
Step 5 - Search for Channels ....................................................................................... 11
Step 6 - Select Channels .............................................................................................. 11
Step 7 - Adjust Volume ................................................................................................. 11
Step 8 - Adjust Screen Angle ........................................................................................12
Step 9 - Connect Optional Wall Mount .........................................................................12
3 - Advanced Settings .......................................................................13
Menu System Overview ...............................................................................................13
PC Settings ..................................................................................................................13
TV Settings ...................................................................................................................14
Video Settings ..............................................................................................................15
OSD Settings ...............................................................................................................16
Audio Settings ..............................................................................................................17
4 - Help................................................................................................18
Troubleshooting ............................................................................................................18
Technical Specifications ...............................................................................................19
Power Saving Mode (PC only) .....................................................................................20
Compatible PC Video Mode .........................................................................................20
Limited Warranty ..........................................................................................................21
Table of Contents
©2004 GoVideo. All rights reserved. Printed in China.
GoVideo is a registered trademark. All other brand and
product names are trademarks or registered trademarks of
their respective companies.
GoVideo shall not be liable for any errors contained herein
or for any damages arising out of or related to this document
or the information contained herein, even if GoVideo has
been advised of the possibility of such damages. This
document is intended for informational and instructional
purposes only. GoVideo reserves the right to make changes
in the specifications and other information contained in this
document without prior notification. GoVideo disclaims any
obligation to update the information contained herein.
IMPORTANT
To aid reporting in case of loss or theft, please
record the TV’s model and serial numbers in
the space provided:
• Model No.___________________________
• Serial No.___________________________

3
NOTE DU DOC
This product conforms to Canadian Class B
emissions regulations.
Ce produit est conforme aux réglements
canadiens relatifs aux émissions pour les
appareils de class B.
WARNING
FCC regulations state that any unauthorized
changes or modifications to this equipment
not expressly approved by the manufacturer
could void the user’s authority to operate this
equipment
CAUTION
TO PREVENT ELECTRIC SHOCK, MATCH
WIDE BLADE OF PLUG TO WIDE SLOT,
FULLY INSERT.
FCC Warning
This equipment has been tested and found
to comply with the limits for a Class B digital
device, pursuant to part 15 of the FCC
rules. These limits are designed to provide
reasonable protection against harmful
interference in a residential installation.
This equipment generates, uses and can
radiate radio frequency energy and, if not
installed and used in accordance with the
instructions, may cause harmful interference
to radio communications. However, there is
no guarantee that interference will not occur
in a particular installation. If this equipment
does cause harmful interference to radio and
television reception, which can be determined
by turning the equipment off and on, the user is
encouraged to try to correct the interference by
one or more of the following measures.
• Reorient or relocate the receiving antenna
• Increase the separation between the
equipment and the receiver.
• Connect the equipment into an outlet on
a circuit different from that to which the
receiver is connected.
• Consult the dealer or an experienced radio/
TV technician for help.
This equipment has been certified to comply
with the limits for a Class B computing device,
pursuant to part 15 of the FCC rules. Only
peripherals (computer input / output devices,
terminals, printers etc.) certified to comply
to the Class B limits may be attached to
this computer. Operation with non-certified
peripherals is likely to result in interference to
radio and TV reception.
Remarks
To meet FCC requirement, shielded cables are
required to connect the device to a personal
computer or other Class B certified device.
Information to Users
The unit is for office equipment used. Any
change or modifications expressly approved by
the party responsible for compliance could void
the user’s authority to operate this equipment.
DOC NOTICE
This product conforms to Canadian Class B
emissions regulations.
Ce produit est conforme aux réglements
d’émission Canadienne class B.
FCC & Safety Information

4
• When relocating the product placed on a cart, it
must be moved with utmost care. Sudden stops,
excessive force and uneven floor surface can
cause the product to fall from the cart.
• Ventilation - The vents and other openings in
the cabinet are designed for ventilation. Do not
cover or block these vents and openings since
insufficient ventilation can cause overheating and /
or shorten the life of the product. Do not place the
product on a bed, sofa, rug or other similar surface
since they can block ventilation openings. This
product is not designed for built-in installation; do
not place the product in an enclosed place such
as a bookcase or rack, unless proper ventilation
is provided or the manufacturer’s instructions are
followed.
• The LCD panel used in this product is made of
glass. Therefore, it can break when the product is
dropped or applied with impact. Be careful not to
be injured by broken glass pieces in case the LCD
panel breaks.
• Heat sources - Keep the product away from
heat sources such as radiators, heaters, stoves
and other heat - generating products (including
amplifiers).
• The LCD panel is a very high technology product
with many thin-film-transistors, giving you fine
picture details. Occasionally, a few non-active
pixels may appear on the screen as a fixed point
of blue, green or red. Please note that this does
not affect the performance of your product.
• If an outside antenna is connected to the
television equipment, be sure the antenna system
is grounded so as to provide enough protection
against voltage surges and built-up static
charges. Section 810 of the National Electrical
Code provides information with respect to proper
grounding of the mast and supporting structure,
grounding of the lead-in wire to an antenna
discharge unit, size of grounding conductors,
location of antenna-discharge unit, connection to
grounding electrodes, and requirements for the
grounding electrode.
• For added protection to this television equipment
during a lightning storm, or when it is left
unattended and unused for long periods of time,
unplug it from the wall outlet and disconnect
the antenna. This will prevent damage to the
equipment due to lightning and power-line surges.
• An outside antenna system should not be located
in the vicinity of overhead power lines or other
electric light or power circuits, or where it can fall
into such power lines or circuits. When installing
an outside antenna system, extreme care should
be taken to keep from touching such power lines
or circuits as contact with them might be fatal.
• Read instructions - All operating instructions must
be read and understood before the product is
operated.
• Keep this manual in a safe place - These safety
and operating instructions must be kept in a safe
place for future reference.
• Observe warnings - All warnings on the product
and in the instructions must be observed closely
• Follow instructions - All operating instructions must
be followed.
• Attachments - Do not use attachments that are
not recommended by the manufacturer. Use of
inadequate attachments can result in accidents.
• Entering of objects and liquids - Never insert an
object into the product through vents or openings.
High voltage exists in the product, inserting an
object can cause electric shock and / or short
internal parts.
For the same reason, do not spill water or liquid
on the product.
• Servicing - Do not attempt to service the product
by yourself. Removing covers can expose you
to high voltage and other dangerous conditions.
Request a qualified service person to perform
servicing.
• Repair - If any of the following conditions. unplug
the power cord from the AC outlet, and request a
qualified service person to perform repairs
a. When a liquid was spilled on the product or
when objects have fallen into the product.
b. When the product has been exposed to rain or
water.
• Cleaning - Unplug the power cord from the Ac
outlet before cleaning the product. Use a damp
cloth to clean the product. Do not use liquid
cleaners or aerosol cleaners.
• Water and moisture - Do not use the product
near water, such as bathtub, washbasin, kitchen
sink and laundry tub, swimming pool and in a wet
basement.
• Stand - Do not place the product on an unstable
cart, stand, tripod or table. Placing the product
on an unstable base can cause the product
to fall, resulting in serious personal injuries as
well as damage to the product. Use only a cart,
stand,tripod, bracket or table recommended
by the manufacturer or sold with the product.
When mounting the
product on a wall, be sure
to follow the manufacturer’s
instructions. Use only
the mounting hardware
recommended by the
manufacturer.
Important Safety Instructions

5
2. Remote Control
4. Power Cable 5. VGA Cable6. TV Tuner
7. AV Cable
1. LCD TV
8. RF Cable 9. User’s Guide &
Registration Card
3. AAA Batteries (2)
DISPLAY
1
4
7
10+
2
5
8
0
3
6
9
JUMP
CH+
VOL- VOL+
CH-
RETURN
MENU
ENTER
MUTE
FAVORITES
INPUT
POWER
CHANNEL
SEARCH ASPECT
CAPTIONS
AUDIO
PICTURE
MODE
1 - Welcome
Unpacking your LCD TV

6
1234567
8
9
10
Push arrow mark
to open cover.
Rear Panel Overview
1 AC In
Connects to the supplied power cable.
2 Video In
Connects to the Video Out of a DVD player,
VCR, or other AV equipment.
3 S-Video In
Connects to the S-Video Out of a DVD
player, VCR, or other AV equipment.
4 Audio In
Connects to the Audio Out of your AV
equipment when using the Video or S-Video
connections.
5 Component Video (Y/Cb/Cr) In
Connects to the Component Video Out of a
DVD player or other AV equipment.
6 Audio In
Connects to the Audio Out of your AV
equipment when using the Component
Video connections.
7 RF In
Connects to an Antenna, Cable TV jack,
Cable Box, or Satellite Receiver using an
RF cable.
8 VGA In
Connects to the VGA Out of a PC using a
VGA cable.
9 Audio In
Connects to the Audio Out of a PC using a
1/8” stereo mini-plug.
10 Line Out
Connects to Headphones or to the Line In
of a stereo receiver using a 1/8” stereo mini-
plug.
1 - Welcome (cont.)

7
1 - Welcome (cont.)
Remote Control Overview
1 POWER
Turns TV on and off.
2 0-9/10+
Selects channels directly.
3 DISPLAY
Displays TV status.
4 CH+/-
Selects next or previous channel.
5 VOL+/-
Adjusts volume.
6 RETURN
Returns to previous menu or exits menu
system.
7 ASPECT
Sets TV aspect ratio to 4:3 (standard) or
16:9 (widescreen).
8 CHANNEL SEARCH
Searches for all available channels in the
selected tuner band.
9 CAPTIONS
Selects the desired Closed Caption mode.
10 INPUT
Changes on-screen view to PC, TV, AV
(Video In), SV (S-Video In) or YCbCr
(Component Video In).
11 JUMP
Displays the previously viewed channel.
12 FAVORITES
Selects your favorite channels as set in the
TV Settings menu; see page 14.
13 MENU/ENTER
Displays the on-screen menu system.
Confirms settings in the menu ystem.
DISPLAY
1
4
7
10+
2
5
8
0
3
6
9
JUMP
CH+
VOL- VOL+
CH-
RETURN
MENU
ENTER
MUTE
FAVORITES
INPUT
POWER
CHANNEL
SEARCH ASPECT
CAPTIONS
AUDIO
PICTURE
MODE
110
11
12
13
14
15
16
2
3
4
5
6
8
9
7
14 MUTE
Turns sound on and off.
15 PICTURE MODE
Sets picture brightness to standard (normal
viewing conditions), demo (brighter viewing
conditions), or favorite (custom viewing as
set in Picture menu).
16 AUDIO
Selects Stereo, Mono, or SAP.

8
TV Control Overview
You can also use the buttons on top of the unit for basic TV functions, including:
• INPUT
• EXIT
• CHANNEL /
• VOL /
• MENU/ENTER
• POWER
These buttons have
the same functions as the
corresponding buttons on the
remote control (see page 7).
NOTE: If you have a PC
connected to the LCD TV,
press the AUTO button to
automatically adjust the PC
display to fit the LCD screen.
1 - Welcome (cont.)
AUTO INPUT EXIT UP DOWN
CHANNEL VOLUME
+
-
ENTER
MENU

9
2 - Getting Started
Step 1 - Insert Remote Control Batteries
Install the supplied batteries as shown below, paying attention to the correct polarities.
-
+
+
-
In Out
Caution
• Do not expose the remote control to severe shock or vibration.
• Do not expose the remote control to liquids, or in an area with high humidity.
• Do not place the remote control in direct sunlight. The heat may damage the unit.
• The remote control may not work properly if the IR sensor is exposed to direct
sunlight or other strong lighting. If this is the case, change the angle of the lighting or
LCD TV, or operate the remote control closer to the IR sensor.
• If the remote control fails to operate, replace the batteries in the remote control.
• Improper use of batteries can result in a leakage of chemicals and / or explosion.
• Place batteries with their terminals corresponding to the correct polarities (+) and (-).
• Different types of batteries have different characteristics. Do not mix batteries of
different types.
• Remove batteries when they become weak.
• The batteries supplied with the product may have a shorter life expectancy due to
storage conditions.
• If the remote control is not used for an extended period of time, remove the batteries
from the remote control.
• Objects between the remote control and IR sensor may prevent proper operation.
Point the remote control directly at the IR
sensor located on the front of the TV.
IR Sensor
Power LED
AUTO INPUT EXIT UP DOWN
CHANNEL VOLUME
+
-
ENTER
MENU
10
Step 3 - Connect to Antenna/Cable
Connect the TV to your antenna or cable/satellite hookup (or PC) as shown.
Connect to Cable Box or
Satellite Receiver
Connect to Antenna
or Basic Cable
Connect to PC
RF Cable
VGA Cable
IN OUT AUDIO S-VIDEOVIDEO
LR
OUTPUT
RF
2 - Getting Started (cont.)
Step 2 - Connect Power Cable
1 Connect the supplied power cable to the AC In jack on the back of the LCD TV.
2 Plug the power cable into a standard AC outlet.
Caution
• Always turn the the LCD TV off when connecting the power cable.
• Always unplug the power cable from the LCD TV and power outlet when not using the
TV for a long period of time.
• The LCD TV has a universal power supply that allows operation with either 100/120V
AC or 220/240VAC voltage. No user-adjustment is required.
Table of contents
Other GoVideo LCD TV manuals