Godox ML-150 User manual

Chinese English Bilingual | 中英文双语
INSTRUCTION MANUAL
说 明 手 册
MACRO
RING FLASH
ML-150
地址/Add: 深圳市宝安区福海街道塘尾社区耀川工业区厂房2栋1层至4层、4栋1层至4层
1st to 4th Floor, Building 2/ 1st to 4th Floor, Building 4, Yaochuan Industrial Zone, Tangwei
Community, Fuhai Street, Bao’an District, Shenzhen 518103, China
电话/Tel: +86-755-29609320(8062) 传真/Fax: +86-755-25723423
705-ML1500-00 Made In China
深圳市神牛摄影器材有限公司
GODOX Photo Equipment Co., Ltd.

部 件
01) 环形闪光灯头
02) 固定旋钮
03) 热靴座
04) 热靴触点
05) 输出功率指示灯
06) 功率选择按钮
07) 测试按钮
08) 电池盖
09) 电源开关
10) 充电指示灯
11) 快充座盖
12) 快充插座
13) 同步插孔盖
14) 同步插孔
1
234
5
6
7
8
9
10
11
12
13
14
前 言
感谢您购买此款神牛产品。神牛环形机顶闪光灯ML-150是微距拍摄
的最佳选择,尤其在牙医、珠宝、生物、网拍等微距摄影方面表现尤为出
色。此产品采用高性能CPU控制线路,精确控制功率输出,实现最低达
1/16功率闪光,让您的摄影更随心。
在使用本产品之前,请先仔细阅读本手册,以确保您能安全使用。请
保存好本手册以备将来查询参考。
警 告
请勿让本产品淋雨或受潮,以免发生火灾或触电。
本产品内部有高压元件,切勿自行拆解或维修,如果接触产品内部的
高压电路,可能会触电。在需要修理时请送往指定地点专业维修。
如果在使用中挤压、跌落本产品或受到强烈的冲击,造成外壳破裂后
请勿继续使用,以免接触到内部电子元件造成电击伤害。
请勿在近距离将闪光灯头正对人眼闪光(特别是婴儿的眼睛),否则
可能会在短时间内造成视力障碍。在使用闪光灯拍摄婴儿时,建议闪
光灯至少距离1米以上,或使用反射闪光减少闪光可能对视力造成的
伤害。
请将电池或容易误吞的东西远离儿童存放,如果误吞了物体,请立即
与医生联系。
如果电池内部腐蚀性液体流出,需戴手套取出电池。
请勿在化学品或某些特殊物质、可燃性气体附近用闪光灯,这些物质
在特殊情况下可能对闪光灯发出的瞬间强光敏感,有可能导致火灾或
电磁干扰。在这些场合请注意相关警告标识。
请勿将本产品放置在超过40摄氏度的环境下(如:汽车尾箱),有可
能对元器件造成损坏。
本产品不能防水,在雨天及潮湿环境下请注意防水。
长时间不用时请将电池取出,存放在干燥的地方。

(1) 电源管理
注意:使用完后请把电源开关拨至“OFF”。
1、电源开关拨至“ON”, 充电指示灯不亮表示正在充电,数秒后
亮红灯,表示可以拍摄;要测试闪光,按“TEST键”。使用完后请把电源
开关拨至“OFF”。
2、当充电指示灯闪烁,周期为1秒时,表示电池电量不足,请更换电
池。
(2) 功率选择
本机有5档功率选择,5个LED分别指示5档功率。按“+”键功率渐
大,顺序为: 1/16,1/8,1/4,1/2,1/1;反之,按“-”键输出功率
渐小。
(3) 快门同步功能
用连闪线将相机与闪光灯连接,可实现与快门同步触发闪光。
(4) 省电功能
本灯带有节能模式,电源会在约30分钟无操作后自动进入省电状态。
如需打开闪光灯,请按任意键开启。省电状态下,只有充电指示灯闪烁,
周期约3秒。
(5) 保护功能
1、进行连续闪光保护:
为防止闪光灯头过热并损坏, 请勿在1/2和1/1功率时进行超过50次
的快速连续闪光。50次连续闪光后,要让闪光灯至少冷却10分钟,如您在
进行超过50次连续闪光后马上继续进行更多次闪光,内部的防过热功能可
能会被激活, 使充电时间变10至25秒左右。 如果发生这种现象,请让闪
光灯冷却约10分钟,闪光灯便会恢复正常。
连续闪光保护对应表:
功率 次数(大约值)
1/1,1/2 50
1/4,1/8 100
1/16 200
使用闪光灯安 装
(一) 、安装电池
1、打开电池仓盖。
用您的拇指按电
池 仓 ,然 后 按 照 箭 头
所示方向滑动电池仓
将电池仓盖打开。
(二) 、把闪光灯安装到相机上
注意:
如果在连续闪光多次后更换电池,小心电池可能会很烫。
不使用时请将电池取出,以免电池漏液损坏闪光灯。
2、安装电池。
按电池仓中的指
示确保电池的正负触
点朝向正确。
3、关闭电池仓盖。
按箭头所示方向
滑动电池仓盖将其关
闭。在电池仓盖发出
咔嚓声的位置,电池
仓盖将被锁定。
1. 安装闪光灯控制器部分
●旋松固定座上的旋
钮。
●滑动闪光灯固定座
使其完全插入相机
的热靴插座。
●将固定座上的旋钮
旋紧直至闪光灯被
锁住。
2. 安装闪光灯灯头部分
本产品配有六种规格的适配环与相机镜头颈圈相符:49mm、
52mm、55mm、58mm、62mm和67mm。
选择相应的适配环安装在相机镜头上。
将环形闪光灯头扣在转接环上。
●如若卸下闪光灯控制器,先将旋钮松开再将其从相机热靴座上滑出。

FOREWORD
Thank you for choosing this GODOX product. GODOX Macro Ring Flash
ML-150 is the perfect choice for photographers who require shadow free
illumination. It is extremely effective for medical, forensic, scientific, and
small commodities photography. Adopting the CPU control circuit, the
flash provides high-quality and high-precision, its power output lowest to
1/16.
Before using the product, make sure to read through this instruction
manual. Familiarity with connecting, operating or adjusting
procedures will help you obtain the best performance. Keep the
manual for future reference.
WARNING!
Always keep this product from rain or damp in order to prevent fire
or electric shock.
The flash unit contains high voltage electric parts, do not try to open
or repair the flash unit. If you touch the high-voltage circuit inside this
product, electric shock may occur. Return it back to the nominated
repair service station.
If the unit is extruded, fallen, suffered from strong impact and thus its
inside is exposed, stop using immediately so as to prevent electric
shock leading from touching the inside electric components.
Do not fire the flash direct to the eyes at short distances (especially
baby's eyes), or it may cause damage to the eyes. When taking
flash picture toward baby, it is recommended to keep the flash unit at
least 1 meter (3.3 feet) away from the subject. Or use diffuser or
bounce the light to soften its intensity.
Always keep the battery or anything easy to be gulped out of
children's reach. In case of gulping due to carelessness, please
contact a doctor immediately.
When there is caustic liquid leakage inside, it is necessary to wear
gloves to take out the batter.
Do not use the flash unit in the flammable gas, chemical or such
liquids. These materials may be sensitive to the flash from the unit in
some circumstance. It may cause fire or electromagnetic
interference.
Do not leave or store the flash unit in temperature over 40℃ (such
like in the automobile), or it may damage the electronic components.
The flash unit isn't water resistant. Please keep it away from rain or
humidity.
2、系统过热保护:
当内部系统过热时,说明闪光灯已经过度使用,内部电路将自动关
闭。整个电源,需等系统温度下降(10分钟左右),闪光灯便会恢复正
常。
名称
闪光指数
电源
闪光次数
回电时间
色温
闪光时间
体积
净重
10(m ISO 100)
4枚AA碱性电池或其他电池
300-1000次(使用AA碱性电池)
约0.1~2S(使用AA碱性电池)
5600K+200K
1/300S-1/5000S
①环形灯头 128*103*28 mm
②控制器 75*50*160mm
370g
规格参数
所含物品:
闪光灯…(1)
说明书…(1)
适配环:49mm、52mm、55mm、58mm、62mm和67mm
机顶闪光灯电源盒
为闪光灯提供电源,缩短
回电时间,全功率闪光可
达300~1000次。
电源盒端子线
Cx(Canon), Nx(Nikon), Sx(Sony),
Mx(Metz)
连接闪光灯和电源盒,有不同的型号
以供不同品牌的闪光灯使用。
规格参数
可购买本公司以下产品搭配使用

If the flash unit is idle for long, please take out all batteries and keep
the flash unit in dry area.
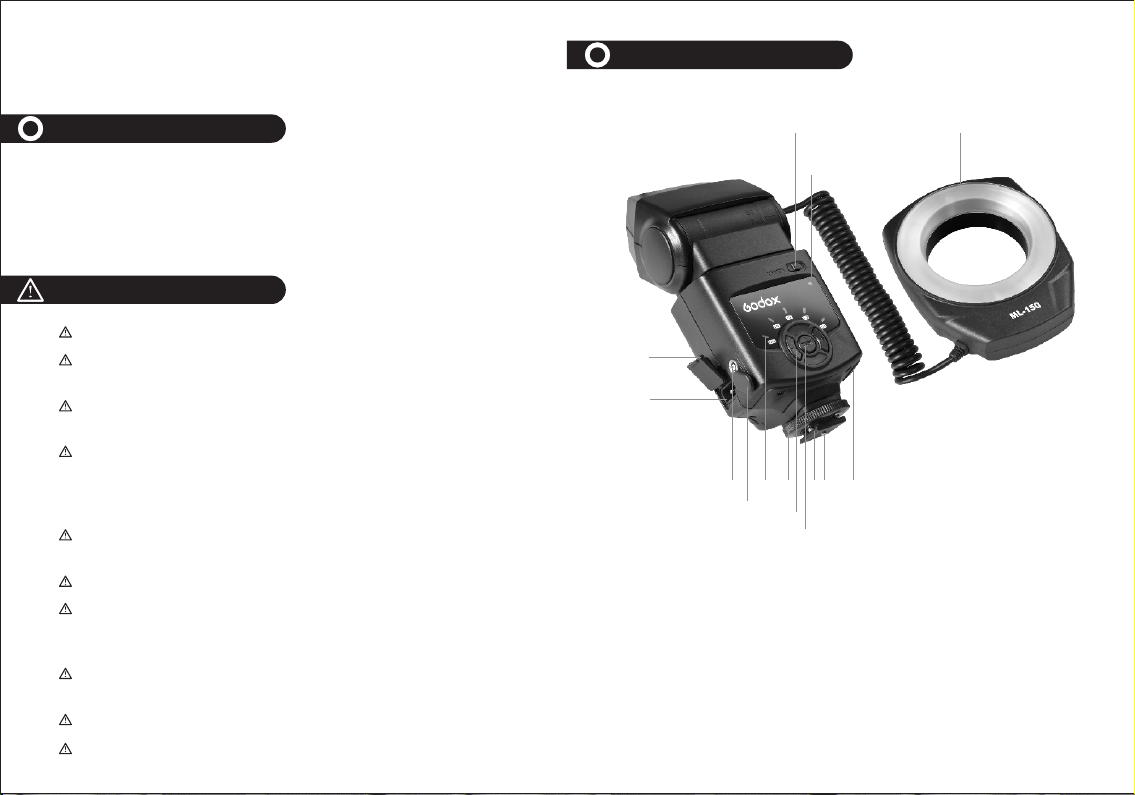
NOMENCLATURE
01) Ring Flash Head
02) Locking Ring
03) Hot Shoe Stand
04) Dedicated Hot Shoe Contact
05) Output Level Indicator
06) Flash Power Level Button
07) Test Button
08) Battery Chamber Cover
09) Power Switch
10) Charging Indicator
11) External Power Pack Terminal Cover
12) External Power Pack Terminal
13) PC Sync Socket Cover
14) PC Sync Socket
1
23 4
5
6
7
8
9
10
11
12
13
14
INSTALLATION
Installing Batteries
1. Open the Battery
Chamber Cover.
Slide the battery
chamber cover along
the arrow direction and
then open it by thumb.
Mounting Ring Flash on the Camera
NOTE:
Take care of the hot battery when changing them after continuous flashes.
Take out of the battery when idle in case the battery leakage damages the flash
unit.
2. Insert the Batteries.
Install the batteries
according to the
direction indicated by
the sticker in the battery
holder and make sure
the + and - battery
contacts are correctly
inserted at the battery
compartment.
3. Close the Battery
Chamber Cover.
Slide the battery
chamber cover along
the arrow direction and
slide it back in place.
The battery chamber
cover will be locked
when there is a “click”
sound.
●Twist the mounting
lock anticlockwise to
loosen it to the highest
point.
●Slide the mounting foot
of control unit into the
camera's hoe shoe
completely.
●Twist the mounting lock
clockwise to tighten it.
1. Attach the Control Unit on the Camera
●To remove the flash, loosen the fixed knob and slide it out of the hot shoe of camera.
2. Attach the Flash Ring on the Camera.
6 types of adapter rings available to suit the camera lens: 49mm, 52mm,
55mm, 58mm, 62mm and 67mm.
Choose the adapter ring needed for your camera and attach to the camera
lens.
Mount the flash ring onto the adapter ring.

Power Management
NOTE: After use, slide the power switch to OFF position.
1. Switch to the ON, the flash will start charging (the charging indicator is
dim). After several seconds, the charging indicator turns red and the
macro ring flash is ready to shoot. For a test flash, press the test button.
After use, slide the power switch to OFF position to power off.
2. If the red charging indicator lamp flickers in every 1s, it indicates low
battery. In such case, the power will turn off automatically and you need
to replace the batteries.
Output Control
The flash unit has 5 steps of power output control which indicated by 5
pieces of LED lamp for different level. Press “+” to make power higher
and they are 1/16, 1/8, 1/4, 1/2, 1/1, otherwise, press “-” to make power
lower.
Synchronization Function
The ring flash and camera will trigger synchronously by using a PC sync
cord to connect the sync terminals of the camera and the ring flash
together.
Power Saving Function
The flash unit is equipped with power saving mode. When idle for about
30 minutes, it will enter “deeper sleep” state automatically to save power.
In this case, the charging indicator flicks every 3 seconds. To restart the
unit, just press any button.
Protection Function
1. Protection in Continuous Flashes
To prevent the flash head from getting too hot and damage, please do
not flash over 50 times when in power level 1/2, 1/1. Please cool down
the flash unit for at least 10 minutes. The over-temperature protection
function will be activated if you continue to flash after 50 times. In this
case, the charging time will turn to 10-25s. Please cool down the flash
unit around 10 minutes and it will turn to normal state.
USING RING FLASH
Power Output Flashes(Approx.)
Number of flashes that will activate over-temperature protection:
1/1,1/2 50
1/4,1/8 100
1/16 200
2. Systematic Over-temperature Protection
When the inner circuit is over-heating, which indicates over use of the
flash unit, the inner circuit will shut down power automatically. The flash
unit will turn to normal state after the inner circuit is cooled down (about
10 minutes).
Name
Guide Number
Power
Flash Times
Recycle Time
Color Temperature
Flash Duration
Dimension
Net Weight
Specifications
SPECIFICATIONS
Packaging Includes:
Ring Flash…(1)
Instruction Manual…(1)
Adapter Rings:49mm,52mm,55mm,58mm,62mm and 67mm
Power Pack for Speedlite.
To provide power supply for
speedlite, shorten the recycle
time, up to 300~1000 flashes
at full power.
Power Flash Connecting Cable.
Cx(Canon), Nx(Nikon), Sx(Sony),
Mx(Metz)
To connect the speedlite and power
pack, dedicated cable available for
different speedlite.
OPTIONAL ACCESSORIES
10(m ISO 100)
4x AA batteries(Alkaline or Ni-MH are usable)
300-1000 times(AA alkaline batteries used)
Approx. 0.1~2S(AA alkaline batteries used)
5600K+200K
370g
①Ring Flash Head 128*103*28 mm
②Control Unit 75*50*160 mm
1/300S-1/5000S

Table of contents
Other Godox Camera Accessories manuals
Popular Camera Accessories manuals by other brands

Viltrox
Viltrox EF-NEX Mount instructions

Calumet
Calumet 7100 Series CK7114 operating instructions

Ropox
Ropox 4Single Series User manual and installation instructions

Cambo
Cambo Wide DS Digital Series Main operating instructions

Samsung
Samsung SHG-120 Specification sheet

Ryobi
Ryobi BPL-1820 Owner's operating manual