German pool DSR-310BK User manual

P.1
Please read these instructions and warranty information carefully
before use and keep them handy for future reference.
在使用之前請詳細閱讀「使用說明書」及「保用條款」,並妥為保存。
即時網上登記保用
Online Warranty Registration
使 用 說 明 書US E R M A N U A L
嵌入式消毒碗櫃
Built-In Ozone Dish Sterilizer
DSR-310BK

P.3P.2
目錄
產品介紹 4
安裝須知 5
安裝說明 6
產品結構 7
使用說明 8
安全注意事項 10
清潔與保養 11
技術規格 11
電器原理圖 12
保用條款 23
請即進行保用登記﹗
有關保用條款細則,請看本說明書最後一頁。
Please register your warranty information now!
For Warranty Terms & Conditions,
please refer to the last page of this user manual.

P.5P.4
產品介紹 安裝須知
產品說明
本產品採用紫外線和臭氧對餐具進行殺菌(可有效殺滅化膿性球菌、腸道致病菌),利用
紅外線進行烘乾,殺菌效果可達到GB17988-2008規定的二星級標準。
使用範圍
適用於家庭餐具的消毒。
隨機附件(裝箱單)
消毒碗櫃 木螺釘 說明書 保用登記證
1台 4隻 1本 1份
使用前請仔細閱讀本說明書。本說明書會向您詳細介紹本機的安裝、使用、維護保養以及注意
事項等,以便充分發揮其性能。
1. 電器安裝應委託專業人員執行。線路容量不足,施工不完善,會導致短路等意外情況。
2. 插座的額定電流不小於10A,請勿與其他家用電器共用一個插座,將插座接入帶有漏電保
護裝置的線路內,以確保安全。
3. 插座應可靠接地,不得將接地線接於自來水管、煤氣管、避雷器及電話線上,防止引發意
外事故。
4. 本機安裝後不應成為承受重量的工具,否則會損毀內部零件。

P.7P.6
安裝說明
1. 在廚櫃安裝的位置上,按圖示尺寸設置方孔,將消毒櫃平穩嵌入,拉開抽屜,用四個木螺
釘將箱體固定。
2. 消毒碗櫃可按需要設置嵌入的位置高度,但支撐消毒碗櫃底部基礎的承重能力必須大於
60kg。
3. 消毒碗櫃應平穩安裝放置,確保拉動抽屜時無搖晃、抖動現象發生,合上抽屜時,應確保
周邊充分密閉。
安裝示意圖
595
595
590
100-150590
500
595
505
564
產品結構
控制面板
螺絲安裝孔
上層拉籃
上層櫃門
下層拉籃
機身
滑軌
下層櫃門
拉手
主機
控制面板
顯示屏
智能鍵 消毒鍵 烘乾鍵

P.9P.8
使用說明
1. 開關櫃門
手握櫃門把手,將櫃門沿水平線拉出或推入,切勿用力過猛。
2. 餐具放置
餐具洗淨瀝乾水後依次豎著放在碗架上,放置時不宜過密,否則影響消
毒、烘乾效果。
3. 開門保護
當打開櫃門時,處於保護狀態,所有功能停止工作,須關上櫃門,才能重新操作。
4. 按鍵說明
上電/初始化操作:
確認安裝到位,抽屜已經關閉後,可開機通電。插上電源插頭,機內發出“嘀”一聲,提示電
源已接通,進入待機狀態。
觀看操作視頻
顯示屏
智能鍵 消毒鍵 烘乾鍵
使用說明
消毒功能:
待機狀態下,按一次殺消毒鍵,消毒鍵指示燈亮,時間顯示90:00,此時5秒內可進行消毒時間
設置,再按一次時間顯示60:00,按第三次顯示30:00,按四次屏幕熄滅,依次循環;消毒時間
設置完成後5秒內無其它操作則開始運行消毒功能,倒計時運行至00:00時消毒工作完成,同時
發出“滴滴滴滴”16聲提示。
烘乾功能:
待機狀態下,按一次烘乾鍵,烘乾鍵指示燈亮,時間顯示90:00,此時5秒內可進行烘乾時間設
置,再按一次時間顯示60:00,按第三次顯示30:00,按四次屏幕熄滅,依次循環;烘乾時間設
置完成後5秒內無其它操作則開始運行烘乾功能,倒計時運行至00:00時烘乾完成,同時發出“
滴滴滴滴”16聲提示。
智能模式:
在待機狀態下,按一次智能鍵,智能鍵指示燈亮,時間顯示60:00,5秒內無其它按鍵操作進入
智能模式,倒計時運行至00:00時消毒完成,時間顯示45:00,待機至00:00,啟動烘乾功能,
時間顯示60:00,倒計時運行至00:00時烘乾完成,同時發出“滴滴滴滴”16聲提示。
組合功能:
待機狀態下,按消毒鍵,時間設置完成後,5秒內再按烘乾鍵可組合運行烘乾功能。同理,按
烘乾鍵,時間設置完成後,5秒內再按消毒鍵也可組合運行消毒功能,時間可任意選擇90、60
或30分鐘。
組合功能時,先運行消毒功能,消毒停止後,待機45分鐘再運行烘乾功能,消毒和烘乾不能同
時運行,消毒和烘乾指示燈同時亮起。為達到最佳效果,建議選擇90分鐘消毒和90分鐘烘乾
組合。

P.11P.10
安全注意事項
1. 拔出插頭時,必須手握插頭端部將其拔出,請勿用手直接拔扯電源線以拔出插頭。
2. 如電源線損壞或發生其他故障,必須由本公司或合資格的專業技術人員更換和維修。
3. 必須確保使用的電源電壓與本機銘牌指定的電壓一致,否則會對本機造成損毀。
4. 除專業維修技術人員外,不得對本機進行拆卸修理。
5. 請不要對機器噴水,否則有短路或觸電危險。
6. 請不要將漆器,耐熱性差的塑膠餐具或非食具(如毛巾、鞋子等)放入消毒碗櫃內。
7. 在使用本產品時,應將食具上的水倒淨後才能放入櫃內。
8. 在消毒(烘乾)結束20分鐘後才能打開抽屜,以免臭氧洩漏和燙傷。
9. 為防止燙傷,打開櫃門,機器會自動保護,停止工作,並非機器故障。
10. 當消毒工作程式啟動時,櫃門己上鎖,請勿強拉。
11. 必須確保電源插座的接地極有效接地。
12. 請勿讓兒童或身體虛弱的人操作使用消毒櫃,否則容易導致燙傷、觸電或其他意外發生。
13. 請勿用濕手插上或拔出電源插頭。
14. 請勿將小型物件放在筷叉網籃以外的區域,防止掉落下層。
警告!
1. 在使用過程中若發現臭氧洩漏或在任何角度不經過任何透光物體即可直接看到殺菌燈管發
出的光線時,應馬上停止使用,並通知專業人員進行維修。
2. 若殺菌燈管損壞,必須聯繫售後服務及維修中心更換相同功率(15W)和波長(253.
7nm)的殺菌燈管。
3. 關好櫃門後,才能進行殺菌或烘乾作業,否則會發生臭氧洩漏、紫外線輻射或燙傷現象。
清潔與保養
請根據您的使用頻率和周圍環境狀況,定期地清潔和保養消毒碗櫃。這
樣能使消毒碗櫃保持良好的消毒、烘乾效果和較長的使用壽命。
• 請先停止機器的所有工作,拔出電源插頭,待機器冷卻後,再進行
清潔保養工作。
• 清潔或保養消毒碗櫃時,請戴上手套,以防在擦拭過程中手指受
傷。
1. 櫃門、拉籃及內膽用沾有中性洗滌液的軟布擦去污垢,再用濕布擦
去殘留的洗滌液,然後用乾布抹乾。
2. 經常清理內膽底部積水,以免水滿外溢。
3. 箱體外側表面的清潔不得用汽油、酒精及其它溶劑、去污粉等,否則會導致主機殼變
色,損傷表面漆膜。
觀看操作視頻
技術規格
型號 DSR-310BK
電壓 220V~50Hz
功率 310W
臭氧濃度(mg/m3) ≧40
容量(L) 100±10
淨重(kg) 26kg
標準承載量(kg) 上層:6下層:8
烘乾溫度(℃) ≦75
機身尺寸(mm) (H)595mmX(W)595mmX(D)500mm
安裝開孔尺寸(mm) (H)590mmX(W)564X(D)505mm
產品規格及設計如有變更,恕不另行通知。
中英文版本如有出入,一概以中文版為準。
本產品使用說明書以 www.germanpool.com 網上版為最新版本。
P.13P.12
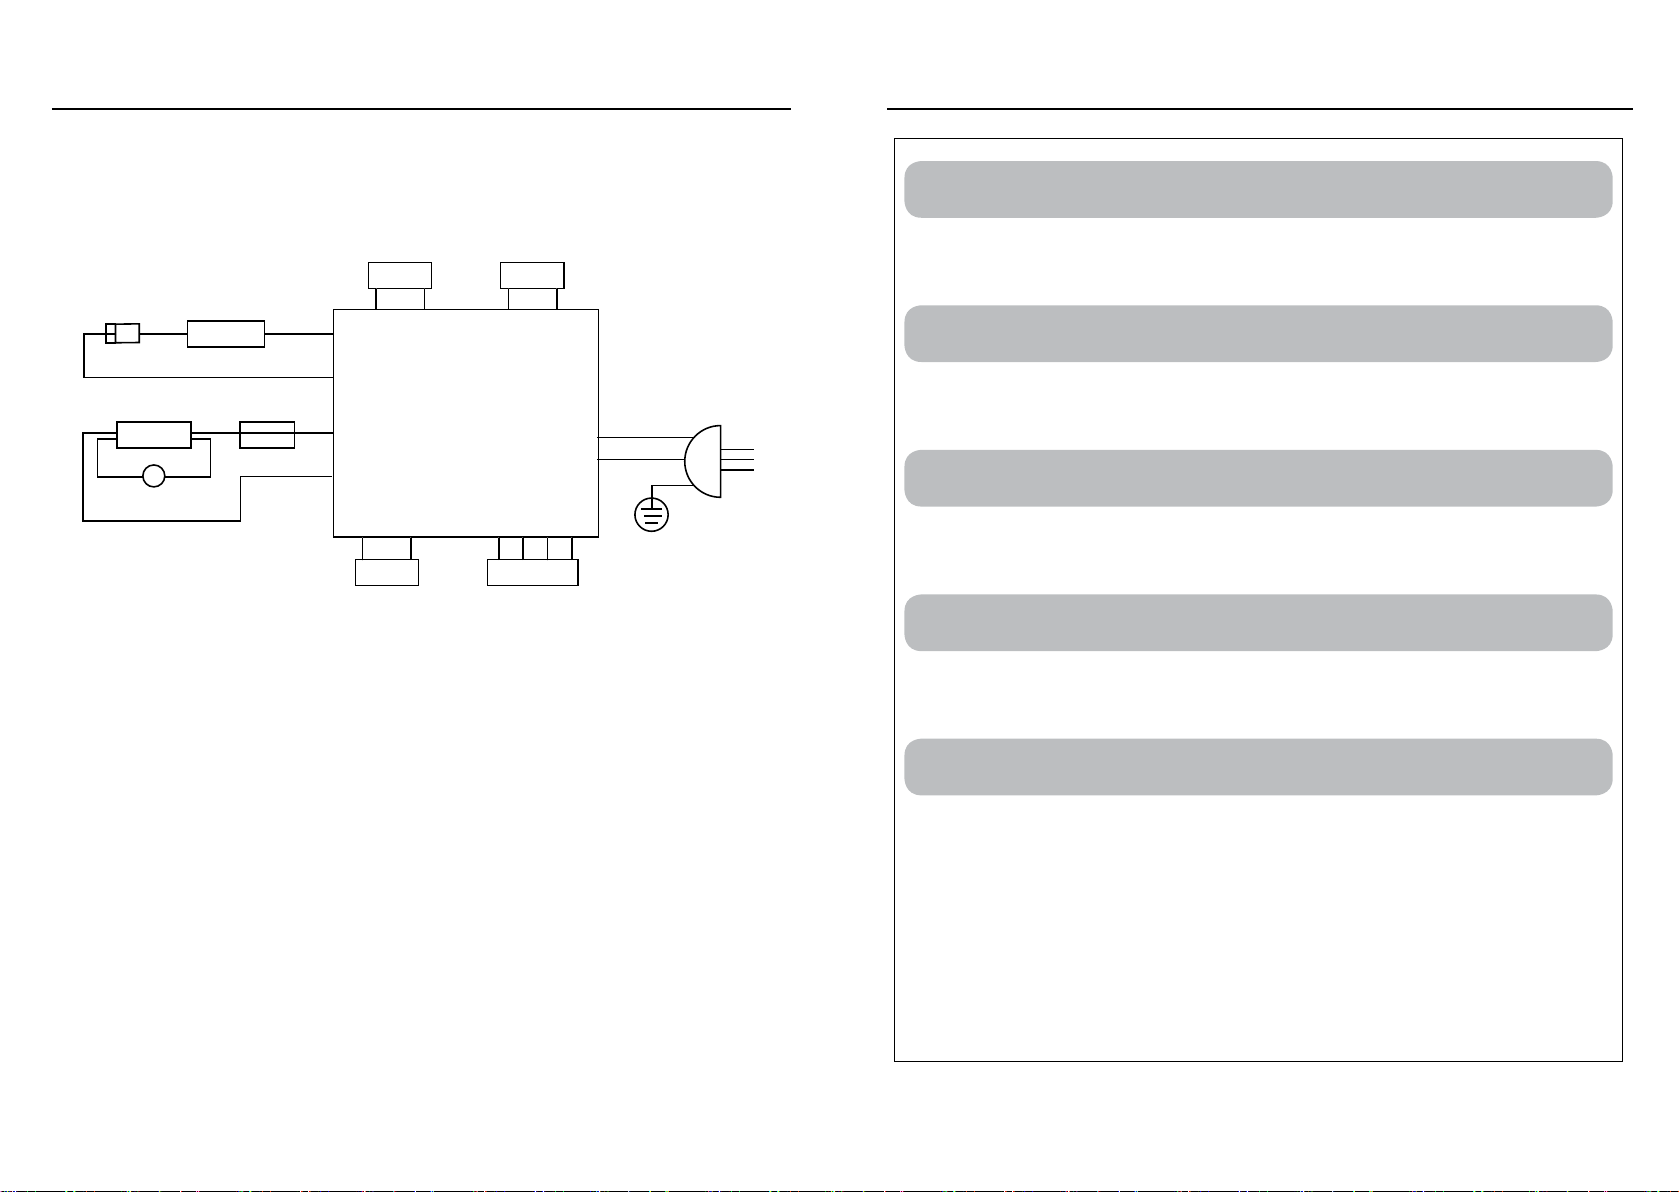
電器原理圖
S
電磁鎖
門控開關
熱保護器
紫外線燈管
啟動器
紅外線燈管
鎮流器
電磁鎖
電路板 棕L
藍N
220V~ 50Hz
按鍵板
Content
Product Summary 14
Installation Guide 15
Installation Instructions 16
Product Structure 17
Operating Instructions 18
Safety Precautions 20
Care and Maintenance 21
Technical Specications 21
Circuit Diagram 22
Warranty Terms & Conditions 23

P.15P.14
Product Summary Installation Guide
Product Overview
This product uses UV and ozone to rst sterilize tableware (capable of effectively exterminating
pyogenic coccus and pathogenic enterobecteriaceae), and then dry the tableware with infrared ray. Its
sterilization result reaches two-star standard specied in GB17988-2008.
Area of Application
The sterilizer is applicable to household utensils.
Supplied Accessories (Packing List)
Dish sterilizer Wood screw User manual Warranty card
1411
Read this manual carefully before using the appliance. Detailed illustration on its installation,
operation, maintenance and precautions will be presented in this manual to help you fully utilize its
functionalities.
1. The appliance should be installed by qualied technicians. Insufcient loading and improper
installation would result in short circuit or other electrical hazards.
2. To ensure safety, the rated current loading of the socket should not be less than 10A; do not
share the socket with other appliances; and the socket should be connected to circuit equipped
with earth-leakage circuit breaker.
3. The socket should be properly grounded. To avoid hazards, the earth wire should not hook up with
water pipes, gas pipes, lightning arresters and telephone lines.
4. Do not let the appliance sustain any weight pressure after installation; otherwise it could damage
the interior parts.

P.17P.16
Installation Instructions Product Structure
1. Follow the diagram below to make room in a cabinet to smoothly embed the sterilizer. Open the
drawer and use four wood screws to x the sterilizer.
2. The mounting height of dish sterilizer is discretionary, but the loading capacity of the supporting
base should be greater than 60kg.
3. The dish sterilizer should lie rmly on a at surface. Make sure the drawer does not judder when it
runs on the slide rail. Fully close the drawer to form an airtight enclosure.
Installation Diagram
595
595
590
100-150590
500
595
505
564
Control Panel
Screw Hole
Upper rack
Upper drawer
Lower rack
Main body
Slide rail
Lower drawer
Door grip
Main Body
Control panel
Display
Smart Key Disinfect Key Heat Key

P.19P.18
1. Open/close the door
Hold the door grip to horizontally pull out or push in the door. Do not apply
brute force.
2. Tableware arrangement
Vertically place the clean and dry tableware on the dish rack. The spacing
between the dishes should be sufciently wide, otherwise the disinfection and heat drying result
will be affected.
3. Auto power off protection
Upon opening the drawer, the sterilizer enters inactive mode and all functionalities will be
suspended. Only by closing the drawer will resume operation.
4. Function Key
Operating Instructions
System Initialization:
Make sure the appliance is properly installed in place. Close the drawer before connecting it to AC
source. Plugging into the socket will emit a ticking sound, indicating the power is on and the machine
enters standby mode.
Disinfection function:
On standby mode, press the “Disinfect” button. The corresponding indicator lights up and the timer
reads 90:00. The disinfection duration can be set within 5 seconds. Press the button once again,
the timer reads 60:00. Pressing 3 times the timer reads 30:00. The display turns off upon the 4th
press. After setting the timer, if no other instructions are given within 5 seconds, the sterilizer will start
running. When the timer ends at 00:00, disinfection is complete and 16 ticking sounds will be emitted.
Heat-Dry function:
On standby mode, press the “Heat” button. The corresponding indicator lights up and the timer reads
90:00. The heat-dry duration can be set within 5 seconds. Press the button once again, the timer reads
60:00. Pressing 3 times the timer reads 30:00. The display turns off upon the 4th press. After setting
the timer, if no other instructions are given within 5 seconds, the sterilizer will start running. When the
timer ends at 00:00, heat-drying is complete and 16 ticking sounds will be emitted.
Smart mode:
On standby mode, press the “Smart” button. The corresponding indicator lights up and the timer reads
60:00. If no other instructions are given within 5 seconds, the sterilizer will enter the Auto mode. When
the timer ends at 00:00, the disinfection is complete. After a short while, the device will enter the
standby mode with the timer starting to count from 45:00 to 00:00. Then the heat-dry function will be
activated with the timer starting to count down from 60:00. When the timer ends at 00:00, heat-drying
is complete and 16 ticking sounds will be emitted.
Integrated functions:
On standby mode, press the “Disinfect” button to set the timer. Then quickly press the “Heat” button
within 5 seconds to integrate the disinfection and heat-dry function. Reversing the sequence of
pressing the 2 buttons will yield the same result. The timer can be set at either 90, 60 or 30 minutes.
When the sterilizer runs on the integrated mode, the disinfection function will precede the heat-dry
function. When disinfection is complete, the sterilizer will enter standby mode for 45 minutes before
proceeding to heat-dry operation. Disinfection and heat-drying cannot run simultaneously. The
“disinfect” indicator and “heat” indicator cannot light up simultaneously as well. To attain optimal
performance, a combination of 90-minute disinfection and 90-minute heat-drying is recommended.
Watch the video clip
Operating Instructions
Display
Smart Key Disinfect Key Heat Key
Table of contents
Other German pool Laboratory Equipment manuals


Popular Laboratory Equipment manuals by other brands


Agilent Technologies
Agilent Technologies 5800 ICP-OES user guide

Endress+Hauser
Endress+Hauser Cleanfit CPA875 operating instructions

NI
NI PXI-5422 CALIBRATION PROCEDURE

Collomix
Collomix Aqix operating instructions

SPEX SamplePrep
SPEX SamplePrep 6875 Freezer/Mill Series operating manual

Ocean Insight
Ocean Insight FLAME-NIR+ Installation and operation manual

Parker
Parker ALIGN-MG-NA Installation, operation and maintenance manual

BD
BD 644787 user guide

DENTAURUM
DENTAURUM Compact Megaplus Instructions for use

Biuged Laboratory Instruments
Biuged Laboratory Instruments BGD 626 instruction manual

VWR
VWR SAS Super IAQ instruction manual

illumina
illumina MiSeqDx reference guide