Fluid BID1000W User manual

fluid bidet seat
Product Handbook & Instructions
BID1000W

01-02
03
04
05
06
07
07
08
09
10-11
12
13
14
Important Safety Instructions
Components
Main Unit Controller Instructions
Technical Specifications
What’s in the box?
Product Size & Installation Preparation
Installation of Main Unit
Installation of Main Unit Continued...
Preparation for Start-up
Cleaning & Maintenance
Removal and Installation of Clamp
Troubleshooting Guide
Warranty
Table of Contents

Important Safety Instructions
DANGER – To reduce the risk of electrocution:
1. Do not use while bathing.
2. Do not place or store product where it can fall or be pulled into a tub or sink.
3. Do not place in or drop into water or other liquid.
4. Do not reach for a product that has fallen into water. Unplug immediately.
5. Do not wash the main unit or electrical plug with excess amounts of water or detergent. Always unplug
the unit before cleaning or maintaining and do not plug back in unless completely dry.
6. Do not handle the electrical plug with wet hands.
7. Never block the air dryer, (with hands or other obstructions).
8. Never disassemble or modify this product as such actions will void the warranty and could cause injury.
9. During installation and maintenance of the product, the electrical plug must be unplugged and water
supply must be shut off.
WARNING – To reduce the risk of burns, electrocution, fire, or injury:
1. Close supervision is necessary when this product is used by, on, or near children.
2. Use this product only for its intended use as described in this manual. Do not use attachments not
recommended by the manufacturer.
3. Never operate this product if the cord or plug are damaged, if it is not working properly, or if it has
been dropped or damaged, or dropped into water.
4. Keep the electrical cord away from heated surfaces.
5. Never use while sleeping or drowsy.
6. Never drop or insert any foreighn objects into any product openings or hose.
7. Do not use outdoors or operate where aerosol, (spray,) products are being used, or where oxygen is
being administered.
8. Connect this product to a properly grounded outlet only. (See Grounding Instructions).
9. Do not throw cigarettes or other burning materials into the toilet. This may create a fire hazard.
10.This product is an electrical appliance, so it must be placed far away from water. Be careful not to
drench with urine or other liquids.
11. Do not lay the product on its side or upside down while plugged in or connected to water.
12. Do not plug other electrical appliances into the same electrical socket being utilized by the product.
13. Do not use a power extension cord or an unstable loose power outlet.
14. Never connect the product to an aging or worn water supply hose. This could cause leaking, a fire or
electrical shock. Installation of the bidet seat should include specified components and a new water
supply hose.
READ ALL INSTRUCTIONS BEFORE USING
When using electrical products, especially when children are present, basic safety precautions
should always be followed, including the following:
1. The product is not to be used by persons, (including children), with reduced physical, sensory or
mental capabilities, or lack of experience and understanding, unless they are given adequate
supervision and instruction.
2. Young children should be supervised at all times and are not to play with the product.
1

Important Safety Instructions Continued...
CAUTION – Failure to follow these instructions may cause bodily injury or property damage.
Grounding Instructions
DANGER – Improper use of the grounding plug can result in a risk of electric shock.
SAVE THESE INSTRUCTIONS
This product must be grounded. In the event of an electrical short circuit, grounding reduces the risk of
electric shock by providing an escape wire for the electric current. This product is equipped with a cord
with a grounding wire and grounding plug. The plug must be plugged into an outlet that is properly
installed and grounded.
1. Do not install or use the product in wet environments such as steam rooms, wet shower rooms etc.
2. It is recommended that a water-proof electrical outlet be used, and that the outlet should be installed in a
location not exposed to spraying water or wetness.
3. This product should be used with 110V-120V,50/60Hz electrical current only, load current is at least 15A.
Power plug must be equipped with a ground fault circuit interrupter or ground fault electrical leakage protector
or a similar highly sensitive, rapid type leakage switch (Rated sensitive current under 6mA).
4. During lightning storms it is strongly recommended that the product be unplugged.
5. Do not stand on product unit, seat or seat cover.
6. Do not lean against the seat cover when using the product, to avoid damage.
7. This product is equipped with a soft-closing seat cover. Do not force the seat closed or you may
damage the hinges.
8. Use only a mild detergent and soft cloth to clean this product. Do not use paint thinner, bleach, abrasive
cleansers or hard scrubbing brushes as they will damage the product.
9. Exposure to direct sunlight for extended periods may damage or discolour the plastic.
10. Only use tap water or potable water in this product.
11. Do not connect water supply to a heated water source. Inlet water temperature should be 3~35 ℃ /
37.4~95 F
12. Ensure that the room temperature is maintained above freezing. If the room temperature is freezing
or below freezing , turn off the unit, disconnect from the water supply and empty and dry, to avoid freezing
and damage.
13. If moving the product from a cold or wet environment into normal room temperature, wait for at least 2
hours to allow any condensation to evaporate. To avoid electrical short-circuit, this product should not be
plugged in until all condensation has been allowed to dry.
14. If the product malfunctions, unplug and disconnect from the water supply immediately.
2

Leakage protection plug
Complete product
Power cord
Infrared receiver
Nozzle baffle
Nozzle
Remote control
Bumper
Lid
Components
Seat
Release button
Drying
baffle
Water supply pipe
Front cleaning
Rear cleaning
3

Main Unit Controller Instructions
Front Back
Rear
Cleaning
Front
Cleaning
Stop Press the controller inward, (push toward toilet bowl) to stop whatever
function is currently in progress: rear cleaning, front cleaning, drying or
nozzle cleaning function.
1. While seated, turn the controller forward to start the rear
cleaning function.
2. During rear cleaning, turn the controller forward or backward incrementally
to slightly adjust the nozzle position forward or backward.
1. While seated, turn the controller backward to start front (feminine)
cleaning function..
2. During front cleaning, turn the controller forward or backward incrementally to
slightly adjust the nozzle position forward or backward.
4

960W
1400W (120V)
Rear cleaning / oscillating cleaning, Front cleaning / oscillating cleaning
110-120V50/60Hz
Rated voltage
Rated power
Water pressure
range
The minimum necessary pressure is 0.08MPa (hydrostatic pressure),
the maximum water pressure is 0.8MPa (hydrostatic pressure)
6-level water temperature adjustment
Power Cord Length is about 1.2m
Heating power
Water
temperature
Water volume 5-level adjustment
Cleaning mode
Main Unit
Technical Specifications
50W
Anti-syphon device, Anti-backflow device, Filter device
The water temperature sensor, Anti-burning apparatus, Thermostat,
Temperature fuse, Ground fault protection, Leakage protection ,
Anti-freeze cracking device
Nozzle position
Water pressure
protector
Anti-siphon
device
Safety device
Pressure stabilizer, Automatic pressure discharging device
Cleaning
Device
200W
High temperature preventer, thermal fuse
6-level adjustment
Over 0.2m³/min
Warm dry speed
Warm dry
temperature
Heating power
Safety device
Drying
device
Automatic deodorizer, (choice of on/off)
6- level adjustment
Deodorization
Deodorization
Surface
temperature
Heating power
Quick Release, soft-close
The beeper is discontinued at night to ensure a quiet environment
Quiet setting
Heated seat Open and close
device
Prevent low
temperature burn
Safety device
Convenience
Choice of three modes: Smart, Always on, Always off
Night light
After 10 minutes of use, the seat temperature will automatically drop
slowly to a low level
Seat sensor,Temperature senor, Bimetal thermostat, Thermal fuse
Antibacterial
position Seat, Nozzle
5-level adjustment
5

What’s in the Box:
Tee - joint (1)
2. Screws (2)
Screws
1. Base plate
Base Plate
1. Remote control
2. Remote
control holder
3. Expansion
screws (2)
3. Rectangular
fixing pieces (2)
Rectangular
Fixing Plate
Expansion
screws (2)
Expansion nut
4. Expansion
nut (2)
Manual
Remote control
Remote
control
holder
Remote
control
assembly
Base plate
assembly
Filter
assembly
Mounting
Cardboard
Mounting
Cardboard
Manual
Main unit
Manual,
Mounting
Cardboard
Tee - joint
6
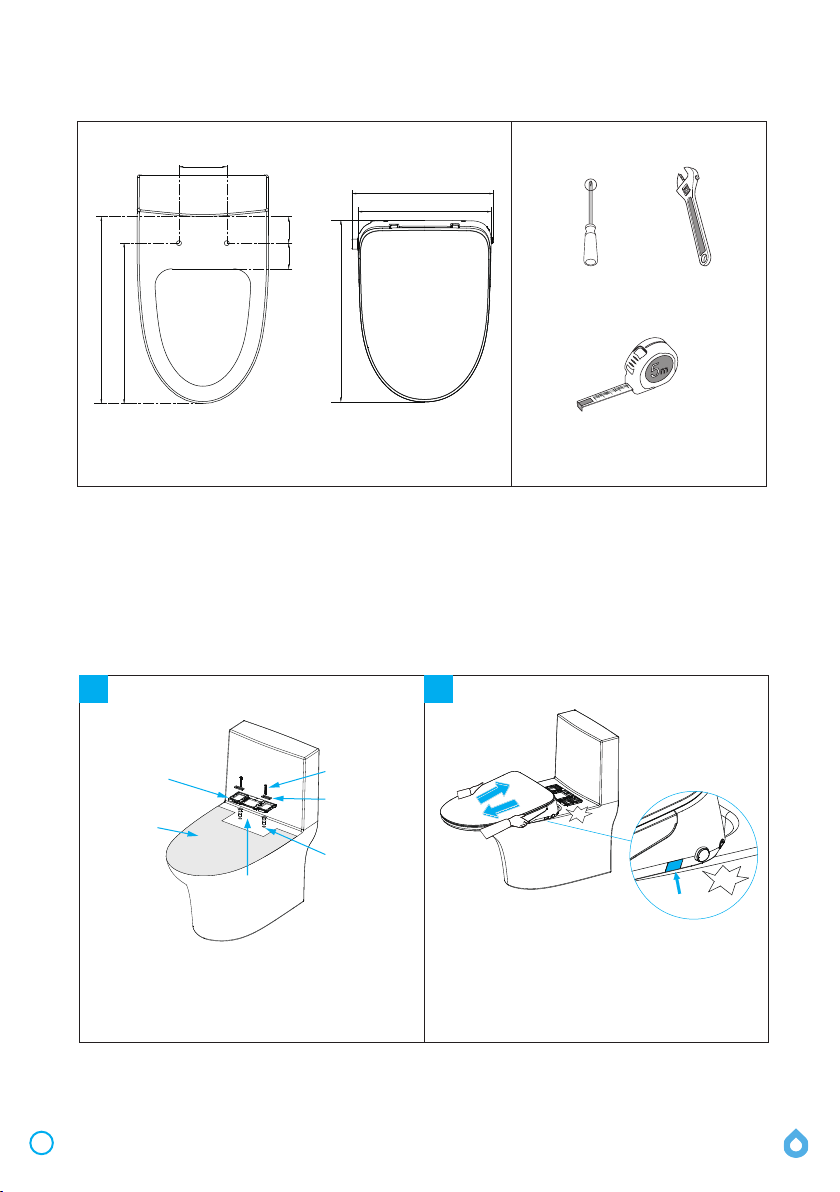
Installation of Main Unit
Product Dimensions and Installation Preparation
403mm
380mm
130-190mm
517mm
434-493mm
>490mm
>25<90
WrenchPhillips screwdriver
Tape measure
1 2
4. Screws
3. Rectangular
fixing plate
1. Expansion nut
Installation of base Installation and Removal of Main Unit
* This product has been tested for water flow before leaving the factory. There may be a small amount of
residual water in the product upon opening. This is normal and does not indicate that the product is used
or malfuntioning in any way.
* Do not install this product in a ‘wet’ bathroom, where there is no division betwen shower and toilet.
2. Install
base plate
Toilet mounting
holes
Install
mounting
cardboard
The black latch faces
forward, groove up
Place the mounting cardboard on the bowl to guide the base
plate installation. Install the expansion nuts into the toilet
mounting holes first, and then install the base plate, the
rectangular fixing plate and then attach with the screws.
Attach the base plate loosely until the final positioning of the
seat is determined, and then tighten.
Disassemble
Click
click
* Important: Please ensure that this seat will fit the toilet bowl
before proceeding with installation.
Installation of Main Unit: Align main unit to base plate and push it
into the base plate. A “click” sound means that the main unit is
installed in place. Removal of Main Unit: Press the "Quick Release
button", and pull out the main unit when a "click" sound is heard.
* Once the “Quick Release button” has been depressed, you don’t
have to continue to hold it in to remove the seat.
7

3Installation of Water inlet pipe and Tee-joint
Angle supply valve
Tee-Joint
Water inlet pipe
to main unit
Current toilet water supply pipe
Connect to the
angle supply valve
Connect to
main unit
➀Connect Tee-joint to angle supply valve; (The originalTee-joint should be removed);
➁Connect the inlet end of water supply pipe to theTee-joint as shown in the above illustration;
➂Connect main unit to Tee-joint as shown the above illustration.
Connect to toilet
water supply pipe
8
Installation of Main Unit Continued...
Other manuals for BID1000W
2
Table of contents


