FitLogic MIRACLE R280 User manual

Read all the instructions carefully before
assembling and using this product. Retain this
owner’s manual for the future’s reference.
!

1
1. Plug the power cord of the treadmill directly into a dedicated grounded circuit.
This product must be grounded well. If it has breakdown, grounding provides a
path of least resistance for electric current to reduce the risk of electric shock.
2. Position the treadmill on a clean and flat surface with at least 2m*1m area.
Do not place the treadmill on thick carpet as it may interfere with proper
ventilation. Also, do not place the treadmill near water or outdoors.
3. Position the treadmill where the wall plug is visible and accessible.
4. NEVER start the treadmill while you are standing on the walking belt. After
turning the power on and adjusting the speed control, there may be a pause
before the walking belt begins to move, ALWAYS stand on the foot rails on the
sides of the frame until the belt is moving.
5. Wear appropriate clothing when exercising on the treadmill. Do not wear long,
loose fitting clothing that could become caught in the treadmill. Always wear
running or aerobic shoes with rubber soles.
6. Always unplug the power cord before removing the treadmill motor cover.
7. Keep small children away from the treadmill during operation.
8. Always hold the handrails when initially walking or running on the treadmill,
until you are comfortable with the use of the treadmill.
9. Always attach the safety pull pin rope to your clothing when using the
treadmill. If the treadmill should suddenly increase in speed due to an
electronics failure or the speed being inadvertently increased, the treadmill will
come to a sudden stop when the pull pin is disengaged from the console.
IMPORTANT SAFETY PRECAUTIONS

2
10. When the treadmill is not being used, the power cord should be unplugged
and the safety pull pin should be removed.
11. Before starting any exercise program, consult with your physician or health
professional. He or she can help to establish the exercise frequency, intensity
(target heart zone) and time appropriate to your particular age and physical
condition. If you have any pain or tightness in your chest, an irregular heartbeat,
shortness of breath, feel faint or have any discomfort while you exercise, STOP
IMMEDIATELY! Consult your physician before continuing.
12. If you observe any damage or wear on the mains plug or on any section of
the mains lead then please have these replaced immediately by a qualified
electrician –do not attempt to change or repair these yourself.
13. If the supply cord is damaged, it must be replaced by the manufacturer, its
service agent or similarly qualified persons in order to avoid a hazard.
14. Put your feet on the side rail before using the treadmill, and always attach
the safety pull pin rope to your clothing. Hold the handle bar before the running
belt moving well ( feel the running speed by your single foot before using it). To
avoid loss balance, please slow down the speed to the lowest or take off the
safety. And hold the handle bar to jump to the side rail when emergency or the
safety key is not attached.
IMPORTANT SAFETY PRECAUTIONS

3
When you open the carton, you will find the below spare parts:
Spare parts list:
NO.
DESCRIPTION
SPEC
QTY
NO.
DESCRIPTION
SPEC
QTY
1
CONSOLE MAIN FRAME
1
31
Right Bottom
Decoration Case
1
9
LEFT HANDLE BAR
1
86
BOLT
M8*16
8
10
RIGHT HANDLE BAR
1
90
BOLT
M8*35
2
16
ALLEN WRENCH WITH DRIVER
S=13, 14,
15
1
92
BOLT
M8*42
2
17
5#ALLEN WRENCH
5 mm
1
104
BOLT
M6*12
6
23
LEFT OUTTER COVER
1
107
SCREW
ST4.2*12
10
26
RIGHT OUTTER COVER
1
108
SCREW
ST4.2*13
8
30
Left Bottom Decoration
Case
1
122
4# ALLEN WRENCH
4 mm
1
Assembly tools:
Allen Wrench: 5mm 1pc, 4mm 1pc
Allen Wrench With Screw Driver :S=13、14、15 1pc
ASSEMBLY INSTRUCTIONS

4
Notice: Do not turn power on before assembly is done.
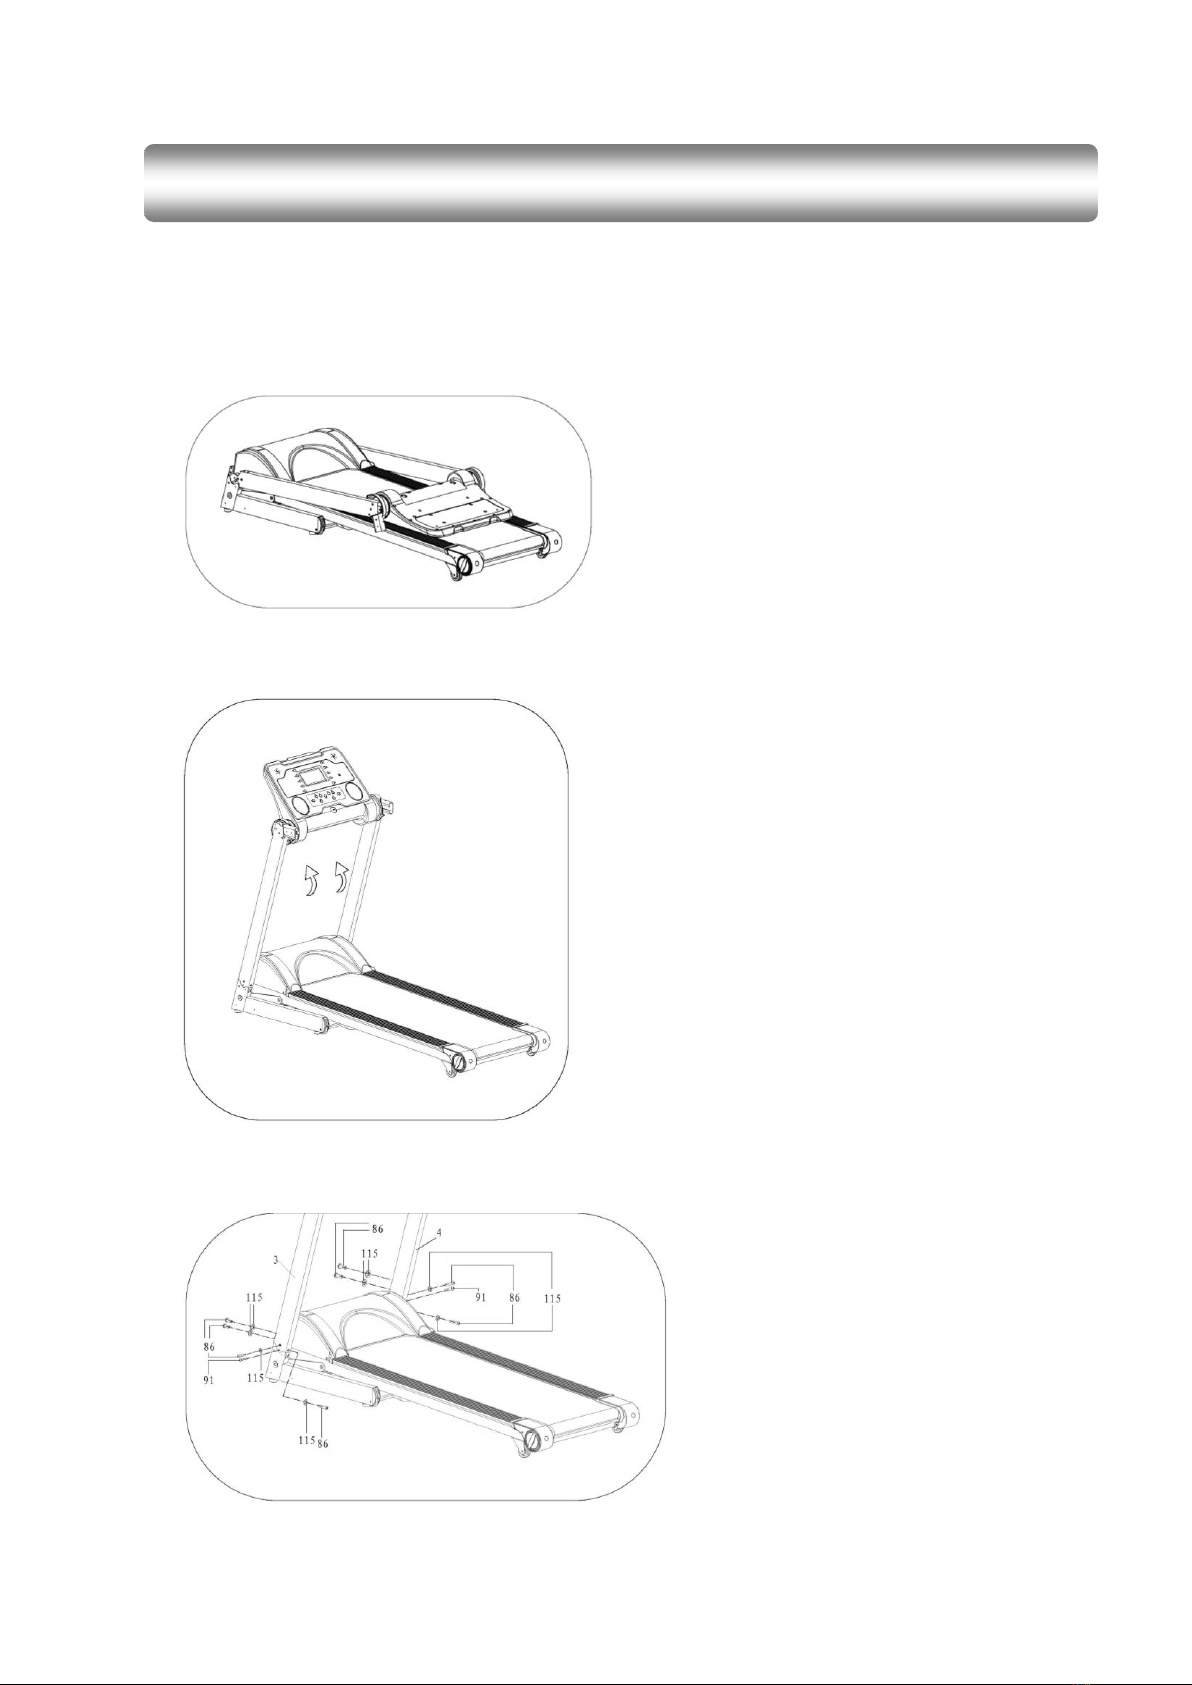
Step 1:
Step 2:
Step 3:
Open the carton,take out the
spare parts,and put the MAIN
FRAME on the ground.
Turn the computer and the
upright frame up.
Attention: Don’t press the
wires inside the upright
frame when folding. Hold
the computer and upright
frame to avoid dropping.
Use 5# Allen wrench, lock the
Left & right upright tubes (#3 &
#4) onto the Base main frame
with M8*16 Bolt (#86), and Arc
washer (#115).
Attention: Hold the left and
right upright tubes to avoid
dropping.
ASSEMBLY STEPS

5
Step 4:
Step 5:
Step 6:
Connect the Hand pulse wire.
Use 4# Allen wrench, lock the
Left and right handle bar
(#9,#10) onto the Upright
upper post (#3,#4) by M6*12
Bolt (#104).
Use 5# Allen wrench, turn the
Computer to the right position
according to the arrow direction
shown as the picture. Lock the
Console main frame (#1) onto
the Upright upper frame by
M8*35 Bolt (#90) and nut. And
then lock the bolt on the position
“A”.
Use Allen wrench with screw
driver, lock the Left & right
outer cover (#23,#26) onto
the Upright upper frame
(#3,#4) by screw 4.2*13
(#108).
Attention: Please fix the treadmill well according to the above steps, and
then go to the next step to assemble the plastic covers.

6
Step 7:
Put the Left and right bottom
decoration case (#30,#31)
onto the Base main frame
(#5), then lock them with
ST4.2*12 screw (#107) by
Allen wrench with screw driver.
Attention:Please don’t put the power on until you make sure that
all the above steps are finished and all the bolts are tightened
well. Please also read all the following instructions when you
operate the treadmill.

7
Folding up:
Releasing down:
FOLDING INSTRUCTION
Hold the place A, and pull up
the main frame up as the arrow
direction till you hear the sound
of the cylinder (#15).
Hold the place A, kick the
position B of cylinder (#15),
and push the running deck a
little bit, then the running deck
will drop down slowly.

8
TECHNICAL PARAMETER
BUILT UP
SIZE(mm)
1700*775*1350mm
FOLDABLE
SIZE(mm)
830*775*1580mm
RUNNING
BOARD(mm)
460*1320mm
NET WEIGHT
69KG
MAX USE’S
WEIGHT
120KG
SPEED
RANGE
1.0-20KM/h
INCLINE
LEVEL
0-15%
ONE
SMILE-SHAPE
LCD DISPLAY
WINDOW
SPEED,TIME,DISTANCE,CALORIES,PULSE
INCLINE

9
GROUND GUIDE
This product must be grounded. If it should malfunction or breakdown,
grounding provides a path of least resistance for electric current to
reduce the risk of electric shock. This product is equipped with a cord
having an equipment-grounding conductor and a grounding plug. The
plug must be plugged into an appropriate outlet that is properly
installed and grounded in accordance with all local codes and
ordinances.
DANGER –Improper connection of the equipment-grounding
conductor can result in a risk of electric shock. Check with a qualified
electrician or serviceman if you are in doubt as to whether the product
is properly grounded. Do not modify the plug provided with the product
–if it will not fit the outlet, have a proper outlet installed by a qualified
electrician. This product is for use on a nominal 120-volt circuit and has
a grounding plug that looks like the plug illustrated in sketch A in
following figure. Make that the product is connected to an outlet having
the same configuration as the plug. No adapter should be used with
this product.
Table of contents
Languages:
Other FitLogic Treadmill manuals