
Doro Primo 413 User manual

by Doro
Primo 413 by Doro
Operating Instructions

U2
2332

i
1. Receiver loudspeaker Making phone calls holding the cell phone
to the ear
2. Display
3. Speed-dial buttons Speed-dialling of the numbers saved under
M1, M2 and M3 with one keystroke
4. Left soft key Selection of the main menu
Right soft key Opening the telephone directory
5. Call button Dialling and answering call; opening
the call log.
6. Arrow keys In idle state [up] for opening the quick
access list.
[down] for opening the message. Scrolling up
and down in menus and lists.
7. Microphone
8. Camera key Selection of camera function
9. Exit key Exiting a call, returning to idle state; switching
the phone on/off
10. Numerical keys In idle state: input of phone number; long
keystroke on 1: calling the voice mail box
(telephone number must be saved);
11.
*-
key In idle state: to enter: “*”/ “+” / “P”/“W“;
Input of text: input of special characters

ii
12. # key In idle state: long keystroke to toggle between
ring tone on/off; For inputs: shifting between input
modes.
13. Headset connector For standard headset with 3.5 mm phone jack
14. Switch for torch
15. Flip up (clamshell) Shows the time in idle state, display of
display missed calls and notification of received text
messages
16. Flash LED
17. Camera lens
18. Emergency call key
19. Loudspeaker For hands-free mode and ringing
20. Micro USB port For battery charger or connection to PC
21. +/- keys Setts the volume of ring tone/loudspeaker
22. Charging contact To charge the device in the charging cradle
23. Charging cradle To charge the telephone

1
Content
Installation . . . . . . . . . . . . . . . . . . . . . . . . . . . . . . . . . . .5
Package content . . . . . . . . . . . . . . . . . . . . . . . . . . . . .5
Inserting the SIM card, memory card and
rechargeable battery . . . . . . . . . . . . . . . . . . . . . . . . .5
Charging . . . . . . . . . . . . . . . . . . . . . . . . . . . . . . . . . . . . .8
Symbols . . . . . . . . . . . . . . . . . . . . . . . . . . . . . . . . . . . . . .9
Auxiliary functions. . . . . . . . . . . . . . . . . . . . . . . . . . . . .9
Display status symbols . . . . . . . . . . . . . . . . . . . . . . .10
Operation . . . . . . . . . . . . . . . . . . . . . . . . . . . . . . . . . . .11
Switching the phone on . . . . . . . . . . . . . . . . . . . . . . .11
Standby mode . . . . . . . . . . . . . . . . . . . . . . . . . . . . . .13
Changing the language, time and date . . . . . . . . . . .13
Making calls . . . . . . . . . . . . . . . . . . . . . . . . . . . . . . . .13
Selecting phone numbers from the
telephone directory . . . . . . . . . . . . . . . . . . . . . . . . . . .14
Answering a call . . . . . . . . . . . . . . . . . . . . . . . . . . . . .14
Volume control . . . . . . . . . . . . . . . . . . . . . . . . . . . . . .14
Text input. . . . . . . . . . . . . . . . . . . . . . . . . . . . . . . . . . .15
Call options . . . . . . . . . . . . . . . . . . . . . . . . . . . . . . . . .16
Call waiting . . . . . . . . . . . . . . . . . . . . . . . . . . . . . . . . .17
Call information . . . . . . . . . . . . . . . . . . . . . . . . . . . . . .18

2
Mute . . . . . . . . . . . . . . . . . . . . . . . . . . . . . . . . . . . . . .18
Headset . . . . . . . . . . . . . . . . . . . . . . . . . . . . . . . . . . . .18
Emergency calls . . . . . . . . . . . . . . . . . . . . . . . . . . . . .19
Emergency calls key . . . . . . . . . . . . . . . . . . . . . . . . .20
Telephone directory . . . . . . . . . . . . . . . . . . . . . . . . . . .22
Creating an entry in the directory . . . . . . . . . . . . . . . .22
Creating an ICE entry (In Case of Emergency)
(emergency information) . . . . . . . . . . . . . . . . . . . . . . .24
Managing entries in the telephone directory . . . . . . .24
ICE (In Case of Emergency) . . . . . . . . . . . . . . . . . . . .28
Messages . . . . . . . . . . . . . . . . . . . . . . . . . . . . . . . . . . . .30
Creating and sending SMS . . . . . . . . . . . . . . . . . . . . .30
Creating and sending MMS . . . . . . . . . . . . . . . . . . . .31
Inbox, sent, outbox . . . . . . . . . . . . . . . . . . . . . . . . . . .33
Call log . . . . . . . . . . . . . . . . . . . . . . . . . . . . . . . . . . . . . .34
Camera (taking pictures) . . . . . . . . . . . . . . . . . . . . . . .36
Image viewer . . . . . . . . . . . . . . . . . . . . . . . . . . . . . . . . .38
Audio player . . . . . . . . . . . . . . . . . . . . . . . . . . . . . . . . .39
FM radio . . . . . . . . . . . . . . . . . . . . . . . . . . . . . . . . . . . . .40
File manager . . . . . . . . . . . . . . . . . . . . . . . . . . . . . . . . .41

3
Connecting the mobile phone to a computer . . . . . .42
Moving data between phone and computer
Safely remove USB cable . . . . . . . . . . . . . . . . . . . . . .43
Settings . . . . . . . . . . . . . . . . . . . . . . . . . . . . . . . . . . . . .44
SOS setting . . . . . . . . . . . . . . . . . . . . . . . . . . . . . . . . .44
Basic settings . . . . . . . . . . . . . . . . . . . . . . . . . . . . . . .47
Network settings . . . . . . . . . . . . . . . . . . . . . . . . . . . . .52
Bluetooth® . . . . . . . . . . . . . . . . . . . . . . . . . . . . . . . . .54
Security settings . . . . . . . . . . . . . . . . . . . . . . . . . . . . .54
Services . . . . . . . . . . . . . . . . . . . . . . . . . . . . . . . . . . .57
Abbreviations . . . . . . . . . . . . . . . . . . . . . . . . . . . . . . .59
Restore to default settings . . . . . . . . . . . . . . . . . . . . .60
Call settings . . . . . . . . . . . . . . . . . . . . . . . . . . . . . . . .61
SMS settings . . . . . . . . . . . . . . . . . . . . . . . . . . . . . . . .66
MMS settings . . . . . . . . . . . . . . . . . . . . . . . . . . . . . . .68
Voice mail (mailbox) . . . . . . . . . . . . . . . . . . . . . . . . . .70
User profiles . . . . . . . . . . . . . . . . . . . . . . . . . . . . . . . .70

4
Organiser . . . . . . . . . . . . . . . . . . . . . . . . . . . . . . . . . . . .72
Calendar . . . . . . . . . . . . . . . . . . . . . . . . . . . . . . . . . . .72
Alarm . . . . . . . . . . . . . . . . . . . . . . . . . . . . . . . . . . . . . .73
Services . . . . . . . . . . . . . . . . . . . . . . . . . . . . . . . . . . .74
Calculator . . . . . . . . . . . . . . . . . . . . . . . . . . . . . . . . . .74
Appendix . . . . . . . . . . . . . . . . . . . . . . . . . . . . . . . . . . .75
Safety notes . . . . . . . . . . . . . . . . . . . . . . . . . . . . . . . .75
Network services and network fees . . . . . . . . . . . . . .75
Operating environment . . . . . . . . . . . . . . . . . . . . . . . .75
Medical devices . . . . . . . . . . . . . . . . . . . . . . . . . . . . .76
Cardiac pacemakers . . . . . . . . . . . . . . . . . . . . . . . . .76
Explosive areas . . . . . . . . . . . . . . . . . . . . . . . . . . . . . .77
Ear protection from very high volume level . . . . . . . . .78
Emergency call . . . . . . . . . . . . . . . . . . . . . . . . . . . . . .79
Vehicles . . . . . . . . . . . . . . . . . . . . . . . . . . . . . . . . . . . .79
Maintenance and care . . . . . . . . . . . . . . . . . . . . . . . .80
Warranty and service information . . . . . . . . . . . . . . . .81
Technical data . . . . . . . . . . . . . . . . . . . . . . . . . . . . . . .85
Specific absorption rate (SAR) . . . . . . . . . . . . . . . . . .86
Approval and conformity . . . . . . . . . . . . . . . . . . . . . . .87
5
Installation
Package contents
• 1 mobile phone
• 1 energy-efficient switch-mode power supply
• 1 charging cradle
• 1 USB charging cable with micro USB plug for the con-
nection to the mobile phone or the charging cradle
• 1 rechargeable battery Li-Ion 3.7 V / 1.050 mAh
• 1 stereo headset
• 1 operating instructions
IMPORTANT
First switch the phone off and disconnect it from the battery char-
ger before you remove the cover of the battery compartment.
Inserting the SIM card, memory card and rechargeable battery
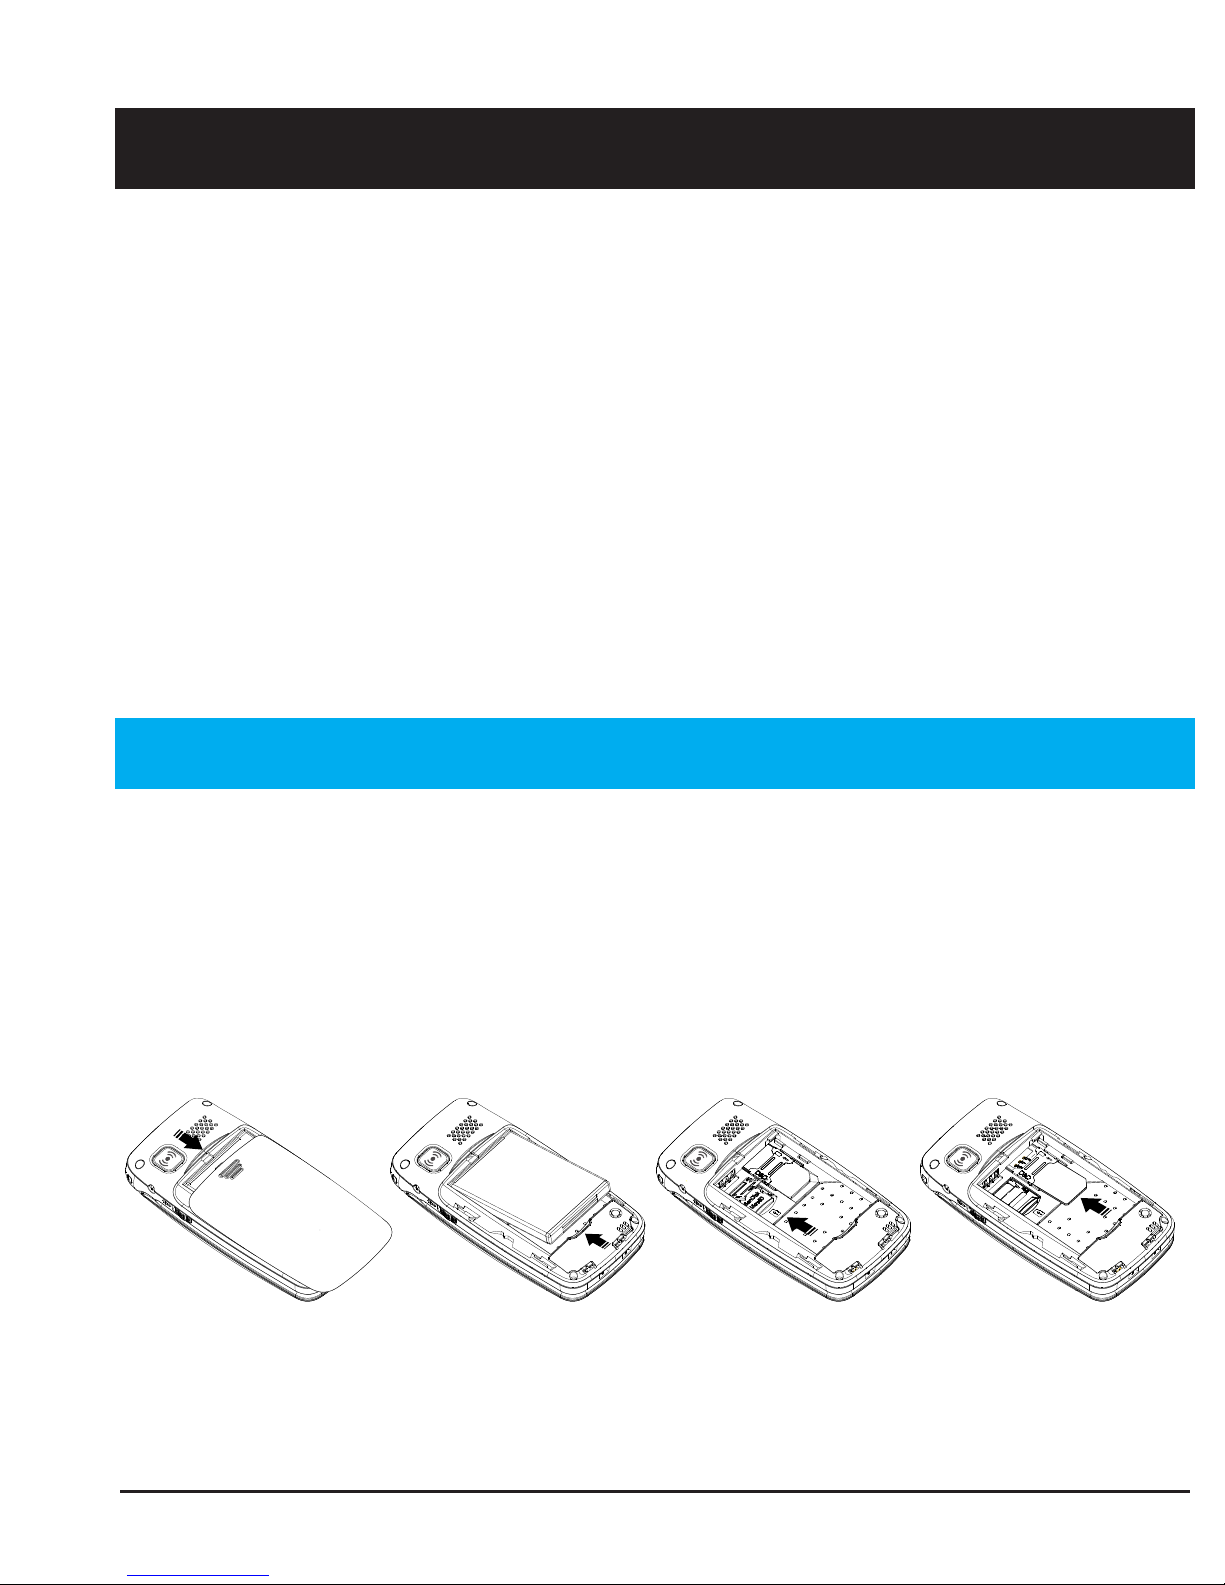
The SIM card and memory card holder are located behind the
rechargeable battery.

6
1. Remove the cover of the battery compartment by placing a
thumb on the cover’s riffle on the rear of the telephone casing
and pushing the cover downwards. If the rechargeable battery
is inserted, remove it by lifting it on the notch at the bottom
using a finger nail.
2. Insert the SIM card by carefully pushing it under the metal bra-
cket on the right side. Make sure the contacts of the SIM card
point downwards and the cut-off corner fits exactly in the
recessed shaping of the holder. The contacts of the SIM card
must not be scratched or bent. Try not to touch the contacts
with your fingers.
3. Micro SD memory card To use the performance features of your
phone that require more memory, in particular photos, music
etc., a micro SD memory card is needed. This is how you insert
the memory card into the slot: slightly press onto card holder on
the left side and carefully push it in towards the upper casing
edge. The memory card holder now can be folded up vertically.
Place the memory card in the black plastic holder in a form-
locking manner. Make sure the contacts of the memory card
point downwards and the "lug" is placed in the marked area.
The contact of the memory card must not be scratched or bent.
Other manuals for Primo 413
1
Table of contents
Other Doro Cell Phone manuals


Doro
Doro PhoneEasy 626 User manual

Doro
Doro PhoneEasy 341gsm User manual

Doro
Doro PhoneEasy 508s User manual

Doro
Doro Primo 305 User manual

Doro
Doro phonoeasy 631 User manual

Doro
Doro 824c User manual

Doro
Doro Liberto 650 User manual

Doro
Doro 780X User manual

Doro
Doro Liberto 810 User manual

Doro
Doro 8031 User manual


