Clayton GS-1350 Guide

March 2021
WARNING
Respiratory protection is recommended
operating this equipment.
WARNING
Eye protection is required when operating this
equipment.
WARNING
Hearing protect is recommended when
operating this equipment.
WARNING
Read and understand operator’s manual before
using this equipment.
SAFETY LEGEND
WARNING
Safety – Operation – Maintenance
Keep this document in a safe place
Read and understand this manual before operating your air tool
• The proper HEPA and Panel Filters from Clayton Associates must be installed in the GS-1350 at all times.
• The GS-1350 must be used with the supplied or recommended accessories from Clayton Associates.
• Any alteration to the GS-1350 by a third party will nullify its warranty.
• Always lock the brakes on the GS-1350 once positioned so that it does not roll.
HEPA Grinding Station
High‑Flow HEPA Filtration System
Models with Prex: GS-1350
Designed for the collection of sanding and grinding dust.
Scan this QR code for
online instructions and
documentation, or visit
www.ClaytonHowTo.com

Clayton Associates, Inc. • 1650 Oak Street • Lakewood, New Jersey 08701 • P.+1-732-363-2100 F.+1-732-364-6084
Repair or Warranty Contact
Page 2
TABLE OF CONTENTS
Table Of Contents................................................................................................................2
Important Safety Instructions...............................................................................................3
Applications & Environments...............................................................................................4
What’s Included ...................................................................................................................4
Specications & Requirements............................................................................................5
Getting Started ....................................................................................................................5
Before Each Use .................................................................................................................7
Panel Filter Replacement ....................................................................................................8
HEPA Filter Replacement ....................................................................................................9
Routine Maintenance.........................................................................................................12
Illustrated Parts Breakdown...............................................................................................13
Limited Lifetime Warranty Terms And Conditions ..............................................................19

Clayton Associates, Inc. • 1650 Oak Street • Lakewood, New Jersey 08701 • P.+1-732-363-2100 F.+1-732-364-6084
Page 3
Repair or Warranty Contact
READ ALL INSTRUCTIONS BEFORE USING THIS APPLIANCE
When using an electrical appliance, basic precautions should always be followed, including the following:
WARNING
To reduce the risk of re, electric shock, or injury:
• Do not leave appliance when plugged in. Unplug from outlet when not in use and before servicing.
• This unit is to be used only indoors and in a dry location.
• Use only as described in this manual. Use only manufacturer’s recommended attachments.
• Do not use with damaged cord or plug. If appliance is not working as it should, has been dropped, damaged, left outdoors,
or dropped into water, return it to a service center.
• Handle provided on power head is used only for removal of power head during maintenance.
• Before separation of power head from tank, users must disengage draw latches on tank.
• Do not pull or carry by cord, use cord as a handle, close a door on cord, or pull cord around sharp edges or corners.
• Do not run appliance over cord. Keep cord away from heated surfaces.
• Do not unplug by pulling on cord. To unplug, grasp the plug, not the cord.
• Do not handle plug or appliance with wet hands.
• Do not put any object into openings. Do not use with any opening blocked; keep free of dust, lint, hair, and anything that may
reduce air ow.
• Keep hair, loose clothing, ngers, and all parts of body away from openings and moving parts.
• Turn o all controls before unplugging.
• Do not use to pick up ammable or combustible liquids, such as gasoline, or use in areas where they may be present.
• Connect to a properly grounded outlet only. Refer to “EARTHING/GROUNDING INSTRUCTIONS” on page 3.
• Do not pick up anything that is burning or smoking, such as cigarettes, matches, or hot ashes.
• Do not use without all lters in place.
• Do not allow to be used as a toy. Close attention necessary when used by or near children.
EARTHING/GROUNDING INSTRUCTIONS
This appliance must be earthed/grounded. If it should malfunction or breakdown, earthing/grounding provides a path of least resistance
for electric current to reduce the risk of electric shock. This appliance is equipped with a cord having an equipment-earthing/grounding
conductor and earthing/grounding plug. The plug must be inserted into an appropriate outlet that is properly installed and earthed/grounded in
accordance with all local codes and ordinances.
WARNING – Improper connection of the equipment-earthing/grounding conductor can result in a risk of electric shock. Check with a qualied
electrician or service person if you are in doubt as to whether the outlet is properly earthed/grounded. Do not modify the plug provided with the
appliance – if it will not t the outlet, have a proper outlet installed by a qualied electrician.
Refer to Name Plate for electrical requirements.
• USA 120V
This appliance has a earthing/grounding attachment plug that looks
like the plug illustrated in Figure 1. Make sure that the appliance is
connected to an outlet having the same conguration as the plug. No
adapter should be used with this appliance.
SAVE THESE INSTRUCTIONS
Figure 1: Earthed/Grounded Outlet and Plug
IMPORTANT SAFETY INSTRUCTIONS
Clayton Associates, Inc. • 1650 Oak Street • Lakewood, New Jersey 08701 • P.+1-732-363-2100 F.+1-732-364-6084
Repair or Warranty Contact
Page 4
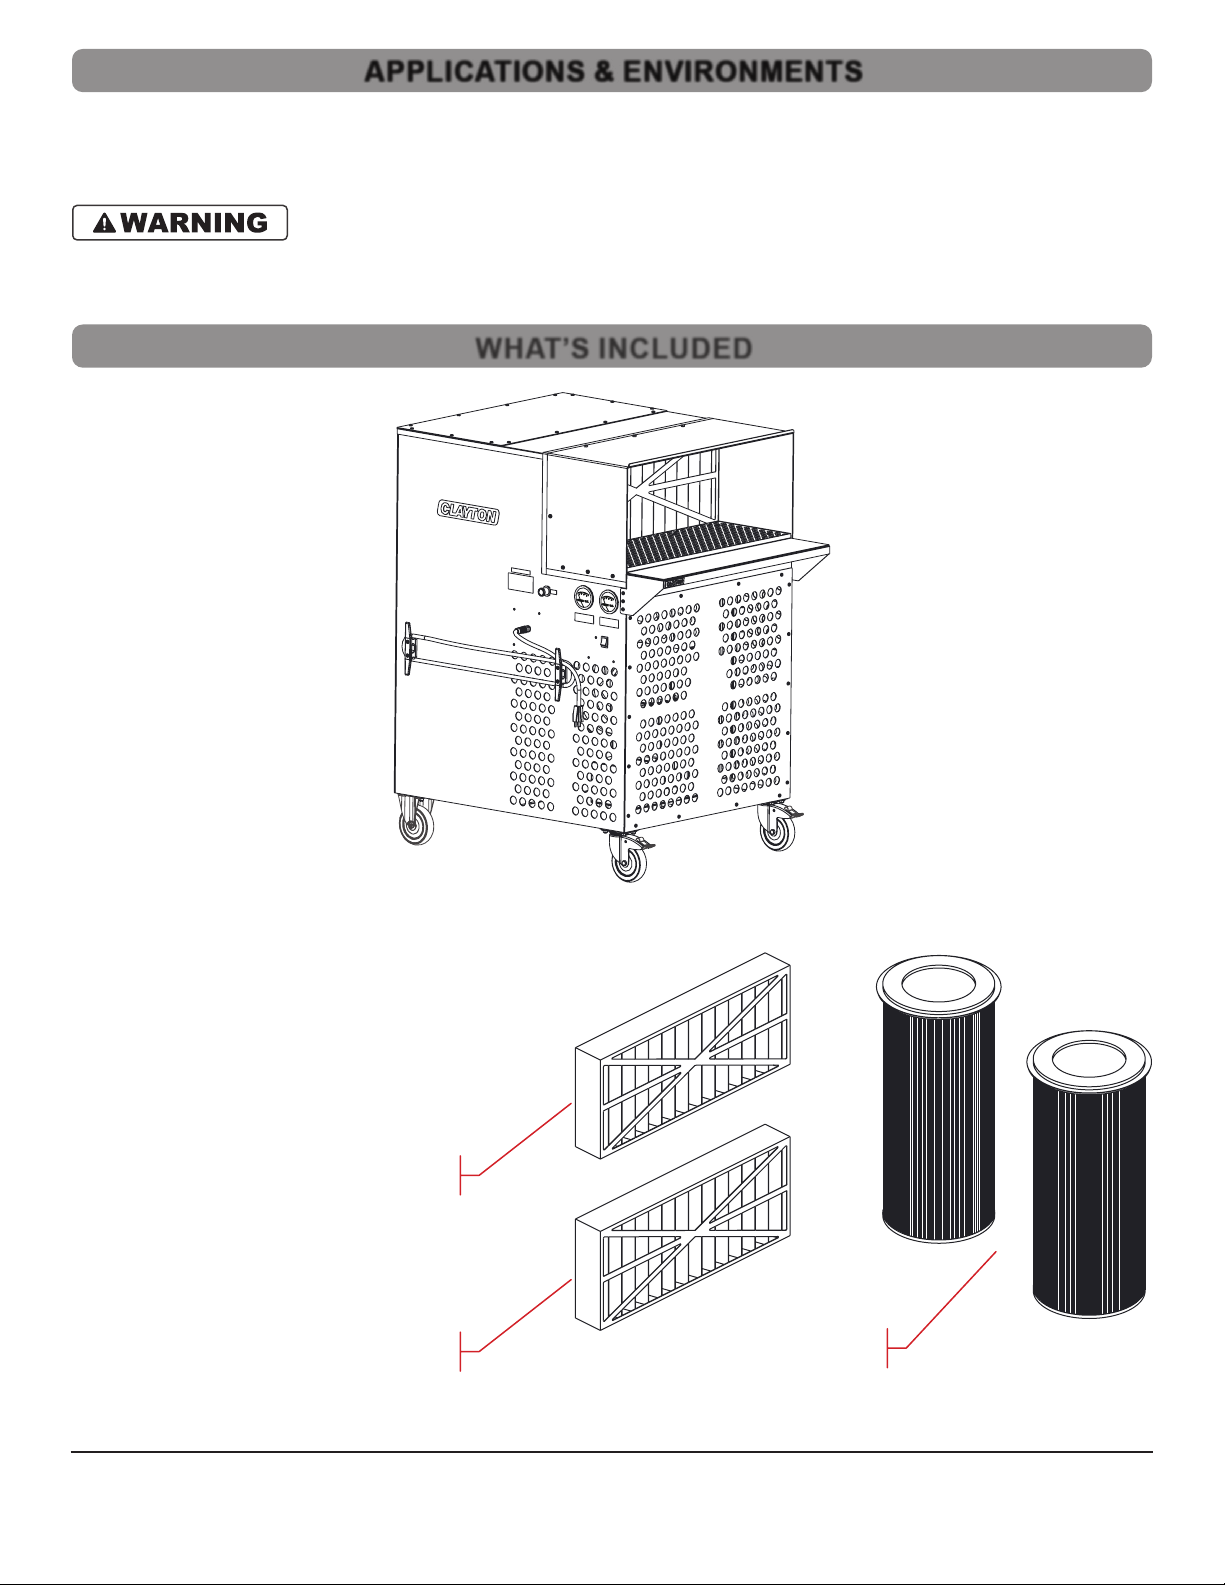
• Designed for general and hazardous dust.
• Dry recovery only.
Do not use this equipment to collect combustible dust.
• GS‑1350 Grinding Station
Consumables
Use only the following Clayton consumables:
• 627‑1350PM08 – Panel Filter 30 in x 13 in MERV 8;
• 627‑1350PM13 – Panel Filter 30 in x 13 in MERV 13;
• 627-1350H – HEPA Filter 14 in x 30 in (2 required).
GS-1350_00
WHAT’S INCLUDED
Stage 2
MERV 13 Filter
Stage 1
MERV 8 Filter
Stage 3 HEPA
Filter (qty. 2)
GS-1350_009
APPLICATIONS & ENVIRONMENTS

Clayton Associates, Inc. • 1650 Oak Street • Lakewood, New Jersey 08701 • P.+1-732-363-2100 F.+1-732-364-6084
Repair or Warranty Contact
Page 5
Weight .......................................................................................................................................................................................... TBD lbs (TBD kg)
Dimensions (W x D x H) ......................................................................................................30.70 x 43.00 x 51.66 in (77.98 x 109.22 x 131.22 cm)
HEPA Filter Eciency.......................................................................................................................................................99.995% @ 0.3 μm (H14)
Panel Filter Eciency ............................................................................................................................................................. MERV 8 @ 10 micron
Panel Filter Eciency .......................................................................................................................................................... MERV 13 @ 0.3 micron
Sounds Pressure Level ............................................................................................................................................................................... <70 dBA
Power Consumption ........................................................................................................................................................................ 120VAC~ 13.5A
Flow.....................................................................................................................................................................................1300 CFM (204 SCMH)
Vacuum Suction.........................................................................................................................................................................120 in/H
2
O (30 kPa)
1. Using a forklift, carefully remove the Grinding Station from the shipping pallet.
2. Visually inspect the Grinding Station to ensure that no parts are missing or damaged.
GETTING STARTED
Place forks
here to lift
GS-1350_002
SPECIFICATIONS & REQUIREMENTS

Clayton Associates, Inc. • 1650 Oak Street • Lakewood, New Jersey 08701 • P.+1-732-363-2100 F.+1-732-364-6084
Repair or Warranty Contact
Page 6
3. Familiarize yourself with the Grinding Station.
Panel Filter
Gauge
HEPA Filter
Gauge
Gauge
Vent
Power
Cord
Lexan
Shield
Debris
Tray
HDPE Work
Surface
Shelf
Power
Switch
GS-1350_001
GETTING STARTED

Clayton Associates, Inc. • 1650 Oak Street • Lakewood, New Jersey 08701 • P.+1-732-363-2100 F.+1-732-364-6084
Repair or Warranty Contact
Page 7
4. The Grinding Station requires a DEDICATED 120VAC, 20A circuit equipped with NEMA 5-20R receptacles.
• Do not attempt to plug the Grinding Station into a standard 15A receptacle.
CAUTION:!You must wait 60 seconds after shutdown before restart.
Failure to wait 60 seconds may trip electrical breaker.
5. Always keep the Gauge Vent clear.
6. Cleaning the Lexan Shield
• Only use a mild soap/detergent, lukewarm water, and a clean sponge or a soft cloth.
• Never use ammonia, vinegar, alcohol, or similar cleaners.
7. The following customer-provided tools and items are required to perform other routine maintenance procedures:
• T25 TORX® Driver;
• Anti‑seize compound.
Prepare the Grinding Station for Use
• Verify the power switch on the Grinding Station is in the OFF position before proceeding.
• Always engage the two (2) front wheel brakes to prevent the Grinding Station from rolling.
1. Unwind the power cord (stored on the side of the chassis) and insert the plug into an appropriate power source.
2. Check the Filters.
• Turn the Grinding Station power switch to the ON position.
• Wait 10 seconds for the blower to stabilize.
• If the Panel Filter Gauge exceeds 0.8 refer to “Replace the Panel Filters” on page 8.
• If the HEPA Filter Gauge exceeds 1.0 refer to “Replace the HEPA Cartridge Filters” on page 9.
NEMA 5-20
Receptacles
GS-1350_003
BEFORE EACH USE
GETTING STARTED

Clayton Associates, Inc. • 1650 Oak Street • Lakewood, New Jersey 08701 • P.+1-732-363-2100 F.+1-732-364-6084
Repair or Warranty Contact
Page 8
Replace the Panel Filters
• If the Panel Filter Gauge exceeds 0.8, replace the Panel Filters, one at a time, starting with the Stage 1 Filter.
1. Safe the Grinding Station
• Deactivate the Grinding Station.
• Disconnect the Grinding Station from the power source.
2. Remove the Debris Tray.
• Slide the Debris Tray out and set aside.
3. Remove the HDPE Work Surface
• Slide the HDPE Work Surface out and set aside.
4. Remove the Stage 1 MERV 8 Panel Filter.
• Grasp the lter pleats and carefully slide the Stage 1 Filter out and set aside.
5. Install a new Stage 1 MERV 8 Filter.
• Slide a new Stage 1 Filter in until it is ush with the Stage 2 Filter.
6. Test the Panel Filters.
• Connect the Grinding Station to an appropriate power source.
• Activate the Grinding Station.
• Wait 10 seconds for the blower to stabilize.
• Check the Panel Filter Gauge. If it exceeds 0.8, repeat the above procedure to replace the Stage 2 MERV 13 Filter.
7. Insert the HDPE Work Surface.
• Slide the HDPE Work Surface into the chamber.
8. Insert the Debris Tray.
• Slide the Debris Tray into the chamber.
9. Return the Grinding Station to service.
Stage 2
MERV 13
Stage 1
MERV 8
Debris
Tray
HDPE Work
Surface
GS-1350_004
PANEL FILTER REPLACEMENT

Clayton Associates, Inc. • 1650 Oak Street • Lakewood, New Jersey 08701 • P.+1-732-363-2100 F.+1-732-364-6084
Repair or Warranty Contact
Page 9
Replace the HEPA Cartridge Filters
• If the HEPA Filter Gauge exceeds 1.0 replace the two Stage 3 HEPA Cartridge Filters.
1. Safe the Grinding Station.
• Deactivate the Grinding Station.
• Disconnect the Grinding Station from the power source.
2. Remove the HEPA Filter Compartment Cover.
• Use a T25 TORX driver to remove the fourteen (14) 10-32 x 3/8” TORX screws securing the HEPA Filter Compartment Cover to the
chassis.
• Remove the cover and set aside.
GS-1350_005
TORX 10-32 x 3/8”
(qty. 14)
HEPA Filter
Compartment Cover
HEPA FILTER REPLACEMENT

Clayton Associates, Inc. • 1650 Oak Street • Lakewood, New Jersey 08701 • P.+1-732-363-2100 F.+1-732-364-6084
Repair or Warranty Contact
Page 10
3. Disengage eight (8) Toggle Latches to release the two (2) HEPA Filters.
• The HEPA Filter are accessed via the top of the Grinding Station.
• Lift the red handle on each toggle latch to disengage the latch.
4. Remove the two (2) HEPA Filters from the Filter Compartment.
• Carefully lift each cartridge up and out of the Filter Compartment.
GS-1350_006
Stage 3
HEPA
Stage 3
HEPA
Toggle Latch
(qty. 8)
Front View [Partial] of Grinding Station Showing
8 Toggle Latches Securing Stage 3 HEPA Filters
HEPA
Filter
HEPA
Filter
GS-1350_007
HEPA FILTER REPLACEMENT
Table of contents
Other Clayton Laboratory Equipment manuals

Popular Laboratory Equipment manuals by other brands


Agilent Technologies
Agilent Technologies 5800 ICP-OES user guide

Endress+Hauser
Endress+Hauser Cleanfit CPA875 operating instructions

NI
NI PXI-5422 CALIBRATION PROCEDURE

Collomix
Collomix Aqix operating instructions

SPEX SamplePrep
SPEX SamplePrep 6875 Freezer/Mill Series operating manual

Ocean Insight
Ocean Insight FLAME-NIR+ Installation and operation manual

Parker
Parker ALIGN-MG-NA Installation, operation and maintenance manual

BD
BD 644787 user guide

DENTAURUM
DENTAURUM Compact Megaplus Instructions for use

Biuged Laboratory Instruments
Biuged Laboratory Instruments BGD 626 instruction manual

VWR
VWR SAS Super IAQ instruction manual

illumina
illumina MiSeqDx reference guide