Clas Ohlson 36-2615 User manual
SUOMI
NORSKSVENSKAENGLISH
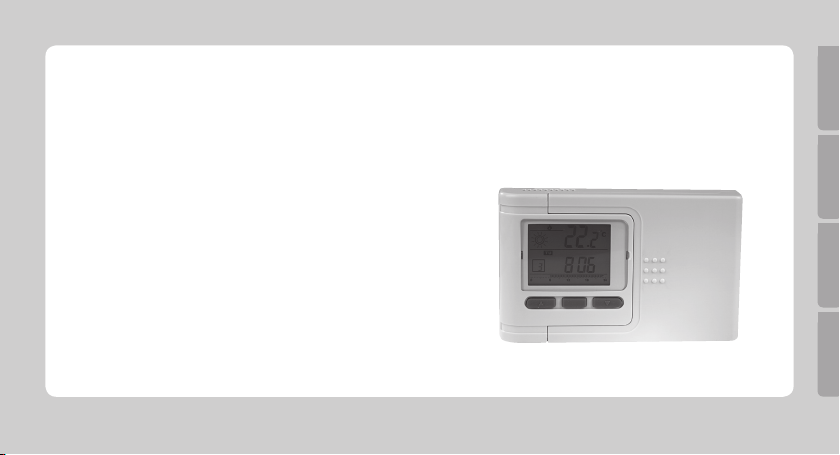
Digital Room Thermostat with LCD
Rumstermostat med LCD-display
Romtermostat med LCD-display
Huonetermostaatti, jossa LCD-näyttö
Article number 36-2615

ENGLISH
2
Digital Room Thermostat with LCD, art.no. 36-2615
Please read the entire instruction manual before using the product and save it for future reference. We apologise for
any text or photographic errors and any changes of technical data. If you have any questions concerning technical
problems please contact our Customer Service Department (see address on reverse.)
Safety
- Turn the power off before beginning any wiring.
- Electrical installations should only be carried out by a qualied electrician.
Product Description
Electronic room thermostat with LCD. Accurate thermostat for regulating heating and cooling systems, etc.
- Programmable night-time set-back feature.
- Built-in NTC thermistor, accurate to ± 1 °C.
- Operating temperature 0 to 34.5 °C.
- Setting temperature 5 to 30 ˚C.
- Making or breaking relay contact (NO/NC).
- Max resistive load: 5 A. Max. inductive load: 3 A.
- Operates on 2x LR6/AA batteries (not included).
- Size: 130x84x30 mm.
ENGLISH
3
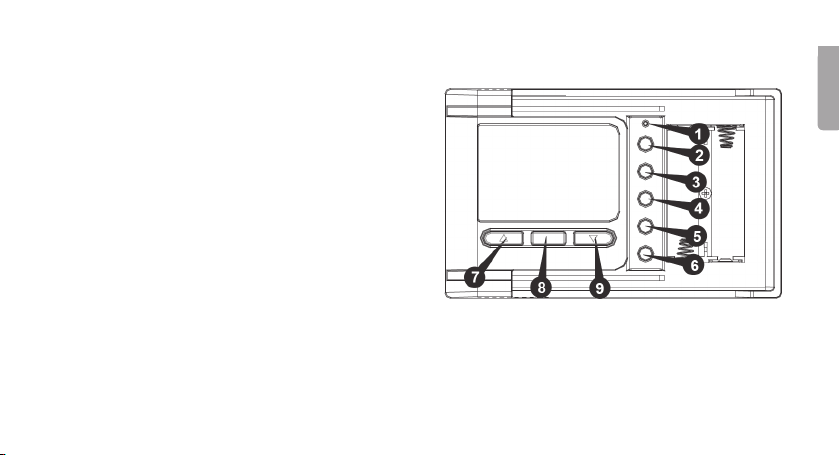
Buttons and Functions
1. ResetButton – Hold in this button to reset the
unit to its factory settings.
2. + Use this button to set the temperature, time,
date and day of the week
3. - Use this button to set the temperature, time,
date and day of the week.
4. SET
Select/conrm functions
5. PROGRAM
Use this button to select programme
6. TEMP
Select temperature range/set temperature
7. SUN
Select comfort mode
8. OK
Conrm settings/return to time display
9. MOON
Select economy mode

ENGLISH
Installation
Warning: Turn the power off before beginning any wiring. Electrical installations should only be carried out by a
qualied electrician.
Choose a suitable place to install the thermostat
The choice of location will signicantly affect the operation of the thermostat. If the thermostat is placed in an unventi-
lated location or if it is exposed to direct sunlight it will not regulate the temperature correctly.
The thermostat should be placed on an inside wall with good air circulation. It is a good idea to select a room where
the family spends a lot of time. Avoid positioning the thermostat close to sources of heat (e.g. TV, radiator, fridge) or
in direct sunlight. Neither should the thermostat be located close to a door, which could cause it to vibrate.
Check your air conditioning
Make sure that your heating or cooling system is working properly before installing the thermostat.

ENGLISH
5
Mounting and Connecting
1. Open the battery cover by sliding it to the side.
1.1 Undo the screw on the bottom of the battery compartment, but do not
remove it.
1.2 Carefully push the screw downwards
using the screwdriver to release the
back cover.
2. Mount the back cover onto the wall where the thermostat is to be installed.
Drill holes and use the accompanying wall plugs if necessary depending on
the wall material.

ENGLISH
6
3. ElectricalConnections: The power supply should be connected to the NO (normally open), COM (common) and
NC (normally closed) terminals on the inside of the back cover. Normally theNO and COM terminals are used.
NB: The thermostat is rated at 230 V AC and maximum 5 A resistive load. Never overload the thermostat, it
could become damaged. Use of the NO and COM terminals is recommended for normal use.
3.1 Loosen the screws holding the connecting block cover.
3.2 Connect the wires to the terminals as shown in the gure. Use a small screwdriver to fasten the wires to the
terminals. Make sure that the wires do not touch each other.
3.3 Replace the connecting block cover and tighten the screws.
Neutral
Live
Heater
or cooler

ENGLISH
4. Settingthethermostattoheatorcool
There is a jumper on the back of the circuit
board for setting the thermostat’s heating or
cooling function.
Tip! Make this selection before programming;
otherwise stored programmes will be lost.
4.1 Change the jumper toHEATif the
thermostat is to be used for heating,
change it to COOLif the thermostat is to
be used with a cooling system.
4.2 Press Reset [ 4 ] to conrm the choice.
Note: When reset is pressed, the
thermostat reverts to its factory setting.
5. First slide the left side of the thermostat behind the tabs on the back cover then slide
the right side of the thermostat onto the back cover until a click is heard and the parts
are lined up. Screw the screw back into the bottom of the battery compartment.
6. The thermostat requires two LR6/AA batteries. Insert the batteries into the battery
compartment and close the cover. Make sure to insert the batteries according to the
markings in the battery compartment. When the batteries have been inserted the
display will show the current time and temperature.
ENGLISH
Use
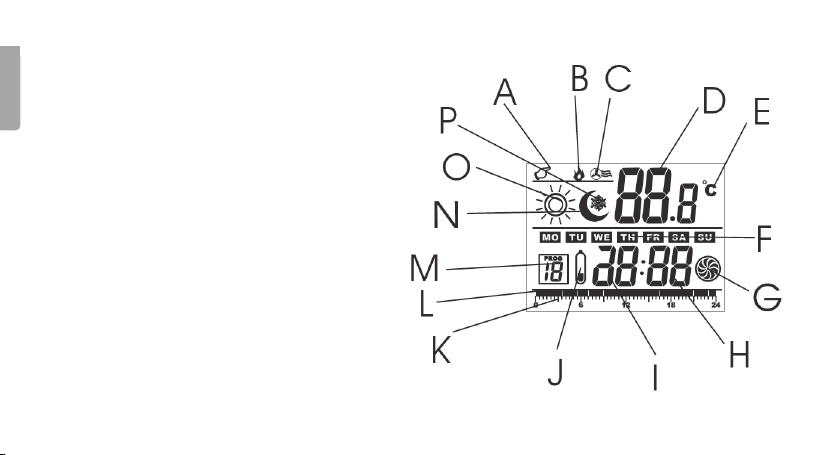
Display Symbols
A. Manual control
B. Heating indicator
C. Cooling indicator
D. Temperature display
E. Unit of temperature (C/F)
F. Day of the week
G. Operating indicator
H. Minutes display
I. Hours display
J. Low battery warning
K. Time axis
L. Comfort or economy mode
M. Programme number
N. Economy mode
O. Comfort mode
P. Anti-freeze indicator

ENGLISH
Setting time and date
1. Press and hold SET(4) for approx. 3 seconds until the day of the week ashes in the
display. Use the +button(2) and -button(3) to change the day.
2. Press SET once more, causing the hour display to ash. Set the hours using the
+ and -buttons.
3. Press SET once more, causing the minutes display to ash. Set the minutes using
the + and - buttons.
4. Push SETto conrm and save. If no button is pressed within 30 seconds the unit
returns to normal mode again.
Setting the temperature range
The temperature range included in the temperature setting determines when the
thermostat activates or deactivates the air conditioning system.
1. Push and hold TEMP (6) for 3 seconds. SP 0, 1, 2 or 3 will be appear on the display.
2. Push + and- to choose between the following temperature ranges:
• SP0 = + 0.3 to - 0.3 0.6 °C in total
• SP1 = + 0.5 to - 0.5 1.0 °C in total
• SP2 = + 1.0 to - 1.0 2.0 °C in total
• SP3 = + 2.0 to - 2.0 4.0 °C in total
3. Push OK(8)to conrm and save. If no button is pressed within 30 seconds the unit returns to normal mode again.

ENGLISH
10
Setting the temperature for comfort and economy mode
1. Press TEMP (6) once.
• Push SUN to choose the comfort mode. Use the + and - buttons to adjust
the comfort mode temperature. The temperature should be set between
0.5 ˚C to 35˚C.
• Push MOON to choose the economy mode. Use the + and - buttons to
adjust the economy mode temperature. The temperature should be set
between 0.5 ˚C to 35˚C.
2. Push OKto conrm and save. If no button is pressed within 30 seconds the unit
returns to normal mode again.
NB: When the temperature falls below 5˚C the anti-freeze function will activate
(a snowake appears in the display) and the thermostat will activate to prevent the
temperature from falling further below 5˚C.
Table of contents
Languages:
Other Clas Ohlson Thermostat manuals


Popular Thermostat manuals by other brands


Saswell
Saswell SAS920XWHB-7-S-RF User manual and warranty card

Aircalo
Aircalo TFP1-ET85P2 operating manual

Honeywell
Honeywell CM721 user manual

Carrier
Carrier DEBONAIR 33CS Installation and operating instructions

Lennox
Lennox iHarmony Zone Thermostat Installation and setup guide

Gemtech
Gemtech GT7000 Operation


