BorMann BWR5044 User manual

Art Nr:
WWW.NIKOLAOUTOOLS.GR
EN FR
BWR5044
011422
IT EL
BG SL
RO
v2.2

Safety and instructions for use
Instructions for use for bike rack made for transporting up to 3 bicycles. Thank you for
purchasing the bike rack for transporting bicycles. This rack is built to the highest standards
and will last for many years provided it is maintained and used properly. Keep the manual
in a safe place for future reference.
Important! Read the following instructions for use and pay particular attention to the
safety rules and the manufacturer's instructions. If you do not comply, there is a risk of
injury and damage to the bicycle rack.
Safety instructions.
Do not use the bike rack if parts of the packaging are missing or damaged. Risk of accident.
WARNING! Due to differences in the design of bicycles and vehicles, the user is responsible
for the correct use and safety of this product. Proper installation of the product on the
vehicle is the responsibility of the purchaser and not of the manufacturer, seller or anyone
else.
WARNING! The user must secure the bike rack and bicycles so that they can be transported
safely. Check the bike rack frequently to ensure the safety of yourself and others around
you.
Use sturdy, good quality brackets to secure bicycles to this product. Do not use elastic
fasteners.
WARNING! If your car lights are obstructed by the bicycles, you are required by law to
replace them with an auxiliary kit that will allow them to operate normally.
Avoid damage to your bikes from hot exhaust fumes. Do not place bikes near the exhaust
tailpipe as this will damage your bikes, especially their tires.
Make sure that the bikes do not come into contact with your car at any point and make
sure that if this happens, the particular surface of the car that the bike is touching is
sufficiently protected from scratching.
WARNING! Remove items that are loose on the bikes such as water bottles and pumps.
WARNING! Avoid sticking bikes out the side of your vehicle as this causes hazards to
passers-by and other vehicles.
Do not use the bike rack for any purpose other than for carrying bicycles.
Do not rest any other object on the carrier other than bicycles.
WARNING! Drive with caution. Be prepared for sudden braking and strong winds. Reduce
speed when transporting bicycles.
WARNING! This carrier is not designed for permanent use. Remove the carrier when not in
use or before making any visits to a car wash.
Each time before use, check the bike rack to ensure that it is properly mounted and that it
is free of wear and tear. Replace any worn component.
WARNING! Remember that the driver of the vehicle is solely responsible for the transport
and safety of the bikes.
EN
WWW.NIKOLAOUTOOLS.GR
2

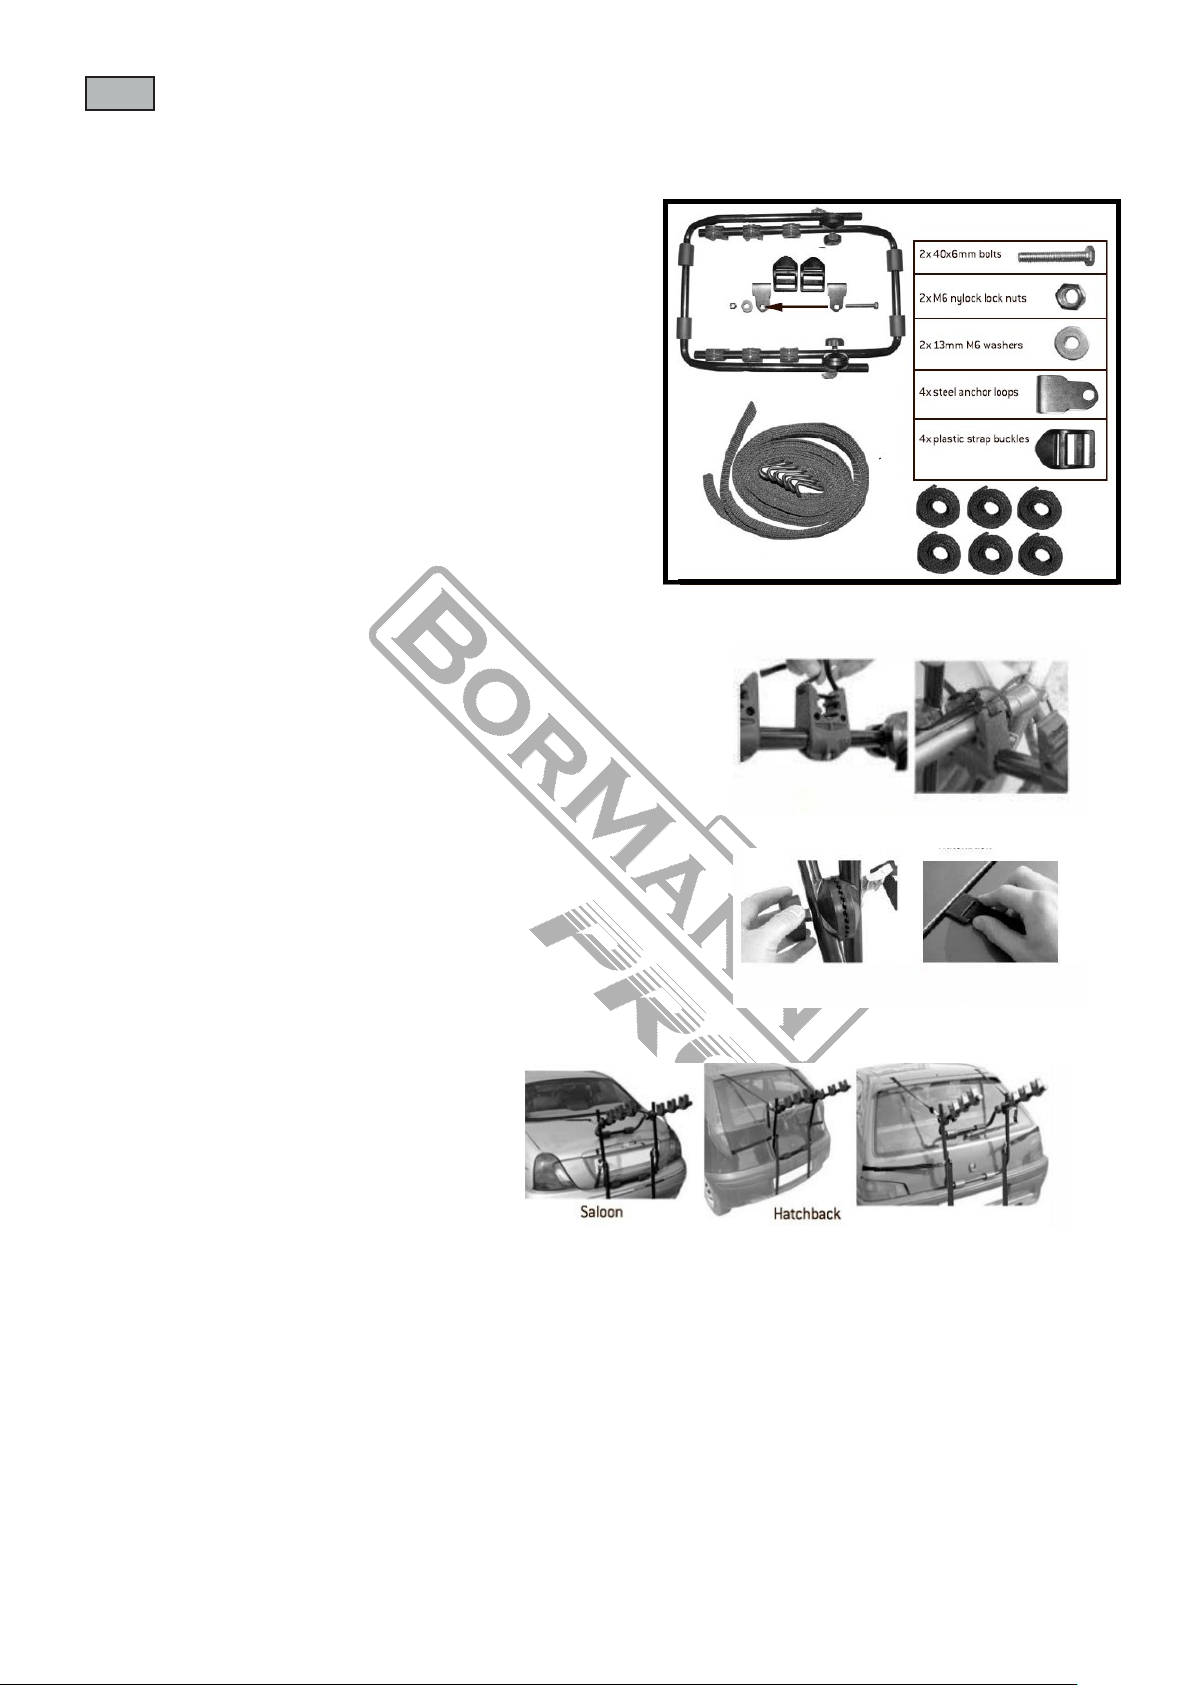
Before installation, make sure that the packaging includes the following parts.
1 x bike carrier frame including pre-attached 6 bike
frame clamps
2 x 40x6mm bolts
2 x Μ6 nylock lock nuts
2 x 13mm Μ6 washers
4 x steel anchor loops
4 x plastic strap buckles
2 x 1190mm straps with plastic-coated fitting hook
4 x 930mm straps with plastic-coated fitting hook
6 x 700x10mm bike frame retaining straps
1. Preparation
•Before installing the bike rack, clean all surfaces of your
car that will come into contact with the straps or the
carrier frame.
2. Installation
•Remove the carrier frame as well as all other
components.
•Place the carrier frame as shown in the photos
according to the type of your car.
•Unscrew the locking mechanism located on the
carrier frame to adjust the carrier to the correct
position.
3. Instructions for use
•Always use the straps to secure the bikes.
•Take care during installation that the exhaust tailpipe of the car
will not be too close to the tyres of the bicycle.
•The weight of the bicycles can cause the straps to loosen, so prior to
taking the vehicle onto the road check that all straps are in place and
sufficiently tightened.
•It is necessary to check that all straps are sufficiently tightened on a
regular basis. It is also important that you check the carrier after driving
over rough or uneven surfaces. If you notice that the carrier or bicycle has
moved then stop the vehicle in a safe position and check the bike rack.
EN
Fitting the frame straps
Unscrewing one of the
locking mechanisms
Clean the vehicle prior
to fitting the strap hooks
WWW.NIKOLAOUTOOLS.GR
3
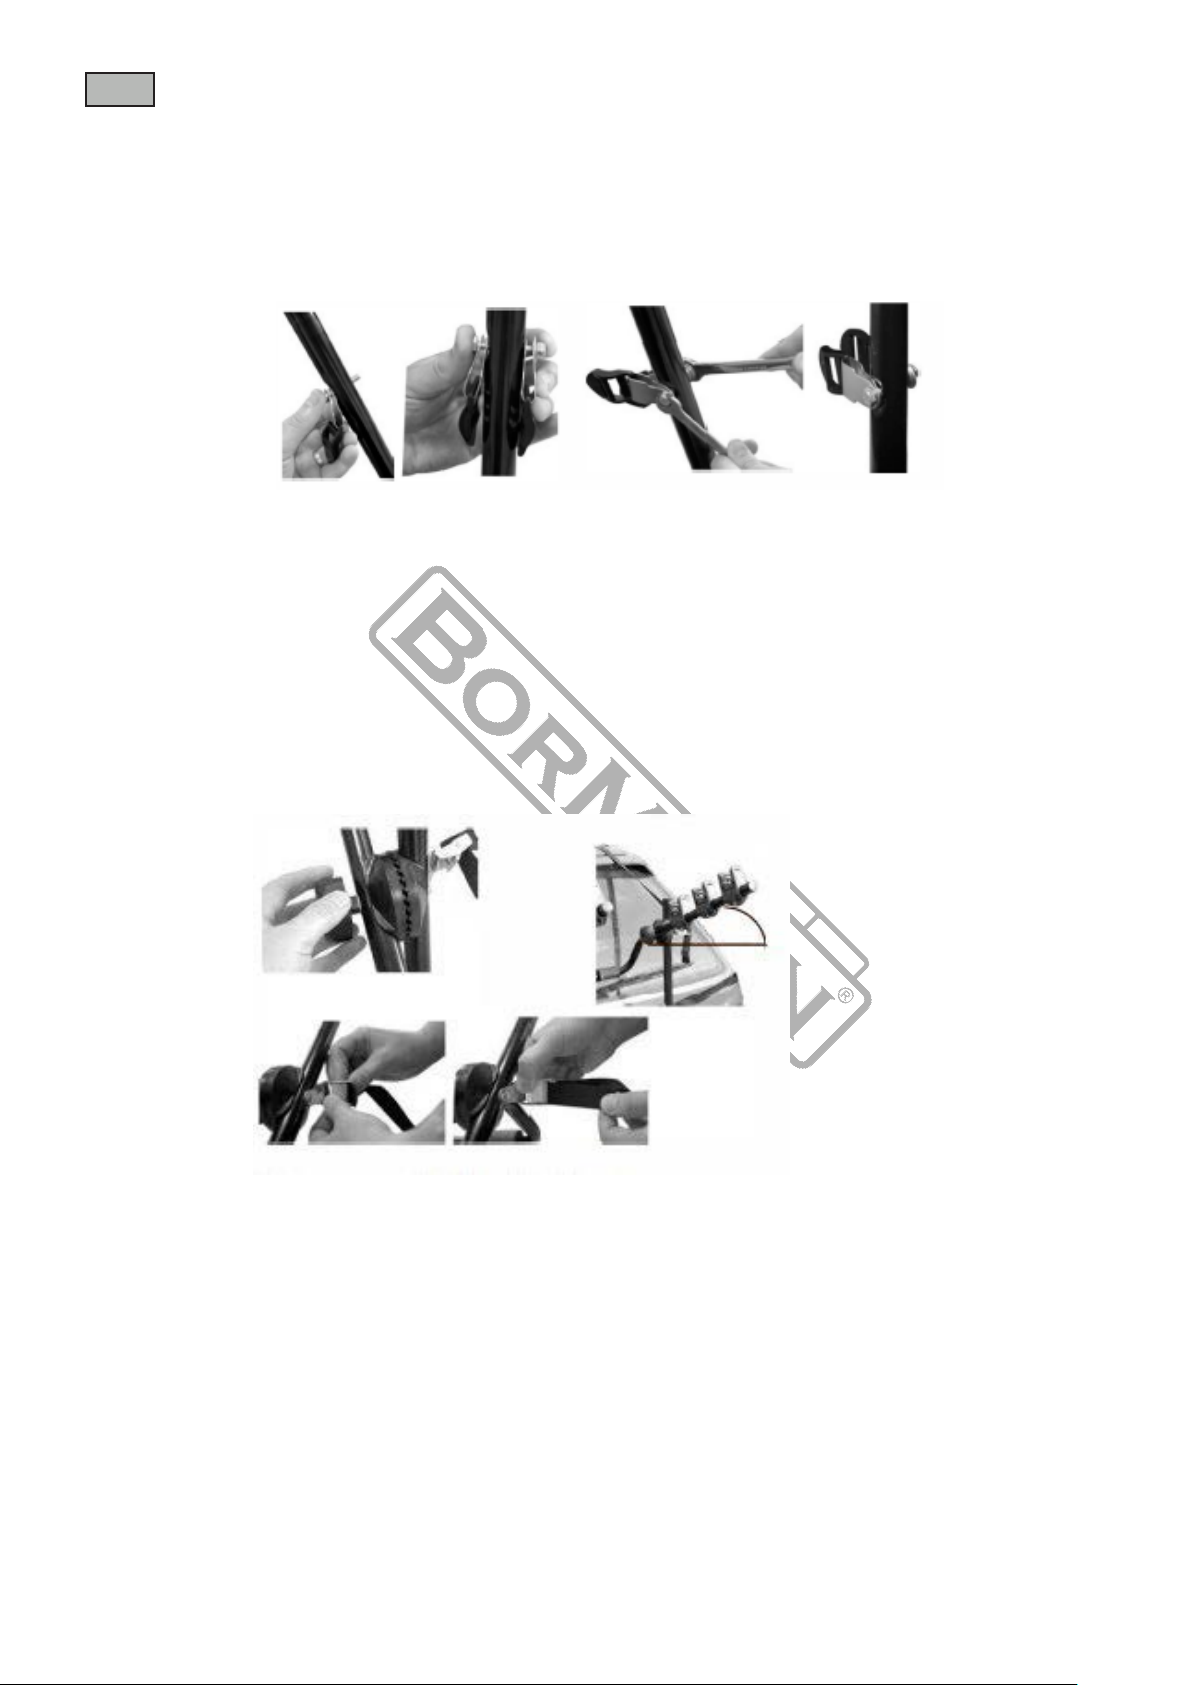
4. Fitting the lower strap anchor points
•Select the 40x5mm bolts and pass the steel anchor hooks through the
plastic belt clips. Pass the bolt with the steel anchor hook through the hole
in the bottom of the carrier frame.
•Place another steel anchor loop onto the end of the protruding bolt followed
by one of the steel washers. Finger tighten the M5 nylock nut.
•Tighten using two 10mm spanners (not supplied), making sure not to
overtighten so as to allow a little movement for adjustment.
5. Adjustment
•Turn/unscrew the locking mechanisms' knobs located on the carrier frame
to adjust the carrier so that there is at least a 20-degrees angle facing
upwards (as shown). Tighten the locking mechanisms until secure.
6. Attachment of straps
•Once the carrier frame is in the correct position, take the two 1190 straps
with plastic coated fitting hooks and four 930mm straps with plastic coated
fitting hooks that are to be placed in each of the fasteners. To fasten, adjust
the straps to the correct length and at the same time push the safety
button to fasten the belt. Make sure that the belts are securely fastened.
EN
Unscrewing one of the
locking mechanisms
20 degrees
Feeding the top straps through the spring locking clasp
WWW.NIKOLAOUTOOLS.GR
4
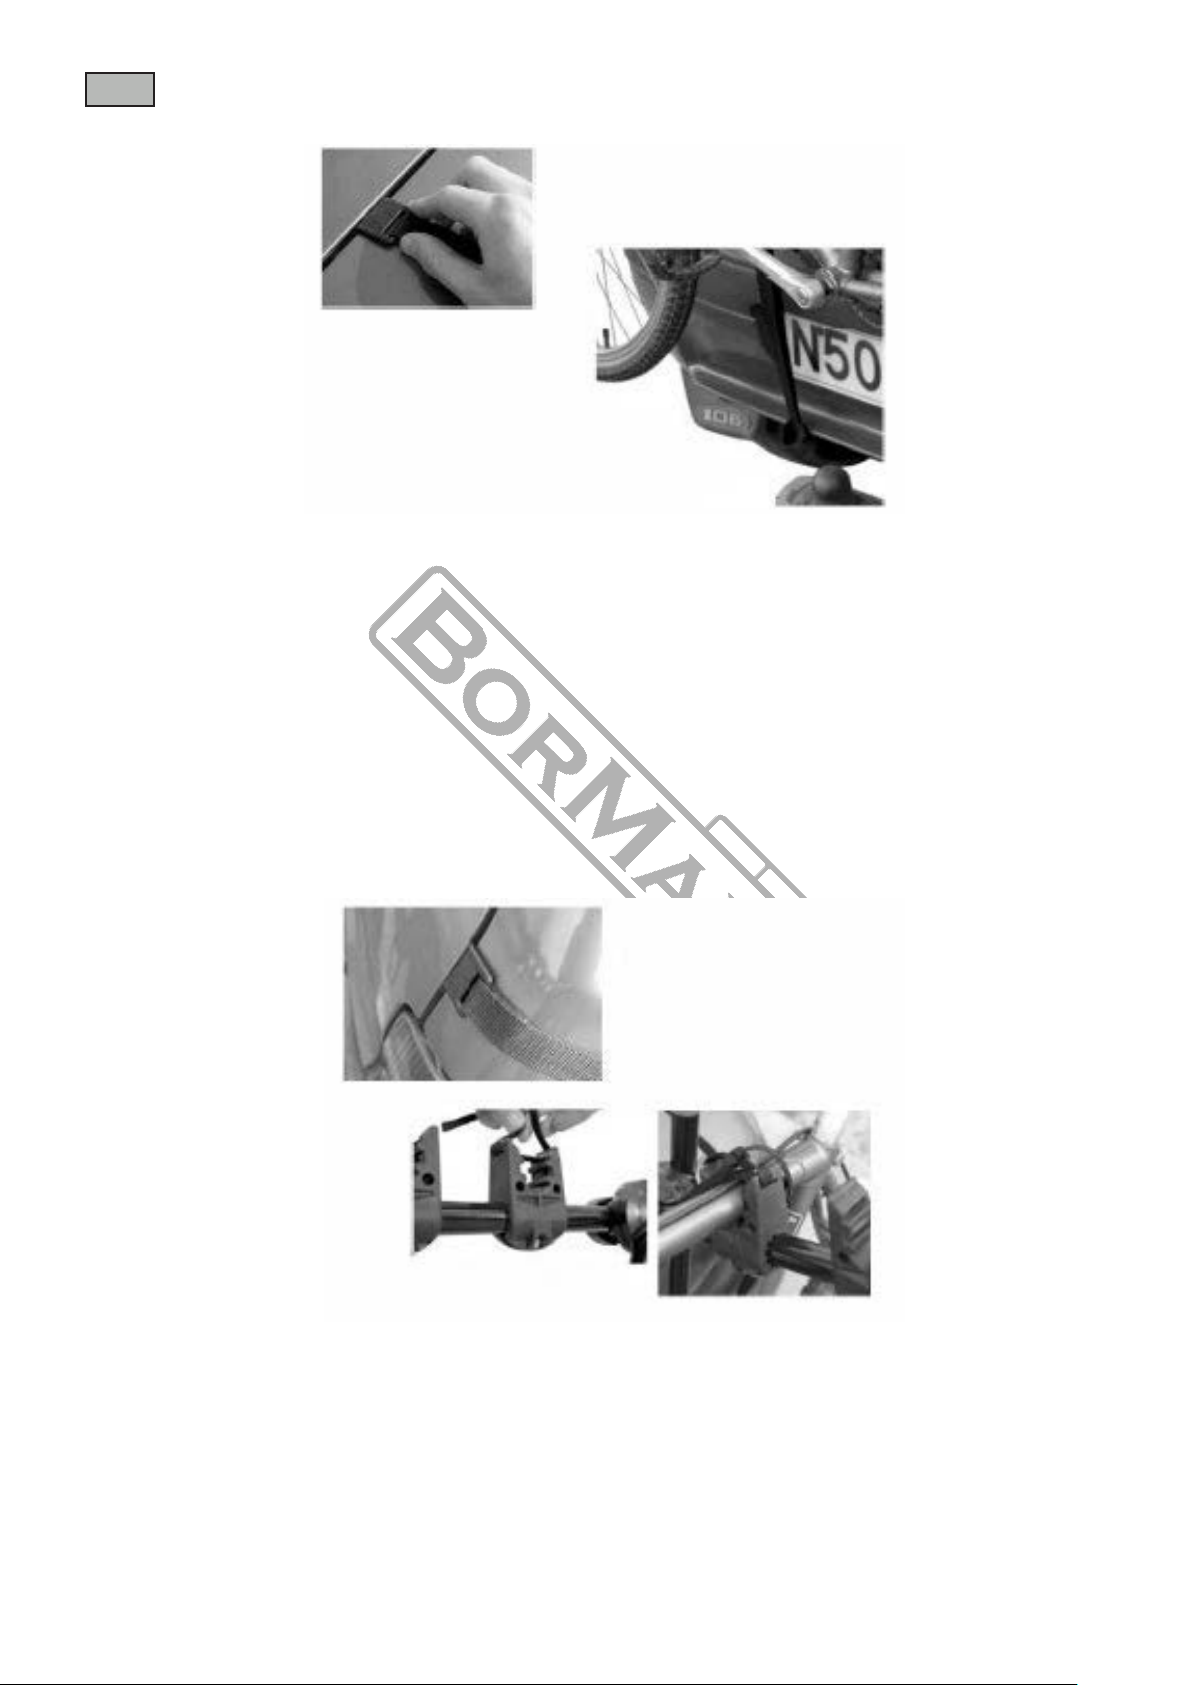
7. Fastening of the top straps
•Fix the two upper strap hooks (in a secure place) on the rear of the
vehicle.
•Adjust the straps in accordance to the correct position. Make sure that
these are secure and are as central as possible to prevent loosening.
8. Fastening of the bottom straps
•Fix the two bottom strap hooks (in a secure place) on the rear of the
vehicle. If it cannot be placed in this position, then try the shock
absorber or chassis rail.
•Make sure that the belt will not come into contact with anything that
might cause it to break. Make sure that these are secure and are as
central as possible to prevent loosening.
9. Fastening of the side straps
•Fix the two side strap hooks (in a secure place) on the rear sides of the
vehicle. One should be securely fastened to the left hand side of the
vehicle and the other to the right. Make sure that the bottom straps
are fastened tightly followed by checking the top straps before
fastening the side straps, retighten where required.
EN Typical top fitting position
Typical bottom fitting position
Typical side fitting position
Fitting the frame straps
WWW.NIKOLAOUTOOLS.GR
5
Make sure that the remaining straps remain tight and in place after you
have finished installing them.
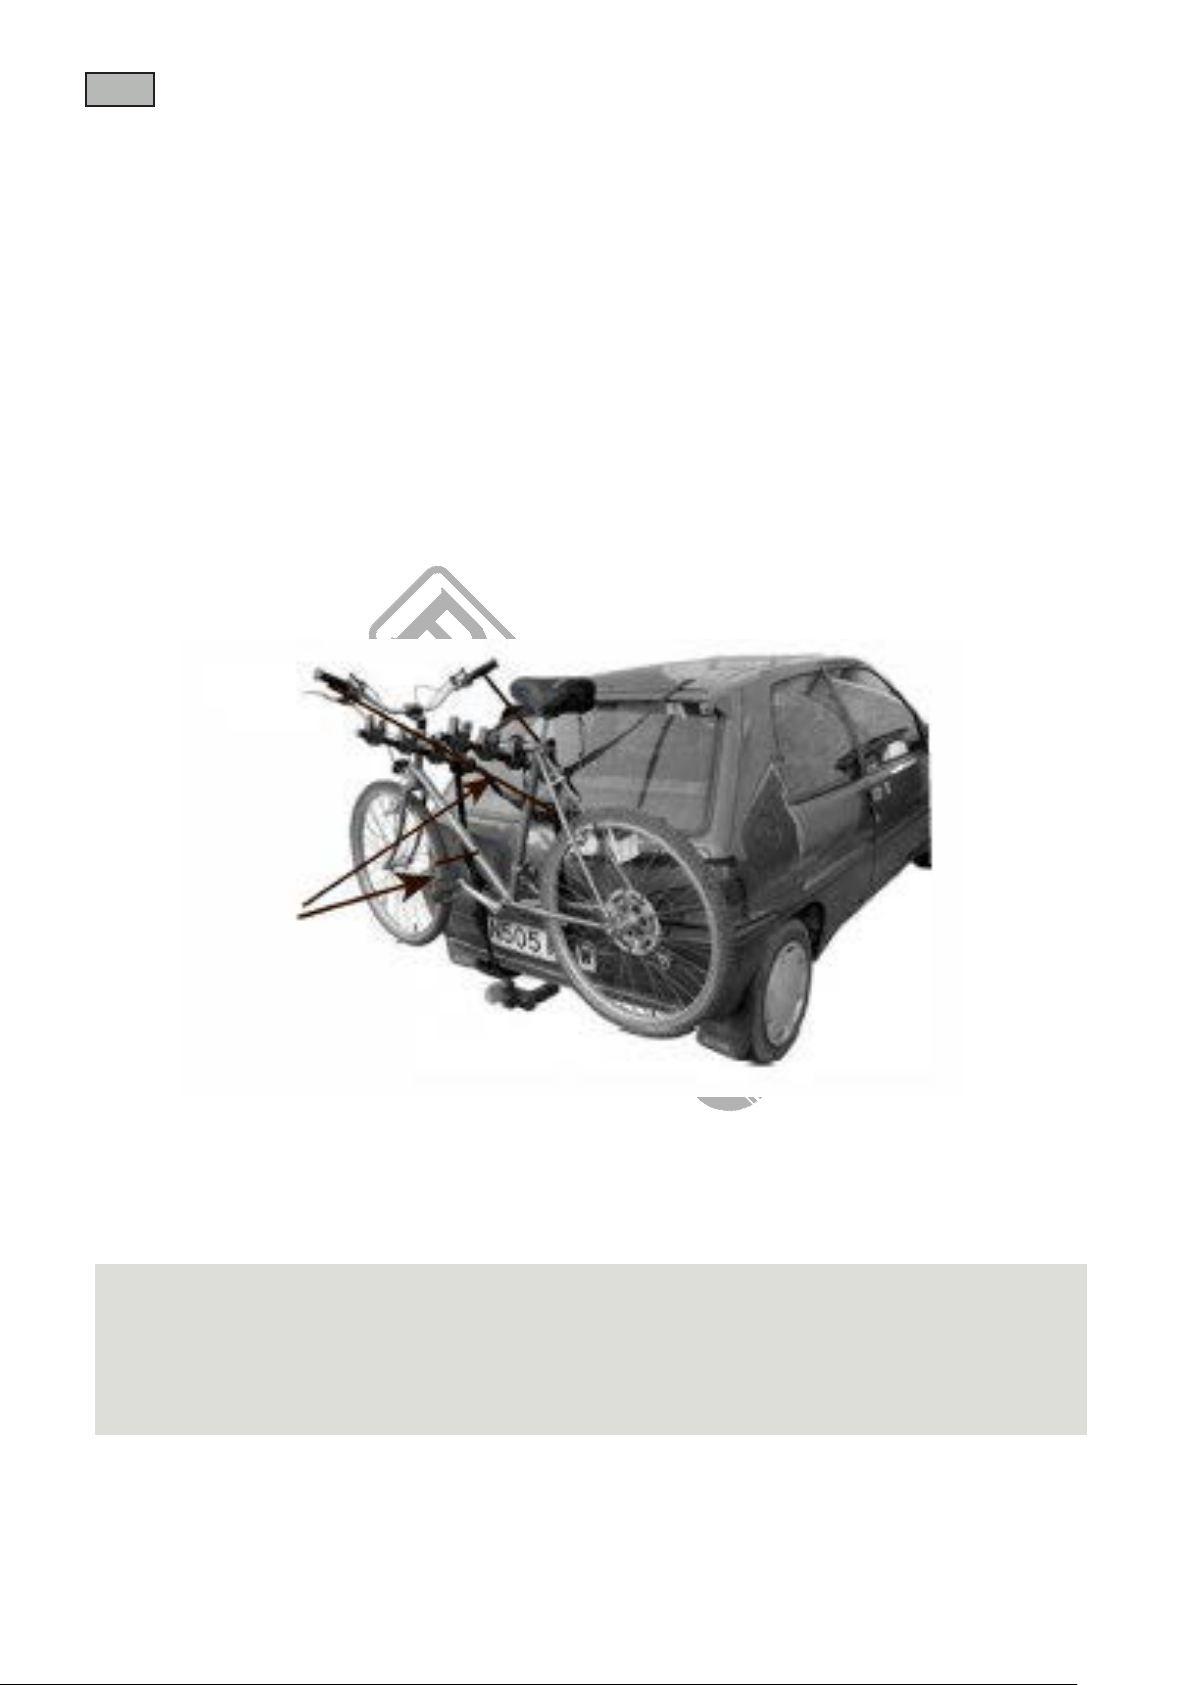
10. Fastening the bicycle(s) to the holders
•Place the bicycle on the carrier in to the bicycle holders.
•Make sure that the peddles or handlebars will not scratch the rear of the
vehicle. The tyres must be put at least 30cm away from the exhaust tailpipe.
•Use the other straps to fix the bicycle to the holders.
•Retighten the straps and tighten the adjusting knobs (they may have come
loose after the weight of the bicycle(s) has been placed on the carrier).
* The manufacturer reserves the right to make minor changes to product design and technical specifications without prior notice unless these changes
significantly affect the performance and safety of the products. The parts described / illustrated in the pages of the manual that you hold in your hands
may also concern other models of the manufacturer's product line with similar features and may not be included in the product you just acquired.
* To ensure the safety and reliability of the product and the warranty validity, all repair, inspection or replacement work, including maintenance and
special adjustments, must only be carried out by technicians of the authorized service department of the manufacturer.
* Always use the product with the supplied equipment. Operation of the product with non-provided equipment may cause malfunctions or even serious
injury or death. The manufacturer and the importer shall not be liable for injuries and damages resulting from the use of non-conforming equipment.
EN
Suggested method for
securing the handlebar
and pedals.
WWW.NIKOLAOUTOOLS.GR
6

Sécurité et mode d'emploi
Mode d'emploi du porte-vélos conçu pour transporter jusqu'à 3 vélos. Nous vous remercions
d'avoir acheté le porte-vélos pour le transport de vélos. Ce support est construit selon les
normes les plus strictes et durera de nombreuses années à condition d'être entretenu et
utilisé correctement. Conservez ce manuel dans un endroit sûr pour pouvoir vous y référer
ultérieurement.
Important : Lisez attentivement le mode d'emploi suivant. Lisez le mode d'emploi suivant et
accordez une attention particulière aux règles de sécurité et aux instructions du fabricant.
En cas de non-respect, vous risquez de vous blesser et d'endommager le porte-vélos.
Instructions de sécurité.
N'utilisez pas le porte-vélos si des parties de l'emballage sont manquantes ou endommagées.
Risque d'accident.
AVERTISSEMENT ! En raison des différences de conception entre les vélos et les véhicules,
l'utilisateur est responsable de l'utilisation correcte et de la sécurité de ce produit.
L'installation correcte du produit sur le véhicule relève de la responsabilité de l'acheteur et
non du fabricant, du vendeur ou de toute autre personne.
AVERTISSEMENT ! L'utilisateur doit fixer le porte-vélos et les vélos de manière à ce qu'ils
puissent être transportés en toute sécurité. Vérifiez fréquemment le porte-vélos pour
assurer votre sécurité et celle des personnes qui vous entourent.
Utilisez des supports robustes et de bonne qualité pour fixer les vélos à ce produit. N'utilisez
pas d'attaches élastiques.
AVERTISSEMENT ! Si les feux de votre voiture sont obstrués par les vélos, vous êtes tenu par
la loi de les remplacer par un kit auxiliaire qui leur permettra de fonctionner normalement.
Évitez d'endommager vos vélos à cause des gaz d'échappement chauds. Ne placez pas les
vélos près du tuyau d'échappement, car cela endommagerait vos vélos, en particulier leurs
pneus.
Veillez à ce que les vélos n'entrent jamais en contact avec votre voiture et assurez-vous que,
si c'est le cas, la surface de la voiture touchée par le vélo est suffisamment protégée contre
les rayures.
AVERTISSEMENT ! Retirez les objets qui ne sont pas fixés aux vélos, tels que les bouteilles
d'eau et les pompes.
AVERTISSEMENT ! Évitez de faire sortir les vélos par le côté de votre véhicule, car cela
constitue un danger pour les passants et les autres véhicules. N'utilisez pas le porte-vélos à
d'autres fins que le transport de vélos. Ne posez aucun objet autre que les vélos sur le porte-
vélos.
AVERTISSEMENT ! Conduisez avec prudence. Préparez-vous à des freinages brusques et à des
vents violents. Réduisez votre vitesse lorsque vous transportez des vélos.
AVERTISSEMENT ! Ce support n'est pas conçu pour une utilisation permanente. Retirez le
support lorsque vous ne l'utilisez pas ou avant de vous rendre dans une station de lavage.
Avant chaque utilisation, vérifiez que le porte-vélos est correctement monté et qu'il ne
présente aucune trace d'usure. Remplacez tout élément usé.
AVERTISSEMENT ! N'oubliez pas que le conducteur du véhicule est seul responsable du
transport et de la sécurité des vélos.
FR
WWW.NIKOLAOUTOOLS.GR
7
Avant l'installation, assurez-vous que l'emballage contient les éléments suivants.
1 x cadre de porte-vélo comprenant 6 fixations de cadre
de vélo préinstallées
2 x 40x6mm boulon
2 x écrous nylock Μ6
2 x rondelles Μ6 de 13 mm
4 x boucles d'ancrage en acier
4 x boucles de sangle en plastique
2 x 1190mm sangles avec crochet de fixation plastifié
4 x 930mm sangles avec crochet de fixation plastifié
6 x 700x10mm sangles de maintien du cadre de vélo
1. Préparation
•
Avant d'installer le porte-vélos, nettoyez toutes les
surfaces de votre voiture qui entreront en contact avec
les sangles ou le cadre du porte-vélos.
2. Installation
•
Retirer le cadre du transporteur ainsi que tous
les autres composants.
•
Placez le cadre de support comme indiqué sur
les photos en fonction du type de votre voiture.
•
Dévissez le mécanisme de verrouillage situé sur
le porte-vélos pour régler le porte-vélos dans la
bonne position.
Dévissage d'un des
mécanismes de
verrouillage
Nettoyer le véhicule
avant d'installer les
crochets de sangle
3. Mode d'emploi
•
Utilisez toujours les sangles pour attacher les vélos.
•
Lors de l'installation, veillez à ce que le tuyau d'échappement de la
voiture ne soit pas trop proche des pneus de la bicyclette.
•
Le poids des bicyclettes peut entraîner un relâchement des sangles.
Avant de prendre la route, vérifiez donc que toutes les sangles sont en
place et suffisamment serrées.
•
Il est nécessaire de vérifier régulièrement que toutes les sangles sont
suffisamment serrées. Il est également important de vérifier le porte-vélos
après avoir roulé sur des surfaces rugueuses ou inégales. Si vous remarquez
que le porte-vélos ou le vélo a bougé, arrêtez le véhicule dans une position
sûre et vérifiez le porte-vélos.
Mise en place des
sangles de maintien
FR
WWW.NIKOLAOUTOOLS.GR
8

4. Mise en place des points d'ancrage de la sangle inférieure
•
Sélectionnez les boulons de 40x5 mm et passez les crochets d'ancrage en
acier à travers les clips de ceinture en plastique. Faites passer le boulon
avec le crochet d'ancrage en acier dans le trou situé au bas du cadre du
transporteur.
•
Placez une autre boucle d'ancrage en acier sur l'extrémité du boulon en
saillie, suivie d'une des rondelles en acier. Serrer à la main l'écrou nylock M5.
•
Serrer à l'aide de deux clés de 10 mm (non fournies), en veillant à ne
pas trop serrer afin de laisser un peu de mouvement pour le réglage.
5. Ajustement
•
Tournez/dévissez les boutons des mécanismes de verrouillage situés sur
le cadre du support pour ajuster le support de manière à obtenir un angle
d'au moins 20 degrés vers le haut (comme illustré). Serrez les mécanismes
de verrouillage jusqu'à ce qu'ils soient bien fixés.
Dévissage d'un des
mécanismes de verrouillage
20 degrés
Passage des sangles supérieures dans le fermoir à ressort
6. Fixation des sangles
•
Une fois que le cadre porteur est dans la bonne position, prenez les deux
sangles de 1190 mm avec des crochets de fixation plastifiés et les quatre
sangles de 930 mm avec des crochets de fixation plastifiés qui doivent être
placés dans chacune des attaches. Pour attacher, ajustez les sangles à la
bonne longueur et appuyez en même temps sur le bouton de sécurité pour
attacher la ceinture. Assurez-vous que les ceintures sont bien attachées.
FR
WWW.NIKOLAOUTOOLS.GR
9

7. Fixation des sangles supérieures
•
Fixez les deux crochets de sangle supérieurs (dans un endroit sûr)
à l'arrière du véhicule.
•
Ajustez les sangles en fonction de la position correcte. Veillez à ce
qu'elles soient bien fixées et aussi centrées que possible pour éviter
qu'elles ne se desserrent.
8. Fixation des sangles inférieures
•
Fixez les deux crochets de la sangle inférieure (dans un endroit sûr) à
l'arrière du véhicule. S'il ne peut pas être placé dans cette position,
essayez l'amortisseur ou le rail du châssis.
•
Veillez à ce que la courroie n'entre pas en contact avec des éléments
susceptibles de la rompre. Veillez à ce qu'ils soient bien fixés et aussi
centrés que possible pour éviter qu'ils ne se desserrent.
9. Fixation des sangles latérales
•
Fixez les deux crochets de la sangle latérale (dans un endroit sûr) sur
les côtés arrière du véhicule. L'un doit être solidement fixé sur le côté
gauche du véhicule et l'autre sur le côté droit. Assurez-vous que les
sangles inférieures sont bien fixées, puis vérifiez les sangles
supérieures avant de fixer les sangles latérales, et resserrez-les si
nécessaire.
Position typique des
sangles supérieures
Position typique des sangles
inférieures
Position typique des sangles latérales
Mise en place des sangles de maintien
FR
WWW.NIKOLAOUTOOLS.GR
10
This manual suits for next models
1
Table of contents
Languages:


