Belkin F5D9010 User manual

Wireless G Plus MIMO
Notebook Card
Connect your notebook computer to a
wireless network
F5D9010
User Manual
�
�
�
�

1 Introduction . . . . . . . . . . . . . . . . . . . . . . . . . . . . . . . . . . . . . . . . . 1
Advantages of a Wireless Network . . . . . . . . . . . . . . . . . . . . . . . . . .1
Placement of your Wireless Networking Hardware
for Optimal Performance . . . . . . . . . . . . . . . . . . . . . . . . . . . . . . . . . .2
2 Overview . . . . . . . . . . . . . . . . . . . . . . . . . . . . . . . . . . . . . . . . . . . 5
Product Features. . . . . . . . . . . . . . . . . . . . . . . . . . . . . . . . . . . . 5
Applications and Advantages. . . . . . . . . . . . . . . . . . . . . . . . . . . 6
Product Specifications . . . . . . . . . . . . . . . . . . . . . . . . . . . . . . . 6
System Requirements . . . . . . . . . . . . . . . . . . . . . . . . . . . . . . . . 7
Package Contents . . . . . . . . . . . . . . . . . . . . . . . . . . . . . . . . . . . 7
3 Installing and Setting Up the Card . . . . . . . . . . . . . . . . . . . . . . . . 8
Step 1: Install the Software Drivers. . . . . . . . . . . . . . . . . . . . . . . . . 8
Step 2: Plug the Card into an Available
CardBus Slot of your Laptop . . . . . . . . . . . . . . . . . . . . . . . . . . . . . 9
Step 3: Install the Wireless Client Utility . . . . . . . . . . . . . . . . . . . . 10
4 Using the Belkin Wireless Client Utility . . . . . . . . . . . . . . . . . . . . . 12
How to Access the Belkin Wireless Client Utility . . . . . . . . . . . . . 12
Navigating the User Interface . . . . . . . . . . . . . . . . . . . . . . . . . . . . 12
Setting Wireless Network Preferences . . . . . . . . . . . . . . . . . . . . . 14
Securing your Wi-Fi Network . . . . . . . . . . . . . . . . . . . . . . . . . . . . 16
Monitoring the Status of your Network Connection. . . . . . . . . . . 28
5 Troubleshooting . . . . . . . . . . . . . . . . . . . . . . . . . . . . . . . . . . . . . . . . 30
6 Information . . . . . . . . . . . . . . . . . . . . . . . . . . . . . . . . . . . . . . . . . . . . 39
Table of Contents

1
Introduction
section
1
2
3
4
5
6
1
Congratulations and thank you for purchasing the Belkin Wireless
G Plus MIMO Notebook Card (the Card). This product features new
MIMO technology that solves interference and range challenges of
wireless networking in larger homes and offices. MIMO (Multiple Input,
Multiple Output) delivers the best wireless network performance over
an expanded coverage area. Belkin’s new “G Plus MIMO” products
achieve 400% wider coverage than standard 802.11g networks with
exceptional data transfer results.
Using MIMO’s revolutionary, smart-antenna technology, Belkin G
Plus MIMO products can boost network speeds by up to four times
previous capacities. Its enhanced data rates and range make MIMO a
perfect technology for downloading music from the Internet, sharing
photos, and gaming online.
The easy installation and setup will have you networking in minutes.
Please be sure to read through this User Manual completely, and pay
special attention to the section entitled “Placement of your Wireless
Network Hardware for Optimal Performance”.
Advantages of a Wireless Network
• Mobility – you no longer need a dedicated “computer
room”—you can work on a networked laptop or desktop
computer anywhere within your wireless range
• Easy installation – Belkin Easy Installation Wizards make
setup simple
• Flexibility – set up and access printers, computers, and other
networking devices from anywhere in your home
• Easy expansion – the wide range of Belkin networking
products let you expand your network to include devices such
as printers and gaming consoles
• No cabling required – Belkin spares you the expense and
hassle of retrofitting Ethernet cabling throughout your home
or office
• Widespread industry acceptance – choose from a wide range
of interoperable networking products

32
Introduction
32
Placement of your Wireless Networking Hardware for
Optimal Performance
Your wireless connection will be stronger the closer your computer is
to your wireless router (or access point). Typical indoor operating range
for your wireless devices is between 100 and 200 feet. Conversely, your
wireless connection and performance will degrade somewhat as the
distance between your wireless router (or access point) and connected
devices increases. This may or may not be noticeable to you. As you
move further from your wireless router (or access point), connection
speed may decrease. Additionally, metal appliances, obstructions, and
walls can weaken signals simply by getting in the way of your network’s
radio waves.
If you have concerns about your network’s performance related to range
or obstruction factors, try moving the computer to a position between
five and 10 feet from the wireless router (or access point), in order to
see if distance is the problem. If difficulties persist even at close range,
please contact Belkin Technical Support.
Note: While some of the items listed below can affect network
performance, they will not prohibit your wireless network from
functioning; if you are concerned that your network is not operating
at its maximum effectiveness, this checklist may help.
1. Placement of your Wireless Router or Access Point
Place your wireless router (or access point), the central connection point
of your network, as close as possible to the center of your wireless
network devices.
To achieve the best wireless network coverage for your “wireless
clients,” (i.e. computers enabled by Belkin Wireless Notebook Network
Cards, Wireless Desktop Network Cards, and Wireless USB Adapters):
• Ensure that your wireless router (or access point) antennas are
parallel to each other, and are positioned vertically (toward
the ceiling). If your wireless router (or access point) itself is
positioned vertically, point the antennas as much as possible
in an upward direction.
• In multistory homes, place the wireless router (or access point)
on a floor that is as close to the center of the home as possible.
This may mean placing the wireless router (or access point) on an
upper floor.
• Try not to place the wireless router (or access point) near a
cordless 2.4GHz phone.
Introduction

3
3
Introduction
section
1
2
3
4
5
6
2. Avoid Obstacles and Interference
Avoid placing your wireless router (or access point) near devices that
may emit radio “noise”, such as microwave ovens. Other objects that
can inhibit wireless communication can include:
• Refrigerators
• Washers and/or dryers
• Metal cabinets
• Large aquariums
• Metallic-based UV tinted windows
If your wireless signal seems weak in some spots, make sure that
objects such as these are not blocking the signal’s path between your
computers and wireless router (or access point).
3. Cordless Phone Placement
If the performance of your wireless network is impaired after attending
to the above issues, AND you have a cordless phone:
• Try moving the cordless phone away from your wireless router
(or access point) and your wireless-enabled computers.
• Unplug and remove the battery from any cordless phone
that operates on the 2.4GHz band (check manufacturer’s
information). If this fixes the problem, your phone may
be interfering.
• If your phone supports channel selection, change the
channel on the phone to the furthest channel from your
wireless network, as possible. For example, change the
phone to channel 1 and move your wireless router (or access
point) to channel 11. (See your phone’s user manual for
detailed instructions.)
• If necessary, consider switching to a 900MHz or 5GHz
cordless phone.
4. Choose the “Quietest” Channel for your Wireless Network
In locations where homes or offices are close together, such as
apartment buildings or office complexes, there may be wireless
networks nearby that can conflict with yours. Use the Site Survey
capabilities of your Wireless Client Utility to locate any other wireless
networks, and move your wireless router (or access point) and
computers to a channel as far away from other networks as possible.

4
4
Experiment with more than one of the available channels in order to find
the clearest connection and avoid interference from neighboring cordless
phones or other wireless devices.
Use the detailed Site Survey and wireless channel information
included in your wireless router’s (or access point’s) user guide for
more information.
5. Secure Connections, VPNs, and AOL®
Secure connections typically require a user name and password, and are
used where security is important. Secure connections include:
• Virtual Private Network (VPN) connections, often used to connect
remotely to an office network
• The “Bring Your Own Access” program from America Online®
(AOL), which lets you use AOL through broadband provided by
another cable or DSL service
• Most online banking websites
• Many commercial websites that require a user name and
password to access your account
Secure connections can be interrupted by a computer’s power
management setting, which causes it to “go to sleep.” The simplest
solution to avoid this is to simply reconnect by rerunning the VPN or
AOL software, or by re-logging into the secure website.
A second alternative is to change your computer’s power management
settings so it does not go to sleep; however, this may not be appropriate
for portable computers. To change your power management setting
under Windows, see the “Power Options” item in the Control Panel.
If you continue to have difficulty with Secure Connection, VPNs, and
AOL, please review steps 1–4 on pages 2–3 to be sure you have
addressed these issues.
These guidelines should allow you to cover the maximum possible area
with your wireless router. Should you need to cover an even wider area,
we suggest the Belkin Wireless G Range Extender/Access Point.
For more information regarding our networking products, visit our
website at www.belkin.com/networking or call Belkin Technical Support.
Introduction

5
Overview
5
section
1
2
3
4
5
6
Product Features
The Card complies with the IEEE 802.11g standard in order to
communicate with other 802.11g-compliant wireless devices at
54Mbps. The Card is compatible with all 802.11g devices as well as
other 802.11b products at 11Mbps. 802.11g products operate on the
same 2.4GHz frequency band as 802.11b Wi-Fi® products.
• 2.4GHz ISM (Industrial, Science, and Medical) band operation
• Integrated easy-to-use Wireless Client Utility
• CardBus interface, for operation in virtually any
notebook computer
• WPA, 64-bit WEP (Wired Equivalent Privacy),
or 128-bit encryption
• Wireless access to networked resources
• Supports for both Infrastructure and Ad-Hoc (peer-to-peer)
networking modes
• Easy installation and use
• Internal antenna
• LED power and network link indicators

6
Overview
6
Applications and Advantages
• Wireless roaming with a laptop around the home or office
Offers the freedom of networking without cables.
• Compatibility with 802.11b products
802.11g wireless LAN solutions are backward-compatible with
existing Wi-Fi (IEEE 802.11b) products and with other products that
display the Wi-Fi mark.
• Difficult-to-wire environments
Enables networking in buildings with solid or finished walls, or open
areas where wiring is difficult to install.
• Frequently changing environments
Adapts easily in offices or environments that frequently rearrange or
change locations.
• Temporary LANs for special projects or peak time
Sets up temporary networks (such as at trade shows, exhibitions,
and construction sites), on a short-term basis; also provides an ideal
solution for companies that need additional workstations for a peak
activity period.
• SOHO (Small Office/Home Office) networking needs
Provides the easy and quick, small network installation SOHO
users need.
Product Specifications
Host Interface 32-bit CardBus
Operating Temperature 32–185 degrees F (0–85 degrees C)
Storage Temperature -40–194 degrees F (-40–90 degrees C)
Humidity Max. 95% (non-condensing)

7
Overview
7
section
1
2
3
4
5
6
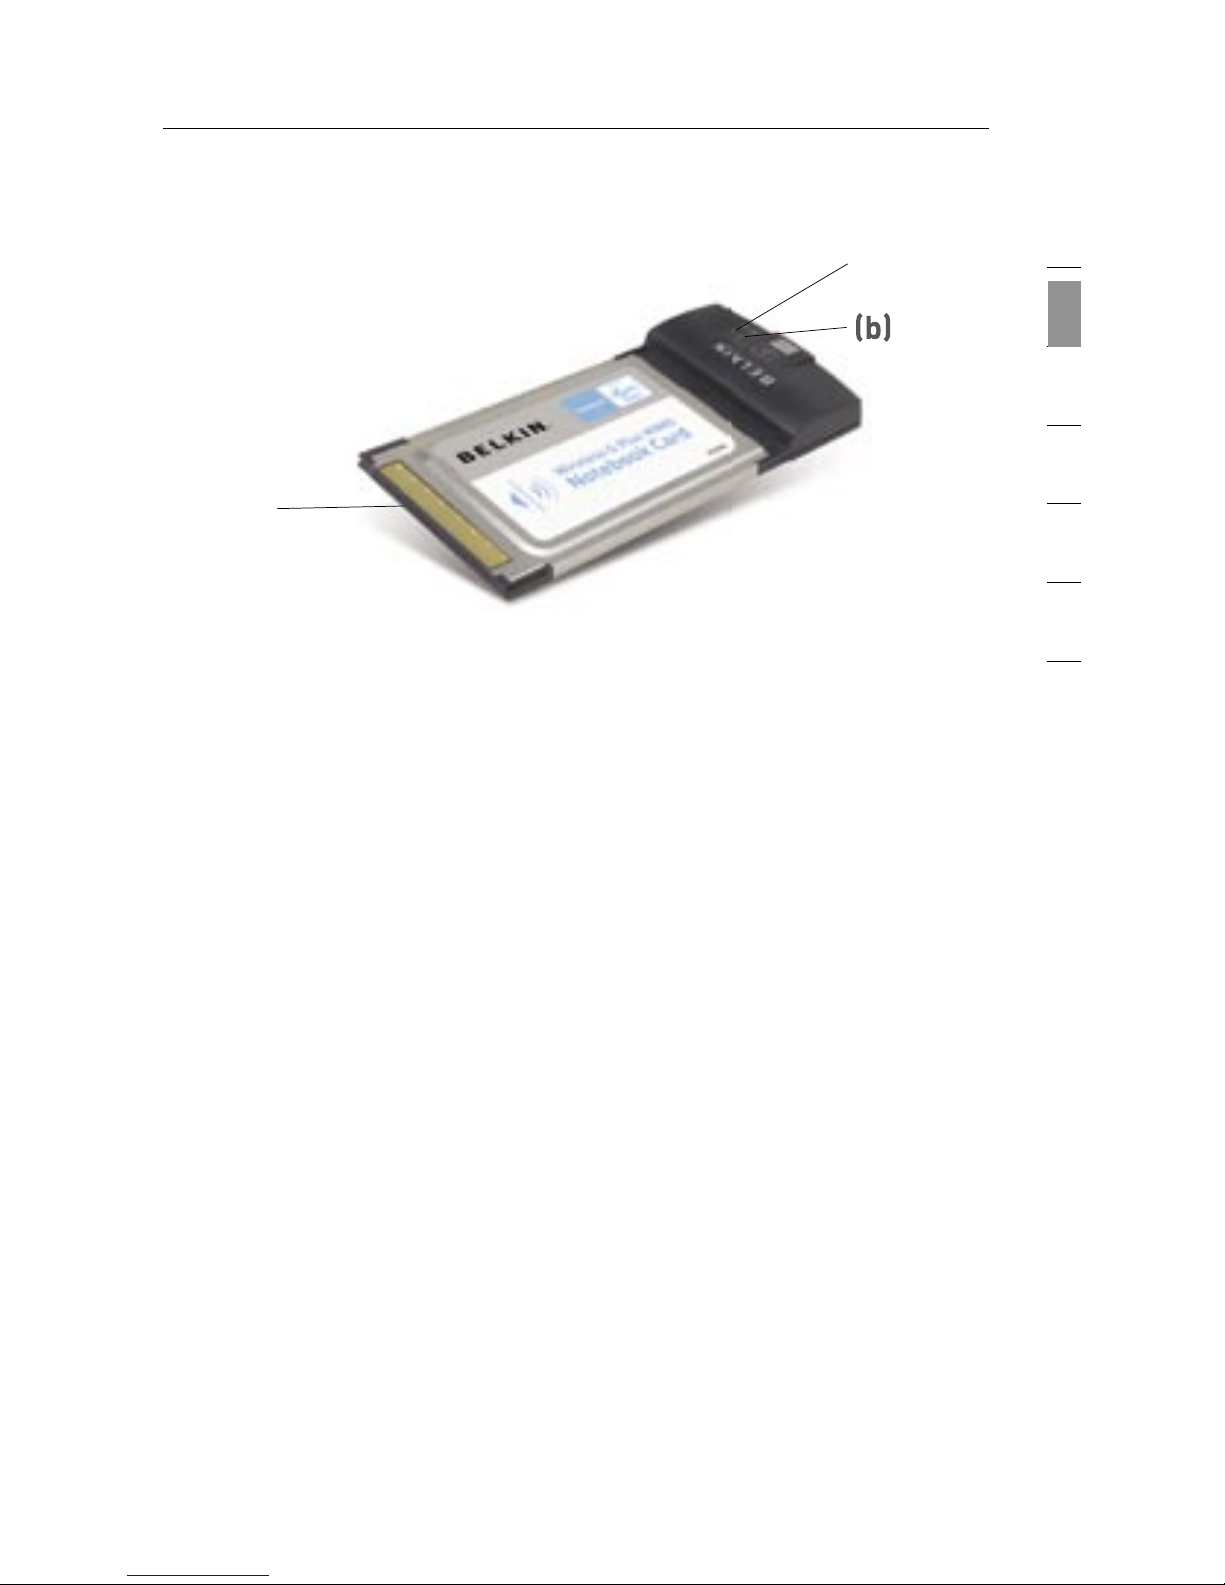
(a) Power LED
Lights up when the Card receives power
(b) Link LED
Lights up and flashes when the Card links to a wireless network
(c) Card Connector
Part of the Card that fits into your computer’s CardBus slot
System Requirements
• PC-compatible laptop with one available CardBus slot
• Windows® 2000 or XP
Package Contents
• Wireless G Plus MIMO Notebook Card
• Quick Installation Guide
• Installation Software CD
• User Manual
(a)
(b)
(c)
(b)

8
Installing and Setting Up the Card
8
Step 1 Install the Software Drivers
IMPORTANT NOTE: Install the software before inserting the Card.
1.1 Insert the Installation Software CD into your CD-ROM drive.
1.2 The Belkin Wireless Client Utility Setup screen will automatically
appear (may take 15–20 seconds to appear).
Note: If the Wireless Client Utility Setup screen does not appear
within 20 seconds, access your CD-ROM by double-clicking on the
“My Computer” icon and double-click on the CD-ROM drive that the
installation CD has been placed in. Double-click on the folder named
“Files”, then double-click on the icon named “setup.exe”.
1.3 Click “Install Software” from the menu.
Other manuals for F5D9010
1
Table of contents
Other Belkin Network Card manuals

Belkin
Belkin F5D5020T User manual

Belkin
Belkin F5D76314 User manual

Belkin
Belkin F5D6020 User manual

Belkin
Belkin F5D6050 User manual

Belkin
Belkin F5D9000 User manual

Belkin
Belkin F5D4085 User manual

Belkin
Belkin F5D7000AU User manual

Belkin
Belkin F5D6020 User manual

Belkin
Belkin VISION N1 User manual

Belkin
Belkin F5D8010 User manual

Belkin
Belkin F6D3000-HP User manual

Belkin
Belkin F5D6000 User manual

Belkin
Belkin F5D8000 User manual

Belkin
Belkin F5D6050 User manual

Belkin
Belkin F5U514 User manual

Belkin
Belkin DESKTOP CARD F5D7001 User manual

Belkin
Belkin F6D3000 User manual

Belkin
Belkin F5D7011 User manual

Belkin
Belkin SURF F5D4077UK User manual

Belkin
Belkin F5D8001 User manual