Artusi AUM51 User manual

AUM51X
OPERATION MANUAL
APPLIANCES
FOR LIVING

Congratulations, you are now the proud owner of an ARTUSI cooking appliance. Thank you for purchasing ARTUSI
and welcome to the ARTUSI Family.
This instruction manual has been specially created to inform you of the full range of features your ARTUSI appliance
has to offer and serves as an introduction to getting the very best out of your ARTUSI appliance.
We present detailed information on each of the features your ARTUSI appliance consists of. Once you have read
this section you will be able to choose the most appropriate settings for your appliance when cooking different
types of food.
We ask you to read the instructions in this booklet very carefully as this will allow you to get the best results from
using your appliance. KEEP THE DOCUMENTATION OF THIS PRODUCT FOR FUTURE REFERENCE.
TO REGISTER YOUR PRODUCT WITH ARTUSI, PLEASE FILL OUT THE WARRANTY CARD AT THE END OF
THIS BOOKLET AND POST IT TO: REPLY PAID 83617
LEICHHARDT NSW 2040
Dear Artusi Customer, please read this user manual carefully before using the product and, keep it permanently at
your disposal.
Note: This user manual is prepared for more than one model. Some of the features specified in this Manual may not
be available on your appliance.
All our appliances are only for domestic use, not for commercial use. Products marked with (*) are optional.
“THIS APPLIANCE SHALL BE INSTALLED IN ACCORDANCE WITH THE REGULA TIONS FORCE AND ONLY USED
IN A WELL VENTILATED SPACE. READ THE INSTRUCTIONS BEFORE INSTALLING OR USING THIS APPLIANCE”
“Conforms with the WEEE Regulations.”
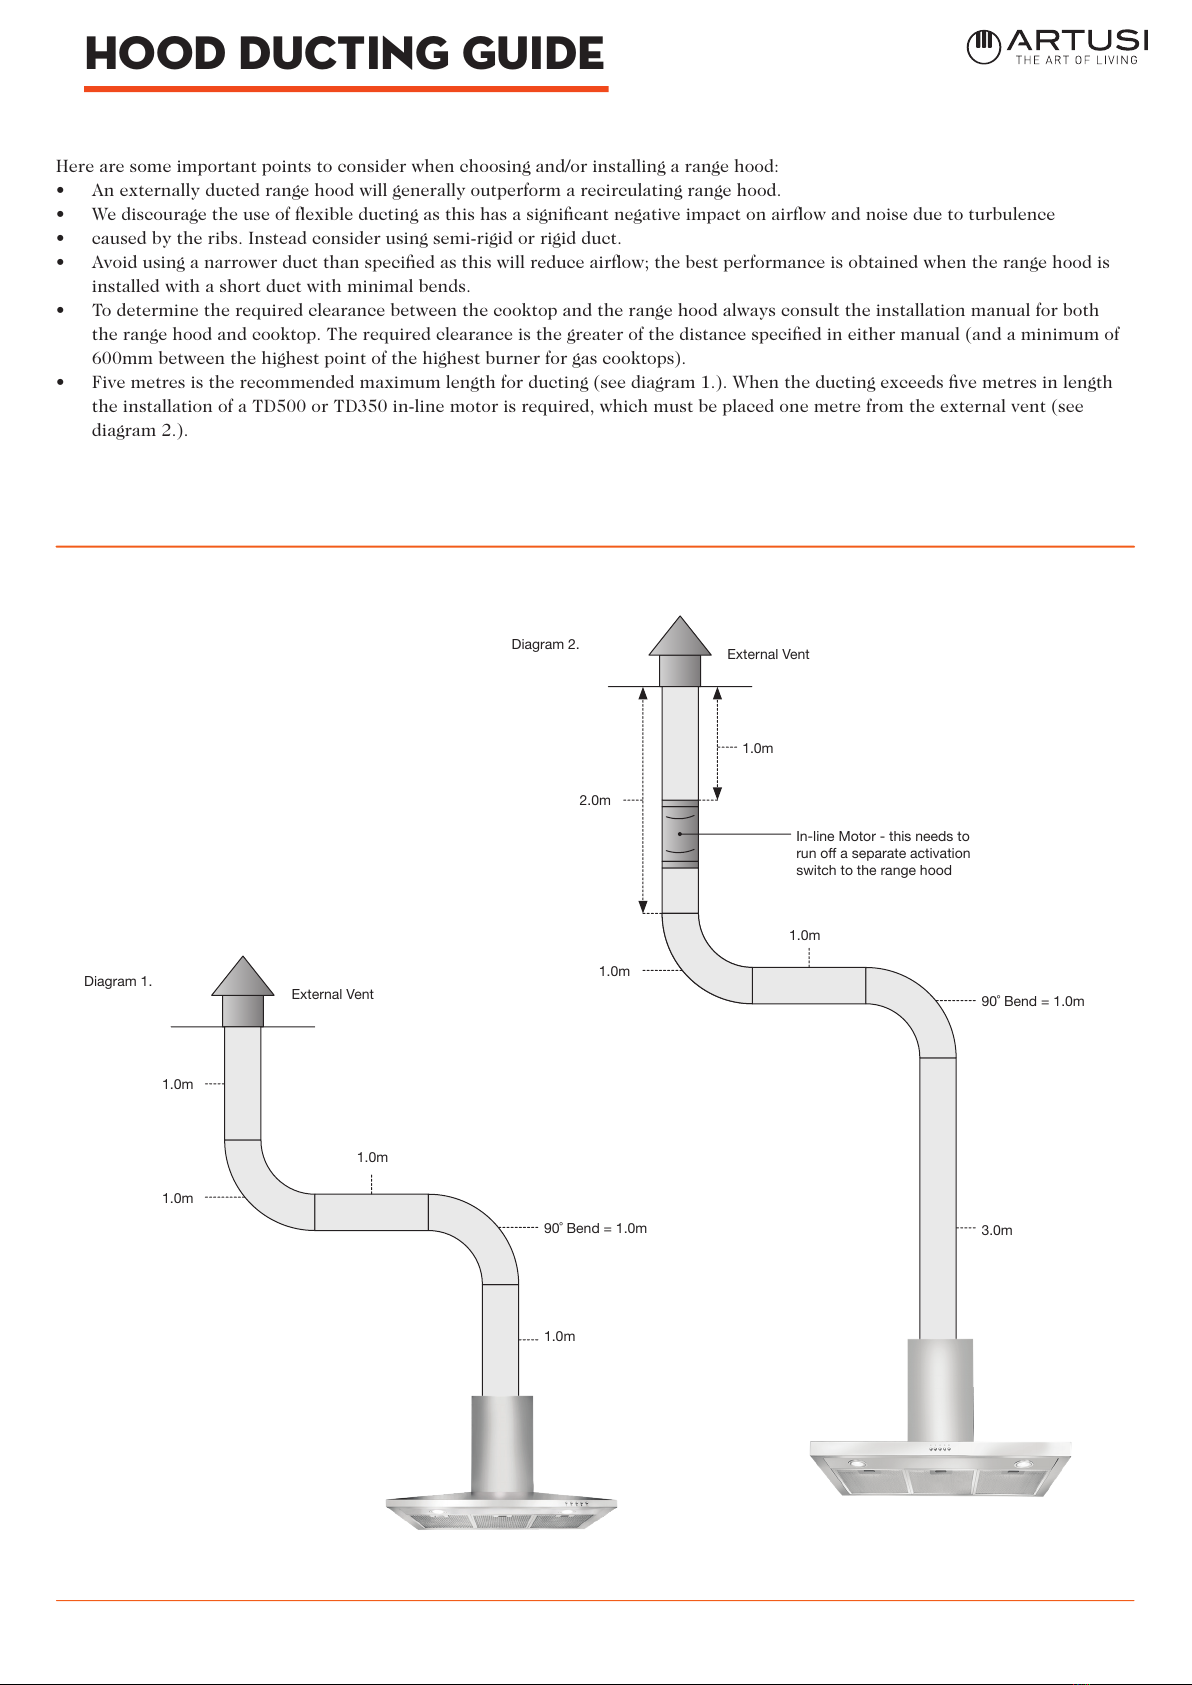
HOOD DUCTING GUIDE
Here are some important points to consider when choosing and/or installing a range hood:
• An externally ducted range hood will generally outperform a recirculating range hood.
• We discourage the use of flexible ducting as this has a significant negative impact on airflow and noise due to turbulence
• caused by the ribs. Instead consider using semi-rigid or rigid duct.
• Avoid using a narrower duct than specified as this will reduce airflow; the best performance is obtained when the range hood is
installed with a short duct with minimal bends.
• To determine the required clearance between the cooktop and the range hood always consult the installation manual for both
the range hood and cooktop. The required clearance is the greater of the distance specified in either manual (and a minimum of
600mm between the highest point of the highest burner for gas cooktops).
• Five metres is the recommended maximum length for ducting (see diagram 1.). When the ducting exceeds five metres in length
the installation of a TD500 or TD350 in-line motor is required, which must be placed one metre from the external vent (see
diagram 2.).
1.0m
1.0m
1.0m
90˚ Bend = 1.0m
1.0m
2.0m
1.0m
1.0m
90˚ Bend = 1.0m
3.0m
1.0m
In-line Motor - this needs to
run o a separate activation
switch to the range hood
External Vent
External Vent
Diagram 1.
Diagram 2.

4
GB IE
Safety
These instructions are for your safety. Please
read through them thoroughly prior to
installation and retain them for future reference.
•All installation work must be carried
out by a competent person or qualified
electrician.
•This appliance must be installed correctly
by a suitably qualified person, strictly
following the manufacturer’s instructions.
This appliance complies with all current European
safety legislation, however, the Manufacturer must
emphasise that this compliance does not prevent
the surfaces of the appliance from heating up
during use and remaining hot during its operation.
Accessible parts may become hot during use.
Young children should be kept away. Care should
be taken to avoid touching the appliance.
The Manufacturer highly recommends that this
appliance be kept out of the reach of babies and
small children.
This appliance can be used by children aged from
8 years and above and persons with reduced
physical, sensory or mental capabilities or lack
of experience and knowledge if they have been
given supervision or instruction concerning use of
the appliance in a safe way and understand the
hazards involved. Children shall not play with the
appliance. Cleaning and user maintenance shall
Getting started...

GB IE
5
Safety
not be made by children unless they are older than
8 and supervised.
Keep the appliance and its cord out of reach of
children less than 8 years.
Means for disconnection must be incorporated in
the fixed wiring in accordance with the wiring rules.
An all-pole disconnection switch having a contact
separation of at least 3mm in all poles should be
connected in fixed wiring.
Regularly check the power plug and power cord
for damage. If the supply cord is damaged, it must
be replaced by the manufacturer, its service agent
or similarly qualified persons in order to avoid a
danger or injury.
Do not allow the electric cables to touch the hot
parts of the appliance.
Please dispose of the packing material carefully.
Make sure that the power cord is not caught under
or in the appliance and avoid damage to the power
cable.
Warning: Failure to install the screws or fixing
device in accordance with these instructions
may result in electrical hazards.
Do not install the appliance outdoors in a damp
place or in an area which may be prone to water
leaks such as under or near a sink unit. In the
event of a water leak allow the machine to dry
naturally.
Getting started...

Do not use flammable sprays in close vicinity to
the appliance.
We also recommend that great care be taken
during use and cleaning. Read the cleaning and
maintenance sections for this appliance carefully.
6
GB IE
Safety
A steam cleaner is not to be used.
The appliance is not intended to be operated by
means of external timer or separated
remote-control system.
Getting started...
The appliance is for domestic use only.
Warning: Before connecting the hood: switch off
the electricity supply and check that the supplied
voltage and frequency coincide with that indicated
on the appliance nameplate.
Warning: The hood may stop working during an
electrostatic discharge (e.g. lightning). This
Warning: Consult local regulations regarding
fumes outlets. Do not connect the hood to a fume,
ventilation or hot air duct. Confirm that room
ventilation is appropriate with the local authorities.
Make sure the maximum air extraction flow rate for
the appliances in the room does not exceed 4 Pa
(0.04 mbar). The room must have adequate
ventilation if an extractor hood is used
simultaneously with appliances that run on gas or
other fuels. The air must not be discharged into a
flue that is used for exhausting fumes from
appliances burning gas or other fuels. Regulations
regarding air extraction must be complied with.

GB IE
7
Safety
To avoid the risk of fire, clean the metal filter
regularly and closely watch and regulate pans
containing hot oil.
Do not use the hood if it shows signs of damage
or imperfection. Contact customer services.
Flambe cooking must not be carried out
underneath this appliance.
When installing the appliance, make sure that the
following distances between the top of cooker or
hob and the lowest part of the cooker hood must
be observed:
> Gas hobs: 750mm.
> Electric hobs: 650mm.
The Manufacturer declines all liability for personal
or material damage as a result of misuse or
incorrect installation of this appliance.
Regarding the information pertaining to installation,
thanks to refer to the below paragraph of the
manual.
Regarding the information for replacing the bulb,
please see section "Care and maintenance".
Getting started...
involves no risk of damage. Switch off the
electricity supply to the hood and reconnect
after one minute.
Warning
There is a risk of electric shock and fire if
cleaning is not carried out in accordance with
the instructions.
600mm.
600mm.

8
GB IE
Before you start
Getting started...
Things to check before you start
To avoid the risks that are always present when you use an electrical
appliance it is important that this cooker hood is installed correctly and that
you read the safety instructions carefully to avoid misuse and hazards.
We recommend that you keep this instruction booklet for future reference
and pass it on to any future owners. After unpacking the cooker hood
please check that it is not damaged. If in doubt, do not use the appliance
but contact Customer Services on 0344 800 1128 (UK) and 01 4475261
(Ireland).
Check the package and make sure you have all of the parts listed.
Decide on the appropriate location for your product.
If this product contains glass please take care with fitting or handing to
prevent personal injury or damage to the product.
This specifications plate is available on this appliance. This plate displays
all the necessary identification information for ordering replacement parts.
If you sell the appliance, give it away, or leave it behind when you move
house, make sure you also pass on this manual so that the new owner can
become familiar with the appliance and its safety warnings.
You will need

10
GB IE
Operation
In more detail...
Product functions
•This appliance extracts the air of the kitchen to remove the odours and keep
an optimum level of air quality inside the room, it also allows you to illuminate
the cooking area.
•Switch on the appliance at the switched fused connection unit. The appliance
is ready for use.
To obtain the best results from your cooker hood it is recommended that you
leave it switched on for 15 minutes after you have finished cooking.
Switching on/off
0 1 0 1 2
A B C
Motor control light(Ref. B)
Light switch(Ref. A)
3 position motor control swtich(OFF, 1st and 2nd speed position) (Ref.C)

Care and maintenance
GB IE
11
In more detail...
Care and maintenance
OFF
Warning
Always switch off the electricity supply before carrying
out maintenance work on the hood. In the event of a
fault, contact customer services.
FUSE
Bulb replacement
10’
FUSE
OFF
The Bulb may be hot, leave it 10 minutes before replacement.
Turn to remove the bulb.
This manual suits for next models
1
Table of contents
Other Artusi Ventilation Hood manuals

Artusi
Artusi CAID64X User manual

Artusi
Artusi ACH12BBQ User manual

Artusi
Artusi ACH905X User manual

Artusi
Artusi AUM60 User manual

Artusi
Artusi AUM51X User manual

Artusi
Artusi CAID63X User manual

Artusi
Artusi ASO600RX User manual

Artusi
Artusi ACH935B User manual

Artusi
Artusi AFR650 User manual

Artusi
Artusi ASO601RX User manual

Artusi
Artusi CAID95X User manual

Artusi
Artusi ASO601X User manual

Artusi
Artusi ATH900B User manual

Artusi
Artusi ACH900X User manual

Artusi
Artusi CAN60SV User manual

Artusi
Artusi AFR6X User manual

Artusi
Artusi ATH601 User manual

Artusi
Artusi AFR650X User manual

Artusi
Artusi ASO600RX User manual

Artusi
Artusi ATH601B User manual


